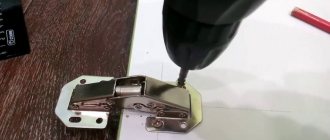
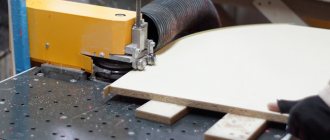
To install connecting elements when assembling furniture, it is most convenient to use a hand-held power tool with a special drill for installing furniture hinges. It allows you to cut (mill) a hole of the required diameter and depth. Excess material is easily separated when drilling.
The hinges, mounted in the machined holes, are attached tightly and securely. To achieve the best performance, it is important to choose the most suitable drill diameter. It is selected based on the parameters of the bowls of the loops used.
What is a drill for furniture hinges?
In order to install furniture hinges, special drills are used. These are special milling-type devices that can be used to make holes in wooden or plastic panels. A necessary condition is sufficient width and thickness of the panel. The drill is used when processing MDF, chipboard and laminated chipboard.
What are the sizes and diameters?
The holes are drilled in order to secure the furniture hinge cup in them. The diameter of the drill is selected based on the size of the furniture hinge. Standard cups come in the following diameters:
- 26 mm;
- 35 mm;
- 40 mm.
The most widely used are loops with cups having a diameter of 35 mm. Using their example, let's look at the installation procedure.
How to use it to cut a hole for a loop?
To cut a hole for the hinge yourself and install it, you will need:
- Measuring device (tape measure or ruler);
- An awl or other sharp object;
- Hand drill or screwdriver;
- Drill for hinges;
- A screwdriver or a special bit for installing self-tapping screws.
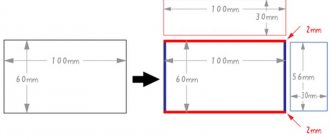
The hinge cup cuts directly into the facade, so it is necessary to mark it to determine the center of the future hole. It is important to correlate the intended position of the hinge with the location of the shelves or other fittings on the frame.
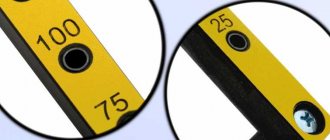
The center of the hole should be marked at a distance of 22-23 mm from the edge of the facade. In this case, there will be about 4-5 mm between the edge of the cup and the edge of the facade. Drilling is done after all markings have been completed.
This stage should be approached as responsibly as possible. It is necessary to drill a hole of such depth that the hinge bowl completely fits into it. It is important not to exceed the permissible depth, otherwise the facade will be damaged, as the drill will go right through.
Experts are inventing various methods to help avoid this problem. For example, they install a special limiting rod to which a drill with a cutter is attached, or they mount limit plates directly on the drill itself. Thanks to the use of such devices, the risk of damage to the facade is reduced, but you should still be careful when drilling.
Advice for those who are going to drill a hole for mounting a hinge for the first time - hone your skills on scraps of chipboard. Furniture fronts are usually made with a thickness of about 16 mm, while the height of the cutting tool (including the central tenon) exceeds this size. After making several holes, you can try on the hinge you are going to install. The cup should fit completely into the cavity, but should not rest against the chipboard.
In order for the process of selecting excess from the hole being made to be optimal, it is recommended to change the angle of inclination of the tool within small limits. This method allows you to speed up the drilling process and reduce overheating of the drill.
How to make a hole for a cabinet hinge yourself?
The furniture hinge has a cup on one side that cuts into the door mass. The standard cup diameter is 35 mm. To install the hinge yourself, you need to get a forstner drill and do the following:
- Place the door against the cabinet body and mark with a pencil where it joins the shelves.
- Measure in several places at right angles from the edge of the door 22 mm. Connect the points into one line.
- Mark the centers of the recesses at a distance of 10 cm from the top and bottom of the door slab. If the points coincide horizontally with the shelves inside the cabinet, move them vertically.
- With the slab on the floor or workbench, carefully make indentations using a forstner drill bit (ø 35 mm). This must be done very carefully so that the drill does not come out. The best option is to purchase a drill with a stop; it will stop at the desired depth.
- As you drill, insert the cup of the hinge into the groove until, when you press on the transverse bars with holes, they swing. When working with a limiter, this is not necessary.
- Lower the hinge cups into the openings so that the line of the slats' holes is strictly parallel to the side edge of the door. Secure the hinges with screws.
- Lean the door against the body so that the hinge arms are against the cabinet wall. Screw the fasteners through the holes in the second half of the hinge.
- Two hinges are installed on the doors of wall and floor cabinets. In the case of installing a door leaf of a pencil case with a height of more than a meter, three hinges are installed.
When installing double-leaf hinges, you need to determine the thickness of the plates. Usually this size does not exceed 2 - 3 mm. Having determined the attachment points on the end surface of the side pillars of the door frame, attach the hinge halves to the wood and trace the outline of the plate with a pencil.
What is a Forstner drill?
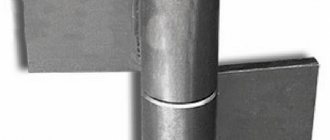
A cutting tool designed to make a blind hole of a certain diameter for the cups of furniture hinges is officially called a Forstner drill. Made from a head on which two or four sharp tips are located.
In the center of the tool there is a tip intended for centering - it is installed in the intended center of the future hole. The cutting element is located on an axis, which can be mounted in a screwdriver or drill. The required hole depth when drilling with a Forstner drill for wood is about 9 mm. The head diameter varies and is 26, 35 or 40 mm. The cutter is selected according to the size of the fittings being installed
How is it safe to add an additive to 16mm laminated chipboard for 35mm hinge cups?
vlad-mal wrote: Otherwise!
If only there were hinges, I might not have bothered. In addition to the hinges, we have to make several hundred holes for Rafix-20 type ties:
However, it’s not easy with the hinges either: I bought 35 mm (“frog”) hinges from Hafele, and their fit is as much as 13.5 mm. With a machine it is more difficult to ruin a part, IMHO.
I wanted to buy just a stand for a drill, but the Encore store only had Sparky-43, for as much as 2,700 rubles. And then - I paid a little extra - and here is the finished device.
When I finish the furniture, I’ll sell it to someone else at half price. Or I'll give it to someone. Or I’ll put it on a shelf in a cabinet. You never know.
On the way from home to the indicated store, I stopped at a couple of shops selling tools (including OBI): everywhere the same, only even worse than the Encore Corvette: plastic pulleys (this one has luminaire), without a magnetic starter, without a vice. Well, it’s 1000 - 1500 rubles more expensive than this one.
The machine, by the way, works much quieter than a drill. I set it to minimum speed - wow...like a Forstner entering the stove...beautiful...
Damn... I put it on my leg poorly when I carried it into the apartment: it still hurts, even though it’s only 20 kg. In general, everything is fine.
Today I quickly decided to drill a couple of 35mm holes in the Egger chipboard. For heating pipes (pass through the cabinet). “Quickly” means without a machine, with a drill. After working in the previous room, the machine is temporarily standing in the corridor; I was too lazy to drag it into the room: it’s already five meters... I used carbide “Fostners” with a short nose produced by Anchor, which I wrote about earlier. I wish I hadn't done this. Firstly, due to the short nose, the drill must be held strictly perpendicular to the surface being processed, otherwise it will easily go to the side: Egger chipboard has a very hard surface, like marble, or harder. I ruined the surface near one hole, it’s good that the part will be in an inconspicuous place, I coated it with sealant to match the color. Secondly, the minimum speed of the drill is many times higher than the recommended 450 rpm, which is also bad. Drills overheat.
I first slightly drilled the second hole with a “regular” (not carbide) forstner, with a long nose, and then with a carbide one. It worked, although it took a long time and careful drilling. But the drill was very dull (the one that is not carbide).
It would be better if I wasn’t lazy and did everything with a machine.
But once upon a time I used these drills to drill IKEA kitchen laminated chipboard without any problems... it was definitely not an Egger.
Colleagues, for work I recommend using only carbide drills and even the cheapest Chinese ones (like mine), but drilling machines: they work quietly, accurately, and are extremely convenient. Once, when testing the machine, I managed to slightly drill such a carbide drill into the cast iron work table of the drilling machine - and nothing, the cast iron crumbled, and the drill drilled perfectly into the chipboard further. You don’t need to do this, of course, but it’s worth keeping in mind that the carbide soldering is of normal quality.
Brief description of the Forstner device
A drill for inserting Forstner furniture hinges is a complex configuration of a metal cutter made of high-quality steel. It can be used to work on different types of wood both across and along the grain (at the ends); it is also used for processing furniture boards and acrylic. In the latter case, you need to maintain the number of tool revolutions no more than 500 per minute .
The appearance of a drill for furniture hinges and its design features are presented in the illustrations attached here. It is worth paying attention to the design of the cutting parts. It is designed in such a way that it automatically removes chips from the hole being drilled.
Tools and materials
During the installation of furniture hinges for chipboard, we will need the following tools:
1. Forstner drill with a diameter corresponding to the loop (in our case 35 mm). The drill is a cutter for making a groove for hinges. These drills sometimes come with stops (designed for chipboard thicknesses of 16, 22, 25 mm), which allow you not to worry about how deep you should go;
2. drill;
3. screwdriver.
The materials we need are the hinge itself and the screws for fastening it.
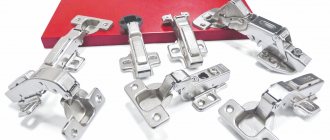
Internal furniture hinge for flush mounting, right angle
Screws
Return to content
How to set up a router for cutting door hinges
In order to quickly and accurately cut door hinges, it is best to use a hand router. You can also use a hammer and chisels for these purposes, but a router produces better results, especially if there is, for example, a knot or complex wood texture at the insertion site.
Let's look at setting up a router using the Bosch POF 1400 ace as an example.
It is better to use a small diameter cutter, for example 9.5 mm, so that less material has to be cut into the corners by hand. You can also use a dovetail cutter to insert the loop more tightly.
Let's start the setup by adjusting the depth of the cutter. To do this, attach the loop to the sole of the router and extend the cutter to the thickness of the loop.
In order to adjust the position of the sole relative to the cutter, there is a lever on the router body.
Next you need to adjust the position of the rip fence.
To do this, we apply the router to the door so that the cutter is at the hinge contour mark.
Then we press the stop to the edge of the door and fix its position with the wings intended for this.
Within the future groove we make a sample of several mm in order to check the depth of the groove.
To do this, put a loop in it and check it. We adjust if necessary. That is, we increase or decrease the immersion depth of the cutter.
We carefully make a sample of the upper edge of the future groove; the parallel stop will not let us go further than the side line, and the ends must be drawn extremely carefully. You can even leave a little material and then trim it with a chisel.
In the same way, we remove the lower part of the loop, and then boldly, leaning on the side stop, connect the top and them. When removing the upper part, it is more convenient to look from above, as if holding the router to your chest and leaning over it. And when the lower one and everything else, it’s more convenient to look at it point-blank, holding the router on outstretched, slightly bent arms.
Within the boundaries of the made contour, we smoothly move the router up and down, removing everything unnecessary.
The sample from the cutter produces rounded corners.
We cut them with a knife or chisel to a right angle.
If necessary, trim the ends further.
The groove is ready, you can insert the loop.
Now let's talk about how to adjust the depth of the cutter for inserting a loop in a box beam.
In this case, the door leaf is two millimeters wider than the quarter of the frame. In the photo, the box connected by the letter G lies on the door, and the door protrudes 2 mm from the plane.
Therefore, the rip fence needs to be moved 2 mm relative to the setting with which we cut the groove on the door. The hinge on the box must be pulled out, otherwise the door will “bite” a quarter and will not be able to close.
We place the router on the box parallel to the plane of the quarter and extend the cutter to the surface of the quarter.
Using a depth limiter, here it is in the photo,
measure the thickness of the loop and tighten the lamb.
Now we shift the sole to this loop thickness. Immersion depth is set.
Milling box timber is more difficult, since the sole rests on the box with only one edge. But if you do everything carefully, then anything is possible.
Please note that the loop is extended by 2 mm!
Happy tie-in!
Best regards, door installer Sergey.