Small mechanisms called door hinges for their design are responsible for the proper operation of swing doors. Their fairly simple device ensures free movement of the door during the process of opening and closing. A fully functional mechanism makes it easy to use the door leaf, without any creaks or backlash accompanying its movement. At the moment, door hinges are used both in the construction of entrance openings in buildings and in furniture. In the latter case, smaller mechanisms are used, but with similar operating principles. Do-it-yourself installation of furniture hinges may be required when you are installing new doors in a kitchen cabinet or bedroom closet yourself. Despite their small size, hinges can cause a lot of inconvenience during installation due to the need for accurate calculations of their fixation locations. Also, some work will have to be carried out in weight, which in some cases may require additional hands to help with large furniture components.
Features and types
The simplicity and functionality of the door hinge mechanism has given rise to many of its varieties, designed for use in various types of products for the home interior. Now such devices are found in the following versions:
- Invoices. Used in wardrobes and cabinets with hinged doors;
- Deposits. For small cabinets with low weight doors;
- Heel. More often used in interior doors, they can serve well in cabinets with small fronts;
- Pianos. Found in folding tables with a book design;
- Adit. Suitable for doors of false panels and fixed panels of sliding wardrobes;
- Angular. Designed for the appropriate types of compartments installed in the corners of rooms and having limited space for opening doors;
- Semi-overhead. Used in cabinets with a large number of fronts;
- Mezzanine. They are also “horizontal” hinges used in hanging cabinets in the kitchen.
The use of a particular type of door hinge in a closet depends on many factors, including its style, dimensions, weight of the doors and the method of their fastening. In some cases, due to the physical placement of the door relative to the frame, the compartment requires the use of exclusively corner hinges, which have a greater range of movement compared to traditional overhead hinges. In products with a classic texture, only such mechanisms can be used that will correspond to this style.
How many furniture hinges should be installed on one door?
If you think that by choosing a manufacturer of high-quality furniture hinges you can relax, then you are mistaken. The brain of an unscrupulous furniture manufacturer is programmed to deceive the buyer. And if you can’t install a cheap sludge, then instead of three expensive hinges, you can install two. I think if it was possible to put one loop, then they would do it.
What happens when the number of installed furniture hinges decreases? That's right, they cannot withstand the weight of the doors and fail. As a result, we have the same problem: sagging cabinet doors and cabinets. You need it? Do you agree that you need more information on this issue? Well then, here you go! I designed it for you in the form of a sign like this:
| № | Facade height, mm | Facade weight, kg | ||||
| 4 – 5 | 6 – 9 | 10 – 13 | 14 – 18 | 19 – 22 | ||
| Number of loops | ||||||
| 1 | Up to 500 | 2 | ||||
| 2 | From 500 to 1000 | 2 | ||||
| 3 | From 1000 to 1500 | 3 | ||||
| 4 | From 1500 to 2000 | 4 | ||||
| 5 | From 2000 to 2500 | 5 | ||||
| The distance from the edge of the facade to the hinge is 80 - 100 mm. The pitch between loops must be at least 500 mm | ||||||
Well, now you are armed with the knowledge that will help you coordinate and control the work of custom furniture manufacturers. Stay with the mebeldok.com portal and order only high-quality furniture from reputable manufacturers.
Buyers about furniture "
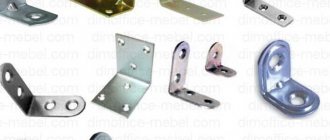
Required materials and tools
Installing a door hinge will require disassembling the mechanism, so you will need tools to perform delicate, neat procedures. In addition, other manipulators will be required for general work with the door. A complete list of all tools for installing an overhead hinge model is as follows:
- Screwdriver with a Phillips bit.
- Set of screws.
- Building level.
- Ruler or tape measure.
- Screwdriver.
- Drill.
- Pencil or erasable marker.
- Cutter with a diameter of 35 mm.
The standard layout of a door hinge involves its disassembly into three components:
- The base is in the form of a strip, which is responsible for attaching the hinge to the cabinet panel.
- Cup, which is mounted on the working door.
- The hinge body is a moving part that connects the door to the cabinet body.
The door hinge mechanism is installed using mounting screws screwed into the holes of the mounting plate and cup. The operating parameters of the device are determined by the adjusting screw in the housing. Thus, the hinge mechanism has up to six mandatory fasteners, which are best prepared in advance as spare ones.
How to prepare for installation?
Installing hinges is a simple job and does not require much effort and time, but provided that the person has all the necessary tools at hand and also has certain work skills. For those new to the project, the task of installing a hinge can be very challenging. You can't just screw it on.
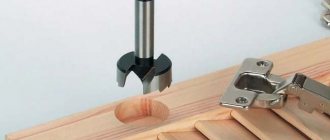
So, the most important tool you will need is a Forstner drill . It has a special working part with the same diameter as the hinge bowl (35 or 26 mm). Using this drill, you need to make special holes in a clearly marked place. The hinge bowl will be inserted into it, and the structure will be secured using screws screwed into special ears.
Forstner drill
Forstner drill price
Forstner drill
To install the hinges you will also need:
- screwdriver;
- ruler and square;
- a simple pencil;
- drill with various attachments;
- level;
- self-tapping screws and self-tapping screws.
Cordless screwdriver
Prices for cordless drill/driver
Cordless drill/driver
It is important to take into account the material on which the loop will be fixed. Thus, fibrous or loose materials are quite soft, glass ones are fragile and at the same time strong, etc. Each material uses its own specific type of fasteners, and in different quantities.
Marking
Marking is an integral part of the cabinet layout for the correct installation of the door and the correct operation of its hinges. Mistakes made at this stage will, at a minimum, spoil the appearance of the product, and at maximum, make it impossible to correctly use the swing door mechanism. During the marking process, you will need a pencil or marker to mark the areas for creating holes for the cups of the mechanisms. Therefore, it’s worth starting with the main points of the markup instructions:
- Depending on the weight and size of the door leaf, the number of hinges installed can vary from two to five.
- You should not install the mechanism cup on the very edge of the door facade. It is recommended to maintain a margin of 2–2.2 cm.
- The average distance between hinges on a meter-long door leaf is at least 50 cm. In this case, you need to take into account its weight, which may require a larger number of fastening mechanisms.
Make sure that the areas for installing hinged awnings on the façade are not opposite the cabinet shelves. Otherwise, there is a risk that the door will not close completely due to the fact that the body rests on the shelf platform.
Scheme for calculating the number of furniture hinges for installation
There is no clear answer to the question of how many hinges need to be installed on one swing façade. Each manufacturer of fittings and components gives its own recommendations. Typically, the scheme for calculating the number of furniture hinges is based on two values, the size and weight of the door:
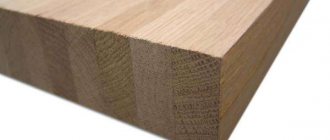
- The height of the door determines the number of connection points to the frame. If the number of hinges is insufficient, the door may bend over time. Its width is no less important. It is recommended not to design facades whose width is too large relative to their height.
- The weight of the door also plays a role. It is logical to assume that a facade made of laminated chipboard, on top of which a mirror sheet will also be glued, will require additional fasteners. Installing a standard number of furniture hinges may not be able to withstand the increased weight - this will require reinforcement.
The standard installation scheme for furniture hinges is as follows.
It can be followed if there are no other recommendations from the manufacturer.
Hole preparation
Holes are created using a drill based on the markings. An electric screwdriver with an appropriate attachment is also suitable as an alternative tool. In addition, the use of a cutter is a must, which ensures that the structural integrity of the door facade and cabinet panel is preserved. Otherwise, drilling a hole can lead to chipping and deformation of the wood panel. The insertion should be made with a depth of no more than 12 mm, which will be enough for a reliable hole for the loop cup platform. It is better to select the drilling speed yourself, based on the density of the material from which the facade and cabinet are made. While chipboard panels are fairly easy to process, natural walnut or ash are distinguished by high strength. For the same reason, you need to ensure that the drill works strictly at an angle of 90 degrees, from which it can easily deviate if you are dealing with hard natural wood.
Quality of installed hinges
A greedy furniture maker, purchasing hinges at a wholesale base, takes into account one single factor - cost. Such dealers simply don’t care about the quality of the fittings. They know that this product will function normally for a while, and when everything starts to fall apart, it will be too late to change anything. So the cheapest furniture hinges are sold out, they are installed in cabinets, and then the mezzanine doors fall off and fall on the client’s head at the most inopportune moment.
Why do furniture manufacturers save on hinges? The situation on the furniture fittings market is such that a furniture maker can, instead of one high-quality, solid European hinge, buy three cheap ones, stamped from thin tin cans in the poorest Chinese neighborhoods. And with wholesale purchases, decent savings are obtained, for the sake of which some furniture manufacturers easily step over their conscience.
How to determine the quality of a furniture hinge? To an inexperienced client who has difficulty distinguishing a self-tapping screw from a bolt, slob furniture makers sell crap under the guise of an expensive exclusive. They open the cabinet doors in front of his nose and say: “Just look at how well and softly the furniture hinge works! Do you know why it glows in the dark? Yes, because this is Honduras – the leading nuclear waste processing plant!”
In fact, anyone can easily learn to understand the quality of furniture hinges. You just need to pay attention to the thickness of the metal. The thicker the metal, the better the loop. But how do you know that this hinge has thick metal and will withstand the load? After all, you need to have a standard for comparison! I think the right decision would be to go to a wholesale center that sells furniture fittings and talk to the sellers. Let them show you cheap hinges and give you the opportunity to hold expensive, high-quality hinges in your hands. This way you can really understand the difference between cheap crap and a good product. Well, then, write down the markings of a quality hinge and the name of the manufacturer in a notebook in order to indicate this data in the contract for the manufacture of furniture. And just let them try to install something else for you!
By the way, start expanding your horizons by reading our publication: Types of furniture hinges - this is a very educational material that talks about the most popular types of hinges among furniture makers. Well, then - forward to the wholesale base for the sale of furniture fittings!
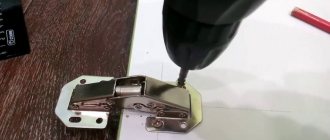
Hinge Attachment
Due to the fact that the door leaf is a moving object, unlike the cabinet, you need to start attaching the hinge from there. This will make your work easier by eliminating the need to adjust the facade to the hinges when you have to hang it. Installation work with swing mechanisms can be carried out in accordance with the following instructions:
- At the stage of installing the door hinge, all the flaws in marking and work on the holes may appear if you first place it on the site of future installation. Try to carry out a similar check first, making sure that the platform of the overhead hinge cup fits tightly to the surface of the door leaf over its entire area. Even the slightest deviation can cause the door to warp in the future.
- Using a pencil and applying a loop, new markings are made for the screws so that they fit evenly into the grooves of the loop.
- After this, you can install the platform last by screwing in the fasteners using a screwdriver or screwdriver.
Hanging the facade
The complexity of this stage of work lies in the need to manually hang the door leaf with installed hinges so that their bodies fall under the platforms fixed to the cabinet panel. All installation work is carried out in the following sequence:
- If possible, it is worth turning the cabinet into a horizontal position. This will simplify the process of trying on the façade for further installation.
- Using a pencil, create markings for future mounting strips into which the hinge mechanisms will be installed.
- Place the planks exactly according to the markings and secure with self-tapping screws using a screwdriver.
- Install the door on the side of the cabinet, being careful not to deviate from the marked positions for the hinges.
- You can begin to fully assemble the hinges by connecting their front and base platforms using the housing. The result is finished swing mechanisms, ready for work.
- At the last stage, you will need to adjust the hinge using a screwdriver. The main role in this task will be played by the corresponding screw in the housing of the central component of the mechanism.
Adjusting the hinges
Despite the fact that some users carry out the adjustment procedure “by eye” when the cabinet door leaf has not yet been installed on the furniture structure, this approach cannot be called correct. By starting the adjustment stage after hanging the facade, you will get a complete picture of how your manipulations with the hinge adjustment screw will affect both the appearance and ease of use of the door. Prepare in advance for the fact that you will need to unscrew and tighten the screw in the mechanism body several times before you achieve the ideal location of the door leaf. In the process, it is recommended to use a manual rather than an automatic tool, which is why it is better to give preference to a Phillips screwdriver. A screwdriver, although capable of manipulating a screw much faster, can put too much stress on the component and wear out its head. You will need to make adjustments based on three parameters of the facade location, which will be discussed in more detail below.
Adjustment for horizontal discrepancy
The position of the door leaf is adjusted by moving it to the left or right. Your ultimate goal is to eliminate too large gaps between the front and the cabinet panel. Please note that too narrow a gap will make it impossible for the door to move along the axis of its hinge. Also, adjustments are required in rooms with non-standard walls, where the cabinet may be located at some angle.
Vertical adjustment
Unlike horizontal adjustment, vertical adjustment in the up and down directions is made by manipulating the oval fasteners in the hinge mechanism. The next difference from the horizontal adjustment procedure is the fact that the vertical position of the facade may “sag” over time due to the constant influence of gravity. For this reason, vertical adjustments have to be made on a regular basis.
Door depth adjustment
Depth means adjusting the position of the door relative to the cabinet body, which also affects the gap between them. For most users, provided that the installation is correct and the markings are correct, this type of adjustment is almost not required. Most often, façade adjustments are made in rooms with uneven floors, which can cause difficult door movement.
The process of installing furniture hinges
Installation of fasteners is carried out in 4 steps:
- Marking areas for fixing parts.
- Preparing holes for screws.
- Assembly and installation of fittings.
- Hanging the door.
The final and most difficult stage is the stage of adjusting the position of the canvas relative to the body of the cabinet or cabinet. If the furniture structure is not assembled correctly, the door leaves will begin to sag, which will lead to damage to the product.
Marking
In order to correctly install fasteners, you must first mark the connection points of individual parts of the furniture structure, otherwise the doors will not close well.
Recommended procedure:
- Step back 7-12 cm from the bottom and top edges of the canvas. These will be the fixation points of the first loop.
- Fasten each subsequent fastener at a distance of 50 cm or more from the previous element. At this stage, the number of required canopies is established. Accordingly, you need to draw horizontal lines.
- Mark points for drilling holes for screws. They should be 5-2.5 cm away from the side edge. A vertical line is drawn from bottom to top. At its intersections with horizontal stripes, marks are made using self-tapping screws.
For this procedure, you can use special templates, but drilling holes through them is not recommended: you can ruin the workpieces.
Drilling holes for hinges
After applying preliminary markings to the body of the furniture set and the canvas, recesses are made to fix the fastening elements. For this, a milling cutter, an electric drill and a set of drills of the required diameter are used.
Work order:
- Place the canvas on a pre-prepared, level base.
- Make holes up to 1.25 cm deep, no more. A cutter specially designed for furniture sheds is fixed in an electric drill.
- When drilling, keep the drill perpendicular to the blade. The drill must not be allowed to skew.
The work must be done carefully so as not to drill through the door. It is better to use a cutter: this will avoid damage to the decorative surface of the product. When using drills, there is a risk of chipping.
Attaching the hinge with your own hands
Next, the canopies are inserted into the prepared recesses and adjusted relative to the façade of the structure. The loops should fit snugly to the base. If these parts are placed unevenly, the canvas will begin to warp.
After adjusting the position of the structural elements, mark with a simple pencil the screw-in points for the fastening screws and attach the doors to the cabinet (cabinet).
Procedure:
- Marking of fixation points and fastening of loop platforms intended for installation of the canopies themselves.
- Applying the canvas to the side of the cabinet.
- Connecting parts.
- Adjusting the position of the sash relative to the product using a screwdriver.
It is recommended to hang doors on a smooth base. The side of the cabinet or bedside table on which the striker is fixed must be in a horizontal position. After connecting the pieces of furniture, the doors can already be adjusted in a vertical position.
Installation of the strike plate
Mounting strips are used with insert parts.
The standard thickness of a laminated chipboard façade is 1.6 cm. In this case, you need to retreat 5.4 cm from the edge of the product. This indicator consists of a constant value of 3.7 cm, a thickness of the canvas of 1.6 cm and an additional 0.1-0 .2 cm required for free movement and adjustment of fastening elements.
Hanging the façade on a hinge
This is the most difficult stage of furniture assembly. To facilitate installation work, it is recommended to lay the product body on the base so that the door is installed horizontally on the hinges.
First, the same markings are made on the inside of the cabinet or bedside table as on the canvas. In this case, you will need a cutter for furniture canopies.
Further sequence of actions:
- Fixing the hinge platform using self-tapping screws.
- Connection of individual structural elements.
- Adjusting the position of fittings elements relative to the furniture body and canvas. To do this, use a building level and a screwdriver.
At the final stage of furniture assembly, final adjustments to all components of the structure must be made.
Final adjustment
This is the final stage of installation work related to the installation of awnings on furniture sets. The final adjustment of the fastenings is carried out simultaneously in the horizontal and vertical planes, as well as in depth.
In the first case, the setting ensures free opening and closing of the sashes and prevents the appearance of gaps between individual parts of the structure. This setting option is often used when installing furniture in rooms with uneven floor and wall bases.
Vertical adjustment allows you to move the façade of the set if necessary. In this case, you need to tighten the special oval holes on the hanging structures.
Final adjustment is the last stage of installation work.
Depth adjustment is carried out using oval-shaped holes. This adjustment makes it possible to weaken or increase the pressure of the canvas to the body of the cabinet (cabinet).
Attaching hinges to glass doors
With the growing popularity of tempered glass furniture, the range of fittings that can work properly with this material has also expanded. Despite the increased strength indicators compared to traditional glass, tempered glass is still much more vulnerable to mechanical stress than wood and chipboard panels. Therefore, for doors made of this material, certain types of hinges with a fundamentally different type of fastening element are produced. The first difference between these mechanisms is their increased strength and load-carrying capacity due to the high weight of the glass. The following metals are used as the basis for glass door hinges:
- Bronze;
- Aluminum;
- Zinc alloy;
- Stainless steel alloy.
According to the principle of fastening, hinge mechanisms can be overhead or mortise. The latter traditionally require the creation of holes for fixing screws, when the former rely on holding the glass facade by applying high pressure to it. In this case, overhead hinges can work on the principle of clamping with platforms on both sides of the glass door or using fixing screws that press the facade inside the hinge mechanism.