0
18553
To speed up the furniture manufacturing process, special devices are used. Even novice craftsmen can use them; besides, you can make furniture jigs and templates yourself. Products come in different types, designed for different types of work.
Tools for marking, assembly and processing
First of all, those who want to assemble furniture with their own hands will need a basic set of tools.
The arsenal for measurements and markings includes:
- ruler – you need a metal and thin one, up to a meter long;
- a simple pencil (it is better to take a hard-soft one, it is marked with the letters HB);
- carpenter's square (helps to build perpendicular lines);
- eraser;
- tape measure (a five-meter tape measure will do);
- levels of different sizes;
- awl;
- stapler;
- hammer;
- clamps (for fixing parts at the desired angle).
Do not forget about fasteners and tools for tightening them - screwdrivers, hexagons.
Be sure to choose an iron ruler.
Electrical accessories
Sawing and processing parts of furniture is a more labor-intensive process that cannot be handled with manual tools. It is recommended to stock up on electric tools for this.
Use different ways to create tools.
You may need:
- An electric drill is the most versatile power tool. Choose a model with a speed controller that is fairly lightweight.
- An electric jigsaw allows you to make beautiful cutouts and accurately and quickly cut wood or plywood.
- A grinding machine - with it you can bring the surface to the desired smoothness, make it neat and even, and give it a finished look.
- A construction hair dryer will be needed if you need to glue edges to varnished chipboard.
Electrical appliances are quite expensive. If you are furnishing your apartment and no longer plan to make furniture, you can rent equipment to save money.
Tool for cutting and edging furniture parts
Cutting parts to size and then gluing the visible ends is rarely done at home. It is much easier to order cutting and edging in a workshop. Many companies that supply chipboards offer these services locally. It's very convenient and ultimately cheaper. If you take into account your own labor costs for the need to transport entire sheets of chipboard, their loading and unloading, the cutting itself, sanding the ends and covering them with melamine tape, as well as all the costs of electricity and consumables. Value your time.
In addition, cutting on a wide-format machine is much more accurate and of higher quality than manual cutting, and PVC edges are many times superior to melamine edges in terms of durability and aesthetics.
But there are some designs of built-in furniture (in particular wardrobes) that require adjustment and sawing in place. Some beveled and radius shelves are also designed during installation. This is how hobs and sinks are embedded into kitchen countertops.
In these cases, you should ensure that you have the following tools for making furniture:
- Jigsaw with wood files . The main electric tool for making furniture with your own hands, if you need to saw parts at home. The length of the file is selected according to the thickness of the material (it can be fiberboard with a thickness of 4-5mm, chipboard with a thickness of 10-25mm, postforming with a thickness of 26-38mm). As well as narrow files for decorating radii with reverse and straight teeth without streaking.
- Manual router for removing edge overhang . It will be needed when gluing and subsequent processing of PVC edges with a thickness of 1-2mm. The technology requires a certain skill and additional study to carry out at home.
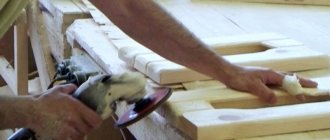
- Grinder machine. An indispensable tool when installing built-in wardrobes. Using a sander, you can adjust the parts to fit the unevenness on the wall, for a tighter and more aesthetic connection without gaps. The grinder is also used to smooth the ends after cutting with a jigsaw, in order to glue the melamine edge more accurately and evenly.
- Iron or hair dryer. The melamine tape is glued with a regular iron and gently pressed until it is completely glued. You can use a hair dryer for these purposes, manually pressing the edge with a rag. Wear gloves, otherwise you may get burned.
- A stationery knife and a blunt knife, sandpaper 40, 60, “one” and “zero”. Excess glue and edges are carefully cut off with knives, then the cut edges are sanded to a visually aesthetic appearance.
- Silicone sealant or wax, wax restoration crayons, touch-ups for masking defects and scratches . This set of consumables cannot be classified as a tool for assembling furniture with your own hands, but in the process you will definitely need it for processing cuts, accidental defects, etc.
What are templates for assembling furniture
A template is a special blank that greatly simplifies the work process for a furniture assembler. In the manufacture of interior elements, you have to perform a lot of repetitive actions - marking, drilling holes.
Blanks will help facilitate the process of creating tools.
To speed up work, use templates.
Typical
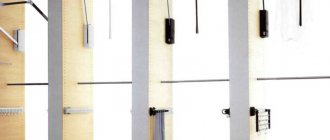
A traditional furniture template is a plate, on one side of which there are holes of a certain diameter, and on the other - a bar for stops.
A furniture jig is a device that can significantly simplify and speed up the process of production and assembly of furniture structures.
Professional furniture templates are quite expensive. There is no point in purchasing an expensive device if you have just started assembling furniture or do not plan to make it your main occupation.
This is a device that can be manufactured in various designs.
In such cases, it is better to do it yourself.
Homemade
Tools for making furniture can be made with your own hands to make drawings and blanks. A homemade template is an excellent solution to save money and customize it to suit your specific needs.
Furniture making tools are needed at every stage of the manufacturing process.
To get a highly specialized tool, you can make do with improvised means. The marking template can be made from an ordinary wooden square: you need to drill holes on it at the required distance from each other.
At home, you can get by with a standard set of devices, most of which are available to every craftsman.
The drill template is made from a metal ruler or strip on which holes are also made. A perpendicular bar is attached to the metal to make it convenient to hold the device in any plane.
DIY tool for pre-assembling furniture and wardrobes
Before assembly, it is necessary to mark the parts and drill the joints for confirmation in the ends and front parts of the chipboard. This process will make further assembly much easier.
Also, preliminary marking will be required for attaching various lifting and sliding mechanisms, furniture hinges, shelf holders, rod holders and other fittings.
For the marking process, at the initial stage you will need all the measuring tools described above.
To add parts (drill holes) at home, you will need a simple hand tool:
- Drill. Drilling holes in furniture parts does not require a high power drill; 350W is sufficient. The main thing is that it is light and comfortable - after all, for large volumes of making furniture with your own hands, you will have to hold this tool in your hand for quite a long time. The drill will require a set of drills - confirmat, wood and metal drills 3, 4, 5, 7, 8, 10mm. And also Forstner drills 15 and 20mm for installing minifixes and eccentrics, 26 and 35mm for inserting furniture hinges, core drills 60.65 and 80mm for inserting lamps, plugs for wires (if required by the purpose and design of the furniture).
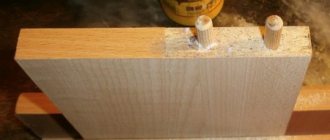
- Clamps and vices. Needed when assembling large-format parts and gluing (for example, when assembling furniture dowels). Also used for direct drilling in place, without preliminary additives, to evenly clamp parts in the desired position. It is better to use quick-release clamps. Homemade variations of clamps and vices are also useful for this purpose.
- Mallet. Used to install hidden fasteners (furniture dowels) and adjust conventional ones. Indispensable when inserting dense removable shelves into designated niches, since it allows you to precisely and without damage “fit” the parts to the right place.
- Hammer . Needed for attaching back walls and bottoms of fiberboard drawers to small nails. But many assemblers have gotten used to screwing fiberboard onto thin self-tapping screws. Or attach to staples using a construction stapler.
Feature of the furniture conductor
A furniture jig is essentially a template. To use it, it is fixed on the desired part, installing the sleeve at the required distance. A cutter of the appropriate diameter is placed in it to drill a hole.
A furniture template is a device that speeds up and facilitates the process of producing wooden structures.
Advantages of a conductor for furniture assembly:
- greatly simplifies the process;
- the result is more accurate;
- it is easier to take accurate measurements and follow them when drilling;
- less time is spent on work.
A separate feature of this device is that its scope of application is not limited to furniture assembly.
You can purchase a factory-made device or make it yourself.
After you finish the interior, you can use this template in construction and even mechanical engineering. The jig can be used for drilling not only on plywood and wood, but also on cylindrical parts.
detailed instructions
Step 1. You need to indent approximately 7-12 cm from the upper and lower edges of the door. In this case, the indentation in the instructions is made at a distance of 8 cm. You need to draw two lines strictly perpendicular to the edge of the door.
An indentation of 8 cm is made
Lines are drawn perpendicular to the edge
Step 2. Next, from the edge of the door to the center of the place where the hole will be drilled, you need to make an indent of 22 mm. This is the standard distance. And you also need to draw lines through the marked point, perpendicular to those drawn earlier.
Bottom space - 2.2 cm
Perpendicular lines are drawn
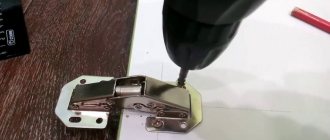
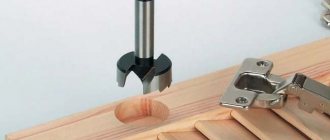
Step 3. Next you need to take a special drill with a standard diameter of 35 mm.
Take a drill with a diameter of 35 mm
Step 4. To make drilling easier and the drill clearly positioned, you need to make small notches using an awl at the intersections of the lines on the markings.
Using an awl to make indentations
Step 5. Now you can drill the holes. You can do this with a drill, or you can use a special router.
You can start drilling holes
Prices for a linear series of milling cutters
Fraser
Result of work
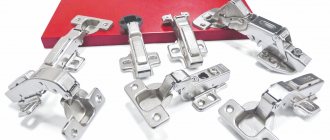
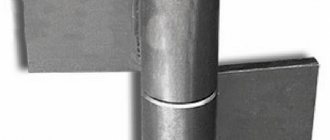
Step 6. Once the holes have been drilled, you can try on the hinge bowl, and also, by aligning the holes for the screws on the ears of the bowl along the line drawn earlier, mark where the drilling will be done, but with a thin drill. Moreover, the points will not be on the line itself, but slightly to the side, with the ears aligned along the line.
Fitting the hinge bowl
Markings have been applied for future holes
Step 7. Now, using an awl, you need to make notches at the designated points to position the drill.
Notches are made to position the drill
Step 8. Next you need to drill holes for self-tapping screws measuring 4x16 mm.
Holes are drilled
Step 9. It is necessary to attach the canopy to the door again, placing the bowl in the hole, and screw it to the facade with self-tapping screws.
Screwing with self-tapping screws
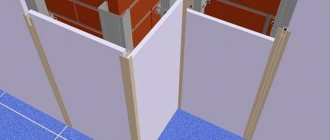
Step 10. Now you can attach the door to the cabinet wall. This is done like this - first you need to attach the door to the wall, choosing the position in which it should stand.
Now you can attach the door
Step 11. When applying markings, you need to ensure that the upper hinge screw, which will be attached to the wall, is in a position close to the door itself.
You need to mark carefully
Step 12. Next, it is important, after taking simple measurements, to set aside 17 mm from the center line on which this part of the canopy lay.
From the center line you need to set aside 17 mm
Step 13. After this, you need to attach the door again and make marks with a marker through the holes in the hinge, aligning them with the lines drawn at a distance of 17 mm.
Markers are used to make marks through the holes in the loop.
Step 14. Now you need to drill holes for Euro screws with a drill.
Holes for Euroscrews are drilled
Step 15. Next you need to screw part of the loop to the wall.
Part of the loop is screwed to the wall
Step 16. Then you can attach the door to the wall. It is important to get the front part of the hinge attached to the door onto the screw located on the part of the hinge that is fixed to the wall. Also, under the hinge that is fixed to the door, there is a screw with a “heel”, which is important to get into the groove located on the other side of the part of the hinge that is fixed to the wall.
This part needs to get onto the screw
The door is attached to the wall
It is important to do everything according to the instructions
Another photo of the process
Step 17. To prevent the hinges from coming apart, the outermost screws need to be tightened a little. There is no need to wrap them all the way yet.
The outer screws are tightened a little
Step 18. Now you need to adjust the door. To begin with, you should move it away from the cabinet wall by about 1-2 mm; you do not need to fix it tightly to it. Once the gap has been maintained, the screws can be tightened.
Door adjustment
Step 19. There is another screw that will help you move the door left or right if necessary. In this case, there was no need to adjust it.
This screw in our example did not need adjustment
Video - Marking and drilling
Devices for making upholstered furniture
When assembling furniture, keep in mind that the main toolkit is designed for the manufacture of cabinet interior elements - cabinets, chairs, shelves, etc. If you want to start making upholstered furniture, you will have to supplement the arsenal.
To assemble high-quality furniture, you need to use special tools.
Required tools:
- A knife with a thin blade and a sharp tip.
- Construction type stapler.
- Separate stapler with 8mm staples for upholstery, drapery, decorating.
- Threads.
- Adhesive for furniture and fabrics. Pay attention to the composition - it should not contain dangerous toxic components.
- PVA.
Also, assembling furniture will require finishing materials, chemical compounds for polishing, and varnishing.
Additional tools for furniture making
When making interior items, we must not forget about consumables and additional accessories.
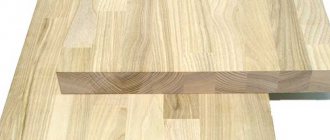
Natural wood has been used to create furniture for many centuries.
Basic and most common materials to use:
- Chipboard is a universal and budget material that allows you to create any type of design and assemble stylish furniture without much expense;
- LDSP - laminated variety;
- Fiberboard - the bottom of drawers and the back walls of furniture are made from it;
- MDF is a fine fraction, it is used for embossing and making partitions;
- glued plywood;
- plastic - mainly used for decorative purposes or for minor elements;
- wood is a noble material, environmentally friendly and quite expensive.
Chipboard is one of the most popular materials for furniture.
The selection of tools depends on what materials you prefer to work with. If you are going to work with glass, you will need a diamond glass cutter.
Plastic is more practical, but less aesthetic.
Over time, you will determine a list of truly necessary devices that should always be at hand. You can purchase them as needed, and in many cases you can make them yourself.
You will definitely succeed!