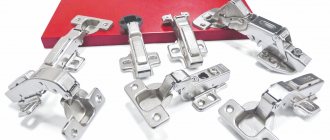
Types of hinges and their installation
Loops can be divided into several types:
- Cylindrical with bearing for support.
Used for mounting standard gates that are not too heavy in weight. It is not recommended to load such systems with a load of more than 0.4 tons since this is their maximum permissible weight. This information should be asked before purchasing because it may vary for each model and brand.
They look like a cylinder that is divided into 2 parts. One of them has an end in the form of a rod, which, during installation, enters the second part with an empty core and a ball at the bottom. This bearing makes the mechanism smoother during movement if too much load is applied. On one of its sides there is a special place for installing a plug, which can be removed.
Cylindrical hinges for gates Source vorota-goroda.ru
- Reinforced structures in shape.
They cope with loads of up to 0.6 tons and differ from the first ones only in the fastening plate, which makes it possible to correctly distribute the mass over the surface. Such a mechanism can be installed using welding or, as in interroom passages, with self-tapping screws, and the opening of doors when using such a hinge can be in both directions.
This fastener is made of durable steel, which increases the maximum permissible load weight and durability of the product. Before purchasing, it is recommended to check the bearing for special markings.
- End-to-end.
Used when welding or other fasteners cannot be used. To install them, the gate support is drilled through and secured with nuts on the other side. Such loops can only withstand small weights, their maximum is 200 kg. They are made right-handed or left-handed, and can also be equipped with canopies.
- Hidden.
They have a special design that can be easily hidden if the gate is closed. They are attached to the side of the post, which acts as a support, and to the inside of the frame. The advantage of this design is that these hinges can only be dismantled with special tools.
Hidden mechanism Source www.travelnews24.ru
- Three-section overhead (magnetic).
They are used if the weight of the sashes is too large. They have good wear resistance, do not make unnecessary sounds when opening the door, they are difficult to break into, and all the weight goes to these fasteners. In the middle they have two rods facing in opposite directions. They are fastened by welding, which is very convenient and reliable.
- Arrow loops.
They are made as hinged or semi-hinged, and can be used for gates with a large weight. There are three types: decorative, standard and removable.
There is also a difference in the shape of the loops:
- Cylindrical . They are tightly fixed on the surface of the gate, as well as smooth and easy rotation of the mechanism.
- Square . When installing, you need to step back a little from the frame. The fixation is more reliable than the previous ones.
- Hexagonal . Universal hinges that can be fixed both cylindrical and square.
- teardrop-shaped . They are used for various structures and have high strength and resistance to loosening.
When choosing gate awnings, it is important to ensure that they match the material. If the hinge doesn't fit metal or wood, it won't last long.
Drop-shaped loops Source news2.ru
See also: Catalog of companies that specialize in small forms (MAF) and fencing.
Selecting loops according to shape
Any shape of loops has its pros and cons, which require special attention. Some will require the lugs to be welded before work to ensure a secure fit. On a three-meter gate made of corrugated sheets, you can install classic cylindrical hinges. You can do this yourself if you follow the instructions.
Drop-shaped hinges with support bearings. The welding seam comes out uniform, and therefore installing the fittings on the gate is simple and convenient. This is one of the main advantages of this type of design.
The boom hinge is used on gates made of different materials, be it metal or natural wood. Thanks to the special shape, there is additional strength, as well as a certain aesthetics.
Cylindrical garage hinges with a ball require more complex installation, but at the same time they have excellent performance characteristics. Such products are considered one of the most reliable for sashes.
Attachment products must be selected based on the load they must withstand. If the hinge is with an eccentric, then it is often suitable for home use, furniture, doors, or small gates. For gates whose load reaches two hundred kilograms, it is recommended to choose designs with wings that can be short or long.
The material for them is high-quality steel, which has many advantages and a long service life. But in gate automation systems, induction magnetic loops are used.
How to choose the right hinges
Gate hinges are a mechanism that consists of at least two parts. When they are connected, a hinge is formed that moves and helps to rotate along the axis without difficulty. Such a mechanism, depending on its type, will allow the gate or wicket to open 90 or 180 degrees. If desired, you can make them open in one direction or both, which allows you to determine the required functionality. But when choosing, you need to look at several criteria:
- the mechanism must be strong;
- it is necessary to look at the maximum weight they can withstand;
- the largest opening angle must be selected depending on what they are purchased for;
- how they will be installed;
- the raw materials from which the hinges are made;
- design features.
If you carefully study this issue and select gate hinges that are suitable for a specific purpose, you can get an excellent result. In this way, you can make a product that will last a long time and will not lose its qualities over time.
Opening 90 degrees Source bouw.ru
Processing a loop on a jeans belt: tips and life hacks
If you are sewing jeans from fairly thick denim, processing the buttonhole on the waistband may cause problems. The machine may begin to act up due to the large thickness and density of the material in several folds; the loop may not come out as neat as we would like. And this place is in plain sight! The tips below will help you create a beautiful buttonhole, whether your machine has a dedicated buttonhole function or not.
How to hem jeans and make scuffs: master class
General recommendations
- Whether you are duplicating the belt itself or not, it is better to reinforce the places where the button will be installed and the loop will be made with duplicating material.
- In order not to create excess thickness, it is better to cut off the allowances, as shown in the photo above. However, it is better not to leave allowances less than 0.5-0.6 cm, so that the belt does not later tear in this place.
- Another way to reduce the thickness, making it easier for the machine to work, is to unscrew the belt and tap it with a hammer. Place something solid under the work.
- The loop on the jeans belt should start no less than 0.6-0.7 cm from the edge.
- The peculiarity of denim buttons is that the loop length for them needs to be chosen a little longer than for ordinary buttons of the same diameter. To get an idea of how your denim will behave with your button, make a test buttonhole. At the same time, reproduce all the original data: duplicate the denim and fold it in two layers. Cut a loop and try to thread a button through it. Then it will become clear how much the loop needs to be lengthened.
- If your machine does not work well on the selected denim when sewing a buttonhole, this will be visible in the test buttonhole or buttonholes you make. Then for the buttonhole you can choose not contrasting threads, but threads in the color of denim: this way, possible flaws will be less noticeable.
- Before cutting through the buttonhole, use an edge treatment to prevent fraying, such as Pryme's Fray Check glue or similar. This glue is transparent, will be invisible on denim after drying, and can withstand washing well. Apply glue to the outside and inside of the loop and wait until it dries before cutting through the loop. The glue will make the loop more stable and durable and will prevent deformation even if you make a slight mistake when cutting it.
- A special loop cutting knife will help you cut the loop carefully. It can be purchased separately (in the photo it is in the center) or, for example, in a set. The loop is cut using a knife like this: the work with the loop is placed on the work surface, a knife is placed on top and pressure is applied. The blade width of this knife is 3 mm, so the action must be repeated to cut the entire length of the loop.
Closed seam like jeans
Making a buttonhole with cord/lobe thread
This type of loop (also called a tied loop) is used on loose and dense fabrics, including thick denim. It turns out to be more convex than a regular loop, more decorative, plus the cord inside gives the loop strength and prevents it from warping (the latter is more important for loose fabrics, but it is also important for a loop on a jeans belt).
The foot for sewing such a loop has special parts on which a thin cord or thread is attached, which will be inside the loop:
The loop is sewn as usual:
Then the ends of the cord or thread must be tightened, and then they and the ends of the working thread must be brought out on the wrong side, secured and cut.
How to sew stretch denim: life hacks and tips
Making a buttonhole on denim using a zigzag stitch
This method is suitable for machines that do not have an automatic or semi-automatic buttonhole function, or if a machine with such a function does not want to work adequately with thick, dense denim. Then you can sweep out the loop using a zigzag.
First mark the loop. You can draw one line and lay seams parallel to the right and left of it, you can draw 2 parallel lines side by side, marking 2 lines, or 1 line in the center and 2 parallel lines on the sides of it, as is more convenient.
Here the loop starts with a tack, but you can start on one of the long sides of the loop. The point is that you need to make 2 parallel lines with a narrow zigzag with a small step, and at the ends combine these lines with wider bartacks. You can also further strengthen the loop by first sewing a simple stitch around its perimeter. This method is described in detail in this master class of ours.
Here the loop is made in a zigzag without additional stitching. The operating procedure is as follows:
- we make a fastening of 5-6 stitches in one place, stitch width 0.5 cm, length 0 (or you can set the length to 0.5-1 mm and make 3 stitches back and forth);
— choose a zigzag with a smaller width, 2 mm, and a step of 5 mm, set the needle so that the stitch does not extend beyond the edge of the bartack, and sew one long side of the loop;
— select the same zigzag settings as for the first tack, and set the second one in the same way as the first;
— turn the work 180 degrees, select the zigzag settings to make the long side of the loop, check how the needle is positioned so that the stitch does not go beyond the edge of the bartack, and make the second side of the loop.
Bring the ends of the threads to the wrong side, fasten and cut. You can also topstitch the finished loop along the outer perimeter with a simple stitch with a short stitch length, for example, 2 mm. This stitch will further strengthen the loop, plus the loop will look smoother and neater.
Embroidering on denim: tricks and tips
Making a buttonhole by hand
Another way: the loop is strengthened with machine stitching and then covered with hand stitches.
Mark the loop. Parallel to the marking line, sew 2 simple lines with a short stitch length on the machine. There are bartacks at the beginning and end of the lines. Then carefully cut the loop without going beyond the markings on the right and left.
Hand sew the buttonhole with a tight buttonhole stitch. Read how to do it here.
Photo and source: closetcorepatterns.com
We sew jeans and trousers in denim style: a selection of patterns
How denim conquered the world: 15 facts about jeans
What to sew for children from denim: 27 patterns for children's models made from denim
Installation on garage doors and gates
The hinges are attached in two ways: welding and screws. They are similar to each other; in both cases, the fasteners go to the post and the front of the sashes. Let's first consider how to properly weld hinges onto a gate or garage door:
- The structure must be placed on a flat surface and the places where the elements are expected to be attached must be marked.
- The hinges must be lubricated with oil.
- The canvas is installed vertically along its plumb line and both parts of the loop are tacked by spot welding.
- Afterwards, the location of the hinge axes is checked and the top one is tacked. Next, you need to check that there are no gaps, cracks and that the sashes move well. When everything is in order, it is necessary to finally weld.
- All welding areas are cleaned with an angle grinder and then painted.
When welding moving parts, you should remember safety precautions and monitor the flow of current. It is best to make a connection using cross welding so that the seam is stronger and the errors that were made during fastening are less noticeable.
Welded fastening Source yandex.net
How to weld the hinges yourself
Welding hinges is not an easy task, especially for beginners. But, if you have patience and desire, you can cope with such work even in the absence of serious experience.
To work you will need the following tools:
- metal tape measure;
- level;
- hammer;
- welding machine;
- Sander;
- special mask;
- gloves for welding work.
Rules:
- When working with a welding machine, you must strictly follow safety rules. A protective mask and gloves must be used.
- In accordance with fire safety standards, welding is prohibited near flammable liquids and objects.
- When hinges are welded to the gate, they need to be lightly “grabbed” by welding.
- Since the hinges are welded to the door leaf, when drawing up the drawing, you need to take into account that the distance from the lower edge of the leaf to the lower hinges, as well as from the upper edge to the upper hinges, must be at least 20 cm. On the wings, the place where the hinges are attached is marked with a pencil.
- Fasteners should be thoroughly lubricated with grease. This measure will protect them from cracking when exposed to high temperatures.
- It is believed that if a match is placed along the edges of the hinges, the door will not jam during welding.
- You need to wedge the doors so that when closed they are level. To level the sashes, use a building level.
Stages of work:
- First, the hinge part located at the bottom is welded. The gate hinge must be fixed in the direction from bottom to top. During the welding process, the electrode should be moved horizontally and with extremely smooth movements.
Temporary fastening of hinges to gates for welding
- After the first seam, the gate leaves must be wedged to check their operation. The hinges are fully welded only after the quality of opening and closing the doors has been checked.
- After welding is completed, the frame must be removed from its hinges, generously lubricated with grease and returned to its place.
- All welding seams must be processed with a grinding machine, and then covered with metal paint.
- Properly welded hinges provide the structure with quick, delay-free opening.
You can also close such gates easily - with one movement of your hand.
Additional features:
- During welding, only serviceable equipment should be used. A faulty device must be repaired by a qualified technician.
- The work of welding hinges to the gate cannot be carried out alone.
- It is prohibited to weld on metal whose surface has traces of fresh paint.
- If there are traces of gasoline, fats, or oil on the protective overalls or gloves, they must be changed. The presence of flammable liquids on clothing is considered unacceptable.
- It is prohibited to weld vessels under pressure.
- Do not place rags soaked in oil on the cylinders, as such carelessness always leads to a fire.
Return to contents
Installation nuances
To ensure that after attaching the hinges they do not fall off after a few days, you need to know the main installation points:
- To begin with, it is recommended to prepare the tools necessary for installation, for example, a hammer and welding or screws and a drill. Also during the installation process you should use a level and a tape measure (or ruler) for more accurate measurements.
- Before starting work, you need to make a sketch of what the finished result will look like. During all stages, you must carefully monitor safety.
- When welding individual plates, it is necessary to give a uniform load on them.
- First you need to make markings for fastening the hinges to the gate posts and the shutters themselves.
Afterwards, weld everything thoroughly and begin hanging the canvas. But it’s better not to do this alone, since the weight of the canvas is too heavy.
Installation with correct weight distribution Source pinimg.com
Operating instructions
After installation, you need to know a few rules for caring for hinges:
- it is necessary to monitor emerging defects;
- service after a certain time specified in the instructions (often 3 months);
- it is undesirable to keep them in one position for a long time, since the hinges begin to rust when idle, which leads to unpleasant consequences;
- to reduce the load on the fastenings, you can install a support under each blade, then the service life will be extended;
- Periodically, the mechanism must be cleaned of grease and old oil.
If corrosion occurs, it is necessary to dismantle the removable hinge elements and clean them from dirt and rust using fine sandpaper. Rub the rotating mechanism with paste, and then lubricate it with grease. To avoid freezing, it is better to do this when it is warm outside. If you use these tips, your gate canopies will last a long time.
Basic truths
The process of installing hinges can be considered using the example of a metal gate. In order for it to properly perform its main functions, a number of conditions must be met when welding hinges:
- Provide a gap between the support post and the gate frame, which should be 3-5 mm.
- Provide a gap of several millimeters between the hinge and the gate frame by welding plates - metal plates of the required thickness - to the hinge. In total, for each loop you need two strips, the length of each of them is 2 mm less than the length of half.
- The optimal distance from the edge of the gate to the loop is 15-20 cm. If you need a middle loop, then it is located exactly in the middle between the outer loops.
First, the lower part of the fastener (with the pin) is welded to the post, then the upper part (with the groove) is welded to the sash.
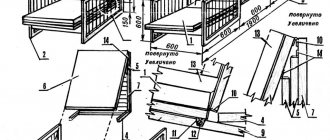
A properly assembled structure should have the following parts:
- a loop;
- plate; wicket frame;
- support pillar;
- lower part (with pin);
- upper part (with groove).
This design consists of several elements.
All loops must be coaxial, that is, their centers must be on the same straight line. The alignment requirement is extremely important. It is on its compliance that it depends on how evenly the weight of the gate will be distributed on the fastenings and, accordingly, how long they will last.
To work, the master will need:
- welding machine;
- metal plate for making plates;
- Bulgarian;
- hammer;
- plumb line;
- oil for lubricating hinges;
- protective equipment - mask, gloves, overalls.
At the preparatory stage, you should mark the gate frame and sash, determining the places where the hinges will be welded. Clean them from dust, dirt, and rust. To do this, you can use a wire brush and solvents. Next, a similar treatment is performed on the surface of the hinges, and lubricant is applied to their inner part.
The traditional welding method involves the installation of plates at this stage, for which it is recommended:
- Take 2 identical plates of the required thickness and length. Place them so that there is a gap of 2-3 mm between them.
- Place the bottom part of the loop on them.
- Weld the loop to one of the plates (in this case, to the right one).
- Do the same for the top of the hinge and weld it to the left plate.
- Then you need to install the shutters in the working position and fix them.
- The plates with the lower part of each hinge are spot welded to the post, then the upper hinge elements are inserted into the lower parts and spot welded to the sash. After checking the alignment of the hinges and the operation of the gate, final welding is carried out along the contour of the plates.
For an inexperienced craftsman, vertical welding, which must be done on an already installed pole, may be too difficult a task. In addition, it is almost impossible to do the work alone: you need an assistant.
Briefly about the main thing
There are 6 types of hinges, which differ in the type of fastener and maximum permissible weight, as well as division into specific needs. For example, a mechanism in the shape of an arrow or a cylinder can be used for gates. And through or hidden for the gate.
They are also distinguished by shape, each of which also has different properties. When purchasing mechanisms, you need to find out whether it can withstand a certain weight.
They are attached in two ways: welding and self-tapping screws. Both methods are easy if you know how to use the tools.
It is also necessary to carefully ensure that the hinges do not deteriorate, otherwise they will not last long.
Ratings 0