Sooner or later, any upholstered furniture, such as a chair-bed, wears out. Its upholstery may become frayed or torn, and stains may appear on it. What to do in such cases? Padding. This process does not require special skills and abilities, so you can do it yourself. What are the stages of reupholstering a chair-bed?
What does the chair-bed consist of?
In general, there are several varieties of the described device. However, each of them has those components that are similar to each other. Thus, the following aspects can be highlighted:
- Frame. It is also possible to consider in several proportions. By choosing steel material, the user is assured of durable operation. If we talk about aluminum, it is very important to emphasize its inherent qualities such as reliability and guaranteed strength.
ATTENTION! However, the product is not suitable for daily use. As for wood, special conditions for use are required. This includes not only a certain temperature, but also a special humidity indicator.
- Folding mechanism.
- Bed.
- Filler. When choosing it, it is recommended to place special emphasis.
- Linen box. Often, manufacturers equip the design with such a product, which adds additional positive aspects.
How does a chair bed function?
The answer to the question directly depends on the model of the bed. Thus, the following can be highlighted:
- Eurobook. The process takes place by pulling out the lower part of the furniture. Due to this, it becomes possible to expand the other part.
- Harmonic. Two sections fold out to reveal a third that functions as a seat.
- Roll-out mechanism. The name speaks for itself. The inverted base forms two sections.
- Click-clack. The main part rises, which means the blockage is removed and a solid mattress is formed.
- Dolphin. The part that folds out is located under the base; after it is pulled out, it transforms into a regular sofa.
How to make a chair bed yourself
Chair-beds are small in size and at the same time solve several problems at the same time. During the day, this furniture is used as armchairs, and when night comes, it transforms into a comfortable place to sleep.
Before you start making a chair-bed, you need to determine which model is best suited to the design of a particular room. To do this, several questions need to be addressed:
- What size should a chair bed be?
- What type of cladding is practical in each specific room?
- In which specific room will the furniture be located?
Naturally, the main aspect is the purpose of the furniture. At night, the product turns into a full-fledged bed, that is, when choosing a specific model, you need to focus on obtaining maximum comfort while resting.
When choosing upholstery, try to choose a material that can withstand cleaning well (especially if you have pets). In addition, when purchasing textiles, be sure to find out whether the fabric is impregnated with special substances to prevent stains.
Natural fabrics do not interfere with normal air exchange, but artificial materials increase the practicality of furniture and simplify its care.
Attention! The dimensions of the chair-bed are selected on a case-by-case basis. If furniture is needed for a small room, then you must definitely take into account the dimensions of all installed furniture and the dimensions of the unfolded chair-bed.
Selection of materials
To make furniture you will need the following material:
- Fibreboard is used to create longitudinal parts of any size that can be manufactured. Most often, a sheet of medium thickness but high density is selected. You can also choose a laminated board (HDF), which will additionally make it possible to avoid toxic fumes. Disadvantages include fragility and a small choice of design, while in terms of budget the cost of this material comes first.
- Furniture board is used like fiberboard, but has better strength properties and a more attractive appearance. The disadvantage is the high cost, because of this it is installed only in open areas.
- Edged board - the density will depend on the type of wood. The board is quite difficult to process due to its physical characteristics. As a rule, it is used as an additional material, but in some cases (if the loads are insignificant) it is a replacement for HDF.
- Beam - used as support and support for the structure. As a rule, its presence is practically invisible, but without it no structure will be strong.
- Foam rubber and synthetic winterizer are fillers for upholstery products.
- Spunbond is placed on top of the filler, due to which it is firmly fixed. This material is also convenient when tensioning the outer skin, as it can provide good sliding.
Required Tools
Before you start making your own chair-bed, you must first prepare the tools that you will need for the job. For production you need:
- Furniture fittings.
- Electric jigsaw.
- Screwdriver.
- Sander.
- Milling machine.
- Roulette.
- Square.
- Marker.
- Sewing machine.
- Scissors.
- Furniture stapler.
- Seam fittings.
- Upholstery materials.
- Chalk.
How to take measurements correctly
Before you start making a chair-bed, you need to determine the place where you need to install the furniture and make measurements and diagrams of the room, taking into account the size of the sofa when unfolded.
When choosing the size of furniture, you need to take into account the size of the room. A bulky chair-bed in a small room with low ceilings looks unsightly, the same applies to small-sized chairs in a spacious room - the furniture will be “lost” against the background of the entire interior.
Attention! When choosing the size, you also need to take into account the height of the person who will sleep on the chair-bed.
Required Tools
What you will need:
- washers;
- 8 pieces of screws;
- 2 springs;
- 2 plugs;
- nuts;
- screwdriver;
- screwdriver
Step-by-step instructions on how to assemble a chair-bed
Follow the following sequence:
- It is advisable to first keep the parts in a warm room for at least two hours.
- Make room and prepare the necessary items.
- Place the packaging materials on the floor and unpack the products.
- Install the brackets on the sides and secure with screws and washers.
- Fix the supports and attach the nuts. Do the same with checkboxes.
- After which you can begin installing the drawer. For this you will need fastenings.
- The spring and plug should also be secured.
- Secure the sides to the mechanism with screws.
- Attach the backrest and make sure the structure is secure.
Drawing up a drawing
Ready-made drawings and diagrams can be found on various online services. Standard sizes of chair beds range from 60 to 140 cm in width, 170–200 cm in length, 10–40 cm in height. At the same time, compact modules with a width of 60–70 cm (80–90 including armrests), double sofa chairs with a berth of up to 120–140 cm, corner models with two backrests 100 cm wide are conventionally distinguished. The dimensions of the chairs are selected taking into account height owners and room sizes. In conditions of limited space, compact models look best; in rooms with high ceilings, placement of bulky products is allowed.
Characteristics of folding transforming beds, placement options
If you have instructions with a drawing explaining what and how to assemble the chair from, with a detailed description of the parts, you should not deviate from the recommended dimensions. The slightest changes in the thickness of the materials used can lead to distortion of the structures. When choosing general sketches, the approach changes - the dimensions of the parts of the chair-bed are adjusted to each other, based on calculations. Detailing, special programs, and cardboard templates help to avoid mistakes.
How to install a chair-bed correctly
When choosing a place that is suitable in your opinion, you should take into account not only personal preferences, but also adequately assess the situation. Thus, the size of the structure itself also influences the result.
REFERENCE! Naturally, it is recommended to choose the position directly under the structure in the unfolded version. And this is understandable, because when assembled, the furniture takes up less space. As a result, the device should not be in the way in the room, and its disassembly should not be complicated.
Simple DIY chair-bed
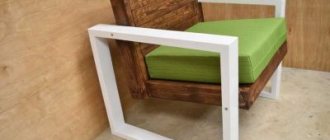
A chair-bed is the optimal solution for small spaces, as well as in case your guests want to stay overnight. This chair does not take up too much space, but will perfectly replace a full-fledged sleeping place.
The mattress is made up of homemade flat pillows: the base of the seat and two pillows for the back. The chair is equipped with a drawer for bed linen. It folds and unfolds easily. To build such a chair-bed with your own hands you do not need any special professional skills - even a beginner can cope with the task.
So, the chair consists of two parts, fastened together with ordinary one-piece metal hinges. Let's see what we need to make a chair-bed ourselves.
Materials:
– 8 boards of the same length for making the frame of a chair-bed; – 8 strips to strengthen the frame in the corners; – slats for the base of the chair, on which the pillow will rest; – slats and two strips for making a base board for the second part of the chair; – plywood panel – the bottom for the main part of the chair; – three pieces of furniture foam rubber 100 mm thick: two narrow for the back and one wide for the seat; – any suitable fabric for pillows; – furniture screws or ordinary wood screws; – furniture glue if desired; – any product for protective and decorative treatment of wood; – furniture varnish if desired; - nails; – metal one-piece hinges: large for connecting two parts of the chair-bed and small for fastening the shield in the bedding compartment.
Tools:
– hand-held circular saw or jigsaw; - Miter saw; – vibrating or orbital sander; – drill and wood bit; – screwdriver; – construction tape; – clamp for drilling at an angle; - pencil, square.
Step one: selection and preparation of materials
To make a chair-bed, you will need boards with a thickness of at least 30 mm and slats of suitable cross-section for the base of the pillows. Replace the plywood - the bottom of the bed linen box - with a sheet of fiberboard or chipboard if desired. Prepare 8 pieces of wood to reinforce the chair-bed frame in the corners.
Unusual and simple chair-bed
At its core, our chair-bed is a chair-mattress. Since it does not have a rigid base, the backrest should be placed against the wall. These are three soft identical pillows, which form an original chair 60 cm wide, 40 cm deep, 30 cm high. The back height is also 30 cm.
Advantages, or why it is worth making such a chair:
- lightweight, there are no wooden or heavy metal parts;
- mobile – even a child can move the chair;
- practical - if the product gets dirty, you can clean it or remove the cover and wash it;
- inexpensive;
- a convenient place for relaxation and children's games.
a) general view of the chair-bed when assembled; b) the principle of folding parts of the product; c) a visual demonstration of how the pillows are laid out:
- 1 – back;
- 2 – strap;
- 3 – strips of fabric that connect the pillows;
- 4 – lower part of the seat;
- 5 – middle part;
- 6 – upper;
- 7 – buttons.
What will be useful at work
- Durable main textile.
- Textile for connecting pillows can be a less expensive but durable material.
- Polyurethane foam or latex at least 10 cm thick for filling pillows. You need to cut it yourself: 1 piece. – 50x60 cm, 3 pcs. – 40x60 cm.
- Straps, buttons.
- Sewing machine.
- Zippers 60 cm long.
Description of work
- We sew a cover for a pillow 50x60x10 cm and three parts for the base of a soft chair-bed 40x60x10 cm.
- Strips of fabric will serve as furniture hinges. Cut strips 60 cm long. Finish the edges with an overlocker or another method that does not allow the fabric to lose strength. Connect the cushion covers in pairs with stripes, as shown in the diagram. For this purpose, you can use detachable zippers. This will make it easier to care for textiles.
- We sew straps to the side edges, and buttons to the sides of the upper part of the seat, respectively. They are needed for additional fixation of the backrest in a vertical position.
DIY chair bed: drawings and manufacturing diagrams
If you make a chair bed with your own hands, you can not only save a lot of money, but also get at your disposal an interior item of the desired design, color and size. Purchased products do not always differ in the quality of workmanship and materials used. Personally assembled furniture will meet all the criteria of environmental friendliness, convenience and reliability. To carry out this process, you will need a little free time, a set of household tools and the ability to use them.
Shapeless chair-bed
It is very easy to make this type of chair-bed with your own hands. You can not only save money on purchasing such furniture, but also get a comfortable and soft corner in your home.
To create a frameless chair-bed you need to prepare:
- upholstery fabric for furniture – 4 m;
- PVA glue;
- foam sheets 10 cm wide;
- threads of a suitable color;
- sewing machine
Now you need to make 5 parts from foam rubber:
- 2 rectangles 80 x 20 cm;
- 2 squares 80 x 80 cm;
- rectangle 80 x 30 cm.
All parts should be carefully cut out. It is better to use a metal ruler and sharp scissors. Now you need to prepare the fabric. When cutting out the corresponding parts, you should remember the seam allowances (1.5-2 cm). Two rectangles must be folded in half and sewn together. We put the zippers so that they are located opposite each other, and their action is opposite.
Deciding on design and construction
Before you start making a folding chair bed, decide on its design.
Important! When choosing a design, factors such as convenience and safety of operation of the product and ease of maintenance should be taken into account.
There are such types of designs of this furniture:
| Frame. | It is a wooden base onto which the soft part is attached. The parts are connected to each other with hinges; rollers can be used. The finished product is heavy and stable. |
| Frameless. | It consists of several fastened pillows that transform into a full-fledged sleeping place of the 60-80 cm standard. Due to the absence of armrests and a rigid base, the seat can be easily unfolded without clinging to the sides, has a low weight and compact size. |
Drawings and diagrams
To properly make a chair bed with your own hands, the drawings of each detail must be carefully thought out and checked. It is necessary to provide for all the nuances, including the installation location, the presence of furniture nearby and the procedure for cleaning soiled upholstery. Thus, frameless models when folded should be close to the wall so as not to tip over backwards
The dimensions of the bed chair can be arbitrary, but the dimensions (width, height, length) should be calculated for an adult.
The recommended data is as follows:
- thickness of the soft part – 10 cm;
- length when unfolded – 190 cm;
- width – 60-80 cm;
- Seat height when folded is 35-45 cm.
The diagram shows the following elements of upholstered furniture:
- frame in detail;
- loops;
- guides;
- legs;
- armrests;
- folding mechanism;
- patterns for covers.
Based on the drawing, calculations are made of the tool needed for the job.
Stages of work
Upholstering the product at home is not difficult. The whole process comes down to disassembly, fabric cutting, trimming and assembly. Even novice masters can do it in a day. Recommendations will simplify the process.
If the design of the chair is too complex, it is useful to watch the rules for disassembling the product in the video instructions.
Step-by-step instructions are a complete guide to action. Before starting work, you should read it to the end, then organize your tools. After completion of the work, the product can be decorated to your liking.
Characteristic features of relaxation chairs, types of products
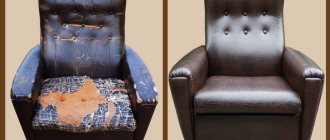
Disassembling the product
Before upholstering an old chair, you need to disassemble it into separate parts. If you have no experience in assembling such models, it is recommended to record the process on paper or in the form of a photo report. Then there will be no problems with assembly at the final stage. Disassembly comes down to the following algorithm:
- dismantle all decorative elements;
- turn the product over, remove the legs;
- remove the fasteners, unscrew the screws and take out the nails;
- pull out old staples;
- remove the bottom.
Unscrew all parts of the structure gradually. The fabric is carefully removed so that it serves as a pattern for new upholstery. Self-upholstery can become part of restoration work. At this stage, you can replace rotten, damaged parts, and repair damaged areas.
A good filler can be left untouched, but a deformed one will have to be dismantled. Use a flat-head screwdriver to remove the staples and remove the foam. If it is glued, carefully cut it off in layers. All garbage and unusable material are sorted into bags so as not to litter the workspace.
Before continuing work, the product is cleaned of dust and damaged fittings are replaced. If necessary, cover the structure with protective compounds.
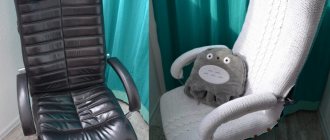
If you have to reupholster an office chair, the procedure does not change. Initially, all parts and decor are removed, the back and bottom are dismantled. Remove the upholstery and take out the filling. The only difference is in the design.
Cutting fabric
Replacing an old canvas with a new one involves preliminary cutting. You can transform the product with flock, jacquard, tapestry, leather, nubuck, chenille. The cutting method does not change depending on the type of material. A pattern can be created in two ways: tracing the old version, creating it from scratch by taking measurements. The first method eliminates the possibility of error. The process boils down to the following steps:
- Preparation. The old upholstery is ironed and laid out on a flat surface. For convenience, you can mark which part belongs to what.
- Open it up. Place the pieces on the new fabric, trace, and mark the hem allowance. It is advisable to overlock or hem the edges. This will extend the life of the upholstery. Cut out the details with tailor's scissors.
- Fitting. Place the parts on the chair, fold the edges for a hem, and check for correctness.
- Making adjustments. Cut off excess if necessary, add darts if the shape of the product is complex.
Stages of making a hanging chair with your own hands based on a drawing
You can also cut the foam rubber yourself to the shape of the old filler. Otherwise, the structural parts are cut to shape, leaving a few centimeters for fastening. An important condition is observed - upholstery fitting is carried out only on a structure with a filler.
Reupholstery and assembly
When all the decorative elements are updated, the parts are cut out, you can start reupholstering. Dust is removed from the structure and parts are prepared for assembly. Step-by-step instructions will tell you how to reupholster a chair with your own hands:
- foam rubber is applied and secured to the inside of the backrest;
- cut off the corners of the filler to make the corners smooth;
- apply batting and fix it with a stapler;
- stretch the materials so that there are no folds or distortions;
- apply the fabric and fasten it with a stapler;
- repeat the sequence of actions with the armrests and seat;
- attach the lower part and secure it.
Once the seats, armrests and backrest are reupholstered and the bottom panel is screwed down, you can put the updated decorative elements back in place. It is more difficult to work with the upholstery of leather chairs, since the leather has to be constantly stretched, preventing the formation of voids, folds, and distortion.
Reupholstering a chair is a simple step-by-step process that even a beginner can do. The main thing is to stock up on tools, choose the right fabric for upholstery and follow the instructions. It is useful to record all stages of disassembly so that there are no problems during assembly.
Required materials and tools
The question of how to make a chair bed with your own hands should be approached creatively, but economically. In the apartment and at the dacha you can find the necessary materials and equipment.
To assemble upholstered wooden furniture you will need the following tools:
- roulette;
- stationery knife;
- hacksaw;
- plane;
- square;
- electric drill;
- screwdriver;
- construction stapler;
- scissors;
- marker;
- sewing machine.
To make a folding chair with a soft part made of foam rubber, the following materials are needed:
- wooden beam;
- chipboard;
- plywood;
- PVA glue;
- acrylic paint or wood varnish;
- sandpaper;
- screws;
- bolts with nuts;
- upholstery fabric;
- metal loops;
- detachable zippers;
- rollers.
This is a short list of necessary accessories. Hardware for connecting parts of the chair into a single structure can be purchased in specialized stores.
Attention! Buy upholstery material that is dense and strong. It should last for many years, subject to constant mechanical stress and regular washing.
How to make frameless furniture
A chair without stiffeners can be made from dense sheet foam rubber 10 mm thick (an alternative is polyurethane foam, struttofiber or natural latex slabs) and high-quality, but simple textiles. Additionally, 7 lightning bolts will be required for these purposes. Their length and number depend on the number of selected unfolding elements. You will also need braid (for edging the edges, selected at will), PVA glue for gluing rectangles or squares of foam rubber, strong threads and a sewing machine. The work is carried out according to a simple scheme:
- Squares or rectangles with a width of 80 mm and a length of 20 to 80 mm are cut out of a single piece of foam rubber (dimensions may vary depending on the purpose of the chair).
- The parts are coated with glue, connected and left alone until completely dry.
- Textiles are cut with a 1.5–3 cm margin for seam allowances. In areas where zippers are sewn in, the allowance is made maximum.
- The covers are sewn together by machine. Zippers are inserted in the center of the sides to be hidden after the chair is laid out. Experienced craftsmen recommend immediately making several types of covers from different textiles, including rough and replaceable outer ones.
- Foam rubber blanks are inserted into the covers, and an inconspicuous fabric handle is sewn to one of the sides.
- The parts are connected using strips of fabric, zippers or Velcro. The method of fastening the chair elements is thought out in advance, the gap between them is kept as small as possible. Its size has a direct impact on the visual appeal of the chair and the density of the individual pillows.
Types of transformable beds for a small apartment, their functionality
The given instructions allow you to make yourself a chair-bed, a sofa or similar transforming structures from type-set soft elements. The simplest alternative to such furniture is a sewn quilted blanket (futon) or a bean bag chair, made in the shape of a large rectangle. When folded, they are used as a seat, and when spread out, they are used as a place to rest or sleep.
Chair parts are cut from foam rubber
Textiles are being cut. Covers are being sewn together using a machine.
Foam blanks are inserted into cases
Parts are connected
Manufacturing process step by step instructions
If working at home, prepare a spacious area for assembly. If possible, it is better to carry out sawing and polishing in a separate room or outdoors. If this cannot be done, then you should take the flowers out of the room and cover the furniture with construction film to protect it from dust and sawdust. When working with wood and a stapler, it is recommended to use assembly gloves to avoid rubbing calluses and to avoid splinters getting into your hands.
Important! During the assembly period, it is better to remove pets and children from the room, as they could be injured by the sharp edges of the tools or damage something.
Case manufacturing
It’s better to make the chair frame with someone, but you can do it yourself. An assistant will be needed when connecting the vertical and horizontal parts.
Housing assembly sequence:
- Based on the calculations and diagrams, the components of the frame are cut out and polished - vertical posts, middle slats, railing parts, bases for the seat and backrest.
- The sides are assembled using furniture screws. Their mirror compliance in all parameters is checked. If these parts are open, then balusters are inserted. The closed type product is sheathed on the sides with plywood.
- The backrest is attached to the rear pillars. Its size corresponds to the parameters of the seats.
- Guides are installed for the movement of the rollers. These pieces will serve as the base for the pillows.
- The bottom of the box is covered with plywood, and its top is covered with a hinged lid.
After checking the compliance of the dimensions with the calculated data, the structure is reinforced with transverse bars.
Installation of the mechanism
Products with a folding mechanism are convenient to use. Thanks to this device, the pillows are firmly fixed in the desired position. When purchasing a part, be sure to obtain installation instructions from the seller.
The frames of the base and seats are fixed in a given position. For this purpose, supports and tape are used. To be sure, it is better to take thin and long screws. When the structure is fixed, you need to attach both parts of the mechanism to it and make marks for drilling. After making the holes, the parts are bolted and lubricated at friction points.
Before further assembly, it is recommended to check the correct installation of the transformation mechanism. It should work gently, without any effort.
Sheathing
You should start by making patterns. It is advisable to first design the process. It is better to do this using two sheets of A4 paper. The canvas and parts that will be used for upholstery are cut to scale. After this, the optimal option for cutting the material is determined by trial. From the resulting patterns, covers are sewn with an allowance of 3 cm for fastening.
Then the side parts are finished. They are covered with 20 mm thick foam rubber. Fastening with brackets is carried out on the lower part.
100 mm foam rubber or 2 layers of 50 mm each are glued to the seat base. When the glue dries, the cover is pulled over the pillow. Nailing is carried out in the direction from the centers to the edges.
Decorating a bed chair
To give the finished product an original and stylish design, the following decoration options are used:
- embedding spotlights into the façade sidewalls;
- armrest trim with LED strips;
- covering with tapestries or embroidery;
- sewing appliques to covers;
- gluing mosaics to legs and balusters.
If time and opportunity permit, you can sew several replacement covers for all occasions. This option will allow you to quickly remove dirt or choose decor to suit your mood.
DIY folding beach chair with gas lifts + drawing
Hello, dear readers and DIYers!
Surely many of you love to relax in the forest, on the beach or just at your summer cottage. However, with a cozy chair, relaxation becomes even more comfortable. In this article, Ivan, author of the YouTube channels “HandCraft” and “Creates DIY,” will tell you how he made a folding chair from scraps of plywood sheet.
This project is not very difficult to make, and with some simplifications it can be made with a minimum set of tools.
Materials. — Gas elevators (100N) for furniture — 18 mm thick plywood sheets, boards — Door hinges, wood screws — Sandpaper, PVA glue, wood impregnation, Whatman paper, masking tape.
Tools used by the author. — Clamps — Circular saw — Grinder, disc sander — Screwdriver, wood drills with countersink — Self-centering drills, magnetic bits — Spade drills for wood — Furniture stapler — Hand router — Set of wood cutters — Quick-release clamp for a workbench — Lathe, reyer, meisel, hacksaw for metal - Electric jigsaw - Hand-held circular saw - Digital square, automatic core - Carpenter's vice, pencil, compass, square, ruler, knife, scissors, hammer, brush. Manufacturing process. So, the main material for the chair will be scraps of sheet plywood 18 mm thick. The author sets the parallel fence of the circular saw at a distance of 25 mm from the edge of the saw blade.
After this, the plywood is unraveled into long slats. From these the master will glue a large panel together to obtain a spectacular pattern. Although it is quite possible to do without this procedure by making a chair from a plywood sheet.
The resulting blanks are laid out with cuts close to each other on three long clamps. A layer of PVA glue is applied to the top surface and leveled with a brush or roller. The planks are turned on their side and tightened with clamps. To ensure that the surface of the shield does not bend when gluing, the author lays a couple of boards on top and weighs them down with bricks. Of course, it is much easier to glue such panels using a special subtype of clamps called clamps. You can make them yourself by reading the following article.
The author should have placed plastic film between the boards and the shield so that they would not stick. Therefore, I had to use a hammer to remove them.
Traces from glue drips have also formed on the lower part of the shield; the master processes both surfaces with a grinder with a disc sanding attachment.
To mark the pattern, the author needed to secure a couple of sheets on a workbench with a furniture stapler and glue them together with masking tape. When marking different angles, it is convenient to use a digital square.
The author also wants the edges of the chair to be slightly curved. To do this, he drives small nails in several places and bends a metal ruler along them.
Excess material from the outside is cut off with an electric jigsaw.
In order not to spoil the edges of the parts, when drilling holes for the jigsaw blade to enter, the author cuts out internal straight lines using a hand-held circular saw. This tool allows you to plunge the saw blade directly into the thickness of the material.
As a result, the master came up with 5 blanks for the back, seat, armrests, and front leg.
Complex internal curves and external edges are sanded by hand with sandpaper. As a result, you get this contrasting pattern at the ends.
Now the workpieces are fixed one by one on the workbench with a special clamp, and all edges are rounded using a hand router using a radius cutter with a thrust bearing. By the way, Ivan made this clamp himself. Its production is described in detail in a recent article.
Eight small door hinges are required to connect the structural elements. Two pairs of them will connect the seat and armrests to the back.
To accurately mark the centers for the pilot holes, the author uses an automatic core punch. Then the holes are made with a wood drill with a countersink. Then the furniture hinges are screwed into place in the lower part of the backrest.
Of course, the operation of drilling pilot holes can be performed much easier and more accurately with self-centering drills.
Using the same method, the hinges with the backrest are screwed to the seat.
The part is fixed in a carpenter's vice, and a notch is made according to the markings for fastening with an end mill. In this case, the master uses a side stop on a manual router.
First, the master snaps the piston heads onto the mounts.
The housing shanks also snap into place.
The author also decided to make the legs for the chair himself, although store-bought rubber ones would have been quite suitable. He cut out several squares of plywood and glued them together.
After the glue has dried, the workpiece is fixed on a lathe and turned to a cylindrical shape using a reamer.
The master gives a rounded shape to the edges of future legs using meisel.
The blanks are cut with a hacksaw, and holes for self-tapping screws are drilled into them. All that remains is to screw the legs into place, after applying a little glue.
The remaining four hinges will connect the front parts of the seat and armrests with the combined part of the chair.
To protect the wood from moisture, the author impregnates the surfaces of the product with linseed oil. Of course, it is advisable to do this before assembly, because oil will not get under the hinges and fastenings.
After a few hours, excess oil is removed, and the author checks it in operation.
He also made a cutout at the top of the back for easy carrying.
And the chair opens on its own, you just need to slightly raise the backrest.
Good mood, good health, and interesting ideas to everyone!
The author's video can be found here.
Source
Become the author of the site, publish your own articles, descriptions of homemade products and pay for the text. Read more here.
DIY chair bed: drawings and manufacturing diagrams
If you make a chair bed with your own hands, you can not only save a lot of money, but also get at your disposal an interior item of the desired design, color and size. Purchased products do not always differ in the quality of workmanship and materials used. Personally assembled furniture will meet all the criteria of environmental friendliness, convenience and reliability. To carry out this process, you will need a little free time, a set of household tools and the ability to use them.
Classic chair-bed
Making a chair-bed with your own hands is quite easy. The main thing is to first understand the sequence of work. The classic frame design is designed for its intended use. In other words, you can sit in a chair during the day and sleep at night. This is an ideal option for a person who lives alone in a small apartment. This model can be described as “three in one”. This is not only an armchair and a bed, but also a chest of drawers. After all, the bottom of the structure can be used to store bed linen, blankets, etc.
Before doing the work, you need to prepare a diagram for assembling the future chair-bed with your own hands. The drawings will help you immediately assemble the structure according to a well-thought-out plan. The base of the structure will be a simple bench with cushions, and behind the back of such furniture there will be shelves with doors. Do-it-yourself drawings and diagrams of a chair-bed can be done quickly. They should include not only a schematic representation of the future product, but also a list of materials.
To make the structure you should prepare:
- PVA glue;
- Chipboard 20 mm thick;
- screws, nails, wooden spikes;
- hardboard sheet for the bottom;
- foam rubber for soft upholstery;
- construction staples;
- textile.
The pattern is ready, now you can start making patterns for future upholstery. You can use ready-made foam pillows and sew them together. To fix upholstery fabric, it is better to use construction staples or furniture nails.
If desired, you can also make armrests. Experienced craftsmen know that soft armrests are not practical. It is better to make them yourself from wooden blocks or metal pipes.
Deciding on design and construction
Before you start making a folding chair bed, decide on its design.
Important! When choosing a design, factors such as convenience and safety of operation of the product and ease of maintenance should be taken into account.
There are such types of designs of this furniture:
| Frame. | It is a wooden base onto which the soft part is attached. The parts are connected to each other with hinges; rollers can be used. The finished product is heavy and stable. |
| Frameless. | It consists of several fastened pillows that transform into a full-fledged sleeping place of the 60-80 cm standard. Due to the absence of armrests and a rigid base, the seat can be easily unfolded without clinging to the sides, has a low weight and compact size. |
Drawings and diagrams
To properly make a chair bed with your own hands, the drawings of each detail must be carefully thought out and checked. It is necessary to provide for all the nuances, including the installation location, the presence of furniture nearby and the procedure for cleaning soiled upholstery. Thus, frameless models when folded should be close to the wall so as not to tip over backwards
The dimensions of the bed chair can be arbitrary, but the dimensions (width, height, length) should be calculated for an adult.
The recommended data is as follows:
- thickness of the soft part – 10 cm;
- length when unfolded – 190 cm;
- width – 60-80 cm;
- Seat height when folded is 35-45 cm.
The diagram shows the following elements of upholstered furniture:
- frame in detail;
- loops;
- guides;
- legs;
- armrests;
- folding mechanism;
- patterns for covers.
Based on the drawing, calculations are made of the tool needed for the job.
Required materials and tools
The question of how to make a chair bed with your own hands should be approached creatively, but economically. In the apartment and at the dacha you can find the necessary materials and equipment.
To assemble upholstered wooden furniture you will need the following tools:
- roulette;
- stationery knife;
- hacksaw;
- plane;
- square;
- electric drill;
- screwdriver;
- construction stapler;
- scissors;
- marker;
- sewing machine.
To make a folding chair with a soft part made of foam rubber, the following materials are needed:
- wooden beam;
- chipboard;
- plywood;
- PVA glue;
- acrylic paint or wood varnish;
- sandpaper;
- screws;
- bolts with nuts;
- upholstery fabric;
- metal loops;
- detachable zippers;
- rollers.
This is a short list of necessary accessories. Hardware for connecting parts of the chair into a single structure can be purchased in specialized stores.
Attention! Buy upholstery material that is dense and strong. It should last for many years, subject to constant mechanical stress and regular washing.
Almost classic furniture
The proposed chair-bed is such simple furniture that you simply won’t need drawings. Such furniture can always be offered to a guest for sleeping. Traditional materials - wood, plywood, polyurethane, textiles - make it a reliable support for many years.
Materials and tools
- For the production of the frame (backrest, railings, seat base) high-quality sheet plywood and boards will be used.
- Glazing beads.
- Saw.
- Furniture hinges.
- Self-tapping screws.
- Screws with nuts.
- Electric drill, drill bits.
- Wood glue.
- Grinding machine with attachments of different grain sizes.
- Varnish or paint for finishing.
The dimensions of the parts can be selected independently depending on personal preferences and capabilities.
Description of work
- First of all, we assemble the sides of the chair. The frame consists of parts:
- vertical racks, the lower part of which will serve as legs;
- three middle bars;
- bottom crossbar;
- railing
Before assembly, the components should be processed: remove roughness, smooth out corners. Drill holes for glazing beads in the lower part of the railing, lower crossbar, and vertical elements. Connect the structure with glazing beads and glue. The main thing is to prepare the same parts for the right and left parts so that they are mirror identical.
- Glue the decorative strip to the railing, moving it 2-3 cm to the front.
- Attach the bars to the bottom crossbar of the inside of the railing with self-tapping screws. This is where the base for the seat will be mounted.
- The back of the chair can be made in a similar way, but completely symmetrical and without legs. That is, the lower crossbar is installed at the ends of the side ones. The back of the chair will not be installed on the floor, but higher, so you don’t have to increase the height of the parts.
- Measure the length of the lower back. This size is the side for 3 identical squares that form the base and the fold-out bed. We make the side parts from bars, the bottom from plywood. For structural rigidity, we install additional bars in the middle of each box. All connections are made with self-tapping screws.
- We install hinges on the boxes, 2 for each connection, so that when unfolding we get a smooth surface.
- We lay the folding parts between the sidewalls. We fasten the bottom box with 4 screws to the sides, as can be seen in the photo.
- Install the backrest of the folding chair. The bottom edge of the backrest should be just above the edge of the top box. Thus, this part will not suffer from unfolding/folding, and will not interfere with transformation.
- Measure the height of the chair legs. You need to decide whether the legs will be on a folding part with a folding mechanism or made separately and attached.
- Cover the surface of the chair with varnish or paint, depending on which finishing method suits you best.
How to make a new chair-bed more comfortable with your own hands is up to you. You can decorate it with many beautiful pillows or equip it with a bright, tri-fold mattress.
Manufacturing process step by step instructions
If working at home, prepare a spacious area for assembly. If possible, it is better to carry out sawing and polishing in a separate room or outdoors. If this cannot be done, then you should take the flowers out of the room and cover the furniture with construction film to protect it from dust and sawdust. When working with wood and a stapler, it is recommended to use assembly gloves to avoid rubbing calluses and to avoid splinters getting into your hands.
Important! During the assembly period, it is better to remove pets and children from the room, as they could be injured by the sharp edges of the tools or damage something.
Case manufacturing
It’s better to make the chair frame with someone, but you can do it yourself. An assistant will be needed when connecting the vertical and horizontal parts.
Housing assembly sequence:
- Based on the calculations and diagrams, the components of the frame are cut out and polished - vertical posts, middle slats, railing parts, bases for the seat and backrest.
- The sides are assembled using furniture screws. Their mirror compliance in all parameters is checked. If these parts are open, then balusters are inserted. The closed type product is sheathed on the sides with plywood.
- The backrest is attached to the rear pillars. Its size corresponds to the parameters of the seats.
- Guides are installed for the movement of the rollers. These pieces will serve as the base for the pillows.
- The bottom of the box is covered with plywood, and its top is covered with a hinged lid.
After checking the compliance of the dimensions with the calculated data, the structure is reinforced with transverse bars.
Installation of the mechanism
Products with a folding mechanism are convenient to use. Thanks to this device, the pillows are firmly fixed in the desired position. When purchasing a part, be sure to obtain installation instructions from the seller.
The frames of the base and seats are fixed in a given position. For this purpose, supports and tape are used. To be sure, it is better to take thin and long screws. When the structure is fixed, you need to attach both parts of the mechanism to it and make marks for drilling. After making the holes, the parts are bolted and lubricated at friction points.
Before further assembly, it is recommended to check the correct installation of the transformation mechanism. It should work gently, without any effort.
Sheathing
You should start by making patterns. It is advisable to first design the process. It is better to do this using two sheets of A4 paper. The canvas and parts that will be used for upholstery are cut to scale. After this, the optimal option for cutting the material is determined by trial. From the resulting patterns, covers are sewn with an allowance of 3 cm for fastening.
Then the side parts are finished. They are covered with 20 mm thick foam rubber. Fastening with brackets is carried out on the lower part.
100 mm foam rubber or 2 layers of 50 mm each are glued to the seat base. When the glue dries, the cover is pulled over the pillow. Nailing is carried out in the direction from the centers to the edges.
Decorating a bed chair
To give the finished product an original and stylish design, the following decoration options are used:
- embedding spotlights into the façade sidewalls;
- armrest trim with LED strips;
- covering with tapestries or embroidery;
- sewing appliques to covers;
- gluing mosaics to legs and balusters.
If time and opportunity permit, you can sew several replacement covers for all occasions. This option will allow you to quickly remove dirt or choose decor to suit your mood.