How to make a chair out of wood with your own hands?
Furniture is one of the necessary attributes for the normal functioning of people in any room. Moreover, it can be used not only for practical purposes, but also as an addition to external decoration. One of the most common options is a chair. This furniture allows you to comfortably spend time indoors reading or watching TV. Let's try to figure out how to make a wooden chair with your own hands so that it lasts a long time and is as comfortable as possible.
Tools and materials
So, in order to make a wooden chair yourself, you need to prepare a number of tools and materials. If we talk about tools, we should name:
- plane;
- Circular Saw;
- drill;
- screwdriver;
- wood hacksaw;
- milling cutter;
- roulette;
- pencil;
- clamps.
If we talk about materials, then you will need to have on hand:
- screws;
- furniture glue;
- sandpaper;
- stain or drying oil;
- masking tape;
- cardboard for stencil;
- dowel or lumber.
Here it should be understood that the choice of wood and the final processing technique will determine the ability of the chair to cope with the effects of natural factors, its stability, reliability and ability to withstand physical stress. For some reason, many people choose chipboard to create a chair, although this material is completely unsuitable for chairs. And especially for garden-type models. The reason is simple - extremely low resistance to moisture. And the strength of chipboard models will be lower than that of solid wood or timber models.
But natural wood, although not the most affordable material, is environmentally friendly and completely harmless . It will be the best solution if you want to make homemade chairs with your own hands. Before starting work, you should inspect the boards and bars for defects - cracks and knots. After this, the material is polished, protective materials are applied to it, and assembly is performed. If we talk about wood, then it would be best to take alder, ash, birch, and oak for such purposes.
There are two reasons here. The first is the presence of an unusual fiber pattern. The second is the high wear resistance of a product made from these materials. And the durability of such products will be high. The only drawback will be deformation under the influence of moisture and low resistance to fire. And one more important point that should also be prepared is drawings and diagrams. This issue should be decided when it is already known what material the furniture will be made from. There are several options to solve this problem:
- make a drawing with your own hand, which will indicate the dimensions and features of this chair;
- do it on a computer;
- download the finished version on one of the specialized sites.
Which option is better to choose will depend on your drawing and computer skills.
Advantages and disadvantages
When considering the features of a throne chair, you should not lose sight of the advantages of this furniture. The main advantages include:
- the furniture has an expensive and stylish design;
- Expensive materials are used to make chairs;
- The chairs are durable and reliable.
Most often, wood is used as a base for a chair. This is due to the fact that the material lends itself well to processing; its surface can be decorated with carvings. Velvet and leather are used for upholstery. Each of these materials looks quite expensive.
Modern designers offer a modernized version of the throne. It resembles a bean bag chair, but unlike it, there is a frame at the base that allows the product to hold a shape similar to a throne.
In addition to the advantages, there are also disadvantages. The main disadvantage of the throne chair is that it is not suitable for modern interiors. For example, furniture with carvings and velvet upholstery does not fit in with the strict geometric lines of Minimalism.
Manufacturing Instructions
Now let's try to look at the process of creating various types of wooden chairs. Considering that there are different types of chairs - a lounger, with a backrest or a “shell”, it is correct to consider the process of their creation in the context of placement on different objects and creation from different materials. In particular, we will consider a universal option that can be placed in a country house or in a house, and a chair model made from pallets.
Dachnoye
Specifically, to create this type of chair, you will need to have on hand:
- connecting bar;
- additional bar;
- back;
- 2 armrests;
- 4 legs.
These parts are first cut out of cardboard, after which they are transferred to wood and the elements of the future structure are cut. When this is done, you can begin to create the frame of the future chair. Before starting assembly, all components must be very carefully treated with a special antiseptic, which prevents the appearance of fungus. Now all parts should be dried.
After all structural elements have dried, it is necessary to begin adjusting the parts to the required dimensions, which are specified in the drawing documentation. Here you should also make markings for the holes intended for fastening . Now we take a drill and drill holes where the fasteners will be inserted, after which the parts are fixed together.
After this, we fix the back leg of the chair at an angle of 90 degrees . Using the same method, we secure the leg on the other side. Now you need to connect the side structural elements. The end parts of the planks, as well as the ends of the legs located on the other side, must match. This will be the key to the correct location of the entire structure. At the next stage, the supports should be installed, which after installation should be secured in the desired position using special clamps.
Now you should install the backrest guide from above using screws. During this process, it is necessary to adjust it to the crossbar from below. You can mark all the crossbars and parts of the back with a simple pencil, and then make a hole again, holding the bar firmly in your hand.
All that remains is to make the roundings by cutting the boards along pre-marked lines. All that remains now is to sand the surface of the chair using sandpaper. Here you should take this issue responsibly in order to get perfectly even and smooth wood without any burrs. After this, we treat the chair with drying oil and several layers of varnish and let it dry.
Shell
Now let's move on to looking at creating a shell chair.
In this case, you will need to have skills in using a tool such as an electric jigsaw. To maximize time savings, the movement of the jigsaw should be as smooth as possible during cutting, so that there are no stops or accelerations. Each jerk will definitely leave a mark, which will take up time for polishing in the future. Vibrations should also be avoided during cutting so that the quality of the cut is as high as possible. Otherwise, you will again need to spend a lot of time sanding the defects.
After the parts are cut out according to the drawings, they need to be varnished. First, you should very carefully sand all the chips and uneven cuts. Depending on the size of the defects, different abrasive cloths should be used. If there are very large cracks, they need to be puttied. The putty should be selected exactly to match the plywood or made independently. If the second option is chosen, then it is made from sawdust, PVA glue and a small amount of chalk.
The surface should also be thoroughly cleaned of dirt and dust. And the plywood must be completely dry .
You should also choose a good varnish. We are talking about varnish that will not lift the veneer pile, which can have a very negative impact on the appearance of the future chair. You should not skimp on layers of varnish. There should be at least 2 of them. And it is better if there are 3 of them.
Model selection
Making a chair from wood is a labor-intensive task, but anyone can do it. Having found the best option and some free time, you can get to work. The process itself consists of developing detailed drawings and preparing parts, which will then need to be combined into one whole. All instructions have a standard algorithm of actions, in which they first prepare the parts, make holes for fasteners, fasten the parts with screws and glue, and finally paint the product or varnish it.
The assembly of the chair must take place taking into account the established plan so as not to make a single mistake.
The work of making a wooden chair begins with determining its type. After all, not every type of chair can be made with your own hands; some of them require either mechanized actions or professional skills. After studying all the possible options, you need to choose the one that is right for you. It is unwise to take on a complex drawing right away, because in the end nothing will work out.
Chairs that you can actually make yourself:
- Soft – the main thing here is the frame and upholstery. A correctly assembled product and neat upholstery are the key to success. This product can be placed in any place convenient for you to create a cozy corner for relaxation.
- Folding ones are a more complex option, but more functional. The frame of the product is made in such a way that it can be expanded and folded with some pressure. This chair will be the perfect item for a country trip.
- Kentucky is a simple version of the product, but very original in appearance. To create it, you only need bars and wire.
- Sliding – their design is more complicated than a regular chair, but a beginner can easily handle it. A sliding product will help save space in a small room and can replace a full bed.
- On wheels - the main thing in their design is to install stable wheels that will be able to move both an empty chair and a chair with a person sitting in it. This is a pragmatic option for disabled or elderly people.
- With a high back - these products can be hard or soft, the main thing is that they have a comfortable high back. Making it is no more difficult than a regular chair.
- Rocking chair - these products are not suitable for beginners, but for experienced craftsmen this is a completely doable task. The main thing in the design of the chairs is the arched bases, due to which they will swing.
Making the sides of the chaise lounge
We glue the prepared boards (the first batch) into a “two-layer” board (in this case, the top “layer” should be laid perpendicular to the bottom).
Then, on a band saw or using a jigsaw, we cut out a circle of the required diameter from it.
We do the same with the next batch of boards. As a result, we will get two identical circles. These will be the side parts of the future chaise lounge.
Side processing
We grind the workpieces using a grinder or an orbital sander, after which we cut off one of their sides, namely the lower part.
To each of the side parts it will be necessary to screw onto self-tapping screws the parts cut from the board that are needed to attach the seat slats (we do it as shown in the photo below).
Wood as the main material
Making a wooden chair can be quite easy if you choose the appropriate method. You can use an old armchair or stool if it is not possible to purchase individual parts. Even from a banquette you can make a small chair that any child will like. To create a classic chair, boards, bars, and logs are usually used. A solid wood product has a number of advantages over other pieces of furniture, because wood is an environmentally friendly material that is absolutely harmless to health.
Natural wood is not a cheap material , but it is the key to the quality of a homemade chair. Once you are confident that the wood is of high quality, you can begin creating a work of art. There should be no knots or cracks on solid wood or bars. All parts must be carefully polished, and only then proceed to assembly. A special coating will protect the material from insect attack and drying out.
To make a chair, it is better to use oak, birch, ash or alder , because they have a unique beauty. These materials allow the product to serve for a long time without squeaking or cracking. The beauty of the product can be emphasized by high-quality textiles that will be used for its upholstery.
The main advantage of wood is its environmental friendliness. This is what makes it different from other materials. It is widely used in construction because it is relatively easy to obtain and costs less than many other materials.
Wood is very durable and can compete even with metal. It does not lend itself to plastic deformation and withstands shocks and loads well. It is easy to work with, and therefore you can make a chair from wood yourself. The disadvantages of this material include intolerance to moisture and high temperatures. When exposed to water, wood swells and crumbles, so you need to first coat it with varnish.
Characteristics of the material
The use of wood for making chairs has a centuries-old tradition. What justifies such popularity? Let's figure it out:
Advantages
- Environmental friendliness. Wood is a natural material that does not have any toxic emissions.
Advice: if you are choosing a chair or chair for your child, then opt for a wooden product. This way you will be sure of the absence of any allergens and, therefore, the well-being of your child’s health.
Children's wooden rocking chair
- Aesthetics. The surface of such material has a texture created by nature itself, which guarantees its uniqueness, and the ease of its processing provides ample opportunities for the master to create the most beautiful and convenient design.
Even such unusual objects are possible
- Reliability. The finished structure, made according to all the rules, will support the weight of even a very large person.
- Assembly instructions available. Of course, you most likely won’t be able to make a real throne without the proper skills, but a simple chair without any frills may well work out.
Assembling a wooden chair with your own hands - Easy to care for. Wood does not have high electrostaticity, which eliminates intensive accumulation of dust. If the surface is dirty with something, the dirt can be removed with any detergent.
- Pleasant tactile sensations. Wood has optimal heat capacity, which is why it is always warm to the touch.
- Durability. A well-assembled product will serve you for decades.
Flaws
But do not forget about some of the disadvantages inherent in wooden chairs:
- Quite a high price. Products made from natural materials are distinguished by their high cost. But, as they say, quality is worth paying for.
- Possibility of defects in the form of knots, resin pockets or cracks.
- Hydrophobicity. Excessive moisture can damage wood.
Advice: it is recommended to cover all wooden elements of the chair with a special varnish, which will reduce their hygroscopicity, protect against accidental scratches and abrasion when in contact with people’s hands, and also emphasize the natural beauty of the material.
Manufacturing workshops
Step-by-step instructions will help to minimize work time and save material consumption. The most popular step-by-step instructions for making chairs:
Chair for the garden
First you need to prepare the necessary tools and materials: electric saw, plane, hand router, hacksaw, screwdriver, drill, centimeter, screws, glue and boards. Procedure:
- You need to cut four legs from the boards (2 pcs. 2/2.5/7 cm, 2 pcs. 2/7.6/5 cm) . Then you need to make a backrest measuring 2/2.7/9 cm, two supports for armrests measuring 2/1.2/4 cm and a back support measuring 2/7.6/6 cm . To work you will need a jumper (2/5.1/5 cm) and strips (1.2/2/2 cm).
- Based on the drawings, you need to prepare the main parts . The most difficult thing is making the side supports. Therefore, before cutting, you need to print a full-size template of this element or draw it yourself on a large sheet of paper.
- To cut straight sections of parts you will need an electric saw, and to cut out shaped elements you need to use a jigsaw.
- First you need to make wedge-shaped supports for the armrests , and then use glue and screws to attach them to the front legs.
- The next stage is cutting out the armrests and rear support.
- To smooth out all the unevenness of the part, they are sanded with sandpaper. Then you need to cut off the ends of the support, press the back part to the back for support and mill along the edge of the surfaces.
- The process of assembling parts should begin after they have all been treated with an antiseptic.
- The rear legs need to be installed perpendicular to the bevel of the support , and after that the side parts of the backrest and the first seat bar are connected. To fasten the parts, you need to make holes for the bolts.
- Having installed the supports, you need to secure them with clamps. The upper part of the backrest must be secured with screws, aligning it with the lower transverse part. The planks need to be cut according to the markings, first drawing a radius of curvature.
Having finished the work, you need to sand all surfaces and hide the screw heads with wooden plugs. You can treat a finished wooden chair with oil impregnation.
Shell
This unusual chair can be made with your own hands using drawings and diagrams, which it is advisable to create in a computer application and then print. This is necessary in order to obtain accurate dimensions and contours of all complex geometric parts. Procedure:
- All parts need to be cut out with a jigsaw. Movements should be smooth so that no unevenness remains. It is advisable to work with bent plywood after the master has previously practiced on a piece of unnecessary wood.
- It is important to varnish all elements so that they look aesthetically pleasing and are not exposed to external influences. But before that, it is necessary to sand all the unevenness and chips and clean the surface from dirt and dust. The varnish must be of good quality and must be applied in at least two layers.
The chair is assembled using wood glue, which secures all the parts. In order for this process to proceed without incident, you need to secure the gluing areas with clamps. Instead of the glue method, you can use self-tapping screws, but you need to screw them in deeply so that their heads are not visible.
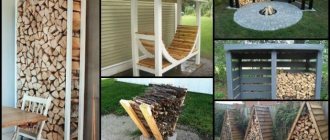
From pallets
To manufacture this product you will not need drawings or preparation of additional elements. A homemade chair from pallets can be made in just a couple of hours:
- First you need to disassemble the pallets and remove old nails from them . They are unsightly and can cause injury.
- To give the pallets a decent appearance, they need to be sanded , after which all the parts must be reassembled.
- The chair is assembled by connecting several pallets. The seat height can be any, it depends on personal preference. Typically this distance is 50-60 cm from the ground to the seat. For children, this distance should be an order of magnitude smaller so that they can sit on it comfortably.
- The armrests and backrest also need to be made from pallets , but for this they need to be partially disassembled. The height of the backrest is set by the master himself.
- It is advisable to varnish or paint all parts before assembly. And to give the product an unusual look, you can put a foam pillow in a colorful cover on it.
A chair made from pallets is not intended to decorate an apartment, but it will look good on a garden plot.
Making your own furniture is always an exciting process . Many creative people have a desire to do something on their own, because making furniture with your own hands means saving money. When making a chair from wood, the master is completely confident in the quality of the materials, and most importantly, he himself controls its strength. Even an old chair or a shabby armchair can be useful for making a wooden chair. By adding a few new details and choosing new upholstery, even the most unsightly product will take on new life.
Varieties
Wooden chairs for the garden and at home can take on a variety of interpretations:
Option number 1: rocking chair
The ability to swing makes your vacation even more enjoyable
Wooden rocking chairs occupy a special position because, thanks to the special shape of their legs, called in this case runners, they provide an original relaxation effect. Leisurely rocking can equally well both stimulate sleep and, conversely, help you concentrate on solving a specific problem.
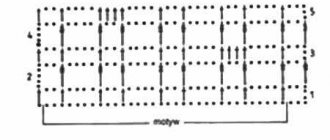
Drawing of a simple rocking chair
| Designation in the figure | Item name |
| 1 | Skids |
| 2 | Seat sides |
| 3 | Armrest supports |
| 4 | Armrests |
| 5 | Backrests |
| 6 | Insert |
| 7 | Back boards |
| 8 | Seat |
| 9 | Guide rails |
Option No. 2: folding
Folding chair made of wooden slats is easy to use
A wooden folding chair is ideal for a summer house, since before leaving it can be folded and hidden in the house or utility unit, and upon arrival it can be unfolded again and placed in the shade of trees or on the veranda. Their design, despite the presence of a folding mechanism, is very simple:
Folding wooden chair in detail
| Designation in the figure | Item name |
| 1, 2 | Legs |
| 3 | Supporting wooden blocks |
| 4 | Transverse ligaments |
| 5, 6, 7, 8, 9, 10 | Seat slats |
| 11 | Back |
| 12 | Transverse ligaments |
This wooden garden chair is also convenient to take with you on a picnic or fishing. In addition, it is inexpensive and easy to assemble on your own.
Garden folding furniture items
Option #3: throne
A throne chair made of wood is a sign of solidity and prosperity
These specimens are overwhelming in their grandeur and, of course, are not cheap, since their production requires a lot of high-grade wood. Thanks to the ease of processing, the craftsman sometimes manages to achieve amazing results by decorating all structural elements with painted carvings on a wooden surface.
Carved fragments turn the chair into a real throne
But it should be borne in mind that such a product will have decent dimensions and heavy weight. So it’s better to immediately find a suitable place for it in your home.
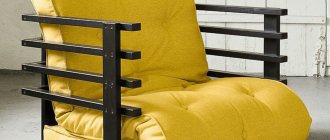
Option No. 4: with a wooden frame
Armchair with wooden frame and upholstery
These representatives of home furniture can be found in almost every home, although their design may differ radically. The bottom line is that a frame is created from wood, which is then finished with soft pillows and sheathed with dense fabric material. Thus, our back and buttocks are in contact not with hard boards, but with a soft surface.
Particularly interesting in this vein are models such as chair-beds. This design is a regular chair when assembled, and when disassembled it is a single comfortable sleeping place, which provides significant savings in usable space.
With a slight movement we turn it into a single bed
It is also worth understanding that in addition to the four options given, there are a large number of design models that are distinguished by their special originality.
Unusual design of garden furniture
How to make a designer wooden chair for your garden with your own hands
Make yourself comfortable. On a cult chair. And contemplate the beauty of nature. The Adirondack chair is a symbol of luxurious and comfortable country life. You don't even have to buy it - now you can make this wooden chair for your garden and home with your own hands!
Furniture as a cult: the legendary Adirondack chair
Sitting on an Adirondack chair, American fishermen slowly fish from the Hudson River, sitting on it, drinking cool cocktails in Haiti, businessmen tired of the hustle and bustle, European aristocrats reclining in this chair, enjoying the sunset on the Cote d'Azur.
Today, this comfortable chair is used all over the world, but only those who know its history stroke the wood of its wide armrests with special trepidation and admire its thoughtful design.
One day back in 1903, a certain Thomas Lee went on vacation to a beautiful place in the Adirondack Mountains in New York State. While enjoying life in a summer house surrounded by nature, he one day realized that what he needed was a comfortable chair. So that you can take it to the river or just sit near the house. So that there is somewhere to put a cup of coffee or a glass, so that you can sit in it with a pillow more comfortably and for a long time. And he made himself such a chair. from 11 rough boards found in a barn.
When his friend, a local carpenter, saw this simple furniture, he appreciated it. And even in 1905, he quietly received a patent and put the chair into production, and for the next 20 years he sold comfortable dark brown and green chairs throughout the country. Gradually, the Adirondack began to be copied all over the world.
Jokes aside, interior designers today continue to admire this chair. Reinterpreted designer models of the same “Adirondack” from Gino Levi-Montalcini, Gerrit Rietveld and many other designers are known.
Today we will try to make an Adirondack chair with our own hands!
To make a designer chair for a summer house, you will need
Prepare materials and tools:
boards 6 meters: thickness 25 mm, width 14 or 15 cm - 2-3 pcs; wood screws 40 mm - packaging; wood screws 70 mm (for perpendicular connection of boards) - packaging; drill; drill ∅ 3 mm; screwdriver ;carpentry clamps (preferably); square; tape measure; meter ruler.
It’s great if you have a jigsaw, a circular saw and an electric plane at home, but if you rarely do carpentry work, just order a cut from a workshop (often such workshops operate at construction supermarkets).
As for the boards, everything is very conditional: you can make everything from the same ones, or you can take a board 1.5-2 cm thick for the back and seat, but for the legs and lower crossbars you can take boards up to 7 cm thick. You can generally take boards from old pallets.
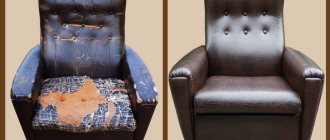
how to make a throne with your own hands from a chair
So, 4.5 months, I can’t even believe how time flies, I don’t understand how I lived without Vasenka before, etc...Blah blah blah. In general, every mother should feel the same)) And now according to the available facts)))
We had an incredible leap in development right at the turn of 3 and 4 months. The little one started to amaze me every day with new skills, and she won’t stop. Before I even had time to gasp, I had in my arms not just a baby doll, but an absolutely conscious little man. Total at the moment:
1. Turn from stomach to back on both sides
2. Turn from back to stomach only from the right side for now
3. We try to crawl, but we stall. The legs are on their knees, the butt is in the air, the forward movements of the legs are correct, but ineffective, since it has not yet occurred to us to use our hands...)) Therefore, we can crawl a maximum of a meter, furrowing the bed with our nose
4. We still eat boobs, about once every 2-3 hours.
5. I started actively playing with toys - no matter what you give, everything is enough, and even if you don’t give it, she will still see it, reach out and grab it.
6. She has become a master at playing while lying on her stomach; she also manages to move toys from hand to hand in this position.
7. Only soft toys are pulled into the mouth. Teethers and rattles are not for us. I guess I was too hasty with my teeth, since it’s obvious that nothing is itching and there is only a plush mane of a lion in my mouth))
8. But there’s a river of drool. All the clothes on top are covered in streams of saliva... and Vasya is also wildly delighted by everything that is in one way or another connected with drooling, no matter whether it’s his own or someone else’s. Often it drives somewhere, judging by the sounds on the ZIL, drool bubbles like a mad dog, splashes in all directions.
9. We chat all the time, the sounds are very different. Yesterday she shocked me by accidentally answering one of my questions clearly: “Yes”..)) I already jumped)) it’s a pity that it was just one time and by accident))
10. Problems with night sleep began ((I used to sleep for 11-12 hours in a row with 3-4 feedings. Now after going to bed she wakes up crying (!!!) and so on every hour. I call it “I want with mom” - because As soon as we pick him up, he immediately falls back to sleep. Closer to midnight, he falls asleep soundly, and we have about 5 more night feedings.
11. We have a good walk, put him in the stroller and he immediately falls asleep.
12. Constantly hee-hee, ha-ha, making eyes at everyone, sympathetically listening to all adult conversations, forgetting even about our most pressing children's affairs... in general, a full-fledged member of the family
13. I noticed a cat. He looks at her slyly. The cat also seems to have sensed that she’s about to get fucked))
14. Yesterday our mums era May-sling arrived in Moscow!!! Beautiful and comfortable!!))
15. Allergies!!! Pfft, I'm shocked! Arms, legs and sides are like scissors. Definitely not food-related - I’ve never followed a diet and, for that matter, I haven’t eaten anything new. I blame it all on the wet wipes from Okey, the devil made me buy them. I threw it out today, we're waiting..
16. I’m waiting for the “legs in the air,” while there’s silence, just playing with them. It’s immediately obvious that she’s a decent girl and doesn’t put anything in her mouth..)
17. I almost had a fight with my husband over a high chair. He offers me all sorts of plastic thrones on the kitchen floor, from which you can even launch into space... and he craps on a cool chair from Phill&Teds, saying that 11,000 for a chair is stupidly expensive... and what will I do if there are no more nice chairs (( Apparently I have to to win back a chair, I’ve won back a stroller... And if anyone knows, please recommend a chair that’s beautiful, but more affordable, otherwise we’ll definitely end up in a fight ((
18. And it looks like I want a babywearing jacket and that damned giraffe Sophie. Victim of marketing((
19. And one more misfortune - hair. My hair. Everywhere. In the sink, in bed, in a diaper and in dinner, everywhere!!!!((((It seems like there are more of them around the apartment than on your head(
20. And I want to end on a positive note - we sleep during the day, and not only in the arms of an adult bed, but in our own crib)) (Always now only on our stomach)
We love everyone, we kiss everyone!!!)))
Where is a throne made from a chair useful?
This throne will be ideal for unusual photo shoots using appropriate royal accessories. It will also look beautiful at any festive event. You can make, for example, a throne for Father Frost or the Snow Queen. It should be decorated with snowflakes cut from thick white and blue cardboard, as well as using cotton wool and foam plastic.
The throne is indispensable for various theatrical events, holidays, masquerades, concerts and matinees in kindergarten. In general, it can be used at any cultural event.
ATTENTION! It is also often done to diversify the interior of an apartment. If the existing furnishings are quite boring, then you can refresh it by decorating ordinary furniture.
We select materials and tools
Depending on how you are going to decorate the chair, the appropriate materials are selected. Among the main range of materials, the following are distinguished:
- PVA glue or instant glue;
- brushes;
- acrylic paints;
- acrylic lacquer;
- self-tapping screws;
- sandpaper;
- stencils;
- shiny multi-colored foil;
- cardboard and self-adhesive paper.
The flight of fancy in making a throne chair can be limitless. You can create a design object that is completely unlike anything else. The main thing, of course, is not to overdo it with the choice of colors and decorations.
Step-by-step instructions for manufacturing
The manufacture of the throne will depend on where it will be used. You can consider the manufacturing process of the most common product for New Year's celebrations. For decoration you will need white wallpaper, fabric or cardboard, a ruler, a regular pencil, scissors, glue, foil (metallic or blue), and tinsel. You can also add ready-made New Year's rain to the decorations. The work process itself will not take much time:
- We take thick cardboard, measure the corners and cut them.
- Next, we assemble the “pattern” of the product.
- On the top side of the “pattern” we cut out the corners. The corners will resemble pointed ice floes, as in the fairy tale about the Snow Queen.
- Additionally, you can cut out patterns inside the top of the “pattern”.
- We glue all the pieces of cardboard together and put them on the chair.
- Next, we decorate the back using white wallpaper, cutting out the patterns prepared in advance.
- We glue the back of the product with tape to the chair.
- We decorate the product with tinsel, rain or colored paper. Additionally, you can glue snowflakes or sparkles.
REFERENCE! Glitter paints or acrylics also work well to decorate the back of the throne.
You can also consider another decoration option, a more complex one. It will take about three days to make it, but the result itself will exceed all expectations if you do everything according to the instructions. In this example, we use a regular wooden chair without upholstery. Follow the following sequence of actions:
- We sand the chair with medium-hard sandpaper.
- Fill the holes from the screws if they are visible.
- Prime the surface of the furniture. For simplicity, you can use a diluted solution of PVA glue.
- When the solution has dried, cover the chair with dark brown enamel.
- After the enamel has dried, rub it with wax.
- Next, we cover the surface with two more layers of white enamel.
- We decorate the chair using stencils. You can, for example, use roses or any other flowers. The paint color can also be chosen to suit every taste. Absolutely any color looks beautiful on a white background.
- The final touch is to varnish the chair. Now it looks like a real throne.
We hope that this article will be useful for creating new interior solutions. After all, with the help of the simplest and most inexpensive materials and tools, you can revive any furniture. Even an ordinary chair can easily turn into a throne.
Claim the title of ruler of the Seven Kingdoms with your own homemade Iron Throne? Or maybe your friend or work colleague is a true fan of this legendary series?
Made entirely from cardboard, the Iron Throne is extremely lightweight and easily attaches to the front or back of any office chair. With his rusty iron spikes and steel swords (Valyrian steel, of course), he will transform a simple seat into an ominous throne fit for the Mother of Dragons or the King in the North. Whether they have a following or not, we guarantee that all your co-workers will take a knee or at least stop by your desk for a photo shoot.
Materials needed: hot glue gun, cardboard, knife, rubber band, black spray paint, silver and copper paint, brush.
Step 1
Measure the height and width of the back of the chair you are going to turn into a throne. Cut a piece of cardboard approximately the same size.
Step 2
Use a utility knife to cut the cardboard. Make slits and thread a long piece of elastic rope through the finished slits.
This is what you will use to tie the throne to your chair. You can use regular rope, but a wide elastic band will do a much better job - it will allow you to more securely attach the throne to your chair and prevent it from slipping throughout the day.
Step 3
Use a ruler to measure and mark long strips of cardboard, then cut them with a knife or scissors. In the end, we will need 24 stripes to make the throne (17 for the spikes and seven for the swords).
Step 4
Cut the tip of each strip into a pointed spike.
Step 5
Place the spikes on top of the piece of cardboard you cut for the back of the chair, fanning them out so they cover most of it. Reserve seven or eight spikes to make swords later. Once you're happy with the placement, hot glue them in place. Trim off any excess length if the tenons extend beyond the bottom of the cardboard.
Step 6
Draw and cut out cardboard sword handles. For variety and visual interest, we made some handles round and some diamond-shaped.
Step 7
Glue the handles to make swords.
Step 8
Place the swords on top of the spikes, positioning them so that the hilts are at the top in the spaces between the spikes. This will allow them to stand out even more. Glue them with hot glue.
Step 9
Paint the entire throne with black spray paint.
Step 10
Once the paint is completely dry, lightly coat the swords with silver paint. Just apply enough paint to them so they stand out against the black iron spikes.
Step 11
To create the illusion of rust, apply copper paint to the swords with a brush. This will give the throne a nice antique look.
Now your throne is complete and you are ready to rule. The winter is coming!