Installing a banquette is one of the most optimal ways to decorate a hallway. This multifunctional piece of furniture will replace several items at once, compactly fitting into a small room or decorating a spacious hall. The modern market offers an unimaginable variety of options for poufs, benches with shoe dryers, drawers, shelves and niches for storing small items, constructed from a variety of materials. However, it is not always possible to choose an option that fits perfectly in style and under the allocated dimensions. In this case, the best solution would be to make a banquette for the hallway with your own hands, which will not only harmoniously combine with other items, but also combine all your tastes and preferences.
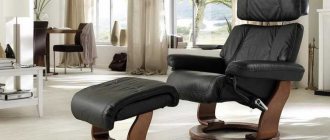
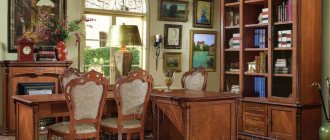
Banquette in the hallway.
The benefits of a DIY banquette
This popular piece of furniture is easy to make at home, even for a person who does not have extensive experience in carpentry. The accessory is based on a bench, which is subsequently complemented by a soft seat and decorated with curls, fittings and other details.
The main advantages of such an independent product will be:
- Saved family budget - by buying or selecting materials and doing the work yourself, you save a significant amount from what is available in the store for a similar product;
- You can be confident in the quality of the designed banquette;
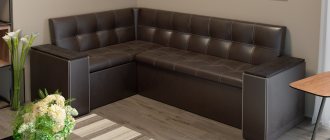
We make a banquette with our own hands. High quality and beautiful. - You can choose the color, size and design to your liking, making an item that is unlike factory goods;
- The bench or pouf will be exclusive handmade products;
Original handmade pouf. - To simplify and reduce the cost of the process, stools, coffee tables, and chairs that are no longer needed or have an attractive appearance are used, which will become the basis of your banquette.
And besides, the creator will be proud of his invention, receiving a dose of positive emotions every day.
Stage two: cut the foam rubber
It is necessary to cut out parts from foam rubber that correspond to the size and shape of the bench cover. The foam part may be slightly larger in size than the wooden lid of the banquette, but it cannot be made smaller, because sitting on the furniture will not be entirely comfortable due to the uncovered hard edge.
You need to do the following:
- measure the wooden lid of the banquette;
- mark the foam rubber with a marker or felt-tip pen in accordance with the size of the lid;
- cut out parts from foam rubber along the marking lines.
Cutting foam rubber is not as simple a task as it seems at first glance. The material must be held, and the blade of the breadboard knife must be positioned strictly perpendicular. Of course, the length of the blade must match the thickness of the sheet of foam used. Heating the knife blade facilitates the process of cutting foam rubber, but at the same time causes melting of the material. Therefore, it is not worth making the cutting process easier by heating the blade.
From athletes to Hollywood stars: men Naomi Campbell
Sometimes we wear a bra incorrectly: ways that are harmful to health
The star of the series “Sultan of My Heart” spoke about the choice of his future wife
Required Tools
To implement your idea you need to have:
- Hammer, building level, screwdrivers;
- Screwdriver and drill, as well as a jigsaw;
- To process a wooden surface you will need sandpaper;
- Stapler for mounting fabric elements;
- Sewing kit, decorative accessories.
Just in case, prepare stain or paint materials.
Necessary tools for work.
Necessary materials
Their list depends on the condition of the banquette. If there are cracks, dents and chips on its wooden parts, you need to purchase wood putty and special wax.
If all parts of the bench are intact, but the varnish on them is cracked, and the fabric of the soft seat has faded, you will need the following materials:
- sandpaper of various fractions (fine, medium and coarse);
- paint or stain;
- varnish;
- a piece of fabric;
- foam rubber for furniture;
- a small piece of felt;
- wood glue;
- cant.
It is better to take acrylic paint, as it is convenient to use, easy to apply, affordable and does not pose a health hazard. It is advisable to buy acrylic or oil-based polyurethane varnish. The first one has virtually no odor. The second dries very quickly, after which the surface can be sanded to a shine.
A carpenter “turned” an ordinary block of wood into a folding stool without a single nail (video)
The cat is lost. Looking out the window, the man saw a scene that made him laugh
Walking is the basis of mental health and clothing is not the least important
The edging is a thin ribbon sewn along the contour of the bench. You need to measure the perimeter of the seat and add 4-5 cm to the result (just in case). This way you will know what length of piping you will need.
Also, for work you need to have threads on hand to carefully sew the ends of the edging. You may need screws or screws if the old ones cannot be reused.
Decoration
The main thing in creating decor is that the end result is in harmony with the overall picture in the hallway, is not sticky or easily soiled and is made of practical material.
A model with a soft seat can always be updated, further decorated or remodeled, thereby making the bench practically new, with a “fresh” interesting appearance.
For example, frame a model without a wall or armrests with a chic cover with frills. They will make a piece of furniture delicate and unusual. Attach a burlap bow or a stylish decorative ribbon at the seams and joints.
Knit the cover with your own hands - then your furniture accessory will become completely original.
Knit the cover yourself.
If the hallway is made in country or Provence style, age the legs and wooden ends, create the effect of peeling paint or scuffs using silver or bronze stains
Aged banquette.
There is a huge variety of options for how to decorate a banquette; everything is limited only by your imagination. However, if it is not there, use online resources. There you can always find interesting solutions.
Painting
It is not very difficult to do this work with your own hands. You need to turn the bench upside down and carefully cover it with paint. It is better to work with a brush.
Many people prefer to cover furniture with stain. This product gives it a noble and sophisticated look, and also protects it from mold, mildew and bugs. Before use, the stain should be prepared according to the instructions. You can work with either a brush or a foam sponge.
When the paint or stain is completely dry, the bench needs to be varnished. It is advisable to buy this product in an aerosol can. Then the layer will be more even and thin. But you can also work with a brush.
You can add ham, but I make do with zucchini and smoked cheese: a simple recipe
Angelina Jolie explained why helping refugees is so important to her
Throwing trash: IKEA employees talk about what not to do in the chain's stores
If you use aerosol varnish, you should cover surfaces where the product may get on (floors, walls, etc.) with newspapers or unnecessary rags. The can should be kept at a distance of approximately 25 cm from the work surface. You should work carefully but quickly so that the varnish covers the wood with an even and thin layer.
Unusual ideas
Creative and talented people have long been using old, worn-out furniture that has become irrelevant, out of fashion or has completely fallen into disrepair to create furniture accessories. Therefore, having a developed imagination, it is not necessary to design an interior item from scratch. It is enough to use a ready-made solution, restoring it and adding some notes to it that emphasize modern style and design. So, you can use an old, unnecessary wooden box as a banquette, modifying it a little. Remove all unnecessary components (hinges, rivets, locks, etc.), sand, prime, apply varnish or a layer of paint, cover the lid with leather or decorative fabric, placing foam rubber to size. You can also decorate it with decorative elements: inserts, drawings, bows. Old chairs connected by bars, old elements of bedside tables, wire products, etc. look original as a banquette. The main thing is that all your fantasies fit into the overall interior.
Making a banquette with your own hands is not difficult. Use materials you have on hand or repurpose an old bench or coffee table. Follow the detailed instructions and carefully consider the decor that will complement the already created style in your hallway. Take careful measurements to ensure the banquette fits perfectly into the room. Be creative when it comes to decorating, and then you will have a real masterpiece that will greet and welcome guests and become a practical and indispensable part of the hall.
Stage three: cut the fabric
There are a lot of options for cutting fabric for sewing a cover. You can make a paper template and cut according to it. However, since the bench seat has a rectangular shape and the sealing material is not fixed to it, you can do it easier and do without creating a pattern.
You need to do the following:
- fold the fabric in half, wrong side up;
- fasten the fabric with tailor's pins in such a way as to completely prevent movement of the material;
- place a foam pillow on the fabric;
- outline it with tailor's chalk or marker, pencil;
- remove the foam cushion;
- trace the applied contour at a distance of a couple of centimeters, this is necessary for seam allowance;
- cut out a rectangle drawn on it from the fabric.
As a result of these actions, you will have two main parts of the case on your hands - the upper and the lower.
The next step is to cut out the strips to cover the ends of the pillow.
You need to cut out:
- a long strip - for the front end of the foam cushion;
- a couple of short strips - to cover the side ends;
- two long narrow strips - for the rear end of the foam cushion.
The dimensions of the strips must correspond to the length, width and thickness of the foam rubber, plus seam allowances. The back stripes are cut taking into account the seam allowance on one edge and the double hem allowance on the other. Of course, a hem requires more fabric than a seam allowance.
Paralympian Talay without arms and legs: “the harder the fight, the greater the victory”
The newlyweds traveled all over the world and took wedding photos in every country
Smooth armpits without shaving: ways to remove hair using conventional products
Photo gallery: DIY banquettes for the hallway
Expert Yulia Kovtunova (Author, content manager) Work experience: 3 years, since 2020.
Banquette: the story of transformation from an old cabinet into a new interior element
In the beginning there was... cabinet.
So old and scary with two doors, but it was too expensive to save it, since it was too damaged.
So I took off the whole top and left only these legs 
Watch the video and below is the process.
The base had grease stains, old peeling varnish and all that, so I lightly sanded it.
And, attention! I wiped it with vodka, because I really didn’t like greasy stains for some unknown reason, and in the future they could come to the surface.
Not with a solvent, not with a degreaser, but with vodka!
This is the safest and easiest option. Since the substances contained in degreasers can react with paints. And there are surprises.
I am telling you something that may sound unprofessional, but has been gained through experience.
The next step was to sculpt the overlays from self-hardening DAS plastic. I like the red and white pack for its plasticity.
Then I started thinking about color combinations.
I realized that I wanted a white bottom. But! With such dirty old furniture and a light finish color, there is a danger that the old impregnation-varnishes may come out and you will see them on the surface...
Therefore, I primed the entire base with white OTEX primer from Tikkuril.
Attention! This soil is terribly smelly! You can't use it at home. I painted it outside in two layers, letting each layer dry naturally.
Next step: I glued the already dried overlays with Moment Crystal glue.
Let's paint.
I chose the color “Baked Milk”. I wanted to imitate the old paint job and technique is very important here! Paint with a natural brush. We take a lot of paint and make short strokes in different directions so that the brush marks are clearly visible (I show this in the video).
Dry with a hairdryer.
Making the second layer. Again, a lot of paint and make short strokes in different directions so that the deep marks from the brush are clearly visible.
And dry it with a heat hairdryer.
Due to aggressive influence, the paint begins to crack a la craquel.
Just don't overheat! Otherwise there will be bubbles...
We cover the entire painted bench with honey wax. Covered and wiped with a lint-free cloth. And immediately cover the chocolate or coffee with wax; I needed Coffee for the shade.
We spread it lightly and do not rub it in with a cloth, but go lightly over the tops, as if removing excess, then the wax remains in the recesses. This is exactly what we need.
Now that you have read this test carefully, watch the video from my profile again, but with the knowledge you have gained and everything will become clear to you
About the fabric.
The shade didn't suit me. Therefore, I mixed Iceland color in a bucket with a small amount of water, did not stir thoroughly and therefore there were several small lumps left, which later gave me stains on the fabric, I needed them. Because stylistically I wanted the top to be interesting too, but not to overload it.
Soaked the fabric in the solution. I think about 2-3 hours. When I liked the coloring result, I took it out, squeezed it out and dried it. Didn't rinse!
After drying, I ironed it very carefully! This sets the paint. I don't recommend fixing it with vinegar. It absorbs into natural fabrics and reacts with them, this is a professional tip.
Attention! Complete development of any paint takes 1 month. Therefore, you should not rub the pouf with a damp cloth until this time.
Let me clarify once again that these are just my experiments. But it can withstand gentle hand washing at 30 degrees.
This was my first experience with fitting. Not super successful yet. It's really difficult.
I cut the base to the size of the banquette, and on top there was the required size of paralon. And she covered it with her fabric.
I watched several videos on YouTube, since this is not my field of activity. Not mine yet
See you!
Making a banquette yourself
Making a banquette for the hallway with your own hands consists of several steps. Each of the stages is quite simple, but they all require care and accuracy.
Required materials and tools
Banquettes with wrought iron frames and forging will require certain skills and professionalism. In this article we will look at the possibility of making a wooden bench with your own hands.
Necessary materials:
The upholstery consists of a cover and a filler. The filler is usually foam rubber. It holds its shape well. If you want to make the seat softer, you can take padding polyester.
For manufacturing you will also need the following tools:
Preparatory stage
Before you start making a bench, you should make a drawing. It is necessary to accurately determine the size of the room and the future product.
First you need to decide on the model. A bench with a back will be difficult to implement if you lack experience, so it is better to choose a simple, wooden model without a back. Next, based on the selected model, you need to calculate the dimensions of the remaining parts.
Advice ! If you are planning a lot of parts, then you should make a pattern, and only then start cutting the plywood.
The parts need to be cut out with a jigsaw and their edges treated with sandpaper.
Product assembly
You shouldn’t make all the necessary parts in one day, especially if this is your first experience making furniture. It may happen that you make a lot of mistakes and something will have to be redone.
First of all, you should make a seat and start from its size. Other parts are much easier to fit to the seat.
Then you need to make the legs. As mentioned above, you can take ready-made ones, but if you want to make new ones, especially for the bench, then you need to take the beams, process them using a hand cutter, and attach them to the seat with self-tapping screws. The workpiece must be coated with stain or paint.
Attention ! A hand cutter will make the legs more stylish and neat. This tool is simpler and cheaper than a milling machine. It will allow you to make the legs round or with non-standard protrusions.
If the future product will rest on the sidewalls, then in this case all the parts are prepared at once, cut out, polished, and then simply assembled together. You need to assemble it onto pins; for them, special holes are made at the ends of the workpieces.
After the work has been done, you can begin upholstery. The first day you need to cut out a piece of foam rubber of the required size. And then secure the foam rubber with glue and a construction stapler to the base. It is advisable to place burlap or any coarse material under the foam rubber.
Then from the selected fabric you need to cut out a piece of the required size with an allowance. After cutting, the fabric must be carefully tucked and secured with a construction stapler.