Features of choosing material for the cabinet
Even inside very small rooms there are niches that can be adapted for rational use - by placing a closet in them. The most common material for cabinets is wood.
- High environmental friendliness.
- Natural color.
- Light weight.
- Relatively low cost.
- Availability of purchase.
However, inside small rooms, a wooden product can look bulky. The simplest way to create a structure that is truly pleasing in appearance is to use lining as the initial material for cladding.
The advantages of its use are:
- Low price.
- Durability.
- Easy installation.
- Natural naturalness.
Most often used for making cabinets:
- Tree . This type of lining is in great demand; it looks more aesthetically pleasing than plastic.
- Plastic.
A cabinet made of wooden or plastic lining is quite easy to assemble.
Advice: When purchasing material, you should not rush to take the first panels that catch your eye. They need to be examined very carefully.
Wooden lining is manufactured in four classes:
- A.
- IN.
- WITH . Panels of this class undergo minimal processing before being sold to the consumer. They may have knots, very small cracks, and pits, which does not allow such lining to be used for interior decoration of a room or assembling a cabinet.
- "Extra".
Classes A, B and “Extra” have a more attractive appearance, but differ only in price.
Advice: When choosing a material for making a cabinet, you need to pay attention to these three classes, and purchase it based on your financial capabilities and preferences for the appearance of the assembled product.
The best materials for making lining are:
They have the lowest resin content.
Lining: class “A” and class “B”
The volume of purchased material must be calculated in advance, based on the design of the cabinet.
- The walls of the room can form the side walls for the cabinet. In this case, it is enough to buy material only for cladding the outer part, including the doors.
- If a lining product is clearly visible from all sides, you will need to purchase a larger volume of material.
Preparatory stage
If there is a niche in the open space of the balcony for building a cabinet, then the work will go much faster.
Before starting installation, you should consider several nuances:
- Availability of glazing. Protecting your outdoor space will help preserve the attractiveness and performance of wood storage structures longer.
- Repair. Arrangement of the storage area is the final stage of work, before which it is necessary to improve the entire area, including floors, wall panels, and ceilings. Replace the sheathing, insulate surfaces if necessary, eliminate cracks, and seal seams.
Preparing the space for the formation of storage areas will increase the service life of cabinets and reduce the risk of damage to stored items and products.
What tools will you need for the job?
To make a reliable and high-quality cabinet, you will need to purchase:
- Square beams made of wood 40x40 millimeters to create a frame.
- Profile corners for assembling frame elements.
- Small thickness boards or bars for making the base of cabinet doors.
- Lining panels.
- Chipboard sheets or regular boards for arranging shelves.
- Anchor bolts for fastening the frame in the room opening.
- Fittings: handles, door hinges.
- Wood screws for fixing elements.
- For installation of lining - clamps and nails.
- Screwdriver.
- Wood saw or electric jigsaw.
- Locksmith's hammer.
- A tape measure, three meters long.
- Building level.
It is better to choose pine as a material for beams - there are no knots or cracks in it. The bars must be clean and dry, which will prevent the material from premature rotting.
After purchasing all the components, you can start making the cabinet.
Required materials for a standard shelving
The work of assembling a rack begins with a drawing.
- To do this, precise measurements are taken of the place where the structure will be installed.
- A board for shelves is purchased with a thickness of at least 25 cm, its length is in the range of 90-150 cm. The shelf will be about 50 cm deep, the standard height is 55 cm.
Close attention is paid to the condition of the board: humidity should not exceed 12%. Preference is given to oak, pine or mahogany boards.
- Before assembly, everything is sawn to size and treated with special wood products.
- It is necessary to stock up on additional auxiliary parts: a sheet of plywood, possibly chipboard, shelf holders, metal or plastic corners, fixing elements, legs.
- Prepare tools for work: to screw in self-tapping screws, nails and a hammer, you will need an electric jigsaw, a grinding machine, the evenness of the surfaces is set by a level, a drill, it is convenient to work with a tape measure, but a ruler will not hurt.
- Last on the shopping list will be wood glue and wood varnish.
How to make a frame
Work order:
- The front and rear frame frames are assembled. For this:
- the beams are adjusted to the size of the room;
- connected by metal furniture corners using self-tapping screws.
- A sheet of chipboard is attached as a wall.
- The assembled structure is inserted into the opening and secured with anchor bolts.
- A selected number of shelves inside the product are mounted on the side surfaces perpendicular to the back wall.
- The updated design is attached to the walls of the room with the same bolts.
Cabinet frame assembly
- The horizontality of the installed bars for the shelves is controlled.
How the frame is sheathed with clapboards, surfaces are treated
When the rear and side walls of the cabinet are invisible, the cladding consists of making doors. Depending on the preferences of the owner of the premises, their size and quantity are selected.
The door assembly procedure is as follows:
- A thin board is sawn into pieces.
- The parts are assembled into a frame.
- An intermediate jumper bar is added diagonally, which increases the strength of the structure.
- The frame is placed on the floor, and the lining is fastened to it with clamps or nails.
Tip: For the door, you should use the thinnest possible lining to ensure its lightness.
- A platband is attached to the inside of the door, and a handle is attached to the outside.
- The door is hung on previously installed hinges.
Preparing to make a cabinet
Choose a basic model of a corner cabinet.
- The furniture is stationary, the frame is attached to the ceiling, floor and side surfaces; only the doors need to be made. This option greatly simplifies the work; you do not have to separately manufacture the frame and cover it with clapboard on all sides. The doors can be made hinged or sliding. These cabinets need to be made before upholstering the balcony; it is impossible to move them to another place.
- The furniture is mobile, a full-fledged corner cabinet is being manufactured
. It is more difficult to do, but the possibilities are greatly expanded; the cabinet can be installed not only in various corners of the balcony, but also used for interior spaces.
We will focus on the second universal option. For the work you will need a 50x50 mm block, lining, corners, screws and fittings. The tools you need to have are a hand-held power saw or jigsaw, a plane, a chisel, a wood chisel, a hammer, a screwdriver, a tape measure and a pencil.
How is the frame installed?
The lining cabinet should be mounted on a wooden frame. The frame is performed in the following sequence:
- First you need to assemble the front and rear frames, which involves connecting beams 1.5 and 1.8 m long; metal frames are used for this.
- You can lay plywood on the floor; it acts as the bottom of the cabinet. The beams can be connected without the use of corners; for this you need to use self-tapping screws, the length of which is 60-75 mm.
- The back wall of the cabinet, which is made of laminated chipboard, must be attached to the rear frame with self-tapping screws or a construction stapler.
- The rear frame with the wall is placed against the rear wall, then fixed with anchors; they must be level.
- Inside the cabinet, you need to install guides, on which the shelves should then be laid.
Preparing for work on the balcony: deciding on the type of structure and design
Before you begin the actual production and installation of lining furniture, you need to prepare. To do this, several key points need to be addressed.
- Decide on the type of structure. To make it easier, you need to create a plan for the future cabinet on a regular piece of paper. In the plan, indicate the dimensions of the structure, the number and type of shelves, the presence or absence of doors. To facilitate this process, you can look at the photos for examples of such furniture.
- Select material. Without proper experience, working with expensive wood or glass is not worth it. It is better to make it from cheap lining. However, there is one condition - such a cabinet can only be used in a glassed room. The material does not tolerate temperature changes. In addition, the lining is fragile, so you need to work with it carefully.
- Decide on a design. Lining is a universal material in terms of decoration (paste it with wallpaper, paint it or leave it as is).
Making a cabinet out of clapboard with your own hands is not at all difficult if you follow the step-by-step instructions.
Lining is a universal material in terms of decoration (paste it with wallpaper, paint it or leave it as is).
Start of production
Tools and materials:
Most balconies have a special niche into which you can build a cabinet, which greatly simplifies the process. But often you have to form the product out of the blue, which is much more difficult, although the result is more interesting (this option will be considered, since it includes both cases).
Diagram of a corner cabinet.
First you need to measure the area that the lining cabinet will occupy. It is advisable to take measurements at the maximum width (usually 90 cm). But the depth should be up to 60 cm, because otherwise it is very inconvenient to reach the end.
For the frame, a 50x50 mm block is used, which now needs to be sawn:
- vertical bars 190 cm - 4 pcs.;
- beams for forming a frame 80 cm - 14 pcs. 50 cm - 14 pcs.
The result is quite a large set. However, every last detail will be used. The frame in this case is not only the formation of external features, but also the basis for each future shelf based on a height of 30 cm (the height of a 3-liter jar is 23.6 cm + space for free movement of hands).
For doors, you can use a board or block. But since the balcony cabinet is made of lining, it will serve as a frame for the doors: 4 pcs. 189 cm each and 4 pcs. 45 cm each. Oblique cuts (45°) are made at the ends so that the future joint has maximum reliability.
We ensure the durability of the cabinet
As a rule, a cabinet on a balcony or loggia is installed in a niche specially designed for this purpose - as shown in the photo.
Wardrobe in a niche
Moreover, if we want the cabinet to last a long time, it is necessary to do something on the balcony itself before starting work:
- It makes sense to install a high-quality lining cabinet only on a glazed balcony . Otherwise, under the influence of precipitation, the tree will not “live” even a couple of seasons.
- Before installing the cabinet, you need to repair the floor of the balcony - especially where the bottom will be located.
- The absence of temperature changes can also significantly extend the life of the cabinet. To do this, we carefully putty all the cracks on the balcony, and then insulate it.
When this “required minimum” has been completed, you can begin making the cabinet itself. Instructions for making it, as well as some useful tips, are given in the next section.
Assembly and complete finishing
Tools and materials:
- beam;
- edged board;
- lining;
- roulette;
- screwdriver;
- jigsaw;
- galvanized hinges;
- screws;
- brush;
- varnish
Diagram of installation of fasteners and fastening of shelves for the cabinet.
Now you can assemble the structure yourself. It should be remembered that the entire system is supported by 4 bars. No more than 1 element touches the floor, so the workflow looks like this:
- The vertical beams are installed in their places, after which 4 beams are laid between them from below (short on the sides, long in front and behind). The lower bars are at a height of 1 cm above the floor. For fixation, 1 long screw is enough, under which narrow holes are initially drilled to avoid splitting. If you really want to strengthen the structure to the limit, you can use 2 screws per joint.
- The upper part of the skeleton is fixed in a similar way, after which the future cabinet takes on its shape (there is no need to indent from the top).
- When the box is formed, you can begin to strengthen it. After 30 cm from the bottom beam, you need to fix a similar perimeter, after which the whole procedure is repeated until the very top. The top shelf will be slightly larger than the others, so you can use it not only for cans, but also for massive accessories.
Now the skeleton of the future structure is completely ready, and it’s time to use an edged board or dense chipboard (chipboard). At the borders, installation is carried out using medium-length screws, and the method remains the same as described above (a small hole is drilled, followed by fixation). Each board has 1 screw on each side (solely to hold the location). But if you need to save on everything, then you can fix only the front and back boards, and the rest can be corrected during operation or screwed in after.
Methods of fastening the lining.
Only now is the time to assemble the doors (the structure is assembled with screws in the manner described above) and attach them to the resulting frame. Fixation is carried out on furniture door hinges made of galvanized steel, which will not remind of themselves even 20 years after installation. The design does not need to be made massive or complicated, because this will not give anything.
And now the time has come for sheathing with clapboard. The length of the lining is always identical (189 cm), since installation is carried out only from the front side. If you want to sheathe the entire structure in a circle, you will have to stock up on as much clapboard as possible, but even here the length will remain until the last moment.
The most inconvenient thing is the installation of 1 board, because there is nothing to catch on. It is leveled, after which self-tapping screws are cut into the tooth in 30 cm increments. You can screw them in without pre-drilling (although it is still advisable), but certainly into the supporting beam. On the reverse side, clamps are attached, which are also screwed to the beams, but only at 4 points (on the doors - and only at the top and bottom), since more is not required for reliability.
Each subsequent board is inserted with a tenon into the groove until it stops, after which a block is placed on the reverse side and hammered to the limit with gentle blows of a hammer. The final fixation on the clamps is always the same.
DIY clapboard cabinet on the balcony - detailed instructions
This page is based on the video below. This is for your convenience. If you don't want to read the text, watch the video. Note that everything did not fit in the video - the text describes the process in more detail.
We have at our disposal a balcony covered with clapboard. You need to put a cabinet at the end.
First of all, inspect the corners. Our angles are close to 90° - this is good. If you have one of the corners of a curve, then mark the façade part based on the flat side. If both corners are crooked, then mark them so that everything appears even to the eye.
Take a tape measure and mark the depth of the cabinet along one of the walls. Then, look for the corresponding size on another wall. We take a laser level, first place it on one mark, then turn around and place it on another mark. At this time we put down the touches.
Thus, we mark the front of the cabinet using a laser level.
We sew the strip along the resulting points. You can read about what kind of rail we use here.
In our case, we need to make a wall on the left side of the cabinet. Therefore, the frame has a complex shape.
Strictly using the laser level, we raise the additional wall, starting from the mark on the floor.
If the rail is loose at the joint, it should be secured with an additional screw. It must be rotated at 45°, and the cap must be recessed.
It is important to correctly position the frame. A smooth frame will save you from many problems.
The frame of the front part and the additional wall should look like this.
Then we cut the lining and sew up the side wall. At this moment, it is important that the ends of the lining do not protrude beyond the plane of the cabinet.
Then you should mark the shelves. When marking, it is convenient to use a laser level. Of course, you can use the regular one, it's just a matter of speed.
Several slats have already been put on, the top shelf and vertical edge are emerging.
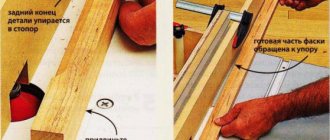
To make the process easier, we use a universal miter saw. But you can do it with a regular jigsaw. The cut from the saw is better and smoother.
To ensure there are fewer holes inside the cabinet, the lining should be cut as tightly as possible.
We have made the frame, prepared the dies and are starting to raise the vertical rib.
In this case, the pattern takes the most time. Cutting and screwing the lining takes much less time.
After the rib is ready, we begin to assemble the top shelf.
The shelf has the shape of a trapezoid. In order to speed up, we cut the lining a little longer than the required length. Then, with a pencil, mark the required size in place. At this time, the lining is not yet screwed on.
Then, remove the lining and cut each strip at the mark. Put it back in its place.
This allows you to quickly and, most importantly, accurately trim the sticks.
We figured out the edge and the top shelf. We need to make a frame for the remaining shelves. The frame can be made in different ways. But I advise you to choose the simplest, yet reliable one.
Each rail should be set as level as possible. This saves a lot of time. Although many people think differently :)
The remaining shelves are made in the same way. In the video, we skip this moment.
The next step is to make the insert. Inserts come in different types and designs. Here we sew on a clapboard insert.
We put the laser level on the edge, mark each die separately and screw it on the back side. This is the picture we get.
Excess parts should be cut off. Let's do it locally.
The end parts of the lining should be covered. I advise you to do this either with corners or wooden planks.
On top, we also make an insert. The top insert is rarely needed. In our case, it is needed to lower the doors. There will be a vine hanging on the ceiling. The doors should open under the hanger.
Here we placed a laser level on the edge of the right façade batten. Looking at the level, we see that the wall of the balcony has collapsed greatly. This is scary, but not for our design.
We will make overlay doors, and all the irregularities will be covered.
Using a butt cutter we cut a series of short dies. They all have the same length. May differ by no more than 0.5 mm.
How to calculate door sizes is a separate topic. If you're interested, I'll make a video about it.
The lining is cut, it's time to assemble the doors. This should be done on a flat, wide surface.
We connect the dies and lay them face down. We align the edge of the dies with a surface, for example, a building level.
Then, on top of the lining we lay pre-cut slats to size. We press and screw along the edges of the slats to the lining.
Then, we screw each lining separately. For this purpose, special screws are needed. Which ones you can see on our website.
We repeat this operation on the other side of the door.
If everything is done correctly, the screws will not stick out from the front side.
The next step will be cutting and installing the end rails. They perform a decorative role.
As a rule, part of the lining sticks out beyond the edge of the slats. It needs to be cut in place with a jigsaw.
Then, we will cut decorative corners. At the corners they should be 45°. This is the only task for those who do not have a miter saw. You can solve it with a jigsaw.
The decorative corner must have certain dimensions.
We nail the corners to the rail, which is the frame for the door.
The appearance of the product depends on how carefully the corners are cut.
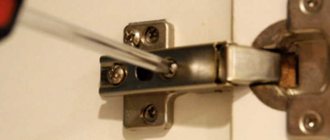
The doors are assembled, we decide on the place where the hinges will be installed. After this, you need to select grooves in the corners. Screw the edge of the hinges into place of the groove.
Often, to install hinges, 2 slats along the facade are not enough. To secure the hinges, you have to cut out small pieces and screw them into the right place.
Almost everything is ready, all that remains is to hang the sashes. To do this, we install the level in the right place. We place adjusting shims under the door and begin to screw it to the frame. Do not screw the door onto all the screws at once. After hanging the first door, you need to do the same with the second.
Let's try to close them. At this moment all the gaps and other jambs come out. To remove them, you should further adjust the doors. The adjustment process is lengthy. You have to remove and hang the door 2 - 4 times. The more doors there are in one cabinet, the more complex the adjustment process.
In our case, the left one hangs slightly lower than the right one. Accordingly, you need to raise it.
As we can see, everything worked out, the risks on the doors coincided. We recommend leaving a gap between the doors of 10 - 12mm. This allows you to open any door without errors.
The gap can be closed with a strip of suitable width.
After the doors are ready, handles should be installed. We will install wooden roundels.
It's good when the sashes are fixed in place. Magnets are not suitable for this purpose; bolts are inconvenient. We recommend roller latches.
Latches should be installed at the top and bottom. There are 2 latches per door.
After everything is adjusted, you should fix the doors in the desired position. To do this, we install jibs.
And here is the finished product.