Sometimes affordable interior ideas become boring and monotonous, especially when it comes to budget options. Lining in the kitchen is one of the original, clear and unconventional ways to decorate a room. But you should think through every little detail so as not to pay twice later.
Covering the walls in the kitchen with clapboard is an affordable and effective way of finishing.
Lining in a kitchen interior in a private house
Private sectors often include houses that are ideally suited to Scandinavian, Provence or country style; these are the most profitable themes for using clapboard cladding. She looks harmonious, stylish and appropriate in them, which cannot be said about many modern trends, such as hi-tech or loft, they must be combined carefully. This method is the optimal variation for introducing the material not only outside, but also as a kitchen design.
Its popularity is also explained by the environmental friendliness of the material and the ability to give an aesthetic appearance.
Kitchen apron made of clapboard
Bold decisions that suggest making a kitchen apron from clapboard look stylish, and installation is quite simple. But the peculiarities of the room and the proximity to the stove or sink makes you think about the need for protection from moisture, temperature, and fire (if it is wood). And these precautions exist:
- Primer to strengthen the fibers of the material.
- Application of moisture-resistant paint intended for interior repairs.
- Sometimes safety glass over the top is appropriate.
If this is not provided for, fumes, grease and splashes can ruin the surface, because it should be easy to care for. The risk of bloating also increases due to stagnant moisture.
Kitchen set made of lining
The headset will not be created entirely from it, but making a front panel from this material is an option. However, there are conditions under which a clapboard kitchen set will ensure long-lasting service and long-term preservation of its original appearance - careful preparation before installation and timely, sufficient care. Usually this does not take much time and does not cause any hassle, but it is necessary to take such points into account.
Lining is a general name for slatted materials, not only wooden, but plastic (PVC) and made from MDF fiberboard.
Advantages of using lining in apartment kitchen design
Previously, this material was used for cladding external walls and balconies and loggias of houses. Now the imagination and experiments of designers have made a discovery in the use of lining in the kitchen of an apartment, the same applies to private homes. It turned out that the environmentally friendly and aesthetically attractive material can be useful on different types of surfaces. It is used both on the ceiling and on the wall, as decoration.
The lining consists of thin boards, joined at the sides according to the tongue-and-groove principle, which are screwed to the base with self-tapping screws.
He also showed himself positively in the following moments:
- Long-lasting service provided correct and intended use.
- Easy to maintain, especially if the original product has been properly processed.
- Affordable price on the market.
- A large assortment regarding options for choosing color, size, material and quality.
- Wear resistance in unfavorable external environments.
- Novelty of the idea, courage of the decision.
Because of these advantages, this design method became popular quite soon, reaching glossy publications.
How to apply lining trim
After any repair, some of the finishing materials remain in any case. Should I throw them away? What if these are clapboard scraps? What can be done with this material, how to apply it, let's look further.
Scenery
Namely, a decorative decoration of the finish. You can make interesting solutions on the walls using leftover wood. For example, these can be decorative additions in the form of planks, baseboards, but the main thing is to join them correctly. You can also make simply interesting accents. For example, if there are a lot of scraps left, adjust them to one size (square if possible), paint them black and white, and decorate one of the areas of the room in the form of a chessboard in which such an element is most acceptable. You can also make other compositions from clapboard scraps by painting the wood in a variety of colors.
You can also decorate certain interior elements. A simple example is a flower pot. You can cut out planks, and they do not have to be the same size. Use glue to plant these planks on an ordinary, nondescript plastic pot. Thus, it will be a wonderful addition to the interior, especially if the flower pot is located in the same room as the clapboard wall decoration.
By and large, it’s enough to turn on your imagination and you can apply the remains in a variety of interpretations. For example, you can make tiny shelves from the leftovers, arranged in the form of a ladder or some set of individual steps. On these shelves you can place small figurines, flower pots and other pleasant interior little things that decorate life.
Another interesting move: you can make a large wall clock from the leftovers. To do this, you will need hands with a mechanism; they can be taken from any old quartz watch. Cut uniform sticks from the clapboard scraps. Conventionally, draw a circle of the required diameter on the wall. The mechanism with the hands is placed in the center, and then the dial is made. To do this, uniform strips are cut out and placed on glue or liquid nails, directly on the wall in the form of Roman numerals. In general, such clocks can suit any interior, since the panels can be painted, making the useful decor unique and interesting.
Now about the baseboards. Using scraps, if they are, of course, more than 10 cm, you can make a plinth. This could be an element of the floor, ceiling or middle of the wall, for example. At the same time, thanks to the composition of such an element, you can also make an unusual solution by painting the parts in different colors. Moreover, if we are talking about a good class lining, which matches each other as much as possible in width. And if there are scraps of eurolining, then even small planks can be laid perfectly thanks to a special lock.
But what if there are very few slats left, and you don’t really want to throw them away, but there is no use for them in the house? It’s okay, you can use them on the balcony, for example, using them as planks for organizing drying clothes. Especially if the entire balcony is lined with clapboard.
And in conclusion: in general, it is better not to throw away decorative elements that remain after finishing work. All you need to do is show a little imagination and it will be a good way to add some zest to your interior. Make it more fresh, organic, interesting.
Wood paneling in the kitchen interior
There is a fundamental difference between wooden panels and their plastic variations. The main difference is toxicity and environmental friendliness. Most types of plastic used are not suitable for indoor installation due to harmful fumes. That’s why wood is selected, and besides, it solves the issue of excessive visual simplicity and low budget of the interior.
Lining is successfully used for ceilings and walls, indoors and outdoors.
Often, lining in a kitchen interior looks more interesting if it is made of wood; preference is given to pine and alder. This solution brings a special, subtle aroma of forest and freshness into the room, which calms you down and allows you to recover faster. And allergy sufferers are usually not afraid to be in such a room; there will be no negative reaction from the body.
Increasingly, lining is chosen for finishing kitchens.
Furniture from lining: we do it together
In fact, the scope of application of lining is not limited to façade cladding alone. This material can be used quite successfully in many other areas.
How to make a box from clapboard?
Indeed, what’s so difficult about it is to take the bottom and a couple of sheets of lining. But you can build more interesting things.
For example, you can make excellent furniture from lining with your own hands:
- When constructing furniture, you must first assemble a wooden frame, which then needs to be covered with clapboard.
- Moreover, you can assemble absolutely any furniture from lining: from a kitchen cabinet to a country bench. Here you are limited only by your imagination and ingenuity.
With the help of lining you can not only beautifully cover your balcony, but also assemble a functional wardrobe. Making such crafts from clapboard with your own hands is much easier than it seems at first glance.
Functional wardrobe
Assembling a cabinet from lining is necessary on the basis of a wooden frame.
Collecting must be done in strict order:
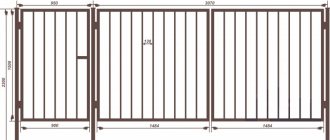
- First we assemble the rear and front frames. You need to assemble 18 and 1.8 meters and fasten them with metal corners.
- You can do without them, but then you will need screws at least sixty centimeters long.
- The floor or bottom can be constructed from a thick sheet of plywood or OSB board.
- From behind, using self-tapping screws or a construction stapler, we fasten the opposite wall. It can be made of laminated chipboard.
- Then we fasten the back frame and the back wall together using anchors. The main thing is not to forget and set everything according to levels. Otherwise, the cabinet will turn out a little crooked.
- After this, we attach 0.5 meter beams to the frame.
- We fix them with anchors.
- We attach the front frame to the ends of these beams.
- To give the entire structure more rigidity, we attach the front frame to the ceiling and floor with anchors.
- Inside we install guides on which the shelves will be installed.
If you plan to make a built-in wardrobe on the balcony, then instead of the walls of the back wall, ceiling and floor, the floor and walls of the balcony itself can serve perfectly.
It only makes sense to install such a cabinet on a glazed balcony. Otherwise, it will quickly deteriorate under the influence of weather changes in temperature and precipitation.
The video in this article will help you see what comes out of this.
Types of wood lining
The modern market offers a wide assortment, suggesting the choice of the option of finishing the kitchen with clapboard that is closest to your soul. There are its main varieties:
- width - we are talking about the distance between parallel joints;
- in thickness, strength;
- along the joints connecting the elements;
- by design;
- in terms of cost - the range is wide, but the top indicators often fall into the middle price categories among competing skins.
Sometimes “raw” material is purchased, the surface is processed using specialized equipment, painted, varnished and installed.
Lining and what it is
When talking about finishing a kitchen with clapboards, we mean the use of facing material in the form of narrow cladding slats that are connected to each other in a tongue-and-groove manner.
Initially, the material for making these strips was only wood, but manufacturers of building materials are increasingly using plastic, so now you can also buy them from PVC. Thus, the following materials are used for manufacturing:
- Natural wood;
- Plastic (obtained from polyvinyl chloride by extrusion);
- MDF (fibreboard obtained from wood processing industry waste).
As a rule, lining for finishing a modern kitchen is produced with a thickness of 7 to 14 mm and a width of about 10 - 12.5 cm. The length of the manufactured products reaches 3 meters (during installation it is cut into convenient segments).
Features of plastic lining
On the pages of magazines you can often find photos of a kitchen covered with wooden paneling in a private house or apartment. But sometimes plastic is not inferior in appearance and properties to the wooden version. Only the selection and creation of the interior should be in the hands of a professional. He will be able to play with this element and make it an accent or addition to the design.
Currently, the range of materials has expanded, decorative surfaces and various lining formats have appeared.
Note! Allergy sufferers often experience an exacerbation of the problem in a room with such cladding. It is worth buying carefully and thoughtfully, studying the composition.
Variety of types of lining
The lining is a set of long slats that are connected using special fasteners on the sides. It is screwed to the surface of walls and ceilings with self-tapping screws. The lining looks stylish in the interior of a country house or apartment.
To begin with, let's look at the main types of lining. It differs in the type of material and profile shape.
Classification of lining by type of material
There are two types of lining depending on the type of material used: wood and plastic. These materials have their advantages and disadvantages.
Wood lining is made on the basis of natural material. Wood has a pleasant aroma, it will create a natural microclimate in the room and give the interior an original look. Wood absorbs excess moisture if it has accumulated in the kitchen, or, conversely, “gives” it away in cases where the indoor climate becomes too dry. This effect creates the impression that the walls are “breathing”. In addition, finishing with natural materials is prestigious.
Do not forget that wooden finishing of walls and ceilings, like any other structure made of wood, requires more careful care than covering made of artificial materials. Under unfavorable conditions, it may become infected with fungus or insect pests. In this case, the source of infection must be immediately destroyed to avoid further spread.
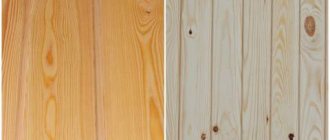
The wood of the following tree species is used for the manufacture of slats: beech, spruce, aspen, pine, ash, etc. In addition, depending on the quality of material processing, the product is assigned the following classes: “Extra”, A, B, C.
Finishing walls and ceilings with plastic profiles does not require careful maintenance. This material is synthetic, but at the same time environmentally friendly. It will also give the interior a pleasant look, but, unlike wood, it will not provide an appropriate microclimate.
Profile form
According to the profile shape, the lining is divided into the following types:
- eurolining;
- panel;
- calm;
- block house.
Eurolining consists of elements with deep groove joints, which provide better ventilation and removal of moisture from the room. The standard size of such lining is 50–600 cm in length, 1.3–1.9 cm in thickness, and 8–12 cm in width.
Panel is the simplest type of profile. It consists of elements in the form of a simple beam. The size of each element is up to 600 cm in length, up to 2.5 cm in thickness, and up to 15 cm in width. When using plastic as a material, this type of profile is used most often.
Calm is a profile shape that differs from other types in its perfectly smooth surface. Most often, the ceiling in the kitchen is finished with clapboard with just this profile.
Block house - profile shape in the form of semicircular boards. Using this type of material allows you to create the illusion of a log building.
Material selection
If the room that you plan to decorate with lining has a fairly aggressive environment, then it is better to purchase plastic material, since it is less susceptible to negative factors. Otherwise, it is recommended to choose a tree, as it helps create a favorable microclimate. But, in this case, you need to check with the store whether it has been treated with special agents against parasites and fungi.
For wall decoration, it is best to use eurolining or block house. But, if you are on a budget, then a panel will do. It is recommended to attach the Shtil profile lining to the ceiling.
Cladding in classic interior styles
Experienced designers introduce this material into different interior styles, among them the most common is classic. To do this, you only need to choose the design of the lamellas. Most would choose wood of high quality and processing, with a matte finish that complements all the elements from the classic direction. These are gilded elements, soft seating and warm colors - creating a special harmony inside the room, without unnecessary details.
A wide selection of high-quality paint allows you to give the material the necessary shade to optimally fit it into the interior.
Clapboard finishing in modern styles
Modern residents of megacities and small towns often want to make their home unique and inimitable. In such situations, experimental ways to diversify standard style trends are what save the day. If you try to combine lining and loft, then, at first glance, it seems impossible. But if you figure out what color of kitchen unit to go with the lining, then everything will fall into place. Usually the solution is a general matte style and a single color.
If the lining is made of natural wood, then its aroma gives a unique atmosphere to the room.
High-tech involves more glossy surfaces, so it is preferable to make lamellas in this format. They can organically decorate one of the walls or become an apron.
Wood material of the highest category has a high cost.
And in minimalism, you can play with the material in an interesting way if you make it an inspiring part of the room. White wood or high-quality white plastic without toxic fumes is suitable for this. This direction does not accept colors other than basic white, so owners will have to find the right shade and slats to create a single harmonious picture.
The kitchen, decorated with wooden paneling, is filled with a special atmosphere and indescribable comfort.
By the way: if you have doubts about the chosen material or its appropriateness, it is better to show the project to an interior designer and ask for his professional opinion.
How is lining installed in the kitchen?
Methods for attaching lining strips.
In fact, covering walls with clapboard is not that difficult. Moreover, it doesn’t matter at all what material you choose: plastic or wood. If you do everything correctly and efficiently, you will end up with a beautiful and durable kitchen space.
When installing the sheathing, you need to make sure that the plane is very level. Each beam at this stage must be checked for evenness using a level or plumb line. In order to level the plane, you will need pads and pegs that are placed under the sheathing strips. The plane may have an error not exceeding 0.5 cm.
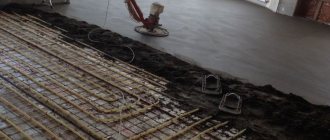
Finishing with clapboard should be done only after all work involving the presence of moisture (for example, with a concrete screed) has been completed.
Options for using lining in the interior
Experts identify several optimal ways to use this material in the interior of the kitchen.
- Apron. It requires careful processing and proper paint before installation, but it looks original.
- The bottom of the wall, about half or two-thirds of the way up. Mounted along the entire wall.
- On one wall, usually it is the least occupied.
- The ceiling looks especially impressive in a country-style room with a sloping or angular, uneven ceiling.
Walls can be sheathed both vertically and horizontally, depending on the interior.
Interesting! The material is sometimes placed not only in the usual vertical way, but also horizontally. This is an option to visually expand the room, giving it an original look.
Natural wood slats can completely cover a kitchen or dining room - from floor to ceiling - adding a rich accent.
Wooden kitchen trim
For a room that is large in area and height, you can use voluminous wood cladding materials - carved, coffered or stacked panels, large timber and a wide blockhouse. It is better to partially decorate a small kitchen with wood, placing the paneling in the dining area or finishing one of the walls with it.
Planed boards or parquet are used as flooring.
Wood kitchen decoration is used in both classic and light modern styles. It can emphasize antiquity and bulkiness, or gracefulness and elegance. Wooden elements on the walls and ceilings are in harmony with metal in the interior of a kitchen decorated in high-tech or modern style. And somewhat “aged” panels will fit perfectly into retro.
Wood is a universal and unique finishing material, which even in small quantities will take its rightful place in the kitchen.
Choosing lining for kitchen decoration
Before purchasing, it is very important to decide on:
- budget - for what maximum amount the owner is willing to buy the material;
- the width of the lamellas, sometimes they go one after another every three to four centimeters, often they are chosen a little wider or with a significant width;
- wood or plastic;
- Do you need additional coating, primer, or special paint? This is also included in the total check for the lining.
Country style is simply created for country houses, and the lining fits perfectly into the interior.
The main thing is that the purchase looks harmonious against the background of the kitchen interior and does not look alien. For a better fit, a special color or texture of paint often helps.
A kitchen in the Provence style has many advantages: it is appropriate both in a small apartment and in a huge country mansion.
So, lining in the kitchen is a good idea if it is installed and prepared correctly. This element can fit into different styles, but Provence, country and Scandinavian style suit it best. For modern design options, it is better to hire a professional designer who can make it an appropriate part of the interior.
Wooden lining fits harmoniously into such an interior.
Simple kitchen made of boards and plywood
It’s clearly not worth skimping on the kitchen, but new furniture does not mean that - alas!
- it doesn't get any cheaper. What remains? Of course, make kitchen furniture with your own hands. Fortunately, the Internet has all the necessary plans for this, including absolutely free ones. But, despite this, the home craftsman is often stopped by the need to make paneled doors for cabinets or their generally sophisticated design. And it’s not even a matter of experience and skill, but at least the availability of the necessary equipment.
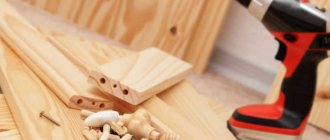
The kitchen presented in this master class was made in Alaska, far from civilization and the bustle of the city. The craftsmen were given the task of equipping the kitchen with furniture using edged boards and plywood. Yes, so that it all looks stylish, beautiful and neat. The cost of materials was only $400 - for residents of this state the amount is not particularly significant. In order to make kitchen furniture yourself at home, you will need:
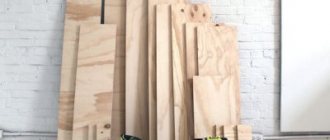
Materials:
- pine board for making the base of a furniture wall, as well as front panels of doors and drawers; — thick high quality pine plywood; — thinner plywood for making the back wall panel; — first-grade boards made of hard and dense wood, such as ash, maple or oak for making countertops; - a ready-made concrete countertop or components for its manufacture in case you do not want to use wood in this area; — paint of a suitable shade (not enamel!); - durable varnish for woodworking; — furniture fittings: handles for cabinets and drawers, as well as furniture hinges; - screws or self-tapping screws, nails; — metal-plastic guides for drawers; - glue for woodworking; — primer for wood if necessary; - metal connecting corners, if necessary; — for the manufacture of a concrete countertop: cement, water, fine river sand, dye, plasticizer or dishwashing detergent, varnish for stone and concrete.
Tools:
- circular saw or jigsaw; - miter saw if desired; - sander; - electric drill; - screwdriver; - carpenter's hammer; - fine-grain sandpaper; — paint brushes and a roller with a plastic tray; - construction tape and square; - pencil; — for the manufacture of a concrete countertop: plywood mold, trowel, construction mixer, construction packaging, grinding wheels for grinding concrete.
Step one: take measurements, draw up a diagram, detail the plan
Despite the fact that this master class gives all the dimensions and describes the design in detail, you still have to do some preparatory work.
First, take measurements of your own kitchen. Think about where the stove, refrigerator and sink will be located. Ideally, the most convenient option for you is when the stove is in one of the corners and the refrigerator is located in the other. In this case, your entire wall will be a solid structure, and this is always more convenient than making each cabinet separately.
Sketch out a diagram on paper using ready-made computer layouts from this master class, and indicate the overall dimensions. After this, carefully disassemble the entire structure into parts and determine the exact size of each of them. At first glance, the task is long and tedious, but it is not so. The wall consists of many similar parts, and such work will not take much time.
Please note that this kitchen wall was made almost entirely from plywood. Even the frame consists of sawn plywood strips. Only its base is assembled from natural boards. This is the fastest and most convenient way to make furniture at home. If you wish, you can replace plywood with natural wood when making front panels for cabinet doors and drawers.
Step two: determine the basic principles of the kitchen wall design.
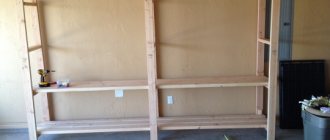
The highlight of the program was the common base of boards for the entire wall. You can see it in one of the photos below. This is an ordinary wooden frame designed to raise a furniture wall above the floor. The idea turned out to be successful for several reasons
: — you don’t need to calculate, mark and cut protrusions on the side parts of cabinets and partitions; — plywood walls are shorter, which is very useful for rational consumption of plywood sheets; — the lower part of the cabinet is solid and this adds very noticeable rigidity to the wall; - and finally, it's easier for you to build the frame, since the top section is simply attached to the base with screws.
In order for the kitchen wall to look complete and neat, the author planned a front frame frame, which when assembled looks like a single piece.
But the main feature was the author’s idea about the design of the cabinet doors. It became impossible to use a milling machine, so I had to come up with something simple, but no less impressive: paneled doors. This is how these easy-to-make doors that imitate drawers appeared.
Step three: assembling the kitchen wall
Transfer the dimensions of the parts to the material and cut the plywood and boards into blanks. Already at this stage, you can sand all the planes that, after assembly, will be inside the cabinets and drawers.
To connect the wall elements, the author used inclined pocket holes with screws, as well as wood glue. If you are sure that the back wall and sides of the structure will not be visible, pocket holes can be drilled from the outside.
Assemble a frame from the side walls, partitions and base for the table top. Also assemble the wooden base frame. and connect both parts using furniture screws and metal corners. Attach the façade plywood frame to the front of the wall.
Make drawers according to the dimensions of the upper cells. The drawers should be smaller and fit into the compartment with the clearance necessary to install metal-plastic guides for retractable systems.
Prepare the cabinet doors as well. To do this, connect the wide and narrow parts using plywood slats. All parts are placed with some clearance to simulate drawers. If you do not want the doors to have gaps, place thin plywood or fiberboard between the facade parts and the slats. You can also fill the cracks on the back side with caulk or wood filler and then sand the surface.
Mount metal-plastic guides for drawers in the upper cells using self-tapping screws. Place the drawers in the cavities and make sure they open and close freely.
Hang cabinet doors. You can use hidden hinges, as the author did, or choose suitable decorative hinges to suit your taste. Attach handles to drawers and cabinet doors.
Step three: making the countertop
You can choose a concrete or wooden base as a working surface. Any of them is quite easy to make at home.
For a wooden base, use carefully planed and sanded hardwood boards. Adjust the parts so that there is no gap between them and fix them to the base of the kitchen wall. To do this, use glue. Sand the surface until it looks like a monolithic base.
A concrete countertop is made from cement (usually white), water, fine river sand, plasticizer (or dishwashing detergent) and toner (dye). All components are mixed in the required proportions and in order. The mass is then placed in a plywood mold and processed on a vibrating table. The frozen workpiece is polished and fixed to the frame with glue.
Step four: painting
Inside, all wall surfaces should be varnished. This is necessary so that in the future you can wet clean cabinets and drawers.
The author painted the outside of the kitchen wall with matte oil paint in two layers. All exterior panels were then lightly sanded to age them.
After this, the furniture must be varnished with durable furniture varnish. Preferably matte. The varnish is applied in several layers, and each new hardened layer is sanded with fine-grained sandpaper. In this way, very high durability coatings can be achieved.
A simple kitchen made of plywood and boards is ready!
Become the author of the site, publish your own articles, descriptions of homemade products and pay for the text. Read more here.