Making homemade furniture is not an easy task, however, it is the skill of building interior items from nothing that will allow you to create a unique atmosphere in your own nest. Indeed, taking care of the home is not only about preparing food and filling the interior with comfortable little things, but also about harmoniously arranging the furniture used. In addition, the ability to assemble a table yourself is also very useful if you have a limited budget and your new home is completely empty. You may be surprised, but it is the creation of small details of interior items that always requires special concentration. Therefore, let's talk about how to make table legs with your own hands with professional precision.
How to make table legs with your own hands?
Determining the dimensions of the dining table
This version of the product is manufactured most often, so it is necessary to plan its dimensions in advance, based on the number of users.
The normal height is considered to be 75...85 cm, depending (including) on the height of people.
The minimum distance between the legs is chosen in such a way that a person can sit and sit freely without bringing his knees together, that is, at least 50...60 cm. The optimal width of the narrow side of the table is considered to be 80...90 cm.
When choosing sizes, it is necessary to take into account that the drawer (support beam) should be located at least 3...5 cm from the edge of the tabletop; a distance of 8...12 cm is more convenient. The height of the drawer is selected so that its lower edge does not rest against the knees of a sitting person.
Materials and tools
When planning to make a table with your own hands, you need to select the necessary materials in advance and prepare them.
For the simplest model, you will need a beam with a cross-section of at least 40x40 mm (for the legs), a board with a cross-section of 10...20x50...100 mm for the drawer (can be replaced with timber) and solid wood, furniture panels or boards with a thickness of at least 18 mm for the tabletop.
Important: when choosing a massive edged board or slab (a longitudinal cut of a trunk with an unaligned edge) as a tabletop, it is necessary to increase the cross-section of the supports - the load on them will be significantly greater than from a conventional light panel.
All lumber is cut to size, processed until smooth with an abrasive material or tool, and adjusted to each other. After completing the assembly, the wood must be treated with protective impregnation (this can be done before installation) or with varnish/paint.
To work you will need:
- wood saw, manual or electric (chainsaw);
- drill for drilling holes;
- grinding machine or sandpaper (sanding sponges) with different grain sizes;
- a screwdriver/screwdriver when using threaded elements for assembly, a hammer when assembling with nails, a mallet and chisels for selecting grooves when choosing carpentry joints.
You will also almost certainly need a brush/roller/rag for applying impregnation, varnish or paint, and tools for marking.
Working with wood usually does not pose a risk to human health, but protective clothing and - especially! – It won’t hurt to get gloves; no one needs splinters in their fingers.
The simplest table made from boards with your own hands: assembly with self-tapping screws
Let's analyze one of the easiest structures to work with: a rectangular table with four square legs, a drawer made of boards, without additional parts.
For a table measuring 80x120x70 cm you will need:
- timber 40x40x680 mm, 4 pcs;
- board 10...20x76 mm, 2 pcs. 650 mm long and 2 pcs. 1050 cm;
- 20mm board 1200mm long. Depending on the width of the board, the required quantity is selected to obtain a total tabletop width of 800 mm (8 pcs. 100 mm each, 4 pcs. 200 mm);
- board for strengthening the corner joints of the drawer, section 20x75 mm, 4 pcs. length 100...200 mm;
- wood screws 20...50 pcs.
Important: in this model, the parts are fastened using self-tapping screws screwed at an angle. To maintain a uniform angle for all drilled holes, it is convenient to use a simple device - a jig.
Assembly sequence:
- After cutting the parts to size, the frame is assembled - drawer and legs. To do this, the parts are placed on a flat, smooth surface and temporarily secured with clamps (when working with an assistant, there is no such need). It is convenient to perform operations one by one - two drawers and a leg. It is necessary to maintain right angles between the drawers as accurately as possible. To connect the elements, drill holes at an angle and fasten the parts with self-tapping screws;
Connecting legs and drawers using overhead metal parts
A simpler option is fastening with corners
Fastening using choppers (dowels) or self-tapping screws
- After assembling the frame, it is necessary to strengthen it in the corners. You can also use metal plates or, as already suggested, a board for this. If the second option is used, the edges of the board are cut at an angle of 45 degrees to fit tightly to the drawers, after which the board is screwed with self-tapping screws;
Jig for quickly cutting boards or timber at various angles
You can further strengthen the connections of the legs and drawers with corner decorative elements or braces made of boards or timber
- the prepared frame is checked for stability, and if necessary, the length of the legs is adjusted;
- arrange the tabletop by securing the boards to the frame. For this, as well as for attaching the legs to the drawers, self-tapping screws and holes drilled at an angle are used.
Each tabletop board requires at least two fastenings on each side
You can also use small corners, which are attached to the drawer with one side and to the tabletop with the other.
Important: the length of the screws is selected so that they do not go right through the tabletop!
The completion of the work will be the treatment of wooden parts with varnish or paint.
Instruction No. 4 – make a coffee table from pallets
If you see ownerless pallets in a store, do not pass by, but rather run to the seller and find out if you can pick them up, since pallets can potentially become your stylish and unusual piece of furniture - a coffee table.
How stylish a coffee table made from pallets can look
Step No. 1 – collect the necessary materials.
So, to make the piece of furniture we are interested in, you will need to collect the following tools and materials:
- pallets;
- hammer;
- nail puller;
- abrasive drill attachment;
- drill;
- primer;
- soap;
- paint brushes;
- paint;
- colorless primer;
- varnish;
- screws;
- nail puller;
- clamps;
- hot glue;
- screwdriver
To assemble such a table, you need the most common construction tools.
Step No. 2 – preparing the pallet to become a coffee table.
So, first, take a drill, put a metal abrasive attachment on it, and go over the entire surface of our future piece of furniture in order to:
- remove old paint from it;
- remove other contaminants.
Clean the surface of the pallet with a special nozzle, and then remove all the nails
Then, using a nail puller, begin removing nails around the entire perimeter of the pallet. If any pieces of wood accidentally break off, return them to their place and fix them with hot glue. Clamp the glued parts with clamps.
Step No. 3 – covering the table with compounds.
To even out all the unevenness, it is necessary to cover the entire body of the pallet with a primer and let it harden thoroughly.
Then everything will depend on whether you are satisfied with the natural shade of the pallets:
- if the answer is “yes,” paint them with varnish;
- if the answer is “no,” paint the pallets in the shade you want, and then just apply varnish.
The pallet needs to be coated with several compounds
Step No. 4 – making the legs.
Using fasteners, purchased legs are quite easily attached to the body of our future table. By the way, since it turns out to be quite bulky, it makes sense to place it on roller legs.
Turn the pallet over, dry after painting, and screw the legs to it, drilling holes for the screws.
Drill holes and secure the legs of the product in them
Please note: pallets are made of rigid material. In order for the screws to easily penetrate into it, they need to be lubricated with soap.
So, our stylish table is ready!
Prices for different types of coffee tables
Coffee table
Video - Coffee table made from scrap materials
A simple DIY table made of wood and ready-made furniture legs
This option is even simpler, including because the master is not limited to certain sizes.
Ready-made furniture legs are made of wood and/or metal, can be single or in the form of flat/shaped supports, smooth or with decoration.
In some models, the height can be adjusted (within certain limits) using a thread or a telescopic mechanism.
A mounting platform or a single mount allows you to mount such legs on almost any tabletop. One limitation is that it must be solid, not prefabricated. The national team will need kings.
There is an interesting nuance when using such legs. A small supporting area requires mandatory reinforcement of the wooden tabletop, so after marking the fastening points, special washers are driven into these places.
Threaded parts are then screwed into them.
Unfortunately, this assembly method does not ensure the stability and strength of the table - in soft wood (for example, in a furniture panel made of pine), the fastenings do not hold well, and the table quickly begins to wobble.
A more reliable option is to assemble using carpentry joints reinforced with glue and/or self-tapping screws.
Materials from which table legs are made
So, the legs can be made from various materials, which will also determine the presence of certain characteristics in a given table part. Let's look at these materials and their features.
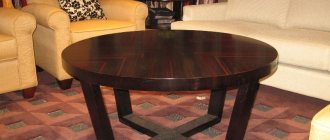
Metal
The legs, made of metal, are very durable, in addition, their appearance is also very attractive. Installing such parts will ensure your table has a long service life.
A table with forged legs can add a unique charm to a room.
So, the most durable and strong legs are considered to be from:
- gland;
- aluminum
It is these metals that can support even a massive tabletop with serious support.
By the way, these legs look very impressive as an interior detail in almost any direction.
Often, chromium is used for the manufacture of these parts, which is heavy, however, its strength is along with that of aluminum. The appearance of chrome legs is considered especially stylish, so such stands are very actively used to create interiors in high-tech style, for example, as well as loft, techno, etc.
Metal legs do not have to be standard stands. No, they can be given absolutely any shape:
- wheels;
- squares;
- triangles, etc.
High-quality forging creates real works of art
Moreover, it is metal products that usually:
- fold up;
- move apart;
- adjustable to the required parameters.
A table with chrome legs will become the highlight of the interior, despite its apparent simplicity.
These legs are represented by pipes with different diameters, usually about 40 millimeters. The wall thickness of each pipe is usually one and a half millimeters. Inside these metal pipes there are:
- core;
- filler.
The pipes themselves must be painted using various technological methods.
Forged furniture with glass tabletops is very popular today. Such interior items are literally all the rage.
Video - DIY forged table legs
Tree
Also quite often, table supports are made of wood. In this case, of course, legs made entirely from solid wood are especially valued, as they:
- serve for a long time;
- reliable;
- environmentally friendly;
- look expensive and stylish.
Classic table with wooden legs
Sometimes the supports are made of timber, which subsequently may not even be treated with paints, but is only covered with a protective layer of varnish. Such legs become an integral part of the interior of rooms of the following styles:
- Provence;
- rustic;
- country, etc.
Wooden table supports create an indescribable atmosphere of comfort in the house. It doesn’t matter whether you own a modest apartment in the city, or have gone to live in the fresh air outside the metropolis, this detail will fit perfectly into your home.
It is worth noting that wood is a valuable material, therefore, very expensive. Its use as a table body composition significantly increases the price of furniture.
Unusual wooden table
However, for those who definitely want a table with wooden legs, but cannot spend their entire monthly salary on it, the following options have been invented:
- table legs made of inexpensive wood and metal inserts;
- making your own legs, detailed instructions for which we provide below in this article.
Plastic
Plastic legs are a much less reliable option than metal or solid wood, however, they are much cheaper and available to almost everyone.
Another advantage of plastic table supports is their elegance. The fact is that manufacturers usually strive to compensate for the low quality of products with an attractive appearance.
Tables with plastic legs - a super budget option
In addition, since it is quite easy to produce anything from plastic, legs made with it are also usually folded out using telescopic technology or in some other way. Usually tables with such supports are equipped:
- small kitchens;
- terraces, etc.
No one will put such tables in elegant rooms with expensive furnishings, as they will stand out sharply against the background of the rest of the luxury.
Plastic tables are often installed in the garden or terrace
Stone
Another variation of luxury table legs are stone supports. This is a wonderful, environmentally friendly design that will add solidity not only to the kitchen or dining room, but also to your personal office. The stone will serve you faithfully for many years, perhaps even being passed down from family to family.
The table's stability with stone legs is maximum and it is also beautiful. However, you need to understand that you cannot easily move it on your own, because the weight of the structure will be significant. In addition, it must be said that the initial price of such a piece of furniture will be really high.
Not everyone can afford a table with stone legs.
laminated chipboard
Another practical and at the same time budget option for the material from which table legs are made is chipboard, or, more simply, plywood.
A plywood table is an excellent solution for a small budget for purchasing home furnishings.
As you know, the following qualities can be attributed to plywood:
- durability;
- moisture resistance;
- resistance to mechanical damage;
- practicality;
- cheapness;
- a wide range of different decorated panels.
Tables made from this material can look stylish, and at the same time be much cheaper than their wooden counterparts. Legs made of plywood are able to support a tabletop of a significant weight category.
Spacious and stable plywood coffee table
Regardless of what material will become the basis for the manufacture of the table, it is preferable that pads made of some soft fabric or rubber be attached to its supports, for example, so that they protect the floor surface, as well as the legs themselves, from damage during contact.
Molding table covers
It is very important to use linings made of such environmentally friendly material as felt. They cost very affordable, and the effect they bring is really worth praising. Thus, their use allows you to extend the life of the product you eat or work with by at least 4-5 years. The shapes of the overlays can be very different. The easiest way is to buy universal round or square blanks, and then cut them to the shape of the legs for your table.
Garden table with dowels and tenons/grooves
This model has two X-shaped supports, assembled, like the entire structure, on grooves and tenons.
For all parts, a board with a thickness of 38 mm is used (you can take a thinner one, but not less than 32 mm).
The crosspieces are connected by an intersection of half a tree - that is, a groove is made in each part as wide as the part and as deep as half of it. It is more convenient to mark when placing parts on top of each other, clearly maintaining the angle of intersection.
Next, double holders of crosses are made - boards with cut corners. They are fastened to the crosspieces with dowels or self-tapping screws.
When choosing dowels, they are driven into the elements of the cross, and then holder boards are placed on them from both sides.
Fixation with bolts and nuts
Fastening the tabletop to the prepared base is carried out in any convenient way.
A similar table can be made with longitudinal tabletop supports and even a folding tabletop.
Also, instead of crosspieces, you can use flat panels with additional extensions at the bottom - for example, as in this garden table.
Table for a summer house or gazebo with carpentry joints
Such products use so-called blind parts, that is, parts made only partly deep, grooves and assembly “without a single nail” (adjusted for modern realities, without metal parts).
As can be seen from the diagram, the connection of the drawer and the leg in this case is made using grooves, additionally secured with dowels. Wedge connections are also used.
Another version of the table with a partially hinged lid.
Important: for carpentry joints do not use “sharp” wood - pine, spruce. Hardwoods, deciduous, well dried and processed are preferred.
It is better to assemble models using self-tapping screws from available materials (pallets, used boards and timber, plywood, etc.).
If the assembly uses ready-made turned or carved table legs with already made grooves, it is better to strengthen the structure with special metal ties.
Table leg shapes
So, another important difference between table legs is their shape, which can be completely different and also determine the convenience, or vice versa, the inconvenience of using the table.
Rectangular and square supports
The traditional version of supports is rectangular. Typically, legs of this shape are made very high. They taper slightly from top to bottom, but can maintain their width throughout their entire length.
The most common table with rectangular legs
Square supports are most often mounted on small children's tables or coffee tables, thus making their appearance elegant and neat.
Non-traditional forms
Non-traditional shapes of legs can be anything, it all depends on the imagination of the manufacturer. Thus, products are often found in the form:
- polygons;
- triangles;
- balls;
- bends, etc.
Table with woven legs
Carved legs, forged, convex or concave - the imagination of the author of the product, as well as its buyer, is not limited by anything.