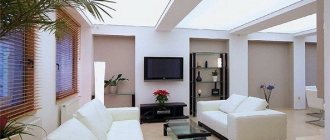
The vessels, which originated in ancient times, were previously used for practical needs. Various liquids and products were stored in them. Previously used household items gradually turned into decorative elements that decorate the interior of many rooms. The main thing in the design of vases is not the painting or the material from which they are created (also an important fact), but their unique, original shape.
Vases are used as containers for placing flowers, but any other vessel can be used for these purposes. Therefore, its purpose is related to the impression it makes on others, how it combines with the style of the room, or stands out against the general background, drawing attention to itself. Recently, many people have become interested in handmade crafts; this practice has given rise to the development of objects and the emergence of new elegant forms. Non-standard materials are used in the work.
Size, shape and properties of the vase
A correctly selected vessel can complement the flowers installed in it, or it can itself become an interior decoration. It will create comfort and coziness in the house, will delight the household and their guests. In order not to make a mistake with your choice, it is necessary to take into account certain characteristics related to the dimensions, design, and features of the item.
An important parameter is the size of the decorative element. Its width is selected individually, depending on the preferences and tastes of the owner, and the functional load is also taken into account. For example, if the bouquet is heavy, and the vase is short and has a narrow neck, then there is a high probability that it will turn over, or the flowers will be cramped and they will dry out. The height is selected depending on the type of product. For large floor structures, its parameter varies between 40 cm - 100 cm, while for those installed on a table, window sill, cabinet, 20 cm - 40 cm is sufficient.
The shape of the vase can be very diverse - oval, curved, cylindrical, elongated, expanding upward, round, conical, rectangular, spherical, asymmetrical, flat. The required type of product is selected for a specific bouquet. For flowers with long shoots, tall structures with a rounded, cylindrical shape are suitable. A field set with short legs will look good in low products with a wide neck.
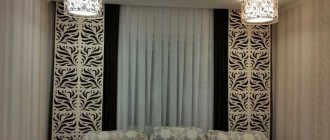
Wall panels
Eco-decor can be taken as the basis for a design project; it will look great. Let us note that the level of stylistic design depends only on talent, imagination and perseverance, since any products made from dry branches require careful implementation. Almost anything can be made from driftwood, scraps of wood, various large dry branches, thin tree trunks - furniture, lamps, decor and, of course, wall panels.
Branches in a picture frame
The theme of the autumn forest was repeatedly revealed by many artists, for example, Klimt. Trees with fallen leaves create a calming atmosphere that promotes relaxation. Meanwhile, such decor for a hallway, living room or bedroom made of dry branches reminiscent of a forest can be decorated with bright elements at any convenient moment; they will thematically enliven the interior and bring natural beauty into it.
Panel of twigs on a wooden base
To make panels from branches for your home, you will need flexible specimens that can be given any shape, and can also be easily placed along the wall. Fastening dry branches to the wall is ensured with the help of staples, self-tapping screws, followed by grouting the cap, and “liquid glass” glue.
Wall decor with tree branches and cuts
For small dry branches use a glue gun. This method will be invisible and look organic from the outside. Branches for decoration go well with modern furniture, complement the Provence style, shabby chic - they will always look good.
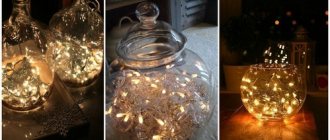
Vase made of glass bottles and methods of decoration
A homemade product has a number of advantages over purchased ceramic analogues. First of all, it is unique, a piece of the soul is put into it. Having decided to make the structure yourself, you need to decide on the material for the work. The simplest, and also waste, raw material will be glass containers. Minimal manipulations with it will allow you to create an original vase, while the investment of time and money will be insignificant. All you need to do is decorate the item, which can be done in different ways:
- Decoupage. It involves transferring the finished design and coating it with varnish.
- Drawing various patterns on glass.
- Decorating the surface by gluing bulk substances (sand, crumbs, salt).
- Wrapping an object with ribbons, twine, threads.
- Pasting with napkins, using additional decorative elements.
For clarity, let’s look at a master class using the example of coloring glass containers:
- Let's prepare the bottle. Remove the label, wash and dry.
- For work, you can use different paints, both canned and in spray cans. Their colors are optional. It is better to use acrylic aerosol options, since after painting with a brush, streaks remain.
- Apply the first layer and wait until it dries. Let's move on to the second one.
- To prevent the object from looking monotonous, we paint it with patterns. If you don’t have drawing skills, you can use special stencils.
- To give the surface a shine, apply several layers of varnish over the paint.
It is better to paint in the fresh air; in an apartment you can go out onto the balcony, in a private house - into the courtyard. Thereby protecting yourself and your loved ones from unpleasant odors and allergic reactions of the body.
If the vase is created not only for decoration, but is planned for practical use, in this case it is necessary to remove the neck of the bottle. To do this, we will use a simple safe method, which is as follows:
- We mark a point on the container, preferably at the narrowing point towards the neck. Draw a line in a circle.
- We take a ball of woolen thread, unwind it to half a meter of yarn, and soak it in a solvent.
- Fill a bucket or basin with cold water.
- We wrap the bottle around the mark in three layers and set the thread on fire.
- After the yarn has completely burned out, immediately lower the item into a container with liquid. Due to temperature changes, the glass will burst along the marking line.
- Clean sharp edges with sandpaper.
- The finished product can only be decorated using any of the above methods.
Vases made from plastic bottles
In every home there is a plastic container left over from drinking a drink, milk, or hygiene products. You should not throw away these items, which are already overflowing landfills, city streets, and towns. This is an excellent material at hand for creating a variety of crafts. They can be reused to store liquids by simply removing the top or bottom and placing the bouquet inside. But in order for this item to turn into a vase, you cannot do without decorating it, which can be done in different ways. Let's take a step-by-step look at one of them, made using the decoupage technique.
Before starting work, we prepare the necessary tools and materials, namely: napkins for decoupage, glue, plastic containers, rope, satin ribbon. Let's get started:
- Cut off the top of the bottle.
- Coat the rest of the container with glue and wrap it with selected napkins with a pattern.
- We cover the surface with varnish.
- Use a hole punch to make a hole in the top.
- We fasten the rope.
- We glue a braid along the top edge, which will not only decorate the product, but also disguise holes and knots.
Festive vase decor
Very often, flower arrangements are used to decorate events. It could be a birthday, wedding, bachelorette party, children's party and much more. But each of these options requires different shades of colors and, of course, decor for the vase.
To decorate a holiday table, a flower arrangement in a vase decorated with wine corks is often used. To do this, place a smaller diameter vase in a large vase in which the flowers stand. And we fill in the plugs between them. This decor looks very interesting.
The festive children's table can also be decorated with fresh flowers, and multi-colored candies can be used as decoration. This decoration will definitely delight the little ones and pleasantly surprise parents.
Themed parties or vacations outside the city are a great occasion to make a flower arrangement in a vase with beautiful decor.
Making a vase from glass jars
Making a project is easy. There is no need to cut anything here, just apply the ornament, paint it, and wrap it with twine. At the same time, material for work can be found in every home. With the help of ingenuity and skillful decoration, ordinary jars of different sizes will be transformed into a magnificent object that will decorate the interior. Let's make a vase with our own hands from a glass jar and twigs; for this you will need the following components:
- liter container;
- a piece of fabric for wrapping;
- twine;
- branches;
- glue.
The procedure is as follows:
- We clean the surface of the glass jar, rinse it with warm soapy water, wait until it dries.
- We prepare the branches. We cut them so that they are the same length, preferably so that they are higher than the container used.
- We take burlap or other coarse fabric, wrap the surface of our base, and fix it with glue.
- We lay out the branches in one row and tie them together with twine on both sides, stepping back a couple of centimeters from each tip.
- We attach the finished rug to the jar with the same thread to make the structure stronger, and glue the branches to the fabric.
- We place a couple of small stones at the bottom of the finished product, this will ensure the stability of the craft.
Tree branches in the interior to decorate a vase
Containers decorated with flowers or autumn leaves create a good impression. But decorating a room with vases with branches is a design classic. A few design ideas:
- The simplest and easiest fantasy to realize is to install branches in a vase. You can put a simple or unusual composition in a container.
Tree branches in the interior
- Paint the branches to match the color of the interior. Black, white, gold and silver tones look especially good.
Vase with branches in the interior color
- You can place flowers in a vase. Small fragments of branches should be secured to the outside of the container with glue or rope.
- Place the branches in a large floor vase.
Place the branches in a large, stable floor vase
- Use a clear vase to display flowers. Place wooden fragments vertically into the water along with the plant.
- An interesting idea: use a vase with branches to store and display jewelry. A creatively designed composition with hanging necklaces, beads, pendants or brooches will solve problems with the placement of jewelry and will undoubtedly decorate the interior.
Using a vase with branches to store jewelry
Branches with attached berries, decorative elements, small balls, and fluffy balls look great. The main thing is that the decoration fits well into the interior and matches its style.
Cement vases
Building materials can be used not only for the construction of houses, decoration, but also for decoration. It makes stylish flowerpots and flower vases. Larger products are installed outdoors, while smaller ones will look great indoors. They can be cast, sculpted with or without a mold, using a plasticizer, or not using polymer additives. Let's consider a master class on creating a product for the home, using the example of an object cast in cardboard molds:
- We begin production by preparing templates. You can use standard boxes for gifts, perfumes, and small household items. Cut it out of thick paper and glue it into a custom shape.
- Having decided on the type of future product, we begin to create a stencil. For small items it can be printed on a standard A4 or A3 sheet.
- We cut out the blanks and glue the figure.
- We prepare the concrete mixture. Mix cement with sand at a ratio of 1 to 2. To increase the strength and fluidity of the solution, add a plasticizer 0.05% by weight of the cement. Gradually pour water into the mixture, bringing it to the consistency of thick sour cream.
- We pour the solution into the mold; to obtain an empty cavity, we insert a candle, a plastic pipe, a test tube, or a thin bottle into the middle of the template.
- We leave the concrete figure to dry for a couple of days. Then remove the cardboard. If there are any imperfections or irregularities, we correct them with sandpaper or a knife.
- The craft can be left as is, or decorated with paint, ribbons, shells, stone chips, and mosaics.
Pictures from branches and small decor
An interesting solution that will allow you to avoid unnecessary spending on photo wallpapers is paintings made from branches. For example, birch branches in the interior look very elegant and Russian. Using willow trimmings you can create light “openwork” compositions. To do this, just make a frame from a wooden plank and attach branches selected to size using self-tapping screws or a stapler. Individual branches can be assembled into various shapes, creating a modern graphic installation, decorating the paintings with available finishing materials.
Small eco-decor is made for the occasion; it does not need to be stored, since production takes a minimum of time.
In addition, small branches dry out quickly in apartment conditions and become very fragile. One branch in the interior can become an apartment decoration in a beautiful vase or flower pot; you can hang hearts on it as memories of happy moments. Silver-plated branch for jewelry
Decorative compositions of dry branches in a vase can become a beautiful decoration for unpresentable flower pots. This way you can arrange an autumn or Christmas bouquet that does not require a vase - just tie it with a beautiful ribbon. For an elegant twig decoration, place collected specimens in a glass vase and hang balloons or birds made from colorful threads.
Book shelf
Simple decor for a child
Kitchen hanger
Bedside Table Decoration Holiday Decor with Toys Potted Tree Wall Decor Candle Holder Outdoor Table Decor Tree Branches
Lamp above the table Bouquet for the holiday
Plaster vases
Along with cement, gypsum is a malleable material. Any design can be made from it. Plaster models will look original and stylish, decorate the interior, and make an excellent gift. There are different techniques for creating crafts. Let's analyze the master class, using a two-liter plastic bottle as a template:
- We prepare the workplace. Cover the table, floor, or other surface with oilcloth.
- Add water to the gypsum mixture and stir to the required consistency. We spread the solution on the table in the shape of a circle, and place a plastic bottle on top in the center. At the first stage, you can use alabaster, however, due to the lack of impurities, it sets instantly, but its price is an order of magnitude lower.
- We begin to apply the solution to the surface of the template until it begins to narrow towards the neck.
- Take a bandage and wrap the sealed part of the bottle. Next, wait for half an hour until the mixture dries. Remove the plastic bottle.
- We dilute a new portion of gypsum putty. We begin to form the base of the vase. We apply several layers of the solution, wrapping each layer with gauze.
- When the base is ready, move on to the top. To do this, we will cut a 1.5-liter plastic bottle, or use a jar of the appropriate size; their height should be a third, maximum half, of the main template. We combine the workpiece with the lower part and follow the same procedures for applying the solution. We coat the joint well and make several layers.
- When the product has acquired its characteristic shape, give it time to dry. To do this, we send it to dry in a warm place for a day.
- After complete drying, we clean the craft with sandpaper.
- Let's start with the decor. You can paint with acrylic paints, do artistic painting, stick a photo, or do 3D decoupage.
The design is not intended for liquids. Serves exclusively for decorative purposes; only dried flowers can be placed in it.
Vases made from metal cans
Waste materials such as cans always end up in the trash. However, they can find other uses. They can become the basis for an original vase. Let's see this using a simple master class:
- Take a liter tin can.
- Paint the outer surface with acrylic paint white.
- We prepare the decor (glass, plastic multi-colored pebbles).
- Using a glue gun, we fix the decorations in a chaotic manner.
- We paint the gaps to match the decorative elements.
Floor vase in the interior
Absolutely anyone can decorate a floor vase with their own hands. This does not require special skills, experience or knowledge. Get inspired by ideas, watch various master classes and be sure to try it. This is the only way to create something truly worthwhile.
Wicker vases made from newspaper tubes
Needlework for weaving from newspapers is very popular. This type of creativity does not require serious expenses and is accessible to everyone. The result of the work will delight the eyes of household members and guests. There are several ways to create a vase with your own hands; it can be woven using the regular or spiral method. The second option has a beautiful pattern; using its example, let’s look at the step-by-step instructions:
- We prepare tubes from newspapers. To do this, we cut the newspaper into pieces, their width should be 7-10 cm, length - up to 40 cm. Then we wind the blanks onto a knitting needle diagonally, gluing the edges. The main condition is that the material used must not be wrinkled or old.
- Let's get to work. First we need a template; you can use a regular plastic bottle. The process begins with the formation of the bottom. To do this, take three tubes and place them on the surface like an asterisk so that they divide each other in half in the center.
- We set a template in the center of the intersection and begin to braid it. We take one end of the tube, wrap it, and put it on the next one. We also wrap the second one and cover the next two ones with it. We repeat these steps, building up the tubes in the process. Having reached the top, remove the plastic bottle.
- We paint the craft with spray paint, you can glue a satin ribbon, add an artificial flower, stick on pebbles.
DIY vase decor
We will tell you in more detail about the most popular and affordable methods of decorating a vase.
Using simple improvised means, you can create a unique interior element from an ordinary vase.
Vase decor with stickers
This decorating technique is perfect for beginners, as it does not require any special skills. In the store you can choose the stickers you like for decorating glass vases, find pictures on the Internet and design something similar yourself. You can add rhinestones, beads or threads to the stickers.
You can simply follow your imagination without looking at any clues.
Filling the vase
This is also one of the easiest techniques. But accessibility and simplicity are combined with stylish and interesting decor. So, for filling you can take a round vase. Any material can be used for filling - lace, twigs, beads, pebbles, starfish, artificial flowers, etc. By filling a vase with pebbles or twigs and tying it with thick thread or lace on top, you will make an excellent and very unusual vase.
A regular tall glass is also suitable for filling.
Coloring
This is a more complex type of decor. To paint, you will need durable acrylic glass paint. If you decide to paint the product in one color (without drawings, color transitions, etc.), the work must be done from the inside. Take an ordinary glass vase without designs (round, square, small, large - the shape and size do not matter) and paint its walls from the inside. Also for painting you will need a brush, a clean rag or towel, water, newspaper (film, paper), solvent.
Remember that the vase must be perfectly clean and dry.
Otherwise, it may affect the quality of dyeing. Also, before the process, it is necessary to degrease the walls of the vessel using a solvent. After waiting for the solvent to dry completely, you need to pour paint onto the bottom of the vase and shake it in a circular motion. Thus, the paint itself will color the walls of the vessel. Then, without waiting for the paint to dry, you need to fill in the “gaps” with a brush.
Choose a high-quality brush so that it does not leave marks and hairs do not come out.
Decor from clothes
You can dress a vase, no matter how funny and ridiculous it may sound. To “dress”, take an old sweater, jeans, T-shirts, etc. An old knitted or woolen sweater looks very stylish and original. You can complement this decor with a twig or thick thread (twine).
To decorate with clothing, you will need the clothing itself, glue, scissors, and twine.
Decorating with paper
The vase can be wrapped in beautiful paper, making a neat (or, conversely, careless) bow or knot in the middle, or at the neck of the vessel.
Despite the fact that this type of decor is very simple, it looks quite impressive and unusual.
Pique technique
This is the name of the handmade dot painting technique. Moreover, these can be like bright flowers with a detailed rendering of texture and shades. It can also be stylish geometry - straight lines or zigzags, for example. The second option is simpler, so it’s perfect for beginners. You will need masking tape, acrylic paint, or canned paint. By applying masking tape so that the uncovered areas outline the lines you want to paint, you protect the rest of the surface from accidental paint. For such painting, as a rule, black, white, silver or gold paint is used.
It can also be other colors - it all depends on your imagination and the general style of the room.
Dot painting, when multi-colored patterns appear in small dots on a vase, is much more difficult. For work you will need acrylic paint, ear sticks, toothpicks, newspaper, solvent. The vase must be washed, dried, degreased and dried again. Then you can get to work. The dots are applied with acrylic paint from thin tubes. Use ear sticks or toothpicks to correct the pattern. The location and distance between the points depends on the pattern that should ultimately be obtained. As a rule, each line becomes staggered.
To make the drawing even and neat, you can first draw the contours with chalk.
Stained glass painting
Geometric shapes have always been in fashion. In order to beautifully paint a vase with stained glass figures, you do not need to be a brilliant draftsman. But in order for the composition to be neat and accurate, you need to follow the following step-by-step instructions:
Strict geometry is created using tape.
It is important to follow your imagination, combining the incongruous and introducing the most unexpected solutions.
Vase decor with fabric, ribbons and beads
This type of decor requires the presence of these materials. How to decorate with beads, fabric and ribbons is up to you. Also for work you will need threads, scissors, glue.
You can borrow an idea from the Internet, or you can come up with your own personal design.
Decoupage
Decoupage is a decoration technique using paper. A sheet of paper is cut into small pieces (squares, triangles) and pasted on the vase. So, for example, you can tear out a sheet from a music book, cut it, and stick it on a vase. It turns out that the notes are arranged in a completely chaotic order.
This design is quite interesting and stylish.
Decorating a vase with natural materials
Natural materials include twigs, tree bark, cinnamon sticks, cloves, dried berries or flower petals, and so on. Such materials can be taken both for filling a vase and for gluing them onto a vessel. As a rule, a small vase is used; a glass is also perfect. You can stick tree branches or cinnamon sticks on the walls, and make a bow or knot on top with a not too thick ribbon.
This design looks very warm and interesting.
Decorating a vase using twine or thread
Twine is an ideal material for decorating vases, bottles and other small decorative elements. It can also be combined with other materials: buttons, fabric, rhinestones, artificial flowers. In order to secure twine or thread to the surface of the vessel, PVA glue is usually used. But some craftsmen also use “Glue-moment” or hot-melt glue.
Natural materials will look original.
Vase decor made of lace and ribbons
An equally popular and original way to decorate a vase is to decorate it with lace and fabric. To work with such materials you do not need to have any special skills. Most people just look for ideas on the Internet and implement them. To do this, they use store-bought ready-made laces and fabrics of different colors and shades.
PVA glue is used for fastening.
Decorating a vase with pasta
As practice shows, pasta is not only a tasty product, but also a rather original way to decorate a vase or any other piece of furniture. You will need regular store-bought pasta, hot glue and spray paint.
The first thing to do is decide on a pattern.
To do this, we recommend going online and looking at possible decor options from experienced craftsmen. Next, attach the pasta with glue in the same order as in the picture and wait until it dries completely. And the third stage is painting.
Apply spray paint to the surface of the vase and your work of art is ready.
Papier-mâché vases
This art allows you to make dummies. The frame of the product, made of glue-impregnated paper, looks fragile, but it is possible to create a fairly functional craft. If you do not remove the base, for example, a glass bottle, then the vessel can be filled with water and bouquets can be placed inside. Consider the following technique for creating a structure:
- Wrap the surface of the selected shape with cling film.
- We dilute PVA glue in water at the rate of 1 to 3.
- We tear the newspaper into many small pieces and separately make long rectangular pieces.
- We dip long pieces in the adhesive solution, form the first layer, let it dry a little and proceed to the second. The more layers the better, there should be more than eight of them. After completing the work, place the craft in a warm place and wait until it dries completely.
- After drying, remove the template. We cover the inner and outer surfaces of the structure with white paper.
- Cover the resulting base with a layer of paint.
- Let's start decorating. For decoration, you can use a knitted cover, wrap the surface in a circle with threads and ribbons. Beads, stone shavings, polystyrene foam, old coins, CDs broken into small pieces will also look great. If you wish and have the skills to work with polymer clay, you can create entire compositions.
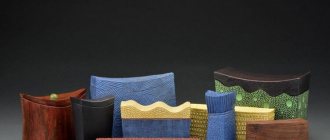
Wood for making vases
A craft made from natural material will be an excellent decoration for any interior. You can use ordinary branches, boards, and logs as raw materials. There are also many ways to decorate, for example, wood carving, painting, adding forged elements. Let's look at two different master classes on creating original wooden products.
Rectangular vase made of boards:
Not everyone has a lathe and special wood saws on hand to create complex structures. Therefore, let’s consider a craft that everyone can do.
- We take a standard board with a minimum width and thickness of 100 x 25 mm. Cut four pieces of equal length. For the base you need a square piece from a 150x40 board.
- We fold the boards into a rectangle, glue the joints with PVA, and additionally secure them with screws.
- We secure the base in the same way.
- We treat the seams with mastic and paint the product.
- After drying, decorate the craft. To do this, we use beads, glass, ribbons, and other decorations.
From a wooden deck
For a simple craft, just make a cavity in the log. More complex products will require additional equipment.
- We take a prepared piece of wood. We cut it so that it matches the height of the finished product.
- Remove the bark.
- Using a saw, we adjust the external parameters.
- We make a characteristic indentation. To do this, you can use an electric drill. The hole should not be through. Sand the inner surface with sandpaper.
- The outer surface also needs to be treated.
- We treat the product with stain.
- We decorate the finished item.
Other interesting ideas for vases and their decoration
You can make an original vase from the simplest objects. There are many interesting ideas and ways to decorate. A beautiful and practical accessory will be made from textiles. You can wrap an ordinary bottle with bright strips of fabric, knit or crochet a multi-colored pocket, or use an old wicker rug. A simple and interesting idea is to use jute twine. You just need to wrap it around the mold and cover it with glue.
You can decorate any item that has no value in the household. A simple tin can will take on an original look if you cover it with colored pencils and decorate it with clothespins.
Using branches to decorate a wall
To decorate the walls, both single branches and whole panels made from a pre-selected pattern can be used. When using tree branches in the interior to decorate walls, follow the following sequence of actions:
- Select fragments of twigs that are similar in color and size.
- Process and prepare the material. Apply varnish or paint in the desired color. Drawings designed in colors contrasting with the wall covering look better.
Arrangement of branches for wall decoration
- First, with light pencil movements, apply the design to the surface of the wall.
- Fill the outline of the picture with fragments of branches. The branches can be placed parallel to each other. Fasten with glue. An illustration made from chaotically arranged fragments looks beautiful.
Panel of tree branches in the interior
- A composition of peeled branches of approximately the same thickness, placed as horizontally as possible, looks good. The fragments, cleared of bark and almost the same size and color, look unusual and creative.
- Try mounting a branched, unusual composition of branches with fixed decorative elements on the wall. These can be butterflies made from fabric, flowers made from improvised material. Berries will fit organically into the interior. You can use small decorative dried pumpkins.
Composition of unprocessed branches in the bedroom interior