Classification of skirting boards
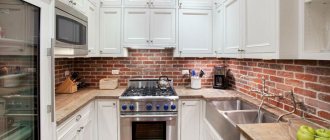
Often, the kitchen set already includes a baseboard that matches the color scheme of the furniture. But if the set is made to order, then manufacturers offer customers several types of skirting boards to choose from. But such products do not always fit the main furniture or meet the customer’s requirements. In such cases, it is necessary to purchase the strips separately. Before purchasing, it is advisable to familiarize yourself with all types of skirting boards, because they are classified by shape, material of manufacture and design.
There are different types of skirting boards
By shape
There are many different forms in which such products are produced. The most popular of them include:
- triangular skirting boards;
- sketches;
- with rounded sides;
- flat or straight;
- square.
The shape and size of the skirting boards can also be different
By design features
Based on their design features, kitchen skirting boards are classified into cast and universal. Cast moldings have a rigid and more massive design. Such products are attached directly to the seal, since they are not equipped with a silicone profile. Cast skirting boards have a presentable appearance, but due to their increased rigidity they do not last very long.
Various types of skirting boards
The base of the universal plinth is a silicone seal to which special profiles are attached. Skirting boards can be produced in different colors, so if a product of the same color is already installed in the kitchen, then, if desired, replaceable inserts can be replaced by choosing a more suitable shade.
By material
Kitchen baseboards are made from different materials, each of which has its own pros and cons. We are talking about the cost of products, their service life and care features. Below are the most popular materials used in the production of moldings.
Table. Classification of skirting boards according to the material of manufacture.
| Type of plinth, photo | Description |
| Wood | Such skirting boards are mainly installed on countertops, which are also made of wood or chipboard. The material is relatively inexpensive, but it is quite difficult to match wooden skirting boards to the tabletop in order to obtain the desired combination. |
| Aluminum | A popular type of skirting boards. Such products are durable, they are not afraid of heating devices, and the surface is easy to clean. For the manufacture of skirting boards, polished and embossed material is used, covered with decorative finishing. Products may have different shapes and appearance. |
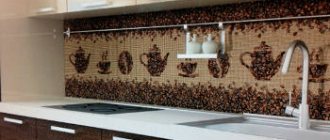
| Plastic | Polyvinyl chloride is used to make plastic moldings. The material is quite easy to modify, so manufacturers offer plastic skirting boards in different colors and shapes. Wood, marble or artificial stones can be used to decorate such products. |
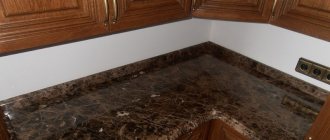
| Stone | The material is more expensive, so skirting boards made of artificial stone are quite rare. Such products are installed vertically, pressing tightly against the wall surface. The baseboards are attached with glue. Their disadvantages include high cost and vulnerability to high temperatures. |
| Metal-plastic | Used to decorate countertops made from almost any material. Metal-plastic skirting boards can have a matte or glossy surface. It is not recommended to install such products near hobs. |
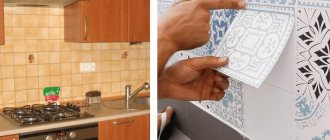
Where is the best place to start?
The work begins with calculating the required amount of material, determining the method of laying the tiles, and preparing the accompanying materials and tools. Let's start with the method of laying the tiles. The most commonly used standard installation method is to place the tiles in horizontal rows. It is also called basic. There is also a diagonal method of laying tiles. In terms of cost, the diagonal method is more expensive. Do not forget that when working with ceramic tiles, defects are inevitable due to their fragility.
Having calculated the total area of the apron, divide by the area of one tile and, adding another 10% to the resulting amount, get the required number of tiles. All that remains is to clarify how to lay out an apron in the kitchen with your own hands and get to work.
No. 3. Kitchen baseboard material
The most common options are plastic and aluminum. Stone, ceramic, wooden and MDF skirting boards are also sold.
Kitchen plinth made of plastic
Plastic skirting boards for countertops are produced on the basis of polyvinyl chloride by co-extrusion. From the molten mass you can create a plinth of any shape and size. The necessary decor is obtained either by dyeing in the mass, or laminated with a film simulating the texture of noble materials. Typically, molding is decorated to match different types of wood and stone types. The texture of the baguette may differ: if the products are glossy and matte, smooth and shagreen.
The main advantages of plastic skirting boards include:
- nice appearance and a wide variety of colors, so there should be no problems with selection - there is an option for any interior and set;
- affordable price. Plastic molding will cost less than others;
- ease of installation;
- availability of space for laying wires;
- high resistance to moisture and chemicals;
- resistance to corrosion and rotting;
- elasticity, due to which the plastic plinth can fit tightly against a slightly uneven wall. This type of plinth is also used when working with complex curved shapes.
Not without a fly in the ointment:
- plastic is afraid of high temperatures, so close proximity to the hob can be disastrous;
- at low temperatures, plastic becomes brittle and can be easily damaged, so it is not recommended to use it in the kitchens of country houses and other premises where people live irregularly;
- not the highest mechanical strength.
Aluminum kitchen baseboard for countertop
Looking ahead, we note that this is the most preferable option in terms of price and quality ratio. Aluminum plinth can have a polished, unpolished or embossed surface. They also produce aluminum moldings with a replaceable color insert. The latter is sold in a small roll, is glued after installing the baseboard and, when dirty, can be removed and replaced with a new one. This color finish is chosen to match the color of the set, countertop or other elements.
The main advantages of aluminum skirting boards:
- high mechanical stability;
- heat resistance, so the distance to the kitchen stove can be minimal - the baseboard will not be damaged;
- resistance to chemicals, sunlight and moisture;
- ease of care;
- high durability;
- ease of installation;
- Great looks and versatility. An aluminum baseboard will look great with most countertops made from cheap materials, and will also be a harmonious addition to expensive stone countertops.
The only downside is the price, but the difference in cost between plastic and aluminum skirting boards is not very significant.
Designers recommend combining an aluminum plinth for the tabletop with the same base plinth - it will look balanced and harmonious.
Kitchen plinth made of other materials
In addition to the most popular plastic and aluminum models, you can also choose a more exclusive skirting board:
- A solid wood kitchen plinth will be a beautiful addition to a wooden countertop. Everything will look gorgeous, but even the least active culinary processes will be accompanied by splashes of water and dirt, which will have a detrimental effect on the wood. If it is impossible to choose another material, then the molding will need to be very well treated with protective varnishes;
- MDF plinth is a little more resistant to moisture than wood, but also more fragile. The top of such a baguette can be painted, finished with veneer or thin lamination, so there should be no complaints in terms of appearance and its variety;
- plinth made of natural or artificial stone looks chic and is highly resistant to moisture, high temperatures and sunlight. This is a very durable material that costs a lot. A natural stone baguette is generally a luxury. Stone plinths are mounted vertically, as if they are leaning against the wall. A significant disadvantage is that the wires cannot be hidden in such a molding;
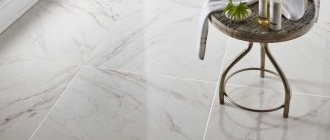
- Ceramic skirting boards are used extremely rarely and are suitable for countertops decorated with ceramic tiles. In terms of performance characteristics, this is a very good option. It, like tiles, is not afraid of high temperatures, moisture, aggressive chemicals, and is durable and easy to maintain.
How to choose drywall for tiles
When using plasterboard for laying tiles, not everything is as smooth as it might seem at first glance; apartment owners often do not know whether ceramic tiles can be glued to plasterboard, or they doubt the choice, and there are more than enough reasons for doubt:
- A sheet of plasterboard of standard thickness is not designed to hold heavy tile ceramics, the weight of which can exceed 15-20 kg per square;
- The paper coating does not look strong enough; it is almost impossible to glue tiles onto paper using conventional cement adhesives;
- Drywall “does not like” moisture, which is always abundant, both in the adhesive mass and in the bathroom or kitchen.
Most of the difficulties associated with the process of laying tiles on drywall, both imagined and real, can be eliminated or circumvented. There are more than enough ways to do this. For example, choose a high-strength tile adhesive before gluing the tiles onto drywall in the bathroom, use waterproofing, and assemble a reinforced load-bearing frame.
Important! The main thing is that as a result of laying plasterboard, the walls, floor and ceiling should be perfectly smooth. Such precise geometry cannot be achieved with plastering work, even with 20 years of practice.
Two drywall options
The industry produces several brands of GVL and GVLV plasterboard. The first option is lithopressed gypsum covered with paper. According to the conditions of SNiP No. II-3-79, GVL can be used for wall cladding in conditions where there is no contact with water. Drywall is ideal for the kitchen, corridor, veranda, any room where there is no condensation on the walls and there are no sudden changes in temperature.
The second type of GVLV plasterboard is waterproof; depending on the operating conditions, it can be used for cladding walls in bathrooms and bathrooms. This material is much more expensive than ordinary drywall, so amateurs often make do with ordinary gypsum board impregnated with a waterproof acrylic primer.
If you have to glue fairly heavy ceramic tiles, then the thickness of the sheet is chosen to be at least 20 mm; for plastic cladding, you can use a cheaper sheet with a thickness of 12-15 mm. It is believed that gluing tiles onto a paper base is no more difficult than gluing tiles onto a waterproof GVLV layer.
No. 4. Kitchen baseboard shape
According to the shape of the outer part, the kitchen plinth can be:
- triangular;
- rectangular;
- flat;
- rounded;
- curly
The width of the plinth is chosen based on which gap needs to be closed. Moldings are usually sold in lengths of 3-4 m along with all the necessary fittings: plugs, corners and connecting elements.
Plastic and aluminum skirting boards usually consist of two parts: a base, which is attached to the tabletop with self-tapping screws, and a decorative insert, which snaps into place after the base has been installed. Stone and some aluminum planks are available in monolithic form. There are also skirting boards that consist only of a base, in which any decorative material is then fixed. This is convenient if the set was made to order from some specific material. Usually one of the parts of the baseboard is equipped with a silicone seal to ensure complete tightness and protect the ends of the furniture from the slightest drops of water.
Depending on the type of attachment to the tabletop, there are three types of skirting boards:
- the base (mounting rail) is completely covered with a decorative strip, on which there are silicone strips at the top and bottom to seal the structure. The connection of the elements is ensured by special elements on the base and on the rail. Plastic moldings are usually arranged in a similar way;
- The silicone inserts are located on the mounting rail, and the outer part is just a decorative strip. This design is more reliable and is typical for aluminum skirting boards, less often - plastic ones;
- the third option is used only in aluminum skirting boards. The base has a small area and is attached to the tabletop; it is also equipped with a silicone strip. The decorative strip is installed on top; it has a special groove in it in order to expose the upper part of the sealant.
Installation of different types of skirting boards for tabletops
How to install a wooden structure
The wooden sample looks good in combination with wooden kitchen tables or those made from chipboard. To purchase a skirting board of the shade most suitable for the tabletop, it is enough to order it together with the table, from the same manufacturer. As a last resort, you can ask him what varnish was applied to the kitchen furniture and start painting it yourself.
If you are an esthete who wants to preserve the original appearance of the wood, you can attach the product using the following methods:
- Rid the surface of excess fat with alcohol, cover the surface with a thin silicone layer, fix the device in the place where you need it, press well and place a weight on top. When the material is dry, get rid of the weighting material. If desired, the silicone mixture can be replaced with liquid nails.
- You can also install the device on the table by having self-tapping screws on hand. Make a groove with a drill, the width of which reaches 8 mm. In this case, the depth should be such that the head of the fastening element is inside the product; in practice, this is about 3 mm. Now press the skirting board against the wall structure and screw it to the tabletop. Putty that matches the color of the wood will help hide obvious defects and imperfections.
Features of installation of stone products
Stone devices will fit under marble countertops, cut by masons to the desired size and shape. The most common example of stone kitchen furniture is the bar counter located in the living room.
This design looks truly chic and luxurious, and, therefore, requires a special approach to decoration.
It is necessary to achieve a monolithic effect
To attach a stone plinth to a table, you need to thoroughly clean the latter and no less thoroughly degrease it. As an adhesive element, use putty intended for baseboards, which contains stone dust of the type of stone from which the countertop is made.
Do not forget to cover the joints, and after the putty material has dried, polish them well. All these actions will help make the product unified and monolithic, without a visible transition from the table to the baseboard component.
Metal-plastic device
The metal-plastic mechanism is useful for a tabletop made of artificial stone. The carbon pattern will ensure that water quickly drains down from the top of the baseboard. The rectangular product, equipped with roundness, is larger in size compared to the previous type of design. That is why practicality is somewhat inferior.
You can begin fixing metal-plastic installations with a Phillips screwdriver or screwdriver.
First, open the baseboard in half. Don't be surprised - the countertop product actually consists of two parts. The first acts as a base and is fixed to the furniture using self-tapping screws. The second, relating to the front side, is attached to the first part and then snaps into place.
Next, install the base, pressing it tightly to the tabletop and securing the position with self-tapping screws. If there are sharp corners, first put on the corner, and only then install the front side by snapping it into place. The plugs included in the kit are installed last, located along the edges of the structure.
Fixing the metal model
Metal installations are most often made of steel or aluminum, respectively, suitable for the same tables. The main part of the presented samples has an angular shape, the angle of which can be 45 degrees, others are made in the form of a rectangle. It is quite easy to distinguish a metal plinth from other specimens - by its unusual color.
You can fix the position of the fixtures with self-tapping screws, but some consumers don’t like to see the fasteners sticking out below. This can be avoided by fixing the base to the metal with glue.
Degrease the surface again and spread a thin layer of glue, apply and press it to the wall. Get rid of excess glue before it dries, snap the front side of the structure into place and install the plugs.
Plastic skirting boards
The devices are universal and are attached using screws and adhesives. There are options when the edges of the products have adhesive tape, which greatly simplifies the gluing process.
How to choose tiles for drywall
Plastic tiles for wall cladding in the bathroom and kitchen are used quite rarely, with the exception of bathrooms or individual sections of kitchen walls. Plastic tiles adhere perfectly to any type of adhesive, but craftsmen prefer polyurethane brands and adhesive compositions such as “liquid nails”.
Choosing ceramic tiles for laying on drywall is more difficult; several important factors must be taken into account:
- It is necessary to buy tiles simultaneously for the entire area of drywall with a small margin of 5%;
- Each pack of tiles must be opened and the dimensions of each one checked; even in branded and exclusive collections, up to 20% of the material has deviations in size;
- The tiles chosen are no thicker than 8 mm, if glued with universal glue; for dispersed and epoxy grades, slab material up to 10 mm thick can be used.
Some craftsmen use special finishing wheels with glued sandpaper. Before gluing the tiles to the drywall in the bathroom, the edges and ends of each are carefully sanded down with sandpaper to make all the material the same size. Fitting the tiles must be done on waterproof sandpaper with a slight clamping force. When adjusting the tiles, you need to be as careful as possible so as not to overheat and chip the edge of the glaze.
Since there is practically no shrinkage with good slab adhesives, experienced tilers, before laying, seal the front part of the tile with tape and grind down the back side so that the thickness is reduced to 5 mm.
Types of moldings for kitchen countertops
Sometimes a kitchen plinth comes complete with a ready-made set, and then all you have to do is install it in place. If not, you will have to go to the store and choose a table molding that matches the appearance and material of your set and kitchen accessories.
Kitchen plinth made of plastic
Kitchen plastic plinth is made from polyvinyl chloride. Co-extrusion, which profiles are subjected to after molding, allows you to give their surface any color and pattern. As you can see by looking at the following photo, such molding can easily imitate artificial stone, marble or wood. This is a fairly popular way to finish a countertop.
Kitchen profiles made of plastic are quite elastic, which means they can repeat small errors in the geometry of the walls. The price of this finishing material is relatively low, and installing it on the countertop will not require much time and effort. The negative point is that installing it next to a built-in hob is undesirable, since PVC does not withstand high temperatures very well. But as a molding for a sink drawer, plastic would be an excellent option.
Furniture and kitchen plinths. Made from polyvinyl chloride
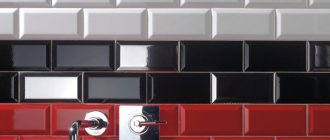
Aluminum profile for table top
The next most popular after plastic is aluminum tabletop plinth. It will cost a little more than PVC molding, but it will perform better in operation. Aluminum will last a very long time and will be easy to clean from dirt. In addition, metal molding has heat resistance that plastic does not, and it can be installed near heated surfaces.
Kitchen skirting boards made of aluminum are available in different modifications and with different types of coatings. The outer surface of such molding can be made of plain, embossed or polished aluminum, with or without replaceable colored trim. In the photo below there is a furniture plinth with a glued-on colored stripe: you can purchase the molding separately and separately the strip, which will match the color of the specific kitchen set.
Skirting board for kitchen, aluminum. The color is changed by gluing a special tape
Kitchen skirting boards made of artificial stone and marble
These moldings are called attached because they are mounted vertically, as if leaning against the wall. They are made from the same materials as countertops. The installation of such molding is carried out using glue, the same one that is used when sealing the joints of the tabletop parts: the sealing of the seams in the end is very good.
Stone kitchen skirting boards have a long service life and excellent appearance, and are not afraid of heating. This molding also has disadvantages: a marble or stone plinth for a table top does not bend at all, and therefore requires perfect alignment of the wall to which it will be adjacent; high price compared to plastic or aluminum.
An example of wall-mounted installation of a ceramic or stone baseboard for a table
The principle of choosing a kitchen plinth for a countertop
The choice of moldings for kitchen countertops is based on two parameters:
- Technical characteristics - compliance of the width of the plinth with the size of the gap between the wall and the countertop, the presence or absence of heating appliances in the immediate vicinity.
- Taking into account the style in which the kitchen set is made, as well as the type of accessories that are located near the molding. So, if you have railings installed under the hanging drawers, then it makes sense to choose a plinth that is similar in appearance to them.
In general, the most popular option is to match the molding to the color of the countertop. However, a profile selected, for example, to match the material of the sink, as in the photo below, will look no worse.
Basement plinth, kitchen, aluminum. Its design is chosen in accordance with the style of the entire kitchen set
Important: the selection of finishes for the countertops of a new kitchen is best done at the same time as the purchase of the last one. In this case, you will be able to attach samples of moldings to the kitchen module and “live” evaluate which of them fit and how well they fit.
How to choose adhesive for tiles on drywall
The most important step is the correct selection of glue brand. The characteristics and type of adhesive must be selected based on the weight of the tile material, operating conditions of the tile and price. You can, of course, not really look for easy ways, but buy the most reliable option - branded epoxy adhesive, which can be used to glue tiles not only to drywall, but also to plastic, wood, natural stone, metal and even paint.
If financial capabilities allow, then choosing epoxy adhesive will be the most optimal solution, regardless of whether it will be tiles on drywall in the kitchen or bathroom. In addition to producing an incredibly strong adhesive joint that is not afraid of open water, acids, alkalis, and detergents, the epoxy mass significantly impregnates and strengthens the drywall sheet itself. If you properly glue the slab material onto a plasterboard base, you get a very strong and solid panel that can easily support the weight of ceramic tiles without deformation or subsidence.
The only difficulty remains the high cost of the epoxy compound; if you plan to glue ceramics or porcelain tiles, you will have to pay at least 15 euros per kilogram of a two-component compound for tile adhesive. For a bathroom of 20 m2, the cost of glue will be at least 600 euros.
Elastic and dispersion adhesives
For rooms where there is no constant heating and the temperature can fluctuate within two tens of degrees, experts recommend using special elastic brands of adhesives. In this case, the thermal expansion of walls, drywall sheets and tile material will in no way affect the strength of the adhesive joint.
For the bathroom, universal brands of tile adhesive are used; almost any non-cement based ceramic tile adhesive ensures high strength and water resistance of the joint. The walls and floors of shower cabins, and tiled splashbacks in kitchen interiors are made on a plasterboard base using special waterproof grades of glue.
For the most expensive brands of tiles, for example, glass mosaics, enamels, porcelain tiles and glass, dispersion tile adhesives are used, which have excellent adhesion, increased strength and excellent appearance. The cost of the dispersion material is approximately twice as high as that of universal brands of adhesives.
Materials for making skirting boards
Ideally, select a plinth made of the same material as the countertop. However, this is not always possible. Knowing the main features of the materials used for the production of skirting boards, it is not difficult to make the optimal replacement.
Plastic skirting board
Ceramics and stone (artificial and natural). Products made of porcelain stoneware and stone are famous for their durability and presentable appearance throughout their entire service life. They have high heat and moisture resistance, but are quite expensive. Installation is carried out vertically by installing it on the wall using special glue.
Aluminum. Aluminum fillets are the most acceptable in terms of price-quality-practicality ratio. They have plasticity, which makes it easy to repeat the geometry of the walls. They can be made with a polished or embossed surface, with or without finishing (including colored). High heat resistance allows the products to be mounted near cooking surfaces and other heating equipment. Their long service life and affordable price make them very popular.
Tree. Among the advantages are the aesthetics of appearance, environmental friendliness, and the possibility of painting or tinting. But wooden products are expensive and require treatment with protective agents and special care.
Aluminum skirting board
Tiling work on plasterboard walls
You need to start laying tiles from the second row. At a height equal to one tile from the floor, horizontal guides, wooden or made of metal profiles, are attached to the walls along the perimeter of the room.
They will be a support for the initial rows, so that under the weight of the next rows the tiles will not “crawl” on fresh mortar.
Important! When installing guides, it is very important to carefully align the entire perimeter horizontally. All further matches of the walls along the seams and tile heights will depend on the accuracy of the installation of the guides.
Using a drill and a mixer attachment, prepare an amount of adhesive mixture sufficient to work for an hour. To lay tiles on drywall, a layer of glue 3-5 mm thick is required. In view of this, you do not need to stir a lot of glue at once - after a while it will begin to set and lose its adhesive properties.
If you need to make holes in the tiles for electrical outlets or utilities, you can use one of the methods presented in the video:
Using a notched trowel-comb, the adhesive is applied to the wall. The tiles of the first row are placed on the guide and pressed against the wall so that the adhesive ridges are crushed and fill the voids as much as possible.
You should pay attention to the presence of glue at the corners of the tiles - corners with voids underneath them are easily broken during use.
Advice! It is advisable to calculate the layout so that the tiles with cut edges at the corners are not too small in width. Half tiles in both corners look much better than a full tile in one corner and a narrow strip in the opposite.
It is recommended to lay three to four rows of tiles in height at one time. After laying the first rows, you should take a break for about an hour so that the tile adhesive has time to set.
This rhythm of work will be correctly applied in the future. The entire process can be seen in detail in this video:
To maintain the same width of the seams, store-bought plastic crosses are inserted between the tiles.
Excess fresh glue in the seams is immediately removed with a damp cloth or sponge.
Laying the bottom row of tiles
You can remove the support guides after the glue of several lower rows has completely dried. The lowest row is installed on the floor tiles. If the floor is not ready yet, you should lay it out first.
Advice! Experienced tilers leave a distance of 2-3 cm less than the height of the tiles for laying the first row. During the installation process, each element is measured and cut according to the fact, taking into account the width of the seam. This will compensate for possible deviations of the floor from the horizontal.
Grouting joints
After laying and setting the mortar, the tile seams are filled with a special tile grout. Its color is selected in accordance with the intended design.
Similarly with adhesive mixtures, grout goes on sale both dry and ready-made. It must be applied with a rubber spatula so as not to damage the glossy surface.
Approximately 1 – 1.5 hours after grouting, the surface of the tile should be actively wiped with a wet sponge. The sponge should be rinsed regularly in a bucket of water to remove excess grout and create neat tile joints.
Important! Do not leave the grout to dry for too long. When dry, this mixture acquires water-repellent properties and adheres very firmly even to the glossy surface of the tile. Mechanically cleaning off dried grout is dangerous - you can damage the gloss, and with a wet sponge you will have to wash the walls hard and tediously.
Installation, installation, replacement of kitchen plinth
There is nothing complicated about attaching the plinth. But the cleanliness of the kitchen and its appearance depend on the quality of its installation. Before you start installing, you need to check the package contents. Usually included in the kit:
- base part of the plinth;
- decorative part;
- plugs that are mounted at the ends;
- angular and straight connectors;
- fastener
Once you are sure that everything is in place, you can proceed to installation. The work is carried out in the following sequence:
Work order (size, wall, fasten, joint)
- first, the required length is measured and a piece of plinth of the required length is cut;
- the plinth is divided and the base part is laid along the wall;
- Having drilled the base with a hammer drill, holes are made for fastening in the wall;
- dowels (preferably plastic) are driven into them, the base is firmly fixed with locking screws;
- a decorative part is attached to the base, it simply snaps into the fasteners;
- after the plinth is installed on one side, it is installed in the same way on the second;
- plugs are installed at the ends; for corner tabletops, connectors are installed at the corners;
- the joint between the baseboard and the tabletop is sealed with silicone, which is added to the fastenings of the plugs and corner connectors;
- Excess sealant should be removed with a soft cloth.
If part of the baseboard has been damaged, then it is not at all necessary to replace it along its entire length; it is enough to carefully remove the damaged part and insert a new piece, placing it on the sealant. But if the damaged part is small, then it is better to select a piece of metal-plastic of the desired color and insert it in place of the damaged one. You can find out which countertop for the kitchen is better to choose in this material.
A bright countertop will make an accent in the kitchen.
No. 2. The most important basics for choosing kitchen baseboards
Most kitchen sets include a matching kitchen baseboard. However, not everyone may like the “default” option, and then you will have to choose the molding to your liking. The question of choice will also be faced by those who made the kitchen to order. In order for the kitchen plinth to look as harmonious as possible, when determining its color, material and texture, the following rules are followed:
- selection of skirting boards of the same material and/or color as the worktop. So, for example, stone countertops are perfectly complemented by stone baseboards, wooden ones – by wooden ones, but combinations of different materials are also possible. Plastic skirting boards can follow the pattern of any material, therefore they can be considered universal;
- selection of baseboards for kitchen fittings, sinks, railings or other parts. If the handles on the facades are made of bronze, then the plinth of the same color will look harmonious.
When a plinth is selected along with a kitchen set, you can immediately test several samples of baguette, attaching them to the kitchen modules and assess compatibility.
Methods for connecting tabletop parts
Three types of connections for kitchen countertops are used:
- joint to joint without euro-saw;
- joint to joint using a euro saw;
- the use of a T-shaped profile made of aluminum alloy.
Euro-sawing is a method of processing the ends of a tabletop according to a pattern. That’s what it’s called – patterned. In this case, the ends are cut on a milling machine. Some manufacturers, in order to reduce the cost of the work carried out, use a format-cutting machine for this. The planes of the ends on such a machine turn out to be uneven with an allowance of a millimeter or more. Therefore, the result is an incomplete fit of the end planes and the appearance of gaps between the joined parts of the tabletop.
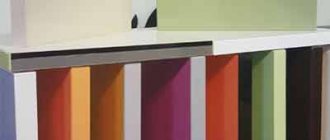
Design and configuration of skirting boards for table tops
The design and configuration of the plinth for the tabletop directly depends on the manufacturing company. When choosing the appropriate option, you should focus on the design of the kitchen and the purpose of the purchased element. We invite you to get acquainted with the available solutions to make it easier for you to choose the shape of the planks.
The design of baguettes may differPHOTO: vkamne.com
Flat, triangular and rectangular
If the distance between the wall and the countertop is minimal, flat baseboards will be the best solution. They will help hide the gap without disturbing the overall interior of the kitchen unit. This is especially true for kitchens decorated in a minimalist style.
Flat borders can cover a small gap between the wall and the desktopPHOTO: zatirka.kiev.ua
Triangular products are most widespread. This is a classic option, the internal space of which is ideal for placing wiring. The plinth consists of a right internal corner attached to the wall and tabletop, and a smooth inclined surface that performs a decorative function.
Thanks to their successful design, triangular skirting boards are in high demand. PHOTO: decoplint.ru
Rectangular or square elements, due to their design, will allow you to hide the wires. Most often, such a baseboard is metal.
Rectangular ones are used for placing wires PHOTO: d-plintus.ru
How to connect a tabletop?
In the process of carrying out renovation work, most apartment owners, in addition to replacing finishing materials, select new furniture for their home. And often, in order for everything to ultimately stand in its place, the furniture has to be slightly modified. This problem very often concerns kitchen countertops.
Kitchen countertop diagram.
For example, in the case of a corner kitchen. If you do not want to use the services of furniture assemblers, then you will have to carry out this type of work yourself. Let us consider in detail how the tabletops are connected and their correct installation.