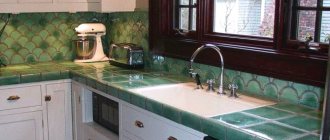
A kitchen apron made of tiles plays an important role in the interior of the dining area. The cost of work by mobile technicians is growing from year to year, so the best option for repairs would be to entrust it to yourself. Even a novice craftsman who has no experience in carrying out this type of repair work can independently lay tiles on a kitchen backsplash.
Tile selection
The future interior of the kitchen largely depends on the color of the tiles. It should be combined with the surrounding environment, not draw attention to itself, but at the same time be catchy and memorable. The variability of shades depends on the chosen material.
| Material | Advantages | Flaws |
| Ceramic | Environmental friendliness, low price, variety of shapes and sizes, patterns. Ease of treating walls with ceramics. | The weak point is the seams; you will have to tinker with the grout, especially if you do not have the proper experience in the work. A messy installation process that requires a level base. |
| Mosaic | Durability, suitable for the design of non-standard shaped surfaces, the ability to create complex compositions. | A large number of seams, complex and expensive installation, |
| A natural stone | Strength, density of the material, expensive and attractive appearance, variety of shades, high degree of resistance to external factors. | Opportunity to buy from an unscrupulous manufacturer, high price, possibility of radioactive exposure. |
| Marble | Low price, beautiful appearance. | High level of moisture absorption. |
| Fake diamond | Does not require special care, durable, seamless apron, a variety of shades. | High price, rough appearance. |
| MDF and chipboard | Low price, variety of colors and shades, ease of installation | Strength is lower than other materials |
We determine the dimensions of the apron and calculate the material
Before you begin laying the apron, you need to calculate the amount of materials and determine the size of the occupied area. Standard parameters of a kitchen apron:
- 55-75 cm vertically. You can navigate from the level of the countertop or furniture.
- It is recommended that the tile border be at least 20mm below the level of the worktop to prevent dirt and moisture from accumulating in the joints.
- The upper border of the apron is the hood.
- Horizontally, the kitchen apron occupies the entire wall, from one corner to the other.
Depending on the interior, the kitchen apron can reach the very floor. Horizontally, it can be limited to one work area, where the stove, sink and kitchen table are concentrated.
Preparing for work
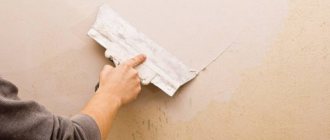
This stage includes preparatory work for laying the kitchen apron. The walls must be treated with plasterboard or plaster in advance to make them smooth and hide small cracks. The glue is applied less easily to curved walls; in some areas it may not adhere well.
You need to remove whitewash or old plaster from the wall. You will have to make notches on the oil paint using a grinder.
It is important to mark the bottom level of the tiles so that the rows are even. It is better to install a profile at the bottom to prevent the tiles from slipping in case the glue does not dry completely. A laser hydraulic level is best suited for this purpose.
Necessary materials for work
For construction work of this type, the following materials will be required:
- A tile of a suitable material with a selected pattern. The recommended resistance level is at least AA; such tiles are resistant to external influences and can withstand any household chemicals.
- Putty and primer to get rid of cracks and uneven walls.
- Glue.
List of tools for work
Tools required for construction work:
- Hammer (the main task is to help remove the old coating to apply a new one).
- A screwdriver will be required if you intend to install the socket and run the wires.
- The adhesive solution is mixed with a special mixer.
- Buckets for diluting glue and water.
- Three types of spatula: narrow, serrated and rubber.
- Level for determining the angle of inclination and even placement of the tiles.
- Laser hydraulic level for adjusting the lower level of the tile and protecting it from falling in case the glue does not dry completely and it starts to fall.
- Crosses and also pegs.
- Pencil for marks.
Tools and materials
If you choose the method of our ancestors, you will need a spatula and mortar to level the end edge. After complete drying, the coating is sanded, dust-free and impregnated with a primer to improve adhesion.
Next comes paint with a brush or sealed grout, which can be spread manually without any tools. If the edges are not even enough, it is better to use a medium-hard rubber spatula. After the grout has dried, the coating should be sanded a little with fine sandpaper.
As for the finishing profile, it is installed simultaneously with laying the tiles. Fixation occurs due to the same adhesive solution.
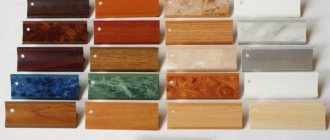
Decorative strips are distinguished according to different parameters:
Material
- impact-resistant plastic;
- metal protected with an anti-corrosion compound or zinc film.
Design features
- roundings can be internal or external;
- flat and curly;
- straight, flexible and curved.
Functional significance
- decorative and protective, for example, for corners and end elements;
- connecting is relevant for designing the transition of dissimilar coatings, including for the end of interest to us;
- compensatory.
Among other things, trims can have a decorative coating. For example, imitation of the structure and shades of natural materials or just any color.
And plastic is painted with special pigments at the manufacturing stage. To give an unusual effect, special insoluble fillers can be used.
For example, crushed quartz or granite.
It is important not to forget that the edges of the tile must be completely secured with adhesive mortar.
Expert opinion
Mikhailova Maria Vasilievna
Furniture store manager. Knows everything about comfort and interior design
You can decorate the end beautifully using any of the methods listed above. An individual approach is also not excluded. The main thing is that there are no voids and water and dirt do not accumulate at the ends.
Installation instructions
- The first stage is to make markings using a hard pencil, a cord with a weight for a perfectly straight vertical line, and a plasterboard sheet for the bottom border.
- Dilution of the adhesive solution . It is important to maintain all proportions so that the glue holds the tile firmly and prevents it from falling to the floor. After two hours, the glue will begin to dry and lose its important properties, so you need to use it up as quickly as possible. The thickness of the adhesive layer should not exceed 10 mm.
- Laying the apron . An adhesive solution is applied to the wall, the lower border is marked with a profile. It is important to press the tile firmly against the wall so that the adhesive adheres firmly.
- You can start laying from the edge, then you will have to install a special corner in the corner. If any part lies unevenly, it can be disconnected and reinstalled.
- The first row is the most important; you can proceed to laying the next one when it is completely dry. You need to install crosses between them so that the seam spacing is uniform.
- The final stage is cutting the tiles and grouting them to give the backsplash its original appearance.
Preparing the wall surface
Before you move on to laying a tile backsplash in your kitchen, it is important to properly prepare the wall. First you need to remove the previous coating - paint, wallpaper, decorative material. To clear the wall of old tiles, you will have to use a hammer drill. Fill all irregularities with primer and putty so that the surface becomes smooth and the tile lays on it without problems.
The angle when moving from one wall to another should be perfectly even. Professionals advise making small notches so that the adhesive solution adheres better. To remove fungus, mold and salts from the surface, it is better to use a high-quality fungicide so that the dirt does not spread further and spoil the materials.
Marking
Particular attention should be paid to the markings so that the pattern is not disturbed and the tiles lie flat. The standard distance from the tile to the floor is 70-85 cm, the recommended height is 55-65 cm. The upper edge of the tile is marked with a hard pencil, the lower edge is limited by an even wooden beam, which will support the tile if the glue does not have time to dry.
The wooden beam can be replaced with a metal profile or sheets of plasterboard. A vertical mark can be made with a special cord with a weight. It is mounted under the ceiling and goes down in a straight line, marking the border. Under the force of gravity, the cord will create a perfectly straight line. You can start laying from the edge or from the center.
Preparing the adhesive solution
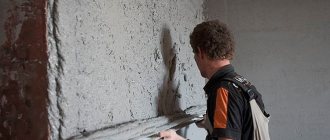
Before laying kitchen backsplash tiles, the wall should be treated with a primer so that the adhesive adheres better and adhesion increases. The adhesive solution must be diluted according to the instructions, observing the proportions and dosage.
First, a small amount of glue is applied to the wall itself. The surface should be covered with a shiny film. The remainder is applied directly to the tiles. For better adhesion, the adhesive is removed from the tiles with a knife or scalpel; the residue should be left in the recesses and cracks to ensure better adhesion.
Using a notched trowel, spread the adhesive evenly over the wall. The composition will begin to harden in 15-20 minutes, during which time you need to start laying the tiles. The adhesive solution can remain in the bucket for no more than two hours.
Trimming and styling
Anyone who has tried to lay a tile backsplash in a kitchen with their own hands knows that in most cases it has to be cut to fit the dimensions of the room and the features of the walls. For convenience, it is recommended to use a special tile cutter, however, there is no point in buying one specifically for laying a kitchen apron.
How to cut tiles for a backsplash:
- This can be done with a regular glass cutter. Use a marker to make the necessary marks and draw the tool along the line, pressing firmly on your hand. Separate the unnecessary part with your hands, placing it on the corner of the table.
- To make it break better, it is recommended to place it in water at room temperature for 10-15 minutes before starting.
- If you have a grinder, you can cut it with it. However, in this case, you will have to get a tight respirator to protect your respiratory system from fragments.
The next stage is laying the tiles. You should start with whole pieces; it is better to place them in the center so as not to spoil the integrity of the design and the appearance as a whole. Leave the trimmings at the very end, for example, along the edges, under the tabletop, where they are not so visible.
It is extremely important to lay it in even rows. Vertical and horizontal marks are made differently. The first tile will act as a kind of beacon, relative to which the remaining elements will be aligned.
The tile must be pressed tightly against the wall so that all the air escapes and the glue sets well. Then the material will not peel off and will last for many years.
How to lay a backsplash tile in the kitchen:
- The pattern should be uniform; its integrity should not be violated, otherwise the apron will look untidy. To make the installation process as simple as possible, on the back of each tile, manufacturers mark with arrows which direction the pattern is located.
- The profile is screwed to the edge of the picture. It is on this that the horizontal mark of the tile is placed. It is better to place plastic wedges under the first element so that you can adjust its position until the glue dries.
- After the first row is completed, plastic crosses should be placed in place of future seams. The thickness of the seams depends on the depth of their immersion.
- The undercuts are attached at the very end in the free areas.
Grout
The kitchen apron will take on its final appearance at the very end. Grouting is carried out upon completion of all work. It is important that the composition does not contrast with the color of the tile, so that the design does not turn out faded. The grout is applied with a rubber spatula; excess can be removed with a sponge.
To protect the seams from fraying, they can be additionally treated with a water repellent.
We also recommend watching: Removing grout from tile joints at home
Output of wires and sockets
The outlet for the wires is installed at the very end, after grouting. The hardest part is making the holes for the socket. The lining of the future location for wiring should be done carefully. If the wires have already been laid, while laying the tiles they should be protected from glue and other liquids using film or a plastic bag.
Once it is installed, you can proceed to marking the location for the future outlet. Mark the boundaries directly along it with a marker or paint and drill holes with a tile drill. Remove dust. It is important that during the process the tiles do not crack or begin to crumble.
If glue gets on the wires, it should be quickly removed with a dry sponge.
Laying tiles
- The first tile is laid in the most visible place, and the trims are left at the end.
- Using the two-meter rule, you can control that all tiles are in the same plane relative to the wall. To do this, you first need to install a temporary beacon tile on the opposite side of the kitchen, on which you will watch the deviations of the others.
- We check vertical deviations with a level, in this case it will be most convenient to use a 60 cm long bubble one, or a laser one - for those who have one.
- When you press the tile evenly against the wall and tap it, the thickness of the adhesive should be approximately 2-3 mm.
- When you install the second tile, you will need to remove the temporary beacon and clean it and the wall itself of glue. The remaining elements will be aligned relative to those already installed.
- If you bought cheap domestic tiles for an apron, then with a 99% probability you will encounter the problem of unevenness of its geometric dimensions by 1-2 mm. Such errors can be compensated for by the width of the seams.
- A profile screwed to the wall will give you a perfect horizontal line, but due to the difference in size, the top line may end up crooked. To avoid this, place special plastic wedges under the tiles under the first row in advance, which allow you to adjust its level, depending on their immersion.
- When you lay the tiles, check their evenness relative to adjacent elements and the overall horizontal level. If necessary, adjust the size based on the width of the seams and gussets at the bottom.
- Laying the second row is done in a similar way, but to control the required space between the tiles you need to use plastic crosses. You should not use them with a thickness of more than 2 mm on the apron; in this case, 1.5 mm crosses are used. When they are completely immersed, the seam will be the same width. If the cross is not fully immersed, the seam becomes smaller. Using them we correct the evenness of horizontal and vertical seams.
- If necessary, cut tiles, use a manual tile cutter or grinder. If there is neither one nor the other, you can do this with any sharp object: a nail, knife, drill, etc. Read more in the article about how to cut tiles correctly.
Laying beacon tiles and first rows
Do not forget to pay attention to the direction of the pattern when laying, usually there are arrows on the back side for this purpose; they should be directed in the same direction for all tiles.
Holes for wires and sockets
Making cutouts for sockets and switches in the apron
- When you reach the wire outlet, you can make a hole using a tile drill bit. Since wall tiles are much softer than floor tiles, one drill will be enough for at least 15-20 holes.
- Larger holes for sockets are made using a diamond-coated bit on a drill. But if you have a grinder with a diamond disc for tiles (the disc should be without holes, and the coating on it should not be jagged) and a little experience, then you can make holes with it.
- When you glue tiles next to an outlet, it is more convenient to apply the glue not to the wall, but to the tile itself.
Try not to leave adhesive on the tiles or inside the grout, otherwise it will be difficult to remove once it dries. It’s easier to clean it right away with a damp cloth.
Recommendations from experts
Some expert advice on how to lay a tile backsplash in the kitchen:
- The grout will have to be updated regularly so that the apron does not lose its attractiveness and does not fade.
- After calculating the amount of materials needed, it is worth adding another 10-15% to this figure in case during the repair process some of the tiles deteriorate and become unusable.
- Installation should start from the center if the tiles for the apron are the same size on the left and right.
- Laying from the edge is suitable for corner kitchens and the edge of the apron in a visible place.
Features of a kitchen tile apron
The glue under the ceramics should lie evenly, without air cavities. A beautiful, but very fragile material will have to be washed repeatedly, sometimes with effort. It's unlikely to fall out, but it will definitely crack.
And the stripe above the work surface should decorate and delight. The process of cooking is labor-intensive, something needs to invigorate. Choosing beautiful tiles is half the battle. They harmonize the top and bottom of the set and are an important part of the interior. Can't go wrong with the design!
Ceramics are three thousand years old or more. Designers insist to pay attention to the following points:
- You can’t put them without seams, 2 mm, 1 mm, but there should be;
- It is necessary to bring part of the tile down, under the table level;
- We place the edge of the top row under the top cabinets;
- We place it higher above the hob; if the exhaust hose does not have front covers, we place it under the very exhaust hatch;
- In the corners of turns, on the turns of the apron, small cuts cannot be made;
- From the corner to the left/right - there should be identical pieces of tiles;
- 2/3 of the length of the tile is a good cut, half a tile is tolerable, it is better to exclude smaller sizes;
- The main thing, the most difficult thing, is to combine the pattern of the apron with the structure of the kitchen furniture.
Overview of methods
Video review
The video below shows how to lay tiles on a backsplash. Detailed instructions allow you to do this yourself, without having much experience in repairs.
A high-quality kitchen apron allows you to create a truly stylish and beautiful dream kitchen. In addition, it reliably protects the kitchen from various types of mold and mildew, high humidity, and dirt. To assemble a kitchen apron, you don’t need much experience, just follow the instructions and carry out each step with care.
Application of adhesive composition
To properly make a kitchen apron from tiles with your own hands , you will need to know the nuances associated with kneading and applying tile adhesive:
- Before you start laying tiles with tile adhesive, a special coating is applied to the surface to be finished. primer, increasing the quality of adhesion of tiles and tile adhesive to the wall;
- It is recommended to apply tile adhesive first thin layer on the wall itself, after which reverse tile surface. This will increase the strength and durability of the finished tile covering;
- Using a special notched trowel, the tile adhesive is evenly distributed over the wall surface. The size of the teeth of the notched trowel is selected based on the dimensions and weight of the ceramic tiles used;
- After the tile is glued to the wall, the master will have no more than 20 minutes to correct any detected jambs, since the tile adhesive has time to harden within 20 minutes after being applied to the wall.
Important : a novice master needs not only to know how to lay tiles on a kitchen backsplash, but also to remember that the mixed tile adhesive should be used within 1-1.5 hours, as it may begin to harden and lose its adhesive properties while in bucket