For aesthetic and practical reasons, they try to make the walls in the room even. Straight surfaces without cracks or other defects create a feeling of well-groomedness and order; they are a convenient basis for all types of decorative finishing.
In this article, I have collected all the basic rules and nuances for leveling walls with plaster: which one is better to choose, how to properly plaster it yourself. I tried to make detailed and complete instructions on the technology of each stage of work.
Ways to level walls
In construction and renovation, two main methods of leveling walls are practiced:
- the first - with the help of plaster, it is also called “wet”,
- the second is sheathing with plasterboard sheets, it is called “dry”.
The choice between these options is determined by factors such as the curvature of the existing walls and the planned decorative finish.
GCR shows itself best in large rooms with uneven walls, where you can easily sacrifice 5–10 cm on each side. Finishing usually involves painting or wallpapering.
Interesting! comparison of drywall and plaster when leveling walls: which is faster and cheaper.
Final work on leveling the walls
Subsequent work can begin no earlier than 7 days after applying the plaster. Cement compositions usually require more time to gain grade strength. During this period, it is important to create suitable temperature conditions. A wall plastered with cement mortar must be moistened periodically. It is not recommended to use heat guns to force the process, as this can lead to cracks.
When the plaster has dried, you can begin the final leveling of the walls. This stage is performed using putty. Read more about these works in the article () on our website.
Leveling with plaster
In most cases, in residential premises it is better to level the walls using plaster. This technology is quite simple, and with due diligence, anyone can do the work in satisfactory quality, which allows you to save money. However, with tight deadlines and high expectations, it is better to leave it to the professionals.
Advantages of plastering:
- Variety of compositions. Various fillers and binders make it possible to obtain a plaster solution with the desired technical properties, for example, porous components increase sound absorption and reduce thermal conductivity.
- Vapor permeability. Moisture does not accumulate on the inside of the finishing layer, but goes outside. This is especially true if the solution was laid on aerated concrete or on top of thermal insulation.
- Low cost of material. 30 kg of dry mixture costs about 350-400 rubles.
- Variability of finishing coatings. The plaster base is suitable for decorative finishing coats, wallpaper, painting and tiles. The solution is strong enough to hold brackets for electronics and household appliances.
Disadvantages of plastering work:
- Garbage. During the work process, a large amount of dust and dirt appears on the floor.
- Heavy weight. A thick layer of plaster significantly loads the walls.
- Time costs. The solution dries for several days, as a result of which this finishing takes a long time.
- Increased cost of work with very crooked walls. The use of plaster is much more expensive if the walls are uneven more than 50 mm.
Work rules
Carrying out plastering and painting work is quite strictly regulated by regulatory documents: SNiP, GESN, technological maps, PPR. The first two sources are of greatest importance.
According to them, during work the environment must meet the following criteria:
- Air temperature more than +10ºC (manufacturers of plaster mixtures allow use from a surface temperature of +5ºC);
- Humidity below 60%.
The technology for high-quality plastering according to SNiP also requires compliance with the following points:
- The strength of the base must be greater than the strength of the coating.
- Protruding parts and joints of walls made of different materials should be plastered using a plaster mesh. Shredded panels are attached to wooden surfaces to ensure adhesion to the mortar.
- At air temperatures above +23, the surface must be moistened before applying the solution.
- The maximum thickness of single-layer plaster is 20 mm, one layer in a multi-layer coating is 7 mm.
- Before applying each layer of plaster or primer mortar, the working surface is cleaned of dust.
Expert opinion
Sergei Shablovsky
Plasterer
I would like to add that the most important rule when leveling porous and highly absorbent surfaces is to prime them to reduce water absorption. Otherwise, some of the water from the plaster will go into the walls and the solution will not gain its strength. I prime brick and aerated concrete with an acrylic universal primer in two layers (with an interval of 3 hours); soaking the wall with water before plastering is not so effective.
Application methods
Plaster solutions are applied to walls manually using a spatula and by machine.
The most common plastering stations on the Russian market are PFT, Putzmeister and Kaleta. Most units are suitable for preparing solutions based on gypsum, cement and lime binders. All components are mixed in a special hopper and supplied under pressure to the wall through a hose. This makes it possible to speed up and reduce the cost of the work process.
Note: The average price for high-performance models that allow you to immediately work with a large amount of mixture is 200-300 thousand rubles. There are mini-stations, these sell for around 20 thousand.
With the exception of the application method, the technology of work in both cases is the same; however, large areas (up to 200 m2 per day) can only be quickly plastered using a mechanized method, which requires the participation of a team of finishers.
Method of placing beacons
You can ideally level the walls by plastering using beacons. They are set according to the building level.
Metal guides are usually used. They are attached to the walls with gypsum mortar. This composition sets quite quickly. It holds the metal profile in the desired position. That is, in the state in which it was already installed using the level.
The beacons are installed at a distance of 1 m from each other. It is necessary that the rule with which the solution will be leveled should follow the adjacent rows of profiles installed along the beacons.
To ensure that the profiles are installed exactly vertically, use a plumb line. When the walls are completely prepared for applying plaster, proceed to preparing the solution.
Which plaster mixture to choose
Before buying a mixture or ingredients for preparing it yourself in a store, you need to clearly determine in which part of the house the work will be carried out and how much solution will be needed.
For facade
To level the outside walls of a country house, only cement and cement-lime mortars are used. They are cheaper than gypsum ones, and in addition, they are easy to prepare yourself, thereby further reducing costs. The financial factor in this matter is not the only one; the main thing is the technical characteristics of the finished product.
Expert opinion
Sergei Shablovsky
Plasterer
Cement-based plasters have the following advantages over gypsum plasters: strength and moisture resistance.
For interior work
Inside the house, the choice of the optimal material depends on the type of room. Gypsum is sensitive to moisture, so the bathroom, toilet and kitchen are finished with cement-sand plasters.
For bedrooms, offices, and hallways, any mixture is suitable based on its physical properties, but gypsum is more convenient to work with; they contribute to the formation of a more favorable microclimate due to increased vapor permeability. Gypsum solutions also have good thermal insulation properties.
Features of application to various surfaces
The differences between plastering walls with your own hands depend on what surface is supposed to be treated. Concrete and panel walls are cleaned and primed before plastering. If it is intended to be coated with cement mortar, then the surfaces are primed with conventional compounds, but if gypsum plaster is intended to be used, then the concrete is treated with concrete contact or sandy soil.
Aerated concrete, foam block, gas block surfaces are cleaned of unstable particles and glue. Impregnated with deep penetration primer. The inside of such surfaces can be plastered with cement and gypsum plaster, and the outside exclusively with cement, and a reinforcing façade mesh must first be installed.
Brick surfaces are first cleaned of previous plaster, paint, wallpaper, chips that are too large, and the resulting gaps between bricks are sealed with a solution consisting of 4 parts cement and 1 part sand. Wait until it dries. Next, the brick walls are primed and plastered.
The preparation and plastering of surfaces made of wood concrete slabs and gas silicate blocks is carried out similarly to the treatment of other surfaces.
SIP panels, OSB, plywood, and wooden surfaces are not plastered! If there are large differences in levels, then they are sealed with special compounds, after sanding and sealing the seams with sickle tape. Then they are reinforced with mesh and leveled.
Application Tools
Tools required for plastering work:
- Putty knife . Basic hand tool. It is a steel plate with a handle attached to one of its ends. Plasterers have at least two of these: narrow and wide. The first one is able to quickly throw the plaster mortar onto the wall, the second one is able to level it.
In addition, the spatula is used for removing old paint, filling masonry joints and cracks, filling, applying adhesive solutions for finishing, etc.
- Rule . A straight rigid rail 1–3 m long. Made of wood, steel, plastic or aluminum. In plastering work it is used mainly for leveling the mortar over the entire area of the wall, as well as for checking the evenness of the surface.
For measurements in the horizontal and vertical plane, many modern rules are equipped with a bubble level showing the deviation from the even horizontal and vertical.
- Smooth (trowel) . A hand-held construction tool consisting, like a spatula, of a metal plate and handle. Only the handle is located on the side of one of the planes of the steel sheet. When leveling walls, use a large trowel (280 x 130 mm) with a rectangular blade.
Mainly used for leveling mortar, it is widely used in creating decorative coatings, such as Venetian plaster.
- Guide beacons . This is a perforated metal profile used to level walls. Beacons are installed at the initial stage of plastering work, forming an invisible plane to which the solution needs to be brought.
They serve as guides when working with the rule. Corner profiles also serve to increase the durability of the finish in this problem area.
Tools and devices necessary for work
Leveling a wall with plaster requires the use of special tools, including:
- To apply the primer you must use rollers.
- Spatulas.
- Trowel and/or half/trowel.
- A container with a nozzle for spraying water when grouting the work surface.
- The materials are the plaster mixture itself.
- Wide container for mixing. Preferably a plastic container.
- Mixer (drill with attachment).
When leveling walls with plaster, you need a supply of water, beacons, and screws.
Instructions: how to plaster with your own hands
Before moving on to the sequence of plastering work, it is worth mentioning how much plaster is needed and how to calculate the consumption. This determines how much material you will need to buy for the rough finishing of the room. I described a simple calculation using the example of Knauf Rotband here.
- Surface preparation . Old coverings are removed from the wall: tiles, wallpaper, paint, plaster. Dust is removed, oil stains and other contaminants are removed. On concrete walls, notches are made under cement plaster to ensure better adhesion.
- Primer. Depending on the type of wall, a suitable solution is selected and applied. There are two main types: deep penetration and adhesive concrete-contact.
- Installation of beacons. To create a single plane, plaster beacons are installed. The most common type is metal profiles 6 or 10 mm thick, which are attached to the hay using plaster mortar or fasteners. They serve as a stop for subsequent leveling of the solution using the rule. Above I left a link to detailed instructions on the types and work with beacons.
- Preparation of the solution. Water is poured into a suitable container and the dry plaster mixture is added. The components are mixed to a homogeneous consistency using an electric drill with an attachment or a construction mixer.
Expert opinionSergei Shablovsky
Plasterer
Important: When mixing the plaster for the first time, you must follow the instructions on the package, because... The proportions of water/dry mixture may vary slightly among different manufacturers. I use a 20 liter plastic bucket to prepare the solution from half a bag and a 45 liter rectangular basin when kneading a bag of mixture.
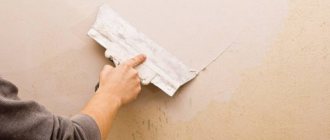
- Applying plaster. This can be done in different ways. For example, plaster is thrown onto a wall with a spatula. When working with cement plaster, a spray is used (also known as spray, basting) - a solution of a thinner consistency compared to the leveling layer is thrown onto the wall with a ladle. Another method of application: put material from a bucket with a spatula onto a rectangular trowel, then spread it onto the wall and level it out a little. The most labor-intensive part is plastering the ceiling.
- Alignment. After applying the required layer of solution, it is leveled using the rule. The tool is rested against the beacons and moved from bottom to top along a zigzag path. The excess solution is removed with a spatula and thrown into the container from which it was taken. The resulting small voids are filled with the mixture and re-leveled.
- Pruning . After the solution has set, small sagging and irregularities are removed as a rule.
- Removing beacons. The guides are removed after a few hours. In this case, a spatula is used on both sides of the profile, as if cutting the plaster. Beacons are picked up and taken out. The newly formed voids are filled with the same plaster mortar and leveled.
The grooves are plastered - Grout. After the surface has completely dried, the plaster is treated with an abrasive cloth or glossed. In this way, small unevenness can be leveled, but not large sagging.
This is where the rough plastering of crooked (and not so crooked) walls ends. This is enough for leveling under wallpaper, tiles, textured decorative plaster. Before painting or Venetian plaster, the walls are additionally puttied until they are perfectly smooth.
Installation of beacons
Plastering walls is a craftsmanship, therefore, to ensure that the walls are perfectly smooth, special beacon guides are used. The lighthouse is a narrow profile made of stainless metal; on the working side there are perforated round holes. At their core, they act as a limiter when leveling a layer of plaster thrown between two beacons.
A standard beacon is usually 3 meters long.
Beacons are installed vertically, along the entire height of the wall (from floor to ceiling). The distance between the mounted beacons should be slightly less than the length of the rule, and usually it is 1.5 m with a rule length of 2 m.
Rule is a specialized construction tool designed for leveling walls according to beacons.
So, let's start installing beacons for plastering walls.
We apply markings to the walls. Using a building level or level, vertical lines are drawn with a pencil on all walls in the places where the profile will be future fastened. The installation of the outer beacons is carried out at a distance of 30-50 cm from the edge of the wall. The products are cut strictly according to the height of the wall (the lighthouse can be made 1-2 cm shorter for convenience).
We mix a bucket of solution, which is applied in strokes along the marked lines, so that the craftsmen can navigate along them.
We apply the lighthouse to the wall using the plaster mixture. Then the master levels it and sets it to the level. A stretched thread across the entire width of the wall and a level will help with this. Ideally, use a laser level, but not all specialists have such equipment in their inventory.
Carefully coat the product with the prepared mixture to achieve a strong fixation. After which the front part of the beacons must be cleaned of excess solution, since the rule will be applied to it. The convenience and ease of plastering depends on how often the profiles are installed. We recommend spacing no more than 1.5 m.
Why level the walls before gluing tiles?
Old-built houses make the problem of crooked walls especially pressing. Each layer inside becomes uneven due to the large amount of repair work. Finishing materials must be completely removed during any major repairs and surface preparation. The base is completely cleaned.
Sometimes you can get by with putty, which simply fills small defects. The following factors determine the choice of technologies in a particular case:
- Changes along the lines.
- Protruding parts, depressions.
- Accuracy of angles.
The need to level the walls in the bathroom appears with deviations of 3 mm or more.
Sometimes you can get by with putty, which simply fills small defects.
Method of applying plaster: description of the technique step by step
It is customary to carry out such work strictly step by step, then the results of the efforts spent will completely satisfy the owner of the premises.
Step one. Using a trowel, the home owner performs a “spray” or “sketch.” You need to start pouring the prepared solution from the lower zone of the wall and work your way up. Heaps of plaster should be placed 0.8-1 cm above the guides.
Throwing plaster mortar
When the wall is covered with plaster from the floor to a height of 100-120 cm, you will need to take a rule and level this mass. The rule will need to be installed on the guides, and then slowly lifted up. In this case, the tool:
- sent to the solution;
- distributes the plaster with smooth movements between the guides with a spread to the right and left.
Step two. Once the first layer of mortar has been poured, leveled and set, a coat of primer is applied. This composition is quite plastic, it can be applied with a wide spatula.
Use a medium-width spatula to remove the solution from the container. The used mass is transferred to a wide spatula. After this, the composition is applied to the wall, it is distributed in an even layer. The same composition hides the visible stripes of the guides.
Step three. At the final stage of work, it is possible to create a perfectly smooth surface. A thin layer is applied - maximum 1.5-2 mm. It is applied to the second layer while it is still not completely dry. If the second layer is dry, it should be slightly moistened with a damp roller.
Finishing layer
The finishing layer must be perfectly smooth. All stripes are smoothed, areas not captured by the spatula are leveled.
Step four. The finishing layer should dry. Then you should start grouting the surface. A grater is used - wooden or plastic. The work must be done in a circular motion in a counterclockwise direction. The grater should be pressed firmly against the surface to be refined.
Step five. A suitable material is taken (felt, felt) and secured to the same grater. With this tool you should complete the grinding of the treated surface.
Plaster prices
Painting the ceiling with water-based paint using a roller, read here.
Watch the video below for a simple method of plastering walls:
(No Ratings Yet)
To keep the walls smooth
We would like to express our gratitude to FORUMHOUSE member Makinsk-KZ for their assistance in preparing the material.
Probably, a house with initially smooth and straight walls never existed. One way or another, every homeowner has had or still has to level the walls using “heavy plaster work” and “plasterboard craft. Each of these methods has its own advantages and weaknesses, supporters and harsh critics. Based on the experience of users of our portal, we will analyze in which cases it is better to use drywall, in which plaster, and how to do it correctly, and we will tell you about tools that will help determine the degree of curvature.
How to measure the curvature of walls
First of all, it is necessary to determine the degree of unevenness of the walls. For beginners, the so-called “dummies,” the easiest way to measure unevenness is with a laser level, which you can “shoot for a day” from a friend.
Makinsk-KZ Member of FORUMHOUSE
The laser level is installed parallel to the wall, at the most protruding point. The leveling beam draws the lines of the future wall. If you are going to install gypsum boards, then you need to retreat at least 30mm from the most protruding part (bump) of the wall, because guide profile 28mm wide.
Palych R34FORUMHOUSE user
The laser beam will draw a strictly vertical plane. Set a point at the top of the “belly”, and the dips from the beam will show the maximum depth of the layer in the pits. Here the teapot will see everything clearly.
The traditional way to measure the curvature of a wall is using a long level (2-2.5 m) - “pass” the level vertically over the entire surface at intervals of about a meter and find the most protruding place. You need to measure the horizontal curvature of the walls with a thread stretched over two self-tapping screws screwed into the wall at different ends of the room. The angle of the thread should be measured using a square.
Makinsk-KZ
You can take a short level, 50-70cm, and tape it to a rule or piece of profile with electrical tape.
How to measure the curvature of walls with a plumb line
Another way to determine the curvature of walls: using a plumb line or a nut tied to a strong thread.
How to determine the curvature of a wall.
A nail is driven in near the ceiling in the corner of the room, which should stick out from the wall by about 3 cm. A plumb line is attached to the nail with a thread of such length that the load does not reach the floor quite a bit. Having stopped swinging, the thread forms a straight line. Another nail is driven into the lower part of the wall so that its head and thread are on the same line.
Such beacon nails, driven in along the entire perimeter of the wall, will give us complete information about the curvature of the wall. By pulling two threads, crosswise, from the upper right corner to the lower left and vice versa, we will make this information almost exhaustive.
Which wall leveling method should I choose?
Gypsum and cement mixtures for leveling walls are traditionally used with a slight deviation, and then plasterboard, but the experience of FORUMHOUSE participants shows that their capabilities are much wider. On our portal, the question “DYPSOCARDBOARD vs PLASTER” was considered from different angles. Each method has both advantages and disadvantages.
Buryat FORUMHOUSE user
What’s not to like about ordinary plaster: one part cement + loosened lime for plasticity + 3 parts sand (relatively speaking)?
The following facts speak in favor of plaster: this method does not eat up the usable area of the room, it is cheaper, with the appropriate skill, the wall can be made smooth, “like the surface of a lake in calm weather,” plaster is a reliable and strong material; It is always possible to repair only part of the wall.
Disadvantages of this method: it is labor intensive and dirty, the plaster takes a long time to dry and slows down further puttying and painting processes, besides, without certain skills you cannot level the wall with plaster yourself, and most importantly:
Buryat
The cost of plastering materials greatly depends on the curvature of the walls.
Therefore, the crude method of leveling surfaces using gypsum or cement plaster is usually used when the walls are not particularly crooked and it is necessary to correct non-catastrophic defects. Otherwise, two problems are possible: too much material consumption (and therefore money) and the danger that an excessively thick layer of plaster will not stay on a vertical surface.
Buryat
With deviations of 2-2.5 cm, you can safely use plaster. With deviations of up to 4 cm, there is reason to think twice. If the walls are completely uneven, you can still plaster them - if operational considerations outweigh them.
The average thickness of the plaster layer is calculated depending on the unevenness of the structure.
Palych R34
We will determine the middle layer based on the minimum layer above the “belly” of 3 mm, and then add 3 mm to the thickness of the depressions.
Thus, if the depth of the largest depression is 10 mm, the layer of plaster above it will be 13 mm.
Palych R34
The approximate layer is seen as 8 mm.
You can find out more accurately the size of the middle layer by assessing which areas of the surface are larger: up to 6 mm (shallow) or more than 6 mm (deep). If it is small, we subtract and take the middle layer as 6-7 mm, if it is deep, then we add it, and the size of the middle layer will be 9-10 mm.
Depending on the size of the middle layer, we calculate the need for the mixture, taking into account the consumption of the dry mixture per 1 square meter. m.
The “average layer of plaster” is different from the thickness of the layer you will apply in reality: its thickness will vary throughout the wall.
Buryat
If there is a bulge on the surface, the plaster is reduced in places to 3-4 mm. If, on the contrary, there is a “convexity”, then the thickness of the mantle increases to 3.5 cm. So walls with deviations of up to 2 cm can be safely covered with plaster and not worry about increasing the thickness of the layer. A particularly healthy bulge can simply be trimmed.
The dry method of leveling walls is carried out mainly using plasterboard sheets, which are either installed on a frame made of metal profiles, or simply glued to the surface. In the first option, centimeters of the house's area are lost, so it is used mainly in large rooms.
Advantages of plasterboard: it can be attached with an adhesive mixture directly to the wall (if it is fairly level), this method does not require complex preparation, and it is much easier for a non-professional to work with plasterboard than with plaster; there is no dirt. Another advantage of drywall: the ability to hide communications under it.
Disadvantages: the living space is “eaten up”. The common belief that plasterboard surfaces are not as durable and may not withstand the load of hanging cabinets, etc., is not true.
Makinsk-KZ
Walls made of gypsum plasterboard can withstand even a water heater, a wall-hung toilet, and even more so kitchen cabinets. It all depends on the correct installation.
And the most annoying minus of this material for FORUMHOUSE members, oddly enough, is the unpleasant sound when tapping.
stanspbFORUMHOUSE user
No, no, sometimes you have to lean against it and knock. I don’t like this hum; in my understanding, the wall should be stone.
How to level a wall with plaster
The wet leveling method begins with preparatory work: the walls, if necessary, are cleaned of crumbling traces of the previous finish, and cracks are eliminated. The surface must be primed and dried well. Before starting the main work, it is necessary to protect the floor by covering it with something so as not to spoil it with the solution.
After this, we install beacon profiles.
PoolUser FORUMHOUSE
These are strips from corner to corner (or from floor to ceiling) at a distance from each other, which should be in the same plane. This plane will be the plane of the plaster in the future.
AMK FORUMHOUSE user
To install the beacons, I used a thin-walled aluminum profile 25x50 mm, 6 m long, cutting pieces 5–10 cm less than the height and width of the walls.
Nowadays, construction stores sell special beacons for plaster.
The beacons are attached to opposite ends of the wall with mortar, checking their vertical position by level. Then they pull a cord between them in three places at equal distances and, guided by it, install the remaining beacons. How many beacons there should be depends on the size of the rule: it must fit between two beacons so as to rest on them.
For plastering residential premises, gypsum mixtures are often chosen for the bathroom, kitchen, etc. – cement-based mortars. But now there are gypsum mixtures suitable for important premises, just as cement-based plaster is used to level surfaces in residential premises.
RegulusFORUMHOUSE user
I would use cement-sand plaster because of the thermophysical properties of the resulting wall sandwich. The thermal conductivity coefficient is very high. The thermal inertia of the wall increases and the dew point does not approach as is the case with drywall with an air cushion.
To prepare such plaster yourself, sand is mixed with cement (usually 6:1, but the proportions can be different 3:1, etc.) and diluted with water to the consistency of sour cream.
It will be quite uncomfortable to live in a house plastered with cement-sand mortar, then cement-lime plaster is preferable. Here is an example of the composition:
Buryat
For 100 cubic meters of solution:
- Construction quicklime lump lime, grade 1 - 14 tons.
- Portland slag cement for general construction and special purposes, grade 300 - 20.4 tons.
- Natural sand for construction work for plaster mortars of the finishing layer is very fine - 110 m3.
- Water - 66 m3.
Pour the gypsum plaster into the water and mix it in two stages with a construction mixer or a drill with an attachment: first just until smooth, then repeat kneading after five minutes.
Using a plaster falcon, we throw the mixture between the beacons and smooth it using the h-rule from bottom to top, evenly distributing the plaster over the surface, orienting the thickness of the layer according to the beacons (they are subsequently pulled out and the resulting openings are filled with mortar). A plaster square will help make the corners straight. The leveled surface is dried and primed; after the primer has dried, we proceed to putty.
How to level a surface using drywall
The surface that can be leveled with drywall can be very uneven - an old brick wall. But if the differences on the surface do not exceed 40mm, then gypsum plasterboard sheets can be glued to it with special glue.
Patrol84
In half an hour, two sheets were glued in a single plane. An hour later it was just a monolith, absolutely no progress: I tried to bend it at the outer corner or at least do something, everything was in vain. It feels like the room is simply Plastered!
If the wall is uneven, sheets of plasterboard are attached to a profile frame.
First, guide profiles are screwed to the floor and ceiling (parallelism is checked with a plumb line), then vertical guides are mounted at a distance of 40-60 cm from each other.
PictFORUMHOUSE User
Profiles every 60 cm are the optimal distance for gypsum boards with a thickness of 12.5 mm; if it is more than 60 cm, you will have to add jumpers from the profile and plus jumpers at all joining seams!
When connecting walls, rubber tape is glued under the guide profiles. And since the tape serves not only as an expansion joint, but also as sound insulation, if necessary, it is glued both under the guides and under the suspensions.
If necessary, insulation or sound insulation is laid between the wall of the house and the plasterboard, after which the structure is covered with plasterboard (two sheets are attached end-to-end on one profile). The sheets are fixed with self-tapping screws so that their caps go into the sheet to a depth of about 1.5 mm.
All that remains is to level the seams and fastening points with putty and proceed to putty. Plasterboard putty is necessary both before wallpapering (otherwise it will show through) and before painting.
alla-more FORUMHOUSE user
High-quality putty is obtained in 3 layers.
The first layer is to level the surface with a large spatula, the second is to fill in the unevenness, the third is to smooth the surface with liquid putty and a small spatula.
At FORUMHOUSE you can get acquainted with not the simplest, but the best way to level the walls of a house made of timber (detailed photo instructions are included), find answers to all your questions about interior plaster, watch a video about finishing rooms with high humidity.
Rules for preparing the solution
Plastering walls and leveling ceilings without beacons is essentially not much different from putty. Therefore, if you made repairs using putty, then it will not be difficult to understand the work process. Those who have no idea how to level walls should watch the video before starting work.
If you decide to use Rotband plaster or other types of ready-made dry mix for finishing, then when preparing the solution you must consider the following points:
- Despite the fact that the instructions say that it is diluted with water in a 1:1 ratio, the water consumption must be different and verified experimentally.
- It is better to prepare the mixture in small portions up to 20 liters, mixing it thoroughly with a mixer.
- First, water is poured into the mixing container, and then the mixture is gradually added in portions.
USEFUL INFORMATION: Which paint is better to choose for wallpaper for painting?