To make the walls uniform, smooth and ready for subsequent finishing work, finishing plaster is used. There are a variety of mixtures for such work. To save money and test your skills, you can try to do everything yourself. You just need to know the technology and do the job using the right tools.
Why finishing plaster?
This is the name of the final layer of plaster. It is applied several millimeters thick. Unlike the base layer, which levels the surface flat and eliminates all defects, the finishing layer makes it ideal for subsequent finishing (painting, gluing trellises). Do-it-yourself finishing plaster of walls can do the following:
- Fills all unevenness, microcracks and hides defects.
- It has protective properties, withstanding minor mechanical damage.
- Makes the wall even and smooth so that the painting looks perfect.
If wallpaper is used as the final decorative layer, then there is no need to bring the surface to perfection. But for painting this stage is required, and the number of layers increases from 2 to 3.
Plaster, putty - choosing the right material
Since we have decided to tell you how to properly plaster walls under wallpaper, we will start with choosing the material. A wrong choice can seriously ruin all future work.
Construction stores offer plasters and putties. This factor misleads inexperienced builders. It is recommended to use both materials. Plastering walls under wallpaper with your own hands will allow you to level the surface, and with the help of putty you will be able to achieve a smooth surface and high adhesion. Only very experienced builders can skip the puttying stage. Otherwise, the risk will be unjustified. We hope you have decided for yourself whether you need to putty plastered walls under wallpaper. And we will not return to this issue anymore.
Now you need to determine what to use to plaster the walls in your apartment under the wallpaper. Of course, now we will reveal the secrets of choosing materials.
- The choice of wallpaper depends on how the surface was prepared. Wallpaper with medium thickness can be glued to a plastered surface. Thin material will show any imperfection and highlight it. Heavy strips simply will not hold on and will fall off under their impressive weight.
- And yet, what plaster to choose for walls under wallpaper? Of the total number of plasters that are offered to the modern user, it is worth choosing finely dispersed options with the addition of a gypsum binder component. Such materials will allow you to qualitatively prepare the wall for further work and allow the adhesive composition to effectively penetrate and adhere to the surface.
- The quality and grain size of the filler is an important selection criterion. Sand with a coarse fraction is completely unsuitable for our case. If such material is used, the quality of gluing will be reduced by almost half.
- Ideal plaster is created from sand with a grain size in the range of 0.25 - 0.3 mm. Such materials are more expensive, but you can save a lot on putty. There is a reason to choose a more expensive putty, right?
We will tell you later whether it is necessary to putty plastered walls over wallpaper, but you should mentally prepare yourself for this process. You will have to buy not only the leveling mixture and putty, but also the consumables that will be used for grouting. We are talking about an abrasive mesh and high-quality sandpaper.
When the materials are selected, you can consider the stages of plastering walls under wallpaper. This is what we will do now.
Types of mixtures
All plasters differ in the components in their composition and the filler fraction. The following types of mixtures can be used for finishing:
- Cement.
- Plaster.
- Polymer.
Let's look at the features of each of them.
Cement plasters
The main component is cement. The solution is strong, durable, not afraid of moisture and is safe. Can be used for interior and exterior work. Knauf finishing plaster is very popular. Feedback from consumers is only positive. It is easy to apply, it is flexible and has minimal shrinkage.
Cement plaster is good for rooms with high humidity, such as the kitchen, bathroom and hallway. At the same time, there are no large mechanical loads on the walls. The price is minimal among other types. The downside is that cement surfaces can crack and are not highly resistant to mechanical damage.
This option is chosen quite rarely. Cement mortars may differ in the type of filler. This is a cement-limestone mortar or cement-sand mortar.
Gypsum plasters
The main component is gypsum. Mixtures are very common. Sold dry and ready-made. The dry mixture must be prepared according to the manufacturer's instructions. Plus the low cost and good performance characteristics, the material is natural and harmless.
The downside is that it is afraid of moisture. Finishing is carried out only inside and in dry rooms. Facades cannot be finished. The solution is plastic and easy to apply. It tolerates shrinkage well and withstands mechanical damage. It does not crack during use. There are many different options on store shelves for finishing coats.
Polymer plaster
Made on the basis of polymers. It is something in between the two previous options. The plaster is universal and allows you to perform any task. It is not afraid of moisture, has a long service life, is flexible, easy to apply, and hides all wall defects.
Thanks to additives, it becomes possible to regulate the properties of mixtures. Manufacturers produce a huge range of plaster mixtures in dry or ready-made form. Acrylic polymer mixtures are gaining particular popularity. The downside is the high cost, however, the quality justifies the price.
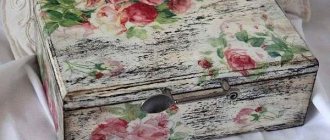
There is also a finishing decorative plaster, which can be painted or tinted at the mixing stage. It is divided into the following types:
- Structural mixture for decorative finishing. It consists of wood fibers, mica, quartz and stone chips. The particle fraction can be fine or coarse. This affects the finished appearance.
- Relief mixture. Made from marble chips or synthetic fibers. Thanks to this, a certain relief is formed on the surface.
- Textured. Made from additives and has a heterogeneous structure. The finished finish will depend on the filler. One of the variations is the bark beetle.
- Folks. Plaster made from acrylic flakes. They have different fractions and colors. After completing the application of the mixture, it is necessary to open the surface with varnish.
- Terrasite plaster. It is made on the basis of cement, to which glass, mica or marble chips are added. Particle size 1–6 mm.
The functions of these finishing mixtures are different, it all depends on the place of use. Having chosen a certain option, you can begin to create the finishing layer.
What tool to plaster walls
I will note the main tools for manual application, and we’ll talk about them. And so, what we need:
| Tool | Description |
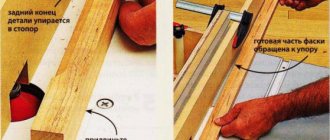
| Rule, cutter | Aluminum long tool for leveling plaster on the surface (see photos below). Available in different lengths up to 3m. Usually, for indoor repairs, we will need 3 cutters of different sizes (1m 1.5m 2.5m), if there are hard-to-reach places, then we can cut them to any desired length. |
| Level | It will be needed to identify deviations from the horizontal or vertical level of the surface, to set beacons, to check the finished wall, to set corners, etc. You can use either a bubble level or a laser level (it will speed up the process). |
| Spatula and smoother | For applying material to a surface. We will need a trowel with an average length of 30-35 cm. A spatula is 10 cm. |
| Trowel, trowel | Needed for throwing material. It has different shapes and types. To apply the mortar, a teardrop-shaped “drop” trowel is usually used, but often craftsmen also use square, mason’s trowels. A matter of taste. |
| Roller and bucket and brush | For priming and wetting the surface. |
| Polyurethane grater | For final grinding of cement and lime compositions |
| Trough, container for kneading and water | For kneading, you will need a 40 liter trough and a 10-15 liter bucket for water, or better yet 2 buckets, because you will need to wash the mixer or kneading whisk in one. |
| Mixer, whisk | Without a construction mixer or something similar, I do not recommend starting such a process as plastering walls. |
| Covering film, masking tape | In order to cover window sills, doors, windows, radiators or simply paste over adjacent walls. |
| Plastering ladle | If you don’t have the skill, then it’s better not to pick it up. We’ll talk about how to plaster walls with this tool in another article. |
Finishing Tools
Do-it-yourself finishing plaster of walls (a video about the application process will be below) is performed using certain tools. They are simple and even a beginner can get them. Here's what you'll need:
- Plastic bucket or other container for stirring.
- Narrow and wide spatulas that can be used to apply the plaster mixture to the wall.
- Ladle or trowel.
- The rule is to level the layer and create a certain texture (if needed).
- Construction float.
- Brush for hard-to-reach areas.
Advice! If you don’t have a tool and there’s no point in buying it, you can borrow it from friends.
What materials to use for finishing walls
If you have a lot of time and want to experiment, you can try to choose the optimal composition of the plaster mass for applying the finishing plaster yourself. To do this, you will need sifted quartz sand, the finest, almost dust-like fraction, grade 400 cement and a small amount of polyvinyl acetate glue.
Why is this necessary? In the vast majority of cases, finishing compositions allow you to simply obtain a smooth and even surface of the plaster, but often such a finish is part of or the basis for decor or liquid wallpaper. In this case, especially if the decorative plaster is translucent and translucent, its appearance will be partially affected by the color and texture of the wall finish. In some cases, to obtain a specific opalescent or marble pattern, ground glass, calcite dust, and various dyes can be added to the finishing plaster.
How to properly apply finishing plaster yourself
The whole process is divided into several stages. However, the work differs depending on where exactly the finishing plastering is performed: outside the house or indoors.
Final plastering inside
This layer must be applied to the rough or base layer. Ideally, it should be done using technology so that there are no problems in the future. It must be smooth, without cracks, protruding elements and other defects. For interior work, you can use any type of plaster (cement, gypsum or polymer). But when working in the bathroom or kitchen, it is better to give preference to cement and polymers.
To improve adhesion between layers, it is important to use materials with the same components. Ideally, the rough layer and finish are made from a mixture from the same manufacturer. Also, if the base was made of polymer, then it is better to apply the finishing plaster layer with a polymer composition.
Exterior decoration
Walls from the outside are exposed to many negative factors. This means that special requirements are placed on plaster. Namely:
- Resistance to mechanical influence.
- Moisture protection.
- Vapor permeability.
- Good sound and heat insulation characteristics.
- Great appearance.
For finishing work on the facade, it is better to choose polymer-based compositions, for example, silicone or acrylic plaster. As an option, a mineral-based mixture.
Preparatory stage
The surface needs to be inspected for quality. Depressions, cracks and bulges are eliminated, since the finishing layer is thin and cannot cover them. Before plastering the inside, the building warms up for 2 days. The humidity in the rooms is no more than 60%, and the temperature is 10 degrees and above. This mode must be maintained for 24 hours after completion of the process. As for work outside, it is carried out in dry weather, at a temperature not lower than -50 degrees.
Next, all tools and materials are prepared, furniture, accessories, floors, windows, doors are covered. Immediately before work, you need to prepare the solution according to the instructions on the package.
Applying the finishing layer
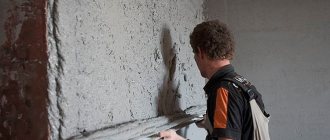
To prevent your hand from twitching, it is important to study the instructions for applying the finishing layer to the wall yourself and practice on an unnecessary surface. The work algorithm is as follows:
- The plaster is applied with two spatulas (narrow and wide). The prepared mixture is collected narrowly from a bucket or other container, after which it is transferred to the entire working surface of a wide spatula.
- Using a wide spatula, transfer the solution to the wall and level it over the entire surface. There is no need to pass over the same surface many times. It is important to pull back the plaster several times and start working on another area.
- The recommended thickness of the finishing layer is 1.5–2 mm. Otherwise, it will crack and the work will go down the drain. This thickness is enough to hide minor irregularities and make the surface smooth.
- If vinyl or non-woven wallpaper will be glued in the future, then such a layer will be sufficient. But before painting, the surface must be brought to perfection, so it is recommended to apply two layers.
- The corners are the hardest part of the job. To process them, you can use special corner spatulas.
After applying the layer, it is important to rub it to remove tool marks and make the surface smooth. Then the wall will be ready for final decoration.
Selection of plaster
The quality of the entire work will depend on the solution you choose. The best option for applying the finishing layer is ready-made cement-based plaster. It will be much more difficult to prepare a solution with your own hands, because you will need to maintain the ratio of all substances.
Special polymers are added to the finished mixtures, which increase plasticity and the level of adhesion, so sometimes you can do without installing a polymer mesh. To finish brick or concrete walls in a room with a high level of moisture, we recommend using cement-sand plaster. It is of good quality and will provide the coating with a long service life. It is better to treat wooden walls with plaster based on gypsum or clay to prevent possible fire of the surface. If there is high humidity in the room, in no case should you choose plaster based on gypsum or clay, they tolerate moisture very poorly.
Additional recommendations
Professionals recommend following these recommendations:
- To improve adhesion between the base coat and the finish coat, it is important to use a primer. It is applied to the wall before finishing plaster. For this, a roller and brush are used. Work continues after drying, which is indicated on the primer packaging.
- A small amount of plaster is applied vertically, starting from the top left corner, working downwards.
- Using a wide spatula (40 cm or more) you can level the layer perfectly and make it thin over the entire surface.
- When finishing walls made of concrete, brick, plasterboard, plaster is applied from bottom to top. To give evenness, the spatula is fixed at an acute angle relative to the wall and moves forward without coming off.
If you listen to these tips, the finishing will be done correctly. However, this is a difficult level and not all beginners will be able to cope with the task. Therefore, it is better to practice in advance and watch a lot of training videos on the topic.
Plastering walls with your own hands: complete detailed instructions for beginners
The quality of the finished coating largely depends on how correctly it was laid. Let's look at all the intricacies of this process.
Preparatory work
The main task of the process is to prepare the surface for laying the plaster mass. First, we carefully inspect the base and study its condition. If there is any coating on it, carefully remove it. We clean the surface from dirt and dust. Detected cracks, regardless of their size, should be repaired. Otherwise, the coating applied over them may also crack.
Be sure to embroider deep cracks at an angle. That is, we expand it so that we can get to its very base. After this, we clean the area from dust and prime it generously, thereby improving the adhesion of the material. After drying, we fill the defect with putty flush with the surface level. Shallow narrow cracks can be filled with silicone or sealant using a thin nozzle tube. Wide defects are removed using polyurethane foam.
Instagram liniya_remonta
Priming is a mandatory stage of preparatory work.
Further steps will vary depending on the material you are working with.
Concrete
This base is quite smooth; to improve its adhesion to the solution, it is recommended to make notches. They are performed at a short distance from each other, deepening by 10-15 mm. Then cover everything with primer. Given the hardness of concrete, the work will be very labor-intensive. Therefore, you can do it differently: prime it with a special primer. Select an adhesive primer with deep penetration.
It contains sand, which should remain on the base after drying. Sometimes this technique does not work well, so it is recommended to carry out a test application of primer before plastering. They treat a small area with it and wait until it is completely dry. Then they carry it out with their hand. If the roughness is clearly felt and the sand does not crumble, treat the entire surface. Otherwise, notches are made.
Brick
Despite the fact that the brick itself is quite rough, it is recommended to go over the cleaned material with a grinder or wire brush. The seams between the bricks must be opened so that the mixture can get into them, which will improve the adhesion of the plaster. Then the dust is removed, first with a brush and then with a damp cloth. Finally, two layers of primer are applied.
Instagram illfukalov
For absorbent surfaces use a deep penetration primer
- Walls
How to properly plaster a brick wall: step-by-step instructions
Tree
In order for the plaster mass to be firmly attached to the wooden base, it is necessary to equip the lathing. It is made from slats, which are also called shingles. The elements are nailed diagonally. It is important to use only high-quality shingles, additionally treated with an antiseptic. Otherwise, it will quickly rot and destroy the coating.
To make the task easier, you can use a chain-link mesh instead. It is nailed onto slats, which are laid between the base and the mesh. They, like shingles, can serve as beacons during the leveling process. In this case, the elements are set strictly according to level. All wooden parts are treated with an antiseptic and dried well, only after this can the sheathing be plastered.
Technology of applying the solution using beacons
Used to level out significant differences. Metal guides are used as guidelines to show how to plaster walls. You shouldn't skimp on buying them. High-quality metal can subsequently be left inside the base, and it will not become rusty over time. It is better to remove parts of questionable quality, which is quite labor-intensive.
Instagram task.repair
Installation of beacons is carried out strictly according to the level
The guides are installed along the entire length of the wall at a distance of about 150 cm from one another. This distance is chosen so that during the alignment process the rule moves along two adjacent profiles. They are set strictly according to the level and securely fastened to the base. The easiest way to do this is to use a gypsum solution, which sets quickly and holds the elements securely. You can attach it with self-tapping screws, but this is more difficult.
Then the plaster solution is prepared. This must be done in strict accordance with the manufacturer's instructions. Next, proceed to plastering:
- Sketch. Pour the mixture onto the base. You can do this manually, with a trowel or with a special device if mechanized installation is intended. Thick paste is poured onto the instrument and, with some effort, “spreads” onto the base. A layer about 5 mm thick is placed on concrete and brick, and 8-9 mm on wood. We put the rule on the beacons and pull the coating from the bottom up, leveling it. Leave for at least 2 hours to dry.
- Priming. Prepare the dough-like mixture. We apply it with a wide spatula, performing movements in any direction, but with some effort. Using the rule, we check the quality of the alignment. Remove all protruding areas with a grater soaked in water. Gently rub a small amount of solution into the depressions. Leave to dry for at least 3 hours.
- Covering. Prepare a solution with a creamy consistency. You can apply it with a spatula or scoop it into a ladle and pour a small amount of liquid paste onto the wall from top to bottom. We smooth it out using the rule, completely leveling the base. Let it dry for 8 hours, then lightly moisten it and clean it with a construction float.
To make everything clear, we suggest watching a video of how a beginner can plaster walls with his own hands.