Selecting fabric and filling for the seats of chairs and stools
At the very beginning, you need to choose the right material from which the pillow will be sewn. For it, it is worth taking durable and wear-resistant materials, such as rep, teak or satin. In the case where the furniture is planned to be used outdoors (in cold conditions), it is better to use felt fabric or old jeans.
Pillows for chairs
Additional Information. Cushions can be made not only for chairs and stools, but also for armchairs, sofas and other furniture. The only difference will be the size of the product.
After determining the color of the future craft, you will need to choose a filler for it. In this case, you should pay attention to the following characteristics of the material:
- Elasticity.
- Resistance to deformation.
- Durability.
- Environmental Safety.
Based on the given criteria, it is recommended to choose holofiber, padding polyester or foam rubber. The best option would be latex.
Filler
Color selection
When choosing the color of a cushion, you should not be guided only by the color of the furniture. You can choose a fabric of a color that will look harmonious with curtains, wallpaper or other interior items.
Pillow colors
But first of all, the color must correspond to the purpose of the product. If you just need it for convenience, then it is better to choose calm, neutral colors. When you want to add some zest to the design of the room, you can choose a bright fabric with an unusual pattern. Sewing threads are chosen in the same color as the material from which the pillow will be made.
You might be interested in this: Simple patterns of Tilda angels for sewing yourself
Preparing the ties
First of all, the ties are needed to prevent the pillow from sliding off the seat. But sometimes they can be used as design elements for a product. To make ties, beautiful ribbons, laces, ropes and just strips of fabric are suitable.
Ties
After completing the preparatory work, select your favorite master class on sewing a pillow and then all actions are carried out according to the instructions. It is worth considering the simplest manufacturing option, which even a novice needlewoman can handle.
Square option
Stools with a square seat are found in all kitchens across the country. That is why crocheting a rug for a chair of a similar shape will be an extremely popular solution in domestic conditions. To complete the task you only need a few colors of yarn of your choice. It could be mixed, light or dark tones.
First, the first row is formed in a circle. You need to create a ring from the thread you are going to work with. Next, a square is superimposed on this whole thing. We won’t talk about the intricacies of the work, but in the end all the rows are connected with a column, and at the end the already elongated loops are knitted.
The work is done from the arch in the corner to the final circle. Everything is repeated the same way in subsequent rows. You need to carefully monitor the elongated loops. Corner groups naturally increase with each new row.
You can always change colors. It is advisable not to tighten the loops too much so that they do not pull towards the central part. These are all specifics that professionals will talk about in more detail. In any case, the strokes should be original.
Pattern
Making a pattern for a chair seat is not difficult. To do this, determine the dimensions of the seat for which the accessory will be made. It is worth considering that after stuffing with filler, the dimensions of the product decrease, so the fabric must be prepared with a margin of a couple of centimeters on each side. You also need to decide what shape the finished item will be. A round pillow is more versatile - it will fit almost any stool or chair.
Round pillow
After calculations and measurements, a figure of the chosen shape is drawn on a sheet of paper and cut out using scissors.
Additional Information. To ensure that the pattern exactly matches the dimensions of the seat, you need to use tracing paper. It is applied to the surface and outlined with a marker.
Round option
Schemes on how to make a rug for a chair are often produced for rounded samples. They can easily be placed on stools with sharp edges. All this will look good in any interior that you want to slightly “domesticate”. There are many types of work, but in every 10 centimeters of width there are about 7 columns with double yarn.
A lush column is created as follows. A slightly under-knitted stitch is knitted (2 loops on the hook). 2 times in 1 loop, resulting in three loops on the hook. All this is knitted through one opening.
Step-by-step sewing instructions
You can sew pillows with your own hands according to these step-by-step instructions:
- The pattern is marked and cut along the contour.
- The filler material is applied to the pattern and the element of the required size is cut out. After that, fabric is applied to the resulting part, and two identical parts are cut out of it with an allowance of 1.5 cm for the dimensions of the filler.
- The edging is stitched and attached to the top piece of fabric. The two pieces of the pillow are then folded together, pinned, and stitched together. There is only a small pocket left to insert the filler. All allowances, undercuts and corners are turned inside.
You might be interested in Beautiful chiffon dresses with long sleeves: patterns and tailoring
Stitching a pillow
- Mark the required number of places where the ties will be attached. The material from which they will be made is selected and cut to the required length. Each piece is then folded in half to form a ring and sewn onto the underside of the pillow.
Ties
- The resulting cover is carefully ironed and filler is stuffed into it. After which the hole is removed. To do this, the edge is leveled, the allowances are folded inward and sewn with a hidden seam.
- If the option of making a quilted pillow is chosen, then at this stage all other seams are sewn.
- If necessary, the pillow can be decorated with additional elements.
Stages of work
When working, you must follow a strict sequence of actions. If the stool is square, measure the length and width of the seat; if it is round, measure the diameter. The pattern should take into account the necessary seam allowances - up to 2 centimeters on all sides, at least 1.5 cm. The height reserve and reserve for sewing in the filler are approximately the same. The step-by-step instructions are as follows:
- Creating a pattern (you can use a ready-made one, adapting it to specific seat sizes).
- Cutting a circle or square from the filler to the required length and width.
- Sewing elements and finishing edges.
- Sewing in elastic.
- Attaching the filler to the seat on the chair.
Distinctive features of growing chairs, important selection criteria
The nuances of tailoring depend on the type of fastening. If the cover for a stool made by yourself has the shape of a square, ties are sewn in at the end, gathers are formed at the bottom of the circle and an elastic band is inserted there. Step-by-step instructions for the first option:
- Place the lining face to face with the main fabric.
- Insert the laces and hand sew them onto the seat.
- Machine stitch, leaving the bottom part untouched.
- Turn the finished product inside out.
If the seat is round, the sequence of actions will be slightly different. The elastic band is attached to the fabric from the inside. While sewing, it is gently held, and the product itself is slowly rotated in a circle. The cover is stuffed with foam rubber (sintepon), placed on the stool and straightened out so that there are no wrinkles or distortions anywhere.
The final stage of sewing chair cushions is decorating the product. The most common option is finishing along the edge using decorative tape. Small tassels or fringe made of thick woolen threads will also look original. You can use an applique made from any patches of matching color for decoration.
Create a pattern based on measurements of the chair seat
Cut a template from cardboard
Prepared Items
Place the filler between two textile blanks
Apply the markings with a ruler and pencil, it will be easier to stitch along it
Secure with clamps
Quilt the workpiece according to the markings
Trim protruding edges according to template
Mark the locations of the ties
Stitch around the perimeter for easy basting
Baste the binding, leaving ties on both sides
Secure corners
Ready seat
Secure the product to the chair
Sewing using the patchwork technique
This technique involves making a pillow from several pieces. For this purpose, fabrics of different colors, textures and even sizes are taken. The more each detail differs from the rest, the more interesting the finished product will be.
Patchwork
After selecting the materials, the pattern is prepared. It all depends on your own imagination. You can make flaps of the same sizes and shapes, or you can make them different. After the pattern is completed, the resulting pieces should be carefully sewn together so that the resulting shape of the future pillow is obtained. The inner side of the product is made using the same method or from a single piece of fabric. The resulting parts are carefully ironed.
A padding polyester cut to size is applied to the front side and attached to the fabric. Then both sides of the pillow are applied to each other with the outer sides and sewn together. There remains only a small hole through which the product is turned inside out. After which the pillow is ironed again, and the remaining hole is stitched with a hidden seam.
Important! To ensure an even seam when using a sewing machine, it must be worked slowly. Then, when wrinkles appear, there will be time to smooth them out.
How to make chair cushions
The sizes and shapes of the seats of chairs and stools differ. Each model requires an individual pillow. There are also several decor options. Products can be round, square, voluminous, with ties and buttons.
How to make a simple chair cushion
Below is a master class for making a chair cushion with your own hands in the simplest way:
- You will need filler, for example, padding polyester or holofiber, scissors, stencils for patterns, buttons, chalk for marks, threads.
- Sweep 2 parts of the future pillow using a needle and thread with large stitches on three sides.
- Sew 3 corners on the inside using a typewriter. Leave one part open.
- Cut the corners with scissors without touching the main seam. This is necessary so that when turning inside out there is no accumulation of dense tissue in the corners.
- Fill the inside of the cavity and sew up the open area with small stitches.
Important! You can sew several sets of pillows and use them for themed holidays.
How to sew a round pillow on a chair with your own hands
Round seats for chairs and stools are becoming increasingly common. They look more delicate and take up less space. For such furniture you will need a round soft cover. It's not difficult to make it yourself. Change the seat, apply cardboard or a sheet of paper and draw a circle. Using a pencil, draw clear lines. It should be the same in diameter on all sides. For crafts, draw a stencil 1 cm wider.
Next, perform the following steps:
- Calculate the radius. It is equal to half the diameter of the entire circle. Fold a piece of fabric in half twice. Draw a rounded dotted line at a radius distance. Do this for 2 circles.
- Place 2 pieces next to each other and sew them together with large stitches.
- Sew the seam using a machine, leaving space for your hand at the edge to fill the product with filler.
- Sew up the area for the arm using small stitches.
- Take a regular button and cover it with a piece of fabric, leaving the eyelet on the outside.
- Make 4 notes on the craft. The button is sewn to one mark. The same is done with all four marks.
- The pillow is ready, you can sew an elastic band on the bottom side for fastening to the seat.
How to sew a chair cushion with ties
This type of product is very popular because it is easy to use and does not fall off the seat. Instead of ties, you can make large bows, which will add an additional decorative element to the interior.
Step by step process:
- Make a stencil according to the seat parameters.
- Fold a piece of fabric in half, outline the stencil with chalk and cut it out, retreating 1.5 cm from the edge.
- Three sides of the pattern are sewn together using a machine. Leave the fourth for filling.
- Place the filling inside, sew up the fourth edge, sew the binding around the circle and make ties.
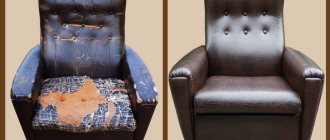
How to sew a foam chair cushion
Foam rubber as a filler is excellent for the seat. It can be cut into small pieces to make it appear softer. Or leave a single piece of foam rubber and cover it with fabric. The product is soft and reliable. The filler does not roll or sag, this is its advantage.
Do-it-yourself chair cushions made of foam rubber are shown in the photo below. The products have a flat surface and can be covered with any type of fabric: velor, nylon, cotton, plush, fleece, terry.
Make the ties as long as possible so that they stay securely on the chair
DIY voluminous chair cushion
Volume pillows are suitable for IKEA chairs. They are easy to use and make the seat soft and comfortable. If you choose a color that matches the interior of the dining room, they will complement the design.
Volumetric products are elevated. Great for dense seating, such as wood or polyurethane. Using furniture with such an accessory will become much more comfortable.
They take measurements and make square patterns. All other stages are the same as in the master classes above. The idea is that more filler is added inside than usual. The following materials are suitable for this option:
- padding polyester;
- cotton wool;
- goose down;
- foam;
- holofiber.
Attach ties to the sides so that the product stays on the surface better.
Use multi-colored fabrics that match the tablecloth
Important! Volume pillows make the chair tall.
DIY chair cushion cover
A pillow in the form of a DIY cover will fit on a stool. You will need a main piece of fabric, which will be for the front side, and a padding polyester lining.
Step by step process:
- Take measurements from the seat. Cut out a stencil from paper or cardboard. Apply it to a piece of fabric that will be the front one. Make an overlap of 10 cm on all sides.
- Cut an additional strip equal to the perimeter of the entire square. The same lengths are made from padding polyester and lining.
- Sew 2 lining elements together, having previously sewn them together with wide stitches.
- Make 2 lines to put the elastic inside. Leave a small area at the edge to stretch the tie through. Several seams run along the entire lining so that the padding polyester does not move out during use.
- The main fabric is applied to the other side of the padding polyester and sewn around the entire perimeter.
- The lining is secured with an inner seam, leaving 1 cm for elastic. Finish the edges with an overlock stitch.
- Sew on a strip for the cover. Make a fold at the edge for the elastic. Pass the tie inside and tie it.
- The inlet hole is stitched on a machine. Put the cover on the stool.
Any applications or drawings are added at the very end, when the product is completely ready.
How to sew pillows for a growing chair
Growing chairs are used for children. The transformer design allows you to use it for a long time, because babies grow very quickly. Since the furniture is used by a child, it is advisable to sew a product that can be securely fastened.
The design includes seats and backrests. Therefore, you will need 2 elements to make the furniture more comfortable. Cotton fabrics are used for the surface of the product. The insides are made with padding polyester, cotton wool or air down.
It is necessary to make ties for the cover so that the product does not slip off or get lost; production is carried out using the same master class as for a simple seat cushion
How to sew a chair cushion from jeans
Jeans often fray and tear, go out of fashion and new ones appear. Everyone has a few pairs of old jeans in their closet, collecting dust. This fabric can be given a second life and made into a seat cushion for the dining room. You will need:
- 2 pairs of old jeans;
- 16 squares and cotton of any color 13x13 cm;
- 16 squares of non-woven fabric 11×11 cm;
- filler;
- 50 cm2 cotton for the inside.
Step by step process:
- A regular circle with a diameter of 16 cm is cut out of cardboard. Draw it using a compass. Apply the stencil to the jeans and draw circles.
- Cut out all the circles.
- Apply a ruler to one edge of the circle and draw a line. In the future, the strip will be hidden inside.
- Fold 2 circles with the right sides inward and sew them together. Make chains of 4 circles. The front side is smoothed with an iron.
- Next they work with non-woven fabric squares - they are placed inside each circle.
- Place pieces of cotton on top and bend the petals outward.
- The petals are stitched, retreating 5 mm from each edge.
- Do this for 4 rows, then sew them together. Repeat the pattern again for the second side.
- Cut off excess pieces of fabric.
- Sew the cover on a machine. It is better to wash it before stuffing so that the petals become terry at the edges.
- Fill the pillow with filler and sew up the hole with a hidden seam.
A denim craft can be made without inserts of other fabric, then cut out not circles, but squares.
DIY chair cushion made from scraps
You can make a chair cushion from patchwork or patchwork with your own hands. It is perfect for those who have a large amount of fabric scraps lying around at home. It is advisable to use material of the same structure. Patterns are made in advance. For this:
- Measure the parameters of the seat.
- Cut out a stencil from paper or cardboard.
- Mark it into equal squares.
- Multiply the number of flaps by 2.
- Cut out patterns from fabric with grip along the edges.
- All pieces are sewn together by machine.
- The edges of the cover elements are sewn together.
- The pillow is filled with padding polyester.
- Sew up the entrance hole with a hidden seam.
- Make ties if desired.
Pillows made from patches are economical and suitable for any interior and design.
You don’t always need to make the flaps square; you can cut out any shapes on a stencil and make patterns from them. On top of the flaps you can sew several openwork elements for beauty.
Decoration
Whatever option for making pillows is chosen, they can later be decorated with additional decorative elements. But here it is worth considering what this piece of furniture will be needed for. If the pillow is needed only as a room decoration, then it can be decorated with beads, beads, sequins and much more. If it is used for its intended purpose, then it is better to discard such elements.
You may be interested in this Children's patterns for boys and girls
Applications
To ensure that nothing causes inconvenience when sitting on a chair, you need to decorate the pillows with materials that are not too bulky. These can be various applications, fringe or buttons. The latter not only decorate the product, but also keep the filler from clumping.
Buttons
It is better to cover buttons with fabric. The color is chosen like the pillow or one that matches it. After this, the surface of the product is marked so that the decorations are located at an equal distance from each other. In the indicated places, the buttons are firmly sewn to the pillow.
DIY pillows
Thus, it can be seen that it is quite easy to sew seats on stools with your own hands. It is enough to stock up on the necessary materials and patience. And ready-made decorative elements will subsequently decorate and update the appearance of the apartment.
Decoding the scheme
The process of creating covers for stools and chairs may seem difficult for beginning craftswomen. First of all, you need to use detailed crochet tutorials with patterns. The latter consist of symbols that should be carefully studied:
- Oval - air loops (VP).
- Crosses - single crochets (SC).
- T - half double crochet.
- T crossed out - single crochet.
- T crossed out twice - with two double crochets.
- T crossed out three times - with three double crochets.
- X with a loop on top - a twisted column.
- X with a line on top is a connecting loop.
Designing and assembling a stool with your own hands, decor options
Crocheting for beginners requires following some rules. Schemes are always viewed only from bottom to top; circular options are read in the direction from the central part to the edges. Odd rows are determined from right to left, even rows, on the contrary, from left to right. The creation of round capes begins from the middle; thanks to the lifting loops, the optimal parameters of the product are maintained.
A square or round cape for beginners usually consists of 3 types of loops: chain stitches, double crochets and single crochets, and connecting stitches. Despite this, the products turn out to be attractive and interesting.