A gazebo with a fireplace is not just an element of landscape architecture that serves as a decoration for the landscape of the site, but also an additional functional area in which, if desired, household members can gather together and spend a pleasant evening in a warm, soulful atmosphere. The design of the gazebo can be adjusted in accordance with the specifics of the site and the personal tastes of the owner, so for almost any conditions it is possible to select a harmonious and interesting project.
Project options for gazebos
The recreation area in the space of the site can be arranged in various ways. Varieties of gazebos are associated with the presence of walls:
- If the structure contains only posts with railings and no walls, such objects are classified as open.
- Partially closed type of gazebos includes several closed walls.
- If all the walls are installed, then the gazebo is closed.
In open versions, it is still necessary to install one wall, which will support the fireplace and protect it from draft winds.
When choosing the type of construction, carefully weigh all factors related to your climatic conditions.
In the southern regions, open gazebos are more often erected, and in case of frequent winds or regular precipitation, partially or completely closed types are chosen.
Using modern materials and technologies, it is possible to build a gazebo with a fireplace according to your own projects and unique design.
Seven stages of arranging a fireplace gazebo
There is no point in making such structures miniature, because you will end up with just an indoor fireplace with a small table on a tiny spot, onto which heat from the fireplace or smoke will constantly blow.
The normal size of a canopy is about 16 m² - this is approximately 4x4 m or 3x5 m. If necessary, this area can accommodate up to 15 people and still have room for a cook.
Miniature gazebos are not the best solution.
Stage No. 1. Choose a place
Ideally, it is advisable to hide the canopy from prying eyes, but this issue must be approached without fanaticism. So if you build a gazebo in the farthest corner of the garden, then you will only get tired of carrying one dish from the house to the table, and then all this will need to be removed.
Building on a neighbor's property is also not the best option. Firstly, the neighbors may be unhappy, and secondly, why would you listen to neighbors’ conversations on a quiet summer evening?
Therefore, we are left with 2 options:
- If you attach a canopy to the house, then all the utensils, food and drinks will be at hand, but the fireplace is a fire-hazardous structure, so this option is not suitable for wooden houses;
- Moving the canopy to the center of the site is considered one of the best options. This way, you don’t bother anyone, and no one bothers you, plus for families with small children, you can place a playground nearby. Just don’t build too far away; from experience, a distance of 5-7 m will be the optimal solution.
A canopy in the center of the site is considered a good solution.
Stage No. 2. Selecting materials for the gazebo frame and tools
- I would not advise an amateur to take on the construction of a brick or stone gazebo; the only exception could be an open canopy on brick pillars; with a strong desire, a beginner can handle laying pillars;
- A practical and relatively inexpensive solution would be to assemble a frame from a metal profiled pipe, followed by partial cladding, for example, with colored corrugated sheeting. Such a canopy will definitely not burn down, although its appearance is not very original;
The frame from a profile pipe is assembled in a couple of days.
- When choosing a material for a canopy, most novice craftsmen prefer wood. The material is accessible, not expensive, and most importantly, it’s easy to work with;
- For a beginner, it is better to take either asbestos-cement slate or the same corrugated sheet for the roof.
Nowadays there is a lot of talk about the dangers of asbestos-containing materials. So, asbestos is really harmful, but only in the form of fine dust, and solid sheets of slate are no more dangerous than any other roofing material.
As for the tools, to erect a wooden canopy you can get by with a minimal set, which is shown in the photo below.
To build a simple wooden canopy, a minimal set of tools is enough.
A mason's tool won't cost much either. The only thing I would recommend purchasing or renting is an electric tile cutter with a diamond blade, or at least a good grinder with the same diamond blade. When laying a fireplace, you will have to trim a lot of bricks.
The minimum set for a mason is relatively inexpensive.
Stage No. 3. Foundation
The foundation for a brick or block fireplace must be poured, and it must be arranged separately from the foundation of the gazebo. While for a wooden or metal gazebo, a concrete foundation is more desirable than mandatory.
A strip or strip-column foundation is poured under a brick or stone gazebo.
When erecting lightweight structures, it is quite possible to get by only by concreting the load-bearing pillars, and lay the floor under the canopy with paving slabs or install logs and lay a wooden platform on them.
Scheme of the base for a light gazebo with a platform.
The instructions for pouring a reinforced concrete slab under the foundation are not complicated; by the way, pillars for light gazebos are built using the same technology, only the sizes of the layers are slightly different:
- Dig a pit at least 250 mm deep;
- Spray the bottom of the pit with water and tamp it down;
- Pour a sand-gravel mixture (200 mm) as a cushion and tamp it down;
- Make formwork with a height of at least 100 mm and knit a reinforcement cage inside, the rod is taken with a cross-section of 8 mm;
- Pour concrete into the formwork and wait for it to set. You can start laying bricks in a couple of weeks, but concrete gains full strength in 28 days.
Diagram of a foundation slab for a stove or fireplace.
Stage No. 4. Recommendations for constructing the frame
Having an accurate drawing of the future canopy at your disposal is a big plus, but a light gazebo cannot be called an overly complex structure, so a good sketch will do here. The main thing is that you can read it and all dimensions and tolerances are indicated on it.
Drawing of a lean-to gazebo.
In the professional literature there are many schemes for the correct joining of timber in wooden frames. But I’ll tell you honestly, it’s very problematic for an amateur to implement all these connections in practice.
Personally, I take it simpler; there are now many different plates and angles on the market designed specifically for assembling wooden frames. All this fittings are assembled using self-tapping screws and there is no need for any special knowledge here, only it is advisable to take the corners with an anti-corrosion coating.
Metal fittings for assembling wooden frames are very convenient.
Stage No. 5. Arrangement of the roof and floor
Of course, gazebos with hipped and other polygonal roofs look impressive, but without experience, it is very difficult to assemble such a rafter system yourself, even if you have a good sketch.
Assembling a gable structure is a little simpler, but it’s also difficult for an amateur. Therefore, I always recommend that beginners build a pitched roof. This type of design is intuitive and it is almost impossible to make a mistake. Plus, on a pitched roof it is easier to install sheathing under the roofing material.
Sketch of the frame of a lean-to gazebo.
I have already mentioned roofing work specifically; the easiest way is to cover the roof of the gazebo with asbestos-cement slate or corrugated sheeting. By the way, the notorious metal tiles are made from the same metal as corrugated sheets, only they cost 2 times more.
Just keep in mind - corrugated sheeting, as well as metal tiles to the sheathing, is attached to the bottom of the wave, and asbestos-cement slate to the crest.
Asbestos-cement slate is attached to the crest of the wave.
As for the floor in the gazebo, I would recommend using a modern polymer-based decking board. The service life of such flooring on the street starts from 25 years, and the planks are installed in a similar way to lining (on clamps). Plus, the deck board is fireproof, which is very important for a gazebo with a fireplace.
Decking made from decking boards is considered the most durable.
Stage No. 6. Choosing a fireplace
| Illustrations | Recommendations |
| Metal fireboxes. In this niche there are 2 types of structures - steel and cast iron. Steel fireboxes are cheaper, but they rust and burn out over time. Cast iron does not rust or burn out, plus these fireboxes accumulate heat better, but they also cost more. | |
| Block structures. Now on sale there are fireplaces that are assembled like a kit, from heat-resistant blocks. You can assemble the firebox in a couple of hours, plus the very next day (after the heat-resistant glue has hardened) such a firebox is ready for use. True, such models are expensive. | |
| Brick structures . If you are making only a fireplace, then it is not difficult to assemble the firebox yourself, but to build a fireplace complex with a stove, smokehouse, etc. more knowledge is already needed. |
Of course, you can buy an electric fireplace, but as practice has shown, such units do not “take root” in garden gazebos. People are trying to be closer to nature, but they are tired of electrical equipment with its magnetic fields and safety precautions in city apartments.
- Gazebo with fireplace
- Fireplace in the gazebo
Stage No. 7. How to fold a fireplace
For some reason, beginners immediately begin by studying the orderly plan of brickwork (ordering), forgetting about the mass of important little things without which it is impossible to build a high-quality firebox. There are dozens of types of such structures and each of them has its own orderly plan.
Below is a plan of a corner fireplace; finding other types of structures is also not difficult, plus the video in this article explains in detail how and where to lay this or that brick. And we will go over the important details that the masters are silent about.
Detailed plan for a corner fireplace.
- The thickness of the reinforced concrete foundation slab starts from 100 mm;
- In order not to pour the concrete slab yourself, you can lay a finished floor slab or several FBS blocks; their strength is sufficient for such a structure;
- Before laying the first row of bricks, the concrete is covered with 2 layers of roofing material;
- The body of the structure, that is, the outer walls, the platform for the firebox and the upper part of the chimney can be laid out from any type of brick (it is better to take facing brick);
- The body can be laid on a standard cement-sand mortar (1:3);
- The firebox and the mouth of the pipe are laid out of refractory fireclay bricks, and 1 layer is enough;
- Fireclay bricks are placed on a clay mortar, so don’t try to make it yourself, it’s better to buy ready-made ones, I use a masonry mixture from. In general, there are many such mixtures, but I can’t speak for the quality of others;
The proprietary mixture is of good quality.
- The first heating should be done no earlier than after 2 weeks and should be heated gradually. You start with 1 kg of wood chips and increase the amount of fuel by 0.5 kg every day for a week.
Scheme of a wooden gazebo frame
The external parts can be decorated with siding, and for a budget option, choose finishing with plastic or aluminum.
The inner surface is decorated with stone or wooden lining. Since wood is a highly flammable material, it is necessary to take into account fire safety measures in advance when designing a gazebo:
- You need to cut out a space in the wooden floor to pour a concrete foundation for the fireplace.
- Before burning, it is necessary to sheathe the working area with sheets of iron.
- The optimal location of the fireplace is in the center, as this eliminates the possibility of the walls catching fire.
When choosing a brick gazebo, it is worth noting that building a fireplace in it will be much easier than in a wooden gazebo. For this you will need standard materials, the same as for laying the stove.
Having thought through all the nuances, you can calculate the amount of building materials needed and proceed to the construction of your gazebo.
What is the difference?
Not everyone knows how a fireplace design differs from a barbecue, grill or oven. Fireplaces are designed to provide warmth in rooms. They create an atmosphere of coziness and comfort. A fireplace can be called similar to a barbecue oven, but its firebox is located quite high. It is convenient to cook food on a special grill. This device also has a grill, tandoor, smokehouse, and oven.
On sale there are complexes that combine several devices
, but they cannot be used outdoors. There are barbecue fireplaces: such designs are chosen by people who want to not only use them to provide warmth in the room, but also to cook. Using a barbecue, you can cook meat using skewers designed for this. This device is visually similar to a box on legs. There are coals inside it, which allow you to achieve the desired effect.
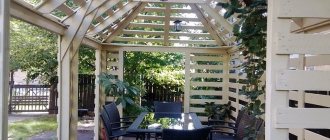
Construction of a gazebo
- Foundation. Construction begins from the foundation. It is better to fill it with a monolith at a time if the floor will be laid with paving slabs in the future. Or construct a ribbon belt when planning a wooden floor in a gazebo.
The foundation must be reinforced using a VR mesh, since the height above the floor level will be insignificant. After pouring the base, it is kept for about 7 days for initial setting so that further work can be carried out.
- Frame pillars and roofing. Next, frame pillars are installed to prepare for the installation of the roof. Rack posts can be made of reinforced concrete, brick, metal pipes or profiles, as well as wooden beams.
- Fireplace laying. After installing these elements, you can proceed to the construction of the fireplace. The walls of the fireplace are laid out on the finished foundation in accordance with the chosen scheme. For masonry, bricks soaked in water are used so that they do not draw moisture from the mortar. The firebox portal is laid out with refractory bricks.
When designing a fireplace, keep in mind that its main function is visual decoration and style, so pay attention to the size of the fireplace. It needs to be made spacious to enjoy an open fire.
Chimney and ventilation system. A fireplace is considered complete if it is equipped with a chimney and a proper ventilation system.
When constructing such structures, always take into account fire safety rules.
Advantages and disadvantages
The fireplace, which is made of brick, is a fairly heavy structure. That is why for its construction you will need to build a good foundation. It is especially important to calculate it in such a way that distortion or shrinkage does not occur. Otherwise, the entire structure may be deformed.
The advantages of a multifunctional fireplace:
- You can cook food on it in any weather;
- the structure has a fairly high strength and, accordingly, is characterized by great durability;
- does not smoke;
- is characterized by high fire safety.
So that you can comfortably spend time with friends or family in the gazebo, you can furnish the structure with various pieces of furniture. This design also has some disadvantages:
- high price;
- such devices must be equipped with a chimney;
- fireplaces have a large mass.
However, such disadvantages do not cover the advantages of these designs.
Construction of a brick fireplace for a gazebo
There are many varieties that differ in the number and modifications of furnace complexes. The optimal location is near the wall or in the corner of the gazebo.
To expand the functionality of the fireplace, you can supplement it with the following elements:
- cast iron hob with additional firebox;
- smokehouse or oven;
- a convenient niche for drying and storing firewood;
- barbecue
According to the principles of construction work, an outdoor fireplace is similar to a home fireplace. It has the same dimensions, masonry scheme and decorative design.
To reduce the cost of the fireplace, you can make a metal hood in the upper part, and instead of a brick pipe, install a metal one.
The success of laying a fireplace is determined by the source material. For it, ordinary or fireclay bricks are used. Simultaneously with the construction of the fireplace, an adjacent brick wall is built.
If you wish, you can carry out the laying yourself or find a professional craftsman.
Fireplace and its varieties
Many owners of country houses already have portable barbecues or barbecues, but all this is temporary and also takes up a lot of space. The best option is considered to be a fireplace design with the functions of a barbecue, grill, oven or barbecue.
Today you can find several options for fireplaces, where there is a complex of barbecue or barbecue functions, for example, a fireplace-barbecue or a fireplace-barbecue.
Gazebo with stove complex
Fireplaces in gazebos can be of several types. Stationary fireplaces with stove complexes are considered the most popular and reliable.
They are usually made of brick and have many stove functions, thanks to which you can prepare not only delicious dishes, but also provide a full-fledged picnic with barbecue and gatherings by the burning fireplace.
In addition, there is a simpler option. These are portable devices: barbecues, barbecues.
Portable grill with barbecue function
The price for such designs is quite low. This type of device is used in cases where the area does not allow the construction of a gazebo with a fireplace. In other cases, stationary versions of fireplaces are used, with the functions of a stove, barbecue or barbecue.
If we talk about a fireplace with a barbecue function located in a gazebo, then its functionality increases noticeably, because cooking can be done at any time without worrying about weather conditions. This is a positive quality of any stove that is located indoors, this is especially true in a country house or on the territory of a country house.
Fireplace insert with barbecue
How to build a gazebo with your own hands
A gazebo fireplace has the same operating principle as a home fireplace. It is no different from the home version either in appearance or dimensions. It is placed inside the gazebo, complemented by decorative design in the form of a castle or column.
In addition, the barbecue fireplace is equipped with other devices that increase its functionality:
- hearth with grill;
- oven;
- washing;
- cooking oven;
- smokehouse;
- cauldron for water.
Construction of walls and roof in the gazebo
Having completed the laying, they begin to install the roof. One of the most important points is the correct calculation of the roof slope angle. The best roof is a sloping one, as it provides less resistance to wind loads.
For covering use boards, metal sheets, slate or polycarbonate sheets.
Important! All wooden elements must be treated with antifungal and fire-bioprotective agents.
- Flooring in the gazebo. After completing the roof, laying the flooring begins. The best option is paving slabs made from sand and various polymers. It has a variety of colors and a long service life.
- Construction of walls or railings. At the final stage of construction, walls or railings are installed. Any material suitable for practical and aesthetic purposes is used here. Typically, lining, block house or decorative wooden grilles are used for walls.
How to build a fireplace with your own hands
Today, fireplaces for country gazebos can have different sizes and design features. The simplest and most functional option is built from brick. You can use a ready-made order, which shows in detail the laying of each row.
Arranging a simple fireplace design for gazebos
The work involves several stages:
- The two bottom rows are laid out in a continuous layer.
- Next, a niche for firewood is formed. For its internal surface it is advisable to use fire-resistant brick . Most often it consists of 5-7 rows of bricks.
- At the top, the structure usually narrows, forming a smoke collector.
- Next you need to decide on the type of chimney. This can be either a metal pipe or its brick counterpart. To save time, you can use the first option.
The fireplace fits perfectly into the interior of a brick gazebo
Advice! It should be remembered that a fireplace is not a stove, and therefore this design is extremely simple.
Now you can bring furniture into the gazebo and decorate it to your taste.
Installation of lighting, electrification and communications
Point elements are used to illuminate the space in the gazebo. For a small area, 2-3 lamps are enough. If desired, you can light the path leading to the gazebo.
For electrification, it is necessary to purchase high-quality wiring, ensuring reliable waterproofing of the wires.
The presence of electrical outlets will provide the ability to install electrical appliances, additional lighting or sound.
For convenience, install a pipeline with drinking water, hiding it in the ground. In this case, it is necessary to consider the sewerage outlet if there is a washbasin or kitchen sink.
Creating a gazebo step by step - saving on builders
Most construction teams charge up to 50% of the cost of materials for work - taking into account rising prices, this entails a serious increase in costs. Isn't it better to think about how to build a gazebo with a barbecue without the participation of strangers? The time spent is worth it, and the help of friends will not hurt, especially if you decide to build a wooden frame structure. This option will cost less than stone, although it will require more careful maintenance in the future. You can settle on the golden mean, combining both materials.
For a wooden gazebo, we recommend a lightweight metal barbecue with a hood - in this case, it will be enough to make a standard columnar foundation. If you want to equip a permanent brick barbecue, you should make a high-quality strip base specifically for it, but the gazebo itself can be left on a columnar one. A strip foundation will definitely be required if your area has unstable soil or you decide to build a completely brick building. In all cases, we recommend that you read the article on foundations for gazebos - everything is described in detail there.
Standard column foundation
The construction of wooden gazebos with barbecues does not require much experience and special skills, which are indispensable when constructing permanent stone buildings. This is a definite plus - almost all the work can be done independently, except that when it comes to the top trim and construction of the roof, you will have to use someone’s help. First things first.
5b5cf1132285e2344cfb015a406394b5.jpe
5de1ebbcfd296753df5635932396dfc7.jpe 77c4ba9fa13ed2b62bc89de4353005fb.jpe 1fabd781bee81a1c6f8af59e01904f1c.jpe
47b316b65be28d2ea736b684157885d4.jpe
Step 1: Bottom Trim
When the foundation has gained strength (5-7 days in the case of reinforced concrete structures), it is time to begin assembling the frame. In all wooden structures, the frame can be divided into 5 main elements: lower frame, risers, joists, top frame, rafters. This is the skeleton of your future gazebo. The first to appear is the bottom trim - a rectangle or square made of 100*100 mm beams
It is important to isolate the beams from moisture and the development of fungus, for which they are treated with an antiseptic, and roofing felt or plastic film is placed on the foundation. If the area of the gazebo is large, the frame is reinforced from the inside with a cross made of the same timber
Assembling the frame of the structure
Step 2: Risers and joists
When the lower frame is completely ready and fastened, we install corner and intermediate risers, for which we take the same beam. Use temporary jibs to secure them in position. After the risers, logs are made - 100*50 mm bars, which are laid on the edge on top of the bottom frame. They will support the weight of the floor and people. They are installed at a distance of no less than 50 cm from each other. For the convenience of further work, boards are laid over the fixed logs - this will make it easier to install the bars of the upper trim.
Step 3: Top Trim
Fundamentally, there are no differences between the lower and upper frames - all the same timber, all the same fastening methods, which are described in detail in the article on the construction of wooden gazebos. True, it will be more difficult to work at heights - here you will need the help of a friend, as well as a good ladder or stepladder.
Attaching the top frame beam
Step 4: Rafters and Roof
To avoid troubles with the weather, try to complete the construction of the frame as early as possible, completing the first stage of construction by installing rafters and laying roofing material. The roof is made of 100*50 mm timber and boards. First, identical structures from prepared rafters are assembled on the ground, then the finished “cocked hats” are lifted onto the roof and secured. If you want to make the room warmer, we recommend laying a continuous plank sheathing on top of the rafters, which is covered with waterproofing and wind protection. A thinner counter-lattice is placed on top of these materials to install roofing sheets.
From this stage, a large number of variations begin with the decoration and area of the walls - you can make both a closed and open or semi-open structure, insulate it from the inside for a comfortable stay at any time of the year, or leave it as is. The construction of various gazebos with and without barbecue is covered in detail on our website, you just have to choose the right direction.
Layout options and ideas
A gazebo on the site can be built completely open, organizing a resting place by the fireplace under one canopy, half-open and closed. When choosing an option, you need to take into account the time and financial costs of each. If the dimensions of the building allow, the stove is placed along one wall. A permanent structure can even replace it. In a small area, a corner location would be appropriate.
For several sources of fire they make a common hood, so they are located in close proximity to each other. The chimney must be designed in accordance with all the rules that exclude smoke in the direction of residential buildings.
The central place of the gazebo usually remains empty or occupied by a seating area. There is a table, chairs, and a sofa. If the building requires a portable brazier only for shish kebab or barbecue, it is installed in the middle, ensuring a good flow of smoke.
Closed gazebos with barbecue grills and stoves according to an individual project
Today, there is no need to independently erect complex structures in the form of closed gazebos in your garden, since specialized companies take on the implementation of projects and work, bringing to life the original ideas of clients. As a result, each gazebo is different, reflecting the unique taste of the designer. However, the investor always receives a finished product, equipped depending on his wishes, that is, with a barbecue grill, stove, smokehouse, and built-in communications. Cabinets, tabletops and benches can also be installed in gazebos. Of course, specialists help in case of doubts about the shape, size and correct choice of raw materials.