Stages of making a garden bench from pallets
The bench manufacturing process itself consists of several steps:
All selected pallets are processed with a grinding machine
Particular attention is paid to those places that will come into contact with the human body. The surface should be smooth and even.
The ends of the pallets also need to be sanded well.
The pallets are cut into two parts of different sizes to create a seat and backrest. The ratio of these parts can be any depending on your wishes. The wide part will be used for the backrest, and the narrow part for the seat.
The back and seat of the bench are assembled. To do this, you need to connect them at an angle using an iron angle and screws. Enough holes are pre-drilled. The screws are tightly tightened so that the product can withstand a lot of weight, is durable and does not wobble.
Four legs 40–50 cm long are cut from wooden blocks. Experts recommend making them not very high, but quite wide for greater stability. The legs are attached to the sides of the seat. To do this, you can take metal strips and use them to connect all the parts. This method is more reliable and practical.
You can attach the legs with ordinary self-tapping screws or screws without metal plates.
Armrests for the bench are being made. You can use small wooden planks for this. The dimensions are determined on the spot, as this will be most convenient. Take two bars (one longer and the other shorter) and saw off 45° corners on both sides. Shorter bars will also serve as an additional fastening element between the back and the seat.
Screw them on both sides of the bench.
If you wish, you can just use regular thick ropes. Make knots on both sides and nail to the sides of the structure. They will serve a largely decorative function.
Tips for finishing, processing and decoration
A bench made of pallets can be left in its natural form or slightly refined. After treating wooden elements with antiseptic agents, they can be varnished or painted.
Such a bench will look more aesthetically pleasing, and if it is red, yellow or green, it will become a wonderful bright spot in your dacha. If you like this design, then you can make an entire furniture set consisting of several benches, a table, loungers and sofas.
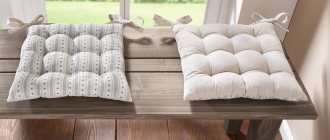
On top of the bench you can put a soft mattress and several pillows. If you wish, sew a cover from any dense and durable textile: burlap, velor, jeans, tarpaulin, etc.
Garden furniture made from pallets with additional finishing looks no worse than a set from a store
Selection and preparation of pallets
The best option for making a bench from pallets would be foreign pallets. Even used ones do not require careful, long grinding.
Be sure to pay attention to the markings and smell of the pallets. Some types are not intended for use as furniture, as they contain toxic impregnations.
Other used pallets smell terrible from being used in grocery warehouses. This smell cannot be removed by anything.
In addition, we should not forget that for long-term use of wood, it must be periodically processed. The first time this is done to increase moisture resistance and from bugs before starting any furniture manufacturing work.
Let's summarize:
- Choose imported pallets, new or used, without toxicity labels or unpleasant odors.
- Sand down any uneven wood.
- Treat with impregnations against bugs and moisture.
- Once construction of the bench is complete, apply paint or varnish.
Pallet preparation
Assembly of the bench begins with the preparation of pallets. If disassembly is planned, the boards are carefully separated from the lintels with a nail puller. You can't put in a lot of effort. A firmly embedded nail can split the board; all that remains is to throw it away.
If the pallet does not need to be disassembled, it is surface treated with a grinder in all accessible places
When it is planned to make a bench from pallets with your own hands without disassembling them, only damaged boards are dismantled for replacement. Sanding is a must, even on smooth wood. The accessible surface of the pallet is easier to go through with a grinder. Hard-to-reach places are reached with sandpaper.
After sanding, the pallets are impregnated with an antiseptic. The product will protect the wood from pests and fungus formation.
Pallet furniture: pros and cons
It cannot be said that everything is so rosy in the use of recyclable materials, which, in essence, are pallets. There are pros and cons to such an environment. The former must be actively used, and the latter must be fought.
| pros | Minuses |
| The furniture is assembled literally in a matter of hours. | Such furniture will not fit well into any interior. Loft or country are best suited. |
| There are many design ideas from this material. | |
| The cost of the finished product is literally pennies. | It is not easy to care for structures made from pallets - dust accumulates under them, which is not easy to remove. |
| The pallets are made of high quality natural wood. | |
| The resulting products will be original and practical. | If you don't spend enough time processing the wood, you risk making an unpleasant impression on your guests. |
| Almost any technique can be used to decorate wooden furniture. |
garden furniture
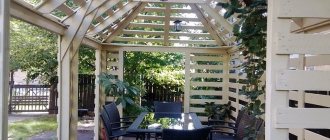
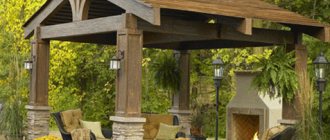
Garden furniture will also look original. There is also room to roam around here, and in addition to tables with sofas, which can be conveniently placed on a terrace or in a gazebo, you can build other items. For example, to make a sun lounger you will need only 4 pallets. Three parts will be used to make the sunbed; they are simply fastened together with nails or bolts. The last element is used to form the back. Paint, place the mattress and enjoy your stay.
Chaise lounge
More experienced specialists and professionals in their field will be able to create the most unusual things from fairly simple pallets, from hanging swings to a gazebo. To do this you will need a large number of materials and tools. You can disassemble the pallets and use the resulting planks to create boxes and chests in which vegetables, fruits and grains will be stored. This is an excellent option for a summer residence.
DIY chair made from pallets
Now you know how to make a sofa and a table from pallets; a couple of armchairs are not enough for a complete set. Not a problem at all. Here are instructions with step-by-step photos on how to make a chair from pallets with your own hands. The view in the picture is not very presentable, but the decor is a matter of taste. If you paint it, throw on a blanket and a couple of pillows, it will be what you need, you can even put it in the room in front of the TV.
For work we will need two pallets and the most common tools, plus bolts and nails...
7092157c6a82e62b537e8f5268e674bf.jpe 5f38e6240ff7e20a1107d0baed6403e3.jpe
a74e24baa3e31addc6fae2b3800d090e.jpe
- First of all, we cut the pallet in half, this will be our seat and back.
- The second tray is for the armrests, we also cut it in half.
- Then we clean the whole thing with sandpaper so that we can work with the finished material.
- We begin to assemble the structure, if you make the backrest inclined, cut it off in the place where it will be attached, it must be diagonally, we attach it to the seat, as shown in the photo.
- We screw the sides, it’s better to make holes with a drill and place them on the bolts, it’s more reliable, otherwise it won’t last long on nails.
- In principle, that’s it, then varnish or paint it; if it’s going to be on the street, of course, it’s better to coat it with a protective varnish.
Bench with back made from pallet
You can also make a bench like this out of pallets for the street. The tools and materials are the same. One pallet is enough for a bench; prepare additional bars for the legs, strips for the sides, metal corners and plates for fastening. The sizes can be guided by this diagram.
The operating procedure is as follows:
- take the pallet and place it horizontally;
- saw the bottom board in half along with the supports
- We apply the sawn-off part of the pallet (the back) and fasten it with corners from the outside;
- We nail the prepared bars on the sides,
- We attach the cut board to the upper part of the back, as in the photo, and add two more planks, nailing them to this top board.
- bench and sand it thoroughly
- we attach the legs to the crossbars; it is advisable to strengthen them from the inside with corners or metal plates;
- The bench is ready and can be varnished.
You see how simple it is, anyone can do it.
Pallet chair
So, let's go from complex to simple. From sofas and armchairs to a simple chair, we will soon reach a stool. Making a chair from a pallet is quite simple; by the way, it’s good practice for those who have never made furniture with their own hands, but here is such a great chance to gain experience. As I already said, a pallet is an excellent semi-finished product; from its boards for a chair you can make all the parts, from handles to legs.
The main advantage is that all the boards in the pallet are the same thickness and size, so when we disassemble the pallet we already have a bunch of finished material. Our only task is to correctly calculate the proportions. This is how it will look schematically in the pictures.
In these step-by-step photos you can see how some guy in camouflage casually assembles a chair from pallets. In general, there is nothing to add, everything is clearly visible in the pictures
All the details of this chair are taken from one pallet, just pay attention to the slope of the back, in this case it was simply fixed with side slats; for reliability, the back can also be reinforced with beveled bars
Pallet lounger
Another summer option if you want to bask in the sun. True, you need a large pallet.
- Sawing in half
- cut off future legs from the back
- fasten the backrest perpendicular to the couch so that there remains a “tail” that will serve as a back support;
- nail the legs sawn off from the back in front.
Simple, cheap and cheerful.
Pallet hammock
How do you like this very exotic use of a pallet? Since we have a dacha theme, what would a vacation at the dacha be without a hammock. It’s a very convenient thing and doesn’t take up much space, the main thing is that there is somewhere to hang it. Making a hammock from a pallet is not difficult, but it will take time.
So, in addition to the pallet, we will need a drill and a strong rope.
Next in order:
- disassemble the pallet into boards;
- we select 20 pieces (plus or minus a couple, look at the situation) and make them the same length;
- We make a stencil from one board, that is, we mark future holes with a pencil;
- the distance of the holes from the edge is approximately 3 cm;
- Using a stencil, we make holes with a drill in all the boards;
- “lace” the boards together with a cross;
- We finish each “lace” with a strong knot, singe the ends of the rope so that it does not “fluff”;
- at the corners of the hammock we make two holes for the rope on which we will hang the hammock;
- We hang the hammock and admire the result.
Another dacha attribute is ready. Photo source instructables.com
A small selection of chairs made from pallets
I don't even know what else I can come up with
Sequencing
For a simple design, you don’t even need a drawing. For those who have a good imagination, it is not difficult to imagine everything in their minds. But for clarity, you can draw a diagram.
Step-by-step instructions for making a bench are as follows:
- The pallets are joined together, installed vertically at the end, and marked with a pencil where the cut will be. It is necessary to cut to length so that there are two supports left on one side (the wide part);
- cut into pieces with a hacksaw, first one pallet, then the second;
- the resulting wide parts are placed one on top of the other. This will be the seat;
- one narrow part is installed on the seat to form a backrest. You can place small bars of equal thickness to create an inclined back;
- Boards are cut out from the second narrow part of the pallet and screwed to the back with screws (two on each side). These slats should be directed downward and, as it were, grip the seat on both sides;
- install the backrest, screw the slats from below to the seat.
All that remains is to additionally secure all the parts with self-tapping screws for reliability - and the bench is ready. It can easily accommodate two adults. It will take a couple of hours to make such a bench from pallets with your own hands. You can improve it by attaching wheels to the bottom or making armrests.
Pallet headboard
The design of this headboard is quite simple. Wide boards that act as pallet beams will be used for both the main frame and as an outer decorative frame. The frame for this bed is 122 cm high and 137 cm wide. Again, this is for a full size mattress, but you can easily adjust the measurements to fit any mattress. The project was developed using SketchUp. The joinery used here was simple butt joints and was attached with pocket screws using a Kregs K5 Pocket Hole Jig.
When the headboard is assembled, these pocket holes will not be visible. Drill two pocket holes at either end of the three horizontal rails. Then simply connect the frame pieces together and attach each joint.
Read the full instructions on how to make a headboard on the website. See images from SketchUp and step-by-step assembly photos in the gallery below.
Photo source: www.instructables.com/id/Pallet-Wood-Headboard/
Pallet headboard with lighting
To make a bed headboard from pallets, you don’t need a lot of materials. You just need to find a few boards from disassembled pallets, buy polyurethane and lamps, if you want to make a beautiful backlit headboard, like in the photo.
Start by measuring the bed frame you will be attaching the headboard to. Then measure your desired height. In this case it is 200 x 210 cm with a box of approximately 70 x 60 cm. These boxes can be adjusted to get the desired size to suit the width of your bed. How to make a shield is shown below step by step photos. You can drill holes for the light wires in the back of the frame, like wiring in a house, or do it another way. Then attach the bed frame to the headboard. This headboard was a little heavy due to using 2x4s for the frame. You can use smaller frame lumber.
Photo source: www.instructables.com/id/Pallet-Headboard-With-Lights/
Want to make a pallet headboard for your bed? There is nothing complicated about it! Here are some tips and tricks to help you with this! Working with pallets is more of an art, but the author wants to share some tips and tricks that are sure to help you as you discover your own methods for creating something beautiful from used pallets. For detailed instructions on how to make a headboard for a bed, as well as recommendations on how to choose the right pallets for such a project, read the author’s website, link under the gallery. See the master class below in the step-by-step photos.
3ad5f6145544f686b7d29d6cb61a72a0.jpe
Photo source: www.thinkingcloset.com/2014/02/24/so-you-want-to-build-a-pallet-headboard/
Here's another example of how to make a headboard from a pallet.
This one is really easy.
Screw the plywood to two 2x4s vertically. Then paint the plywood black to hide the gaps. Align the first row of boards along the bottom of the plywood and screw them in place from the bottom. Continue layering the boards upward. Try to have the same size boards in each row to minimize tearing. You may need to trim some pieces to get the edges even. For strength, screw 3 L-brackets to each of the two legs and attach them directly to the wall using screws and drywall anchors.
Read more about the assembly procedure on the website. Below are step by step photos.
Photo source: www.instructables.com/id/Pallet-Wood-Headboard-1/
If you are looking for a budget option, a bed with a pallet headboard is the classiest option. The trays are accessible, easy to clean, and can be disassembled fairly quickly. It took the author about 3.5 hours to lay out the five pallets, including sawing, nail removal, stacking, and cleaning. By the way, a good way to disassemble pallets is to run a circular saw along their edges to just free the pallet from the central nails. There's always a ton of nails in these things! The headboard was assembled using a Kreg 5 Pocket Hole Jig. For those who don't know what a pocket hole is. This is a hole that cuts into the wood at a 15° angle, allowing you to drill at an angle to attach a board or timber. The length of the screw depends on the thickness of the material. Despite this, they are very durable and can be hidden to keep the joint looking clean. Instructions and a list of materials can be read on the website; below, see the master class with step-by-step photos.
Photo source: www.instructables.com/id/A-Pallet-Wood-Headboard/
Available materials from which you can make a bench
To build a garden bench, you don't need to go to the store. You can use the following available tools:
- old chairs and stools;
- furniture made of plastic;
- stones;
- pallets or pallets;
- plastic bottles;
- crib
This is not a complete list. If you have imagination, you can use almost any materials.
A simple option is to use logs. To prevent the logs from causing inconvenience while sitting, the surfaces need to be sanded. The tree will need to be divided into several parts, covered with drying oil and varnish.
The easiest way to make a garden bench is from sanded logs
An equally simple option is a bench with a stone seat. The method of display and the shape of the product depend on the imagination of the summer resident. The advantage of such a bench is that it is not afraid of snow, wind, rain or sun.
You can make a bench yourself from stone that is not afraid of rain, wind and sun
You can quickly make a bench using pallets or pallets. If there are a lot of similar materials available, then there is no need to throw them away. You can make a beautiful corner sofa from them.
You can make benches of various shapes with your own hands from pallets
If there are no pallets, you can use an old crib. To do this, you need to disassemble the frame, mark the height of the headboard and footboard, measure and set the width of the seat. After this, you should fasten the parts together. All that remains is to decorate the bench.
An old crib can be turned into a kind of garden bench.
If making a bench from an old bed seemed like a tedious undertaking, then you can make a bench from old chairs. It’s enough just to put them in a row, secure the frame structure with a tie, cover it with a solid shelf-shaped seat and cover it with foam rubber in a cover.
To prevent the structure from moving in different directions, the chairs need to be fastened together
It is also possible to use an old barrel. To do this, you need to prepare a 200 liter container.
3e9ffaa8d05ec77fa61e380de30b01d1.jpeTo make a bench from a barrel, you need a large container
Next, follow the steps in the following sequence:
- Cut out a large recess.
- Secure the seat.
- Add decorative elements.
Another option is to build a bench from plastic bottles. The difficulty is that for a full bench you will need more than 150 bottles. Additionally, you can make a beautiful case that will help hide the origin of the design. It is recommended to lay several layers of foam rubber so that the bench is not only beautiful, but also soft.
To build a bench, you need to prepare a large number of bottles
Each of the materials has its own advantages and disadvantages.
Table: advantages and disadvantages of available materials for making a bench
| Material | Advantages | Flaws | Recommendations for use |
| Pallets, pallets or wooden chairs | Wood is a lightweight and easy-to-work material. It is possible to decorate using any method - from simple painting to using carved parts | The structure must be periodically treated with an antiseptic to protect it from moisture and pests | The material should be soaked in antiseptic before use. |
| Stone or concrete | Resistance to bad weather conditions | Heavy weight of the structure, therefore only a stationary option is possible | To make it comfortable to sit on a stone, you need to arrange a bedding |
| Plastic bottles | The material can be processed, is light in weight, and is easy to carry. An additional advantage is minimal material costs. | Fragility, need for a large amount of material | You will need to put a thick fabric cover over the frame. |
| Old children's bed | Durability, long service life, stability | Large weight, the need for mandatory decoration. Design requires coating with anti-corrosion agent | In cold weather, you need to put covers on the seats |
Materials and tools
A bench in a country house is the simplest design. In the primitive case, it generally consists of 2 boxes stacked on top of each other. But if you want to get more comfort, the design can be improved: install a backrest and sides.
- Pallets – 6 pieces: for the seat, back and sides.
- 2 wooden blocks with a cross section of 50*100 mm - the length does not matter.
- Screed beam - or board 2.7 m long.
- Fasteners - screws, studs or nails.
- Hammer or screwdriver, electric drill.
Preparing for work
Wood for packaging is not processed. This is an ordinary dried tree, sometimes even damp. In this form it cannot be used for a garden bench or sofa. Therefore, the material is first prepared. The photo shows the preparation of wooden boxes.
- To begin with, the pallets are sanded or sanded. The latter method is much more convenient and faster. The grinder can be easily rented.
- The wood is treated with an antiseptic primer - twice, since the product at the dacha will be outside constantly, so it needs good protection from moisture. It is recommended to impregnate the wood with fire retardants in order to reduce flammability.
- Products are painted or varnished - also 2 times. Coloring is considered more reliable.
The staining and varnishing procedure is repeated step by step at least once a year.
How to make a bench from pallets
Do-it-yourself benches from pallets can be assembled in a couple of hours. If desired, you can make a drawing first. However, this design is so simple that you can do without it: the standard dimensions of the box do an excellent job as a drawing. The do-it-yourself pallet bench in the photo has a very simple structure.
- Assembly begins by preparing the sidewalls. To do this, the pallet is installed vertically and the lower part is reinforced with a 50*100 mm block. The sidewall in this case will better withstand the load.
- Then both sidewalls are fixed with a tie beam.
- For the seat, two pallets are fastened together with a board or secured with bolts or studs.
- The master class recommends fastening the seat to the sidewalls step by step with studs to ensure a good level of tie. Holes for fastenings need to be drilled.
- The back is also made from 2 pallets. Then it is secured to the screed beam and the seat.
- Since the bench turns out to be quite long - 2.7 m, it is advisable to strengthen the structure with another stand at the bottom center to avoid sagging.
In the video, making a bench with your own hands is presented in more detail.
How to make a bench from pallets with your own hands
You should start making benches for your dacha with a simple design with a backrest. There is no need to disassemble the pallet into individual parts. All amateurs can make such furniture. Step-by-step instructions for making a bench with slats along the seat and a flat back.
Drawings and diagram of a bench made from pallets
- Using a hacksaw, cut the pallet along the edge of the middle board - cut 3 beams 120 mm thick.
- On the narrow part, cut off the bottom strips.
- Place the wide part – the seat – on a flat surface.
- Place the second narrow half perpendicularly, cut side down. She will stand on the ends of the bars. There will be a gap from the floor to the board.
- Using a drill, make conical undercuts for the heads of the screws so that they do not stick out.
- Screw the backrest strips to the seat bars with self-tapping screws.
- Strengthen the backrest on the sides with gussets - slanted planks from the lower cut boards. Nail the ends of the gusset to different beams.
Pallet bench option
The height of the pallet is 156 – 162 mm depending on the thickness of the board. Instead of legs, a second pallet is used, cut in the same way. Fastening is done with self-tapping screws along the edge. The result is a bench made from pallets with a flat base. The height is 8 - 10 cm lower than a standard chair.
If necessary, cut the remaining beams into cubes and place them around the perimeter, finishing off the legs and increasing the height of the garden bench.
The boards are secured to the beams with ring or spiral groove nails. It's impossible to get them out. Use a hacksaw to cut the fastener.
A wide bench with a high back is made in the same way, all actions are performed step by step. Take 2 pallets and cut them, shifting by 1 plank, making the blanks for the seat and back wider.
From the narrow remains, cut the boards and make legs from them, nailing them vertically on the sides.
Pallet features
The design is a wooden flat box with standard dimensions –800*1200*145 mm or 1000*1200*145 mm. Products are produced in smaller or larger sizes, but rarely. It's a matter of the purpose of the box.
Its design is designed to facilitate the transport and unloading of various materials. The ability to securely secure a load to the deck and position it without worrying about uneven bottoms or shaking is a plus for transport. The sides and the strength of the base ensure ease of unloading with modern equipment - a plus during unloading work. And, since such equipment changes little, the parameters of the pallets remain unchanged.
- It is the standard size that makes pallets so convenient for making garden or any other furniture: sofas, beds, tables are simply assembled from fragments. How to make a pallet family essentially comes down to how to secure the boxes together to create a seat of the right length.
The wood used for packaging is not the best - 4 grades. However, since strength is important for transportation, this quality cannot be taken away from pallets. Which makes them quite a promising material for garden furniture.
Installation of the products is extremely simple; there is no need to complete the master class - this means step-by-step attaching the pallets to each other. However, the dimensions of any furniture are determined by the parameters of the drawer: in this case, the dimensions of benches and sofas are adjusted, and not the drawers themselves. Otherwise, the main advantage of the material – ease of assembly – disappears. A bench made of pallets is shown in the photo.
Pallet bench option No. 1
This bench with a back made of pallets is the most common design option.
First you need to cut the pallet into 2 parts. The one that turns out smaller will go on the seat, the second - on the back.
4 bars of 40x40 mm or 50x50 mm should be attached to the base of the seat as legs. For fastening, it is better to use metal strips on the outside. Preferably 2 for each leg.
To attach the backrest to the seat, use 3-4 metal angles or 2 boards on each side. Attach a board to the top of the backrest to cover the holes and give the structure a neat look.
cb8367c03e24134000ff97fa5cc5683c.jpe
c1994013ac08b0eec4a9ce6b91509eeb.jpe
052873b7aaf7bc5213dc791b364e5449.jpe 943c242c08940df24759277d3a34f91f.jpe
It is advisable to sand the mounting holes or cover them with plaster or putty. Then apply a primer and after drying, paint or varnish. If the wood was not sanded or treated with impregnations before starting work, this should be done before priming.
Unusual material - clay
Clay has unique properties: plasticity, environmental friendliness, ease of use. In addition, this material allows you to realize any creative fantasies and is ideal for the garden and personal plot.
The construction of a garden bench made of clay will not require you to make either significant financial expenses or high qualifications in the field of construction. At the same time, an original clay bench will make your garden much more interesting and attractive. It can stand for more than a hundred years, delighting more than one generation with its aesthetics and originality.
A clay bench can last more than a hundred years
For work you will need the following materials and tools:
- base for the frame (wooden pallets, leftover bricks, used tires or plastic bottles);
- clay;
- straw;
- sand;
- water;
- brushes and paint for finishing.
First you need to make a frame that will form the back of the bench and raise the structure above the ground. As mentioned above, any available means can be used to build the frame. For example, you can place wooden pallets on old car tires and nail strips of wood to form the backrest. This is one of the frame options.
Another option is to make the base of the bench from plastic bottles. They need to be filled with earth or sand, laid in several layers on a gravel-sand cushion and fastened together with wire. Instead of plastic bottles, you can use regular bags filled with earth.
The process of making adobe mortar and constructing a clay bench is as follows:
- mix 4 parts clay, 1 part sand and 1 part straw;
- add water and knead the solution, its consistency should resemble a very stiff dough;
- Roll the solution into balls the size of a large orange in your palms;
- apply clay to the frame, forming the outline of the bench;
- At night, cover the finished bench with polyethylene so that the solution dries gradually and does not crack during the drying process.
A clay bench can be installed anywhere on the site: in the garden, in the yard or directly next to the house. If you install it in a gazebo, then to create a unified style, you can decorate one of the walls with clay and build a clay stove.
Clay furniture - video
Often clay benches are built in the form of an ensemble with a stove. This allows you to enjoy hot meals while sitting comfortably on a heated seat. In this case, it is necessary to provide air ducts in the shop.
Often clay benches are built in the form of an ensemble with a stove
How to make a bench with your own hands
How to make a bench with your own hands is almost a rhetorical question. “How to make benches” - almost any home craftsman or summer resident can tell you about this. But the question of what kind of bench to make, from what materials, and how to link designer benches with the existing design of a house or landscape is almost as complex and interesting as the topic of workshops on making benches. Moreover, each homemade bench and bench is unique. Ideas for original benches are everywhere - in the forest, at a construction site, on the seashore. Art benches (which are also incredibly comfortable - you don’t want to leave such a bench) are made from the most unexpected things and improvised means: planed lumber left over from construction, wooden cargo and disposable pallets and pallets, wild stone and soil with sowing of lawn grasses “on seat". A separate extensive family of benches are natural compositions from the trunks of old fallen trees, snags and twigs brought from the forest. In the context of a new construction site, garden and cottage, these are stumps from the uprooting of the site, roots, cuttings of logs and whole trees. As well as old (or purchased specifically for design work) pallets and Euro pallets, car tires, boats, cart wheels, concrete blocks and masonry stones - it is impossible to list all the creative means for benches.
A favorite idea for many is benches made from saw cuts. You can get luxury saw cuts yourself if you have wood and a chainsaw. Modern manufacturers offer saw cuts from wood of various species, clean or processed, in different sizes and degrees of artistry. Benches and benches made from large saw cuts are amazingly comfortable and original. It is interesting that artificial stones are sometimes made to look like a thick saw-cut or stump - to form benches from them, or to cover the hatches of septic tanks on the site with them. One of the master’s tasks when processing natural sawn wood is to preserve the maximum texture, forest atmosphere and naturalness of the tree. The same applies to natural gifts - stumps, fallen trees, snags and other things.
The difficulty often lies in examining the old wood, selecting parts suitable for the product, and then protecting the old wood from further destruction by woodworms and bioflora. It’s understandable why craftsmen rack their brains over such a trifle as rotten trees. An old tree is unique, vintage, and creates a fabulous forest aura in the landscape by its very presence. And if this tree is refined and designed as a functional household item, it has no price. Benches made from driftwood and thick branches, from stained wood from a river or sea bank - are exclusive and invariably arouse the delight of guests and the love of the owners.
Monastic benches are simple and ingenious. Asceticism in this case does not mean discomfort - an elegant and high-quality bench made of half a log, installed on supports-blocks or stumps, is extremely comfortable. Sanding the wood to perfect smoothness is possible, and the tactilely pleasant bench seat, which has only one decor - the natural texture of wood under a clear varnish - will be a favorite gathering place at the barbecue or near the house.
Benches made from solid logs are difficult to make and can be done by a true craftsman. Flowerbed benches are often made with support - tires, lightweight concrete blocks, boards from dismantling pallets. Sometimes the design of a bench is dictated by the existing shape of a log or driftwood.
Caring for a wooden bench is necessary. Moisture and woodworms are the enemies of wood, and the base for wooden outdoor furniture should be protective pads - rubber, stone, slabs, brick. A wooden bench on metal or forged supports, or with wooden legs and rubber boots is a practical approach. Unprotected wood with open capillaries (for example, at the ends of supports) will not last long, and in negative weather conditions it can collapse in just one or two seasons. Therefore, beautiful benches are usually hidden for the winter under a canopy or in a warm outbuilding. Often, lightweight mobile benches are taken out into the garden or to the front of the house only in good weather and removed when it rains. In a house or apartment, a wooden bench is protected from moisture using natural compounds based on wax and oils, or acrylic and latex paints and varnishes.
Properly caring for a wooden bench means renewing the protective paint or wax coating every season, with preliminary cleaning of old paints. And further:
- In the hot sun, a bench is hardly needed - it’s not comfortable to rest. And it’s bad for the tree, UV rays are destructive to the decor, the tree quickly dries out;
- The condition of the fasteners and components of the bench, especially the supporting and critical ones, is checked quite often. The bolt may weaken when it shrinks and deforms, the same applies to nail connections and self-tapping screws. Tighten all the way in time, avoiding loosening of the elements in the nodes;
- If mold and rot are noticed on a separate element, they urgently replace it, preventing it from spreading, and renew the protective impregnation or coating.
DIY bench made from pallets
They say that it is much more difficult to get a suitable pallet for a bench than to make one. the wood of the former container may have an unsurpassed smell (the reason is treatment with chemicals or long service in a food warehouse). It is impossible to remove this amber from wood, and it is better to immediately abandon such material. Another difficulty is nails and the lack of polishing in domestic cargo containers. Euro pallets for a bench are an ideal option: smooth, marked with information about processing, stylish. In landscapes and loft interiors, benches made from Euro pallets are so popular that expensive stores offer them. But any craftsman can make a designer bench and other furniture from a pallet. The process is standard: selection of a model, sketch and measurements of compliance of the pallet dimensions with the plan, disassembly and assembly and decoration. Irregularities are sanded down, but the markings are often left visible - a chic sign of style. Varnishes, waxes, wood oils for decoration are additional opportunities to get unique, comfortable furniture for your home.
The simplest benches made from pallets are U-shaped compositions with or without backs. Three pallets stacked on top of each other form both a seat and a table, depending on the creative purpose. Another popular option for a bench made from a pallet is a container cut into two unequal parts: the smaller panel will become the back, the larger panel will become the seat. Consumables, except for bioprotective materials and paintwork materials: bars for legs and armrests, decorative elements, reinforcement - special perforated corner and other fasteners. Pallet benches look luxurious if you add soft pillows to them. It is also possible to cover it with slats, and any decor according to the personal preferences of the owners.
DIY board bench
Ring garden benches around a century-old tree are often made light and lattice, because the trunk should not get wet at the butt during rains and snowmelt. The ring bench wraps around the old tree, other configurations are possible. It’s interesting that a bench around a tree always has both shady and sunny areas. Such ensembles are arranged around strong garden (not fruit) trees with high-growing branches in order to provide a breeze, a minimum of insects and a maximum of horizons. It is clear that such a bench under the apple tree would be advisable only during those periods when apples do not fall from the tree.
We use wooden pallets
Pallets, or pallets, are wooden boards fastened together in two rows. They are designed for transporting and storing heavy loads. But such properties of pallets as stability, strength and practicality allow them to be used in non-standard options.
Most often, pallets are used as gratings in country showers or stands for building materials. We propose to make an excellent, reliable and functional garden bench from unnecessary wooden pallets, which will become the central element of your garden plot. To do this, you don’t need to be a skilled carpenter; it’s enough to have basic skills in working with woodworking tools and have a great desire to quickly create a unique thing with your own hands.
A finished bench made from pallets can withstand significant loads
Materials and tools
For work we will need:
- 3–4 standard wooden pallets;
- wooden blocks to create legs (if desired);
- metal corners;
- a small electric saw, which is usually used to cut branches in the garden or trim bushes;
- electric screwdriver;
- sanding machine or sandpaper;
- hand saw;
- pencil;
- square;
- sets of bolts, screws and washers;
- nails and screws for fastening structural elements;
- drill;
- assembly gloves and safety glasses for safety.
If you want to build a more comfortable and functional product, you can use additional elements: wooden blocks or metal pipes for armrests, rollers as legs. In addition, you will need mattresses or soft pillows for a comfortable seat, varnish or paint to protect the wood from external influences, and a small table for laying out tools and workpieces.
Before you start work, you should create a drawing of the future bench, or you can simply rely on your imagination.
Before you start work, you should create a drawing of the future bench
Assembly of the structure
- We carefully sand those parts of the pallets that will be used for direct contact with the human body, that is, for the construction of the seat and back, so that the unpolished surface does not spoil clothes or scratch the legs and back. In principle, it is possible to polish all the details of the future bench as a whole, but this will take more time and does not seem advisable.
- Using a screwdriver and self-tapping screws, as well as metal corners, we fasten two pallets together at right angles, if necessary, first cutting them to the required size. The horizontal tray will be the seat of our bench, and the vertical tray will be the backrest. To successfully fasten pallets with screws, we pre-drill holes in the structural elements, insert the screws, and then tighten them tightly.
- We strengthen the sidewalls with the help of additional boards - scraps of pallets left after cutting the structure.
- To create a longer bench, we use two pallets and fasten them together with screws and corners. Such a bench will be more functional, but less attractive.
A finished bench made from pallets can withstand significant loads. If you remove the back from the structure and use nails and screws to attach the legs to the pallet, you will get a simple but very nice bench.
If you remove the back from the structure and use nails and screws to attach the legs to the pallet, you will get a simple but very nice bench
How to make a bench using pallets: step-by-step instructions
Household pallets accumulate in large quantities in industrial warehouses; they can be purchased at a low price when unloading wagons. Having such cheap but environmentally friendly material in sufficient quantities, many make temporary huts in their garden plots and craft various items for a comfortable country life.
Photo: sofa made of pallets
The easiest way to use a pallet is to make a regular garden bench. In order to get started, you need to prepare additional materials and tools:
- screws (self-tapping screws are better for this);
- saw;
- bars for legs, armrests;
- loops;
- plywood or board;
- metal corners;
- measuring tool;
- electric drill;
- screwdriver;
- safety glasses, construction gloves.
Depending on the final result, additional materials may be required:
- rollers (for the case if you plan to move the bench);
- covers, pillows;
- varnish, paint.
The summer resident must decide where and how the bench will be used. It can be built so that it moves or can be fixed in one place. A portable bench will last longer, because even wood that has been well treated with protective agents deteriorates faster due to changes in temperature and humidity. A simplified version of dacha equipment will require a minimum of labor and material costs.
The simple wooden structure is stable and practical for use for household purposes.
Dismantling the pallets is not particularly difficult. They are securely fastened with nails, so dismantling requires some care. Using an ax, the boards are alternately slightly lifted, then lowered into place, while the heads of the nails remain on the surface; they are easily removed with pliers or a nail puller, but there is no need to separate the beams to make a bench.
- The pallet is sawn into 2 parts so that the wide part is later adapted for the seat, and the narrow half for support.
- The surface of the boards is processed using a sanding machine. Pallets are an auxiliary product for transporting goods, so no one processes them. The last stage of preparatory work is the elimination of all roughness. To save time, only the top part is sanded.
Preparing parts
After leveling the surface, be sure to check whether the wood has become smooth enough, and if the jags and roughness have not been eliminated, then the workpieces are sanded again. It is necessary to do this, because any cut, even a minor one, entails a lot of unpleasant consequences, and in some cases, serious injuries.
Installation of seat and backrest
The parts of the future bench are connected using screws. The seat halves are aligned and tightened tightly with self-tapping screws.
We attach the backrest to the seat using self-tapping screws
In this case, the bench will withstand heavy loads for a long time. In order for the bench to accommodate several people, the back and seat can be made so that they are fastened with double slats.
We strengthen the fastening with 4 slats
This assembly guarantees safety during rest - the bench will hold tightly.
Making legs
To ensure stability of the seat, the bars for the legs are not very high, but wide enough. They are fastened from below using metal corners. They ensure the stability of the structure, and fastening with screws is not always reliable.
Photo: street version of the bench. The last stage is screwing the legs
Painting
Varnishing or painting a finished bench is needed not only to extend its service life. Decorating allows you to make your garden plot light and bright, which encourages positive emotions. A bench coated with a special wood varnish not only looks aesthetically pleasing, but harmonizes perfectly with greenery and flowers.
Additional items
After completing the main assembly of the structure, for convenience and attractiveness, the bench is complemented with armrests, decorative patterns, legs or artistic elements. The finished bench will become much more comfortable if you lay a soft bedding or flat pillows on it. It is convenient and practical to make a small table from available parts, using the same assembly principles. Having mastered wood carving, summer residents will be able to produce exclusive garden furniture, and it will decorate any garden.
So, with the help of simple tools and improvised materials, which are always available in the country house, a simple, magnificent and cozy bench is created from transport pallets. The convenience of such designs also lies in the fact that, if necessary, a bench or chair can easily be turned into a garage rack or a table for the veranda.
Features of the use of pallets and their advantages.
The average weight of a standard pallet is 15-20 kg. There are two main types of pallets; their overall dimensions, depending on the purpose of use, can be as follows:
- 120x100x12 cm (standard pallet);
- 120x80x12 cm (Euro pallet).
The wood used in the production of these structures must be strong and durable so that they can withstand a load of up to one ton. After one or two transportations, pallets often remain intact, without cracks or chips, despite this they are usually written off or sold, so even used pallets can find a new life, serving faithfully as unusual and functional pieces of furniture in landscaping for many years.
Kitchen table made from pallets
At the moment, furniture made from pallets occupies a leading position among design solutions in the popularity ranking. Some decorators produce entire collections in eco style, embodying the most unusual ideas using standard transport pallets. Taking your favorite ideas as a basis, you can easily bring them to life in your own way.