One of those household little things that is quite important for many of us is the key holder. After all, it often happens that you have to search for keys for a long time and find them in a variety of places. And the key holder allows you to save time and nerves. Making it is not so difficult, since there are a large number of master classes on making key holders with your own hands.
What types of key holders are there?
It is clear that there is no strict classification of key holders. But based on where they are located, there are two main types: pocket and wall-mounted.
A pocket key holder is a bag-cover that can be made from different materials, for example, leather, fabric. Inside the case, loops are sewn (glued), which can be made of metal or a piece of cord. These loops act as hooks.
Such simple key holders are designed to protect your pocket from physical damage from keys. In addition, this way all the keys are stored in only one place.
Obviously, wall key holders are more common than pocket key holders. They are of open or closed type. The simplest open key holder is a simple board with attached hooks, which can be nails and screws, wire and wood knots. In general, here you can use everything that the key fits on.
If you have not done carpentry before and decided to make a wall-mounted key holder for your home yourself, then it is better to start with something simple.
The first step is to choose the place where the product will be placed. Knowing the location will allow you to immediately determine the type, shape and size of your key holder.
Read here DIY feeder: DIY production and original design options (105 photos)
Learning to make a key holder from genuine leather
Leather key holder
Introductory part
This master class is designed for those who are just starting to work with leather and/or who want to give a gift to themselves or a loved one. Manufacturing time 3 hours pure time.
A minimal amount of special tools were used in production. No paints, finishes, or means to enhance the backside (underside) or edge (edge) were used. Most tools can be purchased without problems in regular stores.
Necessary:
- A piece of natural dense (hard) cattle leather made by VMT (vegetable tanning method) with a thickness of 1.5 to 2.5 mm.
- Nylon threads.
- Sandpaper (fine grain).
- Hammer.
- Stationery knife (blade width 19 mm).
- Scissors.
- Awl.
- Fabric marker.
- Tweezers.
- Hole puncher.
- Device for installing accessories.
- Ruler (preferably metal 25 cm).
- Needles for nylon thread, 2 pieces.
- 5 ruble coin.
- Two plates with a smooth edge, 16 and 22 cm.
- Glue (polyurethane).
- Sponge (for dishes).
- Clothes brush.
- Fabric (preferably denim, only good quality).
- A piece of wax.
- Linseed oil.
- Castor oil.
- Masking tape.
- Accessories (12.5 mm “Alpha” button, two 6 mm single-sided holnitens with a 6 mm leg, blank for a key holder with 4 carabiners).
I’ll tell you right away where and what you can buy.
You will have to order the leather online; you can buy it in stores only in big cities. Although there are not many in the open spaces of the Masters Fair, there are shops where they are sold. Minimum quantity - standard A4 sheet, 6 dts, price 400 rubles.
Wax from honey sellers. A piece no larger than a ruble coin is required, and only because a smaller piece is difficult to hold in your hands.
Flaxseed oil, castor oil - in the pharmacy.
Polyurethane glue in Rybolov Okhotnik stores. Uranus glue 45 mg is most often sold, or in shoe repair shops. I asked, they didn’t refuse me, they sold me.
You don't have to buy hardware installers if you just want to try your hand at leatherworking. Any clothing repair shop will install any fittings for you inexpensively.
Everything else is available on the farm or can be purchased at construction and hardware stores, fabric stores, and stores selling sewing machines and accessories for them.
Instead of a hammer, it is convenient to use a “masher” for puree. Tip: wrap the work surface with tape, otherwise small pieces of wood will fly away from the intense work . I bought it at Ataka, where I also took a plastic cutting board (used for punching holes so as not to dull the punches). Tip: choose a large board with soft plastic. After some time, the board bends when punched, and it becomes impossible to use it, so cut it into four pieces, it will last a long time.
You will also have to make an embossing stamp.
Made from an anchor bolt. 10*6 is more convenient. You can take a larger size or make several sizes and/or shapes. For example: with a round platform, rectangular triangular and the like. I made three different sizes and ground down one side. A very convenient form, you can “fill in” virtually any background. Over time I will make another small triangular one.
It's not difficult to make. The easiest way is to use an engraver and an attachment (the disk is like a grinder, only small and thin). If there is no engraver, we cut it manually with a hacksaw. Make the blade thinner. Clamp it in a vice. Cut 2-3 parallel lines 0.8-1 mm deep. Pay attention when you sew one of the sides so that it is parallel to these lines. It is difficult to achieve accuracy, but at least approximately. Why this will be needed is written and shown in the photo. Next, in random order, there are several lines, but with less depth. Grind down one of the sides. The teeth are sharp, so finally dull them with sandpaper. Try on a piece of leather, sharpen if necessary.
You will also have to make a finishing agent instead of paints or finishing agents. To do this you will need wax, linseed oil, castor oil in proportions 1*1*7. We rub or cut the wax, fill it with oils in proportions. Melt in a water bath. Let cool. The more wax, the harder the consistency.
So, let's get down to making it.
Main part
We will produce keys no larger than 5.5 cm. If you plan to carry larger keys, then increase the width.
Cut out the piece from leather. Length 18 cm, width 10.5 cm.
You can do without embossing, then just move on to the next step.
Leave a margin of 3-5 mm on each side if you are going to emboss, just in case (leather tends to shrink). The leather is not very thin and there is almost no embossing, but it doesn’t hurt just in case.
Embossing
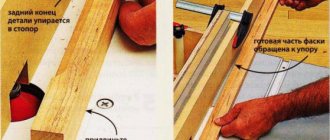
We mark 1.9 cm from any narrow (10.5 cm) edge on both sides. Let me clarify that I give the dimensions based on the diameter of the plates that I will use. If your plates are of a different diameter, which is most likely, then first place the plate on the skin and find the distance you require. As a result, the plate should touch three points. The first is along the top line, two are on the sides at an equal distance from the edge. Measure carefully. A couple of mm and it won’t be a perfect semicircle, but this is noticeable. First of all, you won't like it.
Using a utility knife, cut along the edge of the small plate. Tip: try to hold the knife straight, without tilting towards or away from you. Otherwise, the cut will turn out to be beveled, and this is not good.
Measure 3 cm from the opposite edge on each side.
Place a small plate on the dots. We retreat 6 mm from the edge (by eye) and put dots along the line of the plate (barely noticeable). We remove the plate. We measure towards the points (barely noticeable) from the edges, 6 mm on each side. We put the usual points. Place the plate back on the skin. All 4 points must converge, two on each side. Draw a line between two internal points.
We measure from the top edge (semicircular) 1 cm on each side and 6 mm inward on each side.
Place a large plate on the inner points and draw.
Draw parallel lines on each side between the points.
This is what should happen. I wrote it a little difficult. Be careful, don't rush.
Place tape on the back side. This is done to ensure that the leather does not become deformed during the embossing process. I use wide masking tape. It leaves no traces after removal, which is important for creating a beautiful smooth bakhtarma (wrong side). Trim off the excess tape around the edges. I don’t post photos of this process, otherwise the photo limit that the Masters Fair allocates will not be enough.
Take a sponge and wet the main part until the skin stops quickly absorbing water. The skin will change color and become darker. Leave it until the skin dries. The guideline for starting embossing is to lighten the skin. Wait ten minutes.
We begin the embossing process itself. Using a ruler and plates, we trace with pressure with an awl the contours that were drawn earlier. We take the made stamp. We press along the drawn contour with the flat side of the stamp. We place the stamp at equal intervals exactly along the contour. Use a smaller stamp if you have made different ones.
It turns out to be a strip along the edge. For this purpose, the stamp was ground parallel to the deep cut lines.
We fill in the rest of the background with a larger stamp or the same stamp. This is what should happen.
There is a feeling that a material made of roughly woven threads or straw has been inserted inside. At least for me. We measure again and cut off the excess.
We cut off the corners. To do this, measure 1 cm from the corner and place dots. We apply five rubles to the points. The rim should touch the edge on each side. Using a knife, cut off a little of the excess. Hold the knife straight, do not tilt it to the sides. You can cut in a circle, but there is a chance of moving the coin and cutting unevenly. The second method can be safely used on thin skin. For thick ones, it is better to use method 1.
We apply the product, polish the bakhtarma and the edge.
Apply the prepared cream with a sponge.
Tip: coat the inner, embossed part with a medium-hard toothbrush. Using a brush, you will cover those places that are difficult to reach with a sponge.
Apply in two layers, drying in between. Polish with a clothes brush and cloth. The result is a medium gloss. This cream makes the skin darker. If you stay in the sun for some time, it will become even darker (the skin “tans”). For example: the handbag was made for my wife for her birthday in July. I wore it for two months. This is how the skin got a tan. Please note that skin tans, just like human skin. Therefore, “tan” the product evenly on each side.
We polish the bakhtarma. We use ordinary water. We wet the bakhtarma and polish it using a smooth object. For polishing I used the handle of a metal knife. We polish (smooth) in the direction of pile growth. Checked by hand on dry bakhtarma. In which direction the pile is smoothed, in that direction you need to polish.
Let me make a reservation right away that I tried to polish with water only in this product. The bakhtarma of this leather is well sanded. I don’t know how leather with a long backstrap will be sanded. I’ll try it if I have the opportunity, and I’ll pay attention to this in subsequent master classes.
This is what came out after polishing and drying. Quite acceptable.
We process the edge (edge). Use sandpaper to round the edge on both sides . Tip: place the leather on the table so that the edge of the leather protrudes beyond the edge of the table by a millimeter or two. Sanding will become easier. The skin will not sag .
After rounding, polish. Only water is used. Lightly moisten the edge and quickly rub with a cloth (preferably denim). The skin in areas of friction becomes smooth. This is what comes out.
To mark the line for the seam, we make a parallel marker. I borrowed a masochistic thing from my wife.
We place pieces of leather between the “legs”. There should be 3.5-4 mm between the “legs”, tighten with electrical tape. This is what happened.
Let's draw a line. One “leg” is pressed against the edge, the second draws a parallel line. This tool is essential. If straight lines can be drawn using a ruler and an awl, then different curves will not work out. This is what happens.
Mark the holes for the seam. We use a fabric marker. Its pitch length is 2.5 mm.
For a saddle stitch with 1 mm thread is not enough. In the photo on the left is 2.5 mm, on the right is 5 mm. To be honest, I don't like both. The first one is cut, the second one has too large a step (for a small product). The optimal pitch for small leather goods is 4 mm.
For the purity of the experiment, I decided to use nylon thread for the firmware. Waxed her.
The process of waxing is drawing thread through wax. Do this until the thread is well saturated with wax. Tip: after waxing, fold the thread into a snake and go through it with a hairdryer. The wax will melt and be better absorbed into the thread. There will be no wax residue when you pull the thread through the holes. I went through this myself. There was wax left around the holes, it felt like dirt. Waxing makes the thread darker, take this into account.
We pierce the skin at the marked points. I do it this way. It is more convenient to control, the speed is faster.
I decided to pierce every hole. The thread is relatively thin, a 5 mm pitch would not look nice. I would sew with a standard waxed thread in 5 mm increments.
The seam looks like this.
We bend the leather and give it the shape of a key holder. Attention ! Do not bend too thick leather too dry; the leather may burst. Before bending, wet the bend area well.
Measure in the middle to install the fittings.
Punch a hole.
Fold the skin so that the upper semicircle touches the lower one. Align the edges and secure with paper clips.
Punch the hole again and mark the bottom. Remove the clamps. Pierce the bottom. With this method, the fittings will be installed accurately.
We install the fittings by first punching holes. These installers can be purchased at fabric stores. Sold in sets. The kit includes installation tools and some accessories.
Make sure that the punch is positioned exactly in the center of the intended holes. Tip: Do not punch a hole immediately after applying the punch. Press down on it and remove it. A mark will remain on the skin. From this you can judge whether the punch was installed exactly. And if not exactly, then where should it be moved.
We strengthen the place where the keys will be attached. To do this, we apply a metal blank to an unnecessary piece of leather and trace it.
We cut the semicircle in the same way as rounding the corners. We cut out the rest using a ruler.
This is what should happen.
We fold the leather and apply the metal blank to the attachment point. Align.
Unfold the leather and trace the workpiece. The edge of the metal blank should go just below the edge of the leather.
Glue the leather blank (reinforcer) to the leather. To do this, coat the amplifier and the place of attachment on the skin with glue. We apply it, make sure it is even, press firmly.
We apply a metal blank to the amplifier. We mark the holes. Let's break through. We install holniten (6 mm). Advice: when you purchase holniten, pay attention not only to the diameter of the cap, but also to the length of the stem. Not all sellers specify this parameter, and it depends on whether the installation is normal or not. It is impossible to properly install a holniten with a 9 mm stem on 1 mm skin.
This is a device for installing holniten.
Holnitens are installed.
Soak the bends again with cream, dry and polish thoroughly.
All is ready. Enjoy your work.
At the same time as this key holder, I was making a second one. I didn’t stitch the second one, I just burned the edges. This is when the edges are rubbed very hard and quickly with a board (trowel) along the wetted edge. This procedure is best carried out on a smooth surface.
This is the result.
The first key holder has four carbines, the second has six. The first one is stitched, the second one is not. There was an idea to put one of them to “sunbathe” and see the result, but alas, it’s autumn, there is no sun. Otherwise the key holders are completely identical.
Final part
The purpose of this master class was to show the process of making a simple but high-quality item. Such a key holder will serve its owner for decades. And what’s also important is that not a single gram of chemicals is used in this product. It smells only of genuine leather and not a lot of wax and oil.
Lastly. If you are going to engage in this type of creativity in the future, then sooner or later you will still have to fork out money to purchase a good tool and material. Without this there is no way.
When reprinting this master class, please provide a link to my workshop www.novmanik.livemaster.ru.
I tried to make the master class detailed, if something is not clear, write, I will try to answer everyone.
If you liked it, add me to your circle (column on the left side) in order to quickly learn about the news.
Sincerely, Maxim (novmanik).
What materials are key holders made of?
The most suitable materials for creating key holders with your own hands are wood, plywood sheets, hardboard, MDF, chipboard.
At the same time, wood is often used to make key holders for the hallway with your own hands. After all, this material is quite easy to work with even for a beginner in carpentry.
Perforation
This method consists of making holes in the skin using special punches. Moreover, on small accessories, for example on our key holder, both simple patterns and complex outlandish ornaments look good.
Perforation, as a way to decorate a hand-made leather key holder, is advantageous in that it is accessible to any needlewoman. It is easy to use, and punches, including shaped ones, can be easily purchased at a sewing store.
The most popular key hanger
A wooden key holder is one of the most popular options. After all, everyone can easily find several boards that can be used in any format. They must be connected in accordance with the shape you choose. Then you can start processing, which is also not difficult.
The simplest option is sanding with sandpaper or a machine, followed by painting or varnishing.
DIY pots: how to make a flower pot and the best decor ideas. 130 photos and tips for beginnersDIY boat - interesting ideas on how to make a boat from scrap materials (100 photos)
- Do-it-yourself dolls - the best ideas on how to make stylish, beautiful toys and step-by-step instructions on how to sew a doll (110 photos)
You can make a more complex product. To do this, you need to remove the soft fibers with a wire brush, which will reveal the wood grain. Pine wood is perfect for this. Then the product is coated with varnish with dye pigments and stain. This will give clarity to the wood grain.
Using a blowtorch for processing purposes has a similar effect. But here you should try not to overheat. The treated planks must be fastened together and hooks hung on them.
Key holder with shelf
Agree, the simplest version of a key holder is not the most practical. After all, we don’t have that many keys for all the hooks to be occupied. Because of this, there are key holders with a shelf for various small items. The formats of such shelves can be very different.
An interesting idea for making key holders is a key holder with magnets. This is an ordinary shelf, at the bottom of which magnets are attached; they hold the keys, attracting them. Although only iron keys are suitable for this.
Ideas for key holders sewn using patchwork technique
Ah, these little things made using Japanese patchwork technique! Key holders sewn in a patchwork style are so homely, cute and cozy.
Plywood key holder
Obviously, plywood is more convenient to work with. After all, this is already processed material; you just need to cut out the desired shape. Lightly sand the edges of the product, paint and attach the hooks.
What can be crocheted, ideas for handicraft loversDIY beaded earrings - weaving patterns, best ideas and detailed instructions on how to make jewelry (100 photos)
DIY album - the best design ideas and tutorial for making stylish and modern albums (115 photos)
The good thing about plywood is that it allows you to create a wide variety of shapes in a variety of styles.
Picture frames for the key holder
You can also make a key holder from a picture frame. Using a stapler or glue, you need to attach a piece of hardboard to the back of the frame, which will be used as a base.
The inner surface of the frame can be treated as you please: paint it, glue one-color paper or a drawing. Depending on the type of keys, the hooks must be attached either to the frame itself or to its inner surface.
Unnecessary equipment for making key holders
If you have panels from old appliances with holes for plugs, you have a chance to make a very unusual key holder. You need to cut out the panel and insert the plugs as hooks for keys. Hang the product on the wall.
The headstock of a string instrument also looks good as a key holder. You just need to add hooks to it. If it’s a pity to spoil an old guitar or violin, you can make an imitation, which is even more interesting.
To clearly understand the instructions for making key holders, look for articles with photos of key holders made by yourself.
From improvised means
To store keys, you don’t have to build a whole house; improvised means are enough, and in this section we will show you which ones.
Related article: DIY modeling clay: a simple recipe for crafts
The first option for storing keys is a simple wooden board. Nail ordinary twigs and twigs to it (you can use a board on which small twigs grow). Just sand it well and varnish it. The most important thing is that the tree is not dry, and that the branches can withstand the weight of your keychain.
The second option is boletus mushroom - this is an ordinary dried mushroom. As a rule, they are very strong and durable. Don't forget about kitchen utensils, as bent spoons and forks make excellent key holders.