Simple paper napkins can be used not only as a standard attribute of the dining table, but also as an affordable raw material for making original crafts. The universal material is suitable for creating independent decor or parts of one big idea. Crafts made from napkins require minimal financial investment. After studying the detailed instructions, anyone or even a young child can create voluminous decorations or a sophisticated panel for any holiday. Most interesting ideas will only take a few minutes to implement.
Bright monograms and animal figures
A multi-colored monogram decorated with bright napkin balls will be an excellent decoration for a child’s room. Decor of this type can also be used in the living room with the first letter of the family's surname applied. The technique of rolling thinned paper can be used to make various animal figures on a plane.
To make a simple craft, you will need a sheet of cardboard, multi-colored napkins, and PVA glue. First of all, we make a sketch. If it is a monogram, we draw curly letters and make slits. Prepare paper lumps. It's better to make them as small as possible. This will make the craft seem more magnificent. We attach the pieces of napkins randomly or according to a planned plan. On the back side of the monogram we add a cord and hang the bright product in a visible place.
We transfer the animal figurine through a stencil onto cardboard. Now we mark the drawing and determine the location of each multi-colored ball. Unfold the napkins, cut them into squares and roll them into balls. We distribute them in the picture according to the diagram and glue them. Pre-glued ears, eyes, and noses will look beautiful.
Creating flowers and floral arrangements
Stunning bright bouquets and single flowers made from napkins will decorate any event and make an excellent gift. The only drawback of paper decor, the lack of natural aroma, can be easily corrected by dripping essential oil on it. A paper flower created using the simplest technique will remain attractive for a long time.
You need to start creating right now. The choice of pattern and plant itself will depend on the number of napkins available and their color. It’s very simple to create a unique homemade decor; you just need to move step by step towards your intended goal, using the following master classes as a guide.
Rose
There are several ways to make a paper flower queen. The easiest way is to twist it from one napkin without using scissors or glue. We straighten the material and lay it out on the table. Grab one edge with your index and middle fingers and roll it into a tube. Visually measure 2/3 and crumple the napkin, forming a bud. We bend the upper part arbitrarily, simulating opening petals. We make a stem from the bottom of the tube - we twist the napkin into a spiral.
A beautiful rose can be made from a dense three-layer blank. This elegant white product will decorate a glass on any table. Straighten out a large napkin. We bend one corner by 1-2 cm and fold it, pressing it to the very end. We twist the resulting strip. Holding it from below, unbend the upper petals and place them in a glass or glass.
Peony
You can make a lush peony from a multi-layer napkin of any color. You can make the product more realistic by tearing off one strip of folded paper at the bends. To quickly create several elements for a lush craft, the following step-by-step master class is presented:
- We lay out the napkin in one movement, we get a two-layer rectangle;
- We fold the workpiece like an accordion, tie it with a torn piece of paper or thread in the middle;
- Fluff the pliable folds on both sides from the center;
- We roll up a wire leg or prepare several multi-colored blanks for other crafts.
Carnation
Original carnations on the stem will be made from a thin bright napkin. The blanks will be square elements according to the size of the planned flower. Fold them in half and diagonally. Carefully cut off the edge of the triangle. The small hole will be the center of the flower. On the opposite side of the workpiece we make an arched cut and form a fence around the edge.
Using the same scheme, you need to make at least 5 blanks. The more elements there are, the more magnificent the carnation will be. Now we move on to forming the flower head. As a base you can use stiff wire, a long fireplace match, or a pencil. We string each shaped piece and glue it together in the central part. We straighten each petal. The stem can be wrapped with green tape, colored corrugated paper, or foil.
Topiary made from napkins
Topiary made from any decorative material looks stylish and original. But it’s much easier to make a beautiful tree from napkins. It can be a craft in the form of a circle, star, heart. The constituent elements may also differ. Paper roses, dandelions, peonies, and asters are most often used. It’s enough to start preparing materials and original ideas will come to mind.
Ready-made topiary made from napkins is an excellent gift for any celebration or just a memorable accessory. To make an extraordinary craft, you will need the following materials:
- Flowerpot, flower pot;
- Newspapers, napkins;
- Several tree branches;
- Threads, stapler;
- Scotch tape, glue;
- A mixture of cement and sand.
We prepare a beautiful flowerpot and pour sand and cement into it. Add some water and make a solution. We install the densest branch in the center and decorate the base of the improvised trunk with small pebbles or glass. If desired, the composition can be modified and the central piece of wood can be entwined with flexible rods. We fix small elements with transparent tape.
While the solution in the pot dries, we begin to form the center of the topiary. To do this, we crumple up several newspapers, wrap the resulting ball in a solid printed edition, and secure it with threads. Let's move on to making flowers. Fold the napkin in half twice and secure it with a stapler. Straighten the edges of each layer. Using this principle, we make the required number of flowers. All that remains is to glue them to the newspaper ball and decorate with beads.
Materials and types
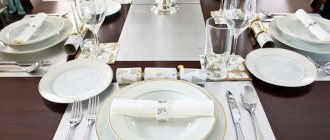
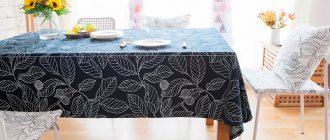
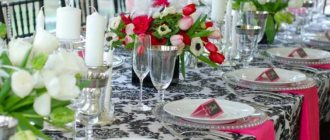
Large napkins are used for table setting. They are placed under plates and cutlery, and used as shaped decorations. The main purpose of napkins is to protect the tablecloth covering the table from contamination. Napkins are easy to replace. Thanks to this, the table will always be clean and fresh. Serving napkins are most often used during breakfasts and business lunches in restaurants.
They are supplied complete with the main tablecloth, and are completely in harmony with it in color and style. You can also purchase wipes separately.
Napkins differ primarily in size:
- For breakfast or tea drinking, a size of 35 by 35 centimeters is used.
- For lunch and dinner, a size of 40 by 40 centimeters is suitable.
- But the most common are napkins 50 by 50 centimeters - they better protect the main tablecloth, and, if necessary, are easier to drape when creating original decorations.
To produce this type of napkins, natural fabrics are used - cotton or linen, which are easily affected by starch. A starched napkin holds its shape well, which makes table setting easier.
The most practical are napkins made from mixed fabrics with the addition of synthetic fibers. They are easier to wash and do not shrink. Napkins are decorated in different ways. This can be a lace border or fringe, embroidery.
Applications and paintings from napkins
The essence of the applications is to glue small elements from a napkin onto a prepared surface. The basis for an original painting can be a sheet of cardboard, a piece of thick wallpaper, or any flat board. At first glance, the craft may seem childish and primitive. But if you come up with a complex plot from many details, it can easily be used as a stylish interior decor.
A suitable option for the hall and kitchen is an applique of napkins “lilac sprig”. For the craft, you will need to prepare a piece of green paper, pink, white, lilac napkins, and glue. Cut out heart-shaped leaves from colored paper. For a painting size A 4, 10-15 pieces will be enough. Tear the napkins into small pieces and roll into loose balls.
We draw a diagram of the future branch on cardboard, determine the places of leaves and clusters of flowers. We coat the designated areas with glue and fix the parts. The thickened beginning of the branch can be decorated with brown beads and dark sparkles.
Decorations for interior and holidays
You can create a festive atmosphere for no reason at any time using available materials. Various crafts made from delicate napkins will be a worthy interior decoration. You can also prepare for the celebration and make an original photo zone with your own hands without spending money or time. The crafts are light in weight, so they can easily be grouped and hung from the ceiling or lighting fixtures. They are easily fastened with PVA glue or tape to each other and to a base made of almost any material.
Garland
A beautiful room decoration can be made from snow-white napkins. A few garlands hanging down the wall will create a breathable atmosphere of warmth and lift your spirits. This decor is not only pleasing to the eye, but will also visually lift the ceilings and create a stunning backdrop for home photos.
To work, you will need a pack of white napkins, scissors, and several thin satin ribbons in light colors. You can create a delicate garland in just an hour by following these steps step by step:
- Fold the napkin into a triangle into three folds;
- Cut the corner into a semicircle;
- We stack the resulting parts on top of each other in a checkerboard pattern;
- We clamp it from the bottom in the center and twist it, fix it with glue, thread, or a stapler;
- We even out all the petals and give them the most round shape possible;
- In this way we prepare the required number of flowers;
- Unwind the required amount of tape;
- We secure the products with double-sided tape.
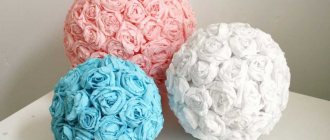
Volumetric balls made of openwork napkins
Openwork napkins are a decoration for any holiday table. You can give a more original look, thus conveying a New Year's, Christmas atmosphere, if you make three-dimensional balls from them. They look great in any interior. They can be hung on ribbons, placed in a beautiful vase, under the Christmas tree.
To work you will need round openwork napkins, multi-colored ropes, a stapler, and glue. Fold the paper product in half, without bending it all the way. You only need to grab the center of the fold. We bend the paper again and fix it with a stapler. You will need to make 10 similar parts. We take a whole napkin and attach a braid to it - this will be the basis for fixing the elements. On each side you need to glue 5 identical parts opposite each other.
You can do without a base and glue by fastening the pieces together with a stapler or double-sided tape. First, 4 pieces are assembled, then the two halves are connected.
Wall decoration for photo zone
A background made of napkins is the most popular and budget-friendly. A large number of ideas, colors, types of materials allows you to decorate any area according to the theme of the holiday. You will need a lot of paper raw material, but the pomp effect will be worth it. An unusual idea will surprise guests and delight little household members.
To make a large craft, you can use plywood, clapboard or cardboard as a base. In the latter case, the photo zone will not only be lush and beautiful, but also mobile. Also suitable for the base are prefabricated parts of former boxes from large equipment.
Wall decoration can be standard pompoms or assorted flowers of various sizes. It's better to make a few eye-catching accents. To do this, straighten 15 napkins, place them on top of each other and fold them like an accordion. We tie it in the center with a ribbon and cut off the edges in a semicircle. Now we lift each part of the napkin up and add volume. Several large flowers should be distributed from one corner to another or randomly. Other elements may be of a different color and size.
Numbers for birthdays and anniversaries
You can decorate this popular decorative element with various color options. Many young mothers are passionate about creating such crafts, especially on their child’s first birthday. Without a doubt, any adult would like to receive an original surprise in the form of a three-dimensional number made from napkins for their anniversary. To make it yourself you will need the following materials:
- Base – polystyrene foam, cardboard boxes are suitable. Young mothers often use baby food packaging and glue them together into the necessary frame;
- Napkins – several packs of the same or different colors;
- Fastening – you can use glue, thread, skewers, double-sided tape;
- Scissors - for shaping the edges of paper products.
First of all, you should make a frame by gluing the existing boxes according to the diagram. Now we prepare flowers from napkins. These can be roses, peonies or just lush pompoms. The simplest option is to fold several transparent pieces of paper, fold them like an accordion, secure and straighten the edges. The more magnificent the details, the less of them will be needed for the figure. Glue the elements to the cardboard blank, straighten the crumpled edges of the thin paper.
Christmas angel
Simple angels made from snow-white napkins will decorate the room on Christmas evening. Intricate figures will turn out beautiful and festive for anyone, even a small craftsman. To make one angel you will need three napkins, white and yellow threads, scissors, glue, and a blue felt-tip pen.
Unfold one napkin and roll it into a ball. We straighten the second half and wrap it around a paper ball, tying it with white thread. The result was an angel's head and a disheveled dress. We crumple the remaining napkin like an accordion from corner to corner and fix it in the middle - these will be the wings. We connect the parts with glue. We make a halo from yellow threads. We wrap them in several layers on two fingers. Remove and scroll a little. Then we glue the angel onto the head. We draw eyes with a felt-tip pen and send them to the Christmas tree.
Christmas wreath
To make an interesting Christmas attribute you will only need a couple of hours of time and a minimum of materials. You need to prepare white or green napkins, you can use both colors at once, a foam base for the wreath, 6 large shiny beads, glue, a round template (for example, a plate). The process of creating a craft will be interesting and simple if you follow the following step-by-step instructions:
- We prepare the elements. Straighten the napkins and cut out circles;
- Fold the circles three times and glue the middle from the inside;
- We attach the parts to the base;
- We decorate the wreath with beads, evenly distributing the decor from each other.
If you use fluted scissors when cutting out round blank parts, the edges of the pom-poms will turn out patterned, and the wreath itself will be more magnificent.
Christmas tree made from napkins
An unusual New Year's beauty will come out of simple green napkins. The craft can be made of any size, both miniature, to decorate a festive table, and large, as a replacement for a natural spruce. This will be an excellent gift for family and colleagues, since hand-made decor will convey a piece of the master’s soul and fill the house with comfort.
You can make a Christmas tree from materials that are probably available in every home. You will need cardboard for the frame, napkins, scissors and glue. First of all, we prepare the base - we fold a sheet of thick paper into a cone shape, leveling the bottom edge for better stability. You can fasten the folded edges with a stapler, glue or tape.
Improvised branches can be made from fluffy paper pompoms. Collect blanks like peony or chrysanthemum flowers. Then they are glued to the frame, observing the dimensions from bottom to top.
They also use decorations made from napkins in the form of flirty ruffles. Cut strips 3-5 cm wide, string them on a thread and pull them together. Then the elements are glued to the cone in a spiral. You can use beads and ribbon bows as decoration.
Schemes at the plate
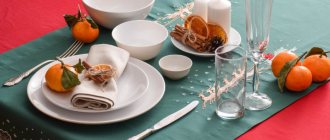
Beautifully decorated napkins at the plate will help emphasize the importance of the event. They can be placed in a glass or on a dish. Envelopes for cutlery look solid, and fans and roses add romance. You can surprise your guests with an unusual folding pattern - under a ring. It's interesting and very elegant. And the scarf on the fork, although simple to make, looks playful and self-sufficient.
Fan and rose in a glass
To make a fan, you need to straighten the napkin and fold it into an accordion. The resulting workpiece is folded in half and placed in a glass. Simple and beautiful.
A flower in a glass looks very elegant. There are several options for making roses. The simplest one includes the following steps:
- unfold the napkin and fold it into a flat tube from the corner;
- the upper corner is folded and the tube is rolled into a bud;
- the “petals” of the resulting flower are slightly bent;
- you can wrap the flower with a green napkin, imitating rose leaves;
- the resulting composition is placed in a glass of a suitable size.
To make your holiday table more colorful, you need to make bright multi-colored roses. Instead of a glass, paper flowers can be placed in a wide, shallow bowl to form a bouquet. In this case, it is important to ensure that the flower buds are tightly twisted and do not fall apart.
Three fold patterns for a ring and a scarf for a fork
Rings are a good idea for decorating fabric napkins. In the first two cases, an elegant bow is made. To do this, the napkin is folded to form a strip. The edges are folded towards the middle, slightly overlapping each other. The resulting part is threaded into a ring, which serves as the middle of the bow. The edges are slightly stretched. The elegant bow is ready.
In the second option, a plain satin ribbon is used instead of a ring. They tighten her middle. Instead of rings and ribbon, you can use a durable foil strip. It securely fixes the workpiece, preventing the fabric figure from deforming.
In the third version of the fold - making a classic flower. A rhombus is made from a napkin. The free edges are slightly bent, forming petals. The lower part of the flower is threaded into the ring.
The simplest but most effective solution is a scarf on a fork. To make it, a cloth napkin is folded into a strip. The strip is folded in half. The fork is placed on top of the workpiece, the edges of which are wrapped around the cutlery and threaded through the resulting loop. Lightly tighten. A simple and elegant scarf is ready.
On a note!
There is no need to come up with overly complex options for folding the figures. Especially if it's a children's party. Guests may have difficulty unwrapping the napkin, which will spoil their mood.
Three envelopes for cutlery
Any of the envelope folding patterns allows you to beautifully decorate your holiday table. The difference lies in the level of complexity of manufacturing. Having chosen the most convenient scheme, you can practice in advance by folding the pocket. Having gained experience, you can quickly make an original and practical decoration for the festive table:
- The napkin is straightened and placed face down. Fold diagonally to form a triangle. Bend the left side of the triangle to the opposite side, not reaching the corner a few centimeters. Next, bend the right side towards the left. The corner that extends beyond the edges is folded under the bottom of the figure. The envelope is ready.
- The napkin is folded in four, with the front side inward. The upper corner of the top layer is folded down, diagonally. The next layer is folded in the same direction, not reaching the previous corner of the napkin a couple of centimeters. The corner of the second layer is tucked into the pocket formed from the previous layer. The third layer is folded back and tucked under the second. The structure is turned over, both sides are folded towards the center. The envelope is turned over and cutlery is placed in it.
- The napkin is folded in half, forming a rectangle. The upper part of one side is bent twice by two centimeters. The workpiece is turned over. The upper right corner is folded towards the middle, forming a rectangular trapezoid. Bend again to the midline. The same steps are repeated on the other side of the workpiece. The result is a double-sided envelope. If you unfold it with the pointed end up, it will fit two cutlery. By turning the envelope over to the other side, you can place three devices in it.
Instead of cutlery, you can put cards with wishes, a card with the name of the invited guest, or a spruce branch in beautiful pockets. It is better to fold envelopes from plain napkins. The pattern will be distracting, and the monotony of the material, on the contrary, will help emphasize the elegance and craftsmanship of the envelope.
How to beautifully fold napkins for a holiday table
Beautifully placing napkins on a holiday table is one of the main win-win decor options. It can be a simple addition or a bold, spectacular idea in the form of a swirling figure. Single elements are placed directly on plates, in glasses, and a special place is allocated for compositions in a napkin holder. Translucent paper of different colors, a smart combination can become a unique element of thematic design of a feast.
Easter bunny
To create a cute bunny you will need a plain square napkin of any color. We straighten it one turn. We bend the resulting double rectangle in half lengthwise. Mark the middle and bend the edges towards the center. Now we bend the lower corners one by one. You should get a multi-layered rhombus with even central bends.
We bend both corners alternately towards the center. They should meet in the center and be equally even. We turn the workpiece over to the other side and direct the lower corner forward. Folding pockets should form on the sides. We roll the product as if into a tube and direct one end into the pocket that appears. We straighten the bunny's ears and face with our hands. We make the lower part stable.
Christmas tree
Flat single figures made from napkins will decorate any New Year's table. You can make a craft of any thematic focus, but the most suitable would be a green Christmas tree on the entire plate. The following master class will help you quickly and correctly fold thin paper:
- We place the square on the table so that the open sections face down;
- We lift the top layer and bend it up, not bringing 1 cm to complete connection;
- Raise the next layer in the same way, leaving a space of 1 cm to the edge of the previous element;
- We carry out the same manipulations with the remaining two parts;
- Turn the workpiece over to the reverse side to form an outline;
- We bend both sides at right angles to the center;
- We unfold the craft with the front side and bend the corners;
- We begin tucking the ends from top to bottom, using closed scissors or a ruler;
- Each layer must be aligned with the previous one;
- Place the wavy Christmas tree on a plate and decorate it with a red felt star.
How to lay it out beautifully
Setting the table with fabric napkins depends on the type of meal, the number of dishes and the type of linen figure. Etiquette allows for the following methods of placing table textiles:
- parallel to the dessert cutlery, closer to the center of the table, if the napkin is rolled up;
- in the center of the appetizer plate, if the table is set for a full dinner with a large number of plates, glasses and cutlery;
- to the left of the hot plate (after the last fork), when the product is folded into a triangle, envelope or tube;
- in the middle of a small dinner plate for hot dishes if there is no appetizer plate on it;
- between spoons and forks, if already filled dishes are placed in front of the cutlery;
- on the far edge of the serving plate, in the center of which there is a pair of teas;
- in a glass (glass) to create a special atmosphere during a romantic dinner or a themed feast.
To make the linen figures look organic among other cutlery, they are placed on plates of small diameter, on average 20 cm. Wine glasses and glasses for this purpose are tall, with a volume of 300–500 ml. In the bowl of a glass, the options “candle”, “tulip”, “fan”, “bouquet”, “horn”, “tower” look especially impressive.
It is permissible to fold napkins directly on the tabletop in the form of a flat figure or tube. Complex tall versions of textile decorations are placed only on plates or in wine glasses.
Ballerina made of napkins and wire
A weightless craft made from napkins and wire will decorate any room. Delicate, graceful ballerinas can be used as pendants, placed on a festive table, or hung on a Christmas tree. To work, you will need a piece of flexible wire, several napkins, glue, and scissors.
First we make the frame. We twist the body, arms, legs from two wires. We make hands, feet, and head in the form of loops. Then we cut the napkins into equal strips and wrap the entire frame of the craft. To ensure that thin paper adheres well, the tips can be slightly wet.
To make a pack, you will need to straighten one napkin and cut it into four squares. Place the pieces on top of each other and fold them twice to form an acute triangle. We squeeze and scroll the paper with our hands - we add texture. We round off the bottom edge of the future skirt.
Now we dress the ballerina in a weightless outfit. To do this, we make slits for the head and arms and place the dress on the frame. We tie it at the waist with thread or shiny ribbon. You can decorate your head with beads, make a paper kokoshnik, a crown, or a hoop.
Beautiful paper napkins on the table: double fan
1. Place the napkin laid out on the table.
2. Fold in half (from bottom to top).
3. Bend the top layer down (towards the bottom edge).
4. Turn the napkin over.
5. Fold the top layer down (toward the bottom edge).
6. Fold the napkin evenly like an accordion.
7. Take the napkin in your hand so that there are 2 layers on top. Fold the first layer inside each inner accordion piece downwards (see image).
8. Gently spread the napkin to form a fan.
Video instruction using a cotton napkin as an example:
Doll made from napkins for Maslenitsa
Preparations for the spring holidays take place with special trepidation. Making ritual dolls for Maslenitsa has long become an established tradition. Beautiful crafts made from napkins will be an excellent gift and will decorate a plate of pancakes and other treats. To create a miniature Maslenitsa beauty you will need several multi-layered thin sheets, threads, and scissors. We will proceed in the following way:
- We prepare four napkins of different colors;
- We lay out one piece on the table with the pattern down, bend the opposite corners to the center;
- Roll a ball from another napkin and place it at the intersection of the edges of the folded workpiece;
- We turn the future pupa over and cover the area with the ball with a white circle;
- We form the head in the form of a ball, tie it with threads;
- We twist another napkin into a tube, tie the ends - these will be puffy sleeves;
- We put our hands under the base and tie them at the waist;
- We make a scarf from a bright piece of colorful napkin - fold it into a triangle and tie it on the head. We fix the ends with glue.
Table decoration using napkins
Accessories
There are many napkin accessories on offer, including rings, clips, etc. These small decorative elements will help you create an unusual composition.
Napkin rings allow you to achieve elegance and economy in design. They can be personalized, decorated with rhinestones, flowers and feathers in a variety of materials. Cutlery is placed under the rings.
Ribbons are used to tie napkins and serve as rings.
The clips also secure the napkins. They can also be decorated with glued streets or flowers.
If you are interested in how to make a round table, we recommend reading the article: //6.///stoly/
Accessories
/stoly/stoly/-rukami.html.
Folding methods
In fact, there are many ways to fold napkins, both paper and cloth, there are many ways. But of them you can forgive some of the most successful and simple ones.
Perhaps the most striking design option for napkins is the sail. Fold the cloth napkins in the middle, folding them away from you. Bend the upper corners to form a triangle. Then fold the resulting number in half (at the seam).
Go. This type of folding napkins is suitable for formal functions. Fold the napkin in the middle and place the fold toward you. The right and left edges of the “triangle” cover the cutlery. Wrap the resulting envelope.
The French way of making napkins is very elegant. First you need to fold the napkin along a diagonal line with the folded edge on the left side. Then the top corner is folded down, leaving a few centimeters of the right corner open. Finally, the right side folds down.
Pyramid
It looks quite impressive and severe. To fold the figure, fold the napkin along a diagonal line, and then fold the right and left sides. At the last step, bend the future pyramid along the center line.
Fan
A fan-folded napkin can be placed on the table in front of a large serving plate or on the plate itself. An original solution is a fan in glass.
Horizontal envelope
A simple and strict horizontal envelope, or horizontal package, is used only for cutlery.
There are also more sophisticated ways to design napkins:
- crown;
- Bishop;
- shooter;
- rose;
- Calla and many others.
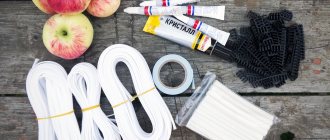
Gift decoration
You can make not only original gift wrapping with your own hands, but also decorate it with bright napkins. In the next master class we will use the simplest materials: empty packaging, napkins of two colors (for example, red and pink). You will also need glue, a figured and a simple hole punch.
We prepare the box - remove the glossy layer with the manufacturer's information. We cover it on all sides with a napkin of a brighter color. When the gift box is dry, cut off the paper protruding beyond the edges and begin decorating. We take a pink napkin, crumple it and glue it, without straightening it, onto the product. We divide the red blank into 4 squares and twist flagella from each. Then we lubricate the tubes with glue and wind them tightly onto the handle in a spiral.
When all the parts are dry, glue the strands onto the pink background, imitating an uneven twig. Using a hole punch, we make flowers from a white album sheet and slightly curl the leaves with it. We combine the petals offset to the center and glue them to the red branches. The centers can be decorated with a napkin rolled into a ball.
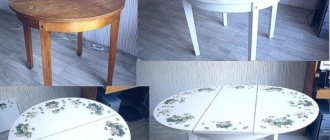
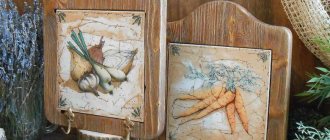
Using napkins for decoupage in the interior
For deucapage, special multi-layer napkins with a more durable top layer are used, but ordinary table elements are also suitable, provided that the decoration is done very carefully. To prevent the product from tearing and to adhere better, needlewomen use some tricks: apply hairspray to the surface or glue them using a file.
Decorating and refreshing any piece of furniture using the decoupage technique is very simple. First, you should select and prepare a suitable surface (table, chest of drawers, picture frame, etc.), choose napkins with a thematic picture. To work, you will need the paper material itself, PVA glue, a roller, and brushes.
You can decorate various furniture and accessories by completely covering them with paper or partially by cutting out individual motifs. In any case, the work involves applying glue to the surface and attaching a picture. Then the decor is leveled with a roller or soft brush. Using this technique, you can easily decorate interior parts of any shape.
General instructions for numbers
General recommendations for all forms are the same. Since the figures imply volume, all numbers require cutting out two identical shapes and connecting them with end parts. You can draw the side protrusions in advance, which will then help secure the two parts together, but it is possible to make them separately.
The first figure is drawn on cardboard with a ruler, as well as using a downloaded and printed template. The second one needs to be traced around the first and also cut out.
Individual parts are made according to the following recommendations:
- Bottom. Flat base, size 25x10. It can be made in two layers to increase mass and stability.
- Sidewall. Rectangular segments of the same width. In complex shaped numbers like 2 or 6, they should be short in length to ensure a rounded shape.
Glue is selected separately. The most accessible method is PVA. School stationery is suitable for one-time use. Its problem is long drying time. In this case, “Moment” is preferable, which dries in seconds and holds much better.
But an even faster method is hot melt glue. It will allow you to fix large pieces of cardboard. It will allow you to fix large pieces of cardboard. In addition, it allows you to glue joints, and drying occurs in 1 minute.
You cannot use regular tape. It is dense and has no pores, so napkins simply won’t stick to it. Masking tape works better because its surface has a cellulose base.
Read: Plumbing inspection hatch