Before assembly
Before directly placing homemade or purchased furniture, you need to decide exactly where it will be located. This is an extremely important step, because the location of the equipment must meet all safety rules and proper operation.
The basic rules are:
- Availability of outlets nearby and the ability to easily connect devices.
- It is better to position the structure so that it does not take up much space in the room.
- To avoid vision problems, the room with the computer should be well lit with natural light.
- The wall to which the computer table will be placed must be level and there should be no paintings or other decorations hanging on it.
- Do not place equipment near heaters or radiators, otherwise the devices may overheat.
By following these rules, you can eliminate most problems that may arise when working on a personal computer in the future.
Let's not ignore additional details
A cabinet, hanging shelves, drawers - all these are integral components of a computer desk, including self-assembly. This element of the interior cannot be considered complete and complete if, with the exception of the monitor, keyboard and the processor itself, nothing else fits on it.
You also need to build a cabinet, hanging shelves, and drawers for your computer desk yourself. For this:
- For stability, we cut out the top shelf and crossbar from a furniture board 400 mm wide, and the middle wall from a 200 mm wide board;
- We attach the central wall to the tabletop, and the rear crossbar is screwed behind it;
- Place the top shelf on the central wall and check the level;
- the shelf is screwed on the sides with self-tapping screws;
- the overall structure is attached to the middle wall;
- the shelf above the cabinet is cut out of a 200 mm wide panel and fixed at a height convenient for installing a printer, for example;
- drawers for the cabinet are cut from 12x120 mm boards and plywood (used for the bottom);
- guides for drawers are attached from the bottom to the top; the distance between them should be the same, and the guides themselves should be parallel;
- After that, attach the guides for the shelf where the keyboard will be installed.
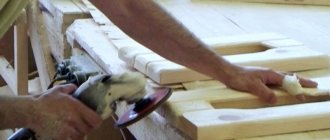
When the table is a solid structure and you are sure that you like it that way, take it apart! Do not be surprised. The reason is that all wooden parts will now need to be sanded and varnished. And so that reassembling the computer desk goes quickly, mark which part was attached where.
Independent production of computer work is not particularly difficult for a person who knows how to use the appropriate tools and materials. By choosing this option for arranging your work area, you will save a lot and also implement an individual design of the product.
By assembling a computer desk yourself, you can arrange both a small compact room and a more spacious room. It is advisable to open the table not only with colorless transparent varnish, but also paint it in any color you like and decorate it in every possible way. This way you will get an original product - comfortable and ergonomic. Don't doubt your abilities. And good luck!
Let's figure out how to make a computer desk with your own hands. It is worth recognizing that working at a desk always brings more productivity than working on the couch. If you place the computer on the table, you will feel focused. A homemade computer desk will significantly improve the overall interior of the room. So let's look at everything in detail - how to make a computer desk?
Having a computer has recently been considered an absolute necessity. Many adults keep important documentation on a personal computer, but for children this machine is simply important for school studies. Recently, the technological process has climbed high. Buying a computer is considered a common thing. As you know, there are stationary and portable devices. And each of them requires proper space.
Assembling a computer desk according to instructions
Ordering a ready-made table without assembly and delivery will save a significant amount, and the process itself, although it requires accuracy and painstakingness, is quite simple. Even if difficulties arise with the table assembly diagram or during the process, you can always contact the support center of the store that sold the product.
Before assembly, check that each necessary part and the diagram itself are present. The fastest and easiest way to assemble a cabinet, and the most difficult stage is the installation of moving parts, so it is recommended to start with a cabinet.
Carefully fasten the supporting components to the tabletop so that the finished structure does not wobble.
Glass table care
In order for the product to serve you as long as possible, it will require proper care. How to care for a glass table? First you need to figure out how to protect it from damage. If you cleaned the room, the table must be set. This will protect it from dust and possible damage. It is necessary to find a special approach to the glass table - wipe it with special compounds, protect it from exposure to direct sunlight and temperature changes.
If you have small children, a glass table could put their lives at risk. To prevent children from getting hurt or accidentally breaking the product, move the table away from children's games. It is best to install a glass table in places where it will be least exposed to household occupants. Pets are another risk to the existence of glass products. Fluffy fidgets can both break and scratch the table. For this reason, it is better to keep them away from the product. As you can see, if you properly treat a glass table, this piece of furniture can serve you for many years.
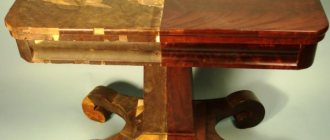
In life, you will need not only the installation of furniture, but also its dismantling, for example, if you move. To disassemble the table, having all the tools at hand, will not require any difficulty. You will need: a regular and a Phillips screwdriver. When starting to disassemble the table, carefully inspect its structure and all its fasteners. Basically, they are located under the countertop. It is attached to the legs, which are fastened together with a strap.
Sequencing
Unpack each bag and distribute the parts. Put the small ones in some tray or box, arrange the individual modules: legs, table top, etc. The tabletop, as a rule, will be assembled at the very end according to the instructions.
Prepare a screwdriver and 2 screwdrivers (flat and Phillips). According to the diagram, place the parts required according to the instructions on the floor with the inside facing up, place metal fasteners so that the holes match, and connect them with mounting screws and plugs. Each part is connected exactly according to the instructions for assembling this table.
Check how well the walls are secured. Next, you need to attach the side walls to the tabletop; to do this, install the mounting brackets on its underside.
Under the work surface, install the guides for the pull-out shelf under the keyboard, in the places indicated for this purpose, horizontally and parallel to the floor. Make sure the shelf fits in smoothly and without interference, and secure the guides with a screwdriver. Install the plugs and insert the shelf with casters.
Check all connected parts according to the instructions; the structure itself must be tightly secured and not loose. You can install and connect your computer.
This algorithm is applicable to almost any type of furniture. Even such a difficult process as assembling a transforming table will not be unnecessarily complicated if you arrange the parts in the order of the diagram and carefully read the instructions.
Drawing work
Once you have dealt with all the small points, proceed to assembling the computer desk with your own hands. First you need to determine the height of the structure. The standard figure is 75 cm. Not everyone has the same height. Therefore, it is worth correctly calculating the height using one formula:
“Your height” is multiplied by 75 and divided by 175. Your height is 190 cm. So the calculations will be as follows. 190×75/175=81 cm.
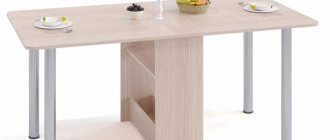
The above formula allows you to accurately make a drawing. If you want the table to be smooth and not take much time to make it, pay special attention to the drawing work. In order not to invent “bicycles”, borrow a standard plan for making a computer desk structure. For this model, too many manufacturing materials are unnecessary. The design has the following components:
- Monitor shelf;
- Keyboard shelf;
- Shelf of various small things;
- Cabinet for files and other documentation;
- Upper shelves for books and speakers.
As you can see, the computer components can easily fit on the table. What tools should I use to assemble a computer desk? For such a task, you cannot do without a jigsaw (preferably an electric one), a drill, a screwdriver, a screwdriver, a grinder and a chisel. And since you will do the work according to the drawing, do not forget about the construction pencil.
If there is a laptop in the house
We've discussed how to make a computer desk yourself. But what to do if there is a laptop in the house instead of a computer? It would seem that the thing is quite mobile and does not require additional stands. But, as practice shows, lying in bed or on the sofa with a laptop in your hands is not always comfortable. Therefore, now we will make a laptop table with our own hands.
The easiest and free option
First of all, let's consider a design that does not require special construction skills and not a penny of financial investment. It’s tempting to make such a table for a laptop with your own hands. You can use parts of old furniture, remnants from renovations and other scraps of any building material.
You only need three parts: 2 side parts and a table top. Its size will depend on the size of the equipment. We will make a tabletop 270x660 mm. It’s easy to cut, the main thing is to measure it exactly.
It will be a little more difficult with the side strips: they must have a beveled side, which is attached to the tabletop. The dimensions of the side walls are 270×205×255×280 mm. it turns out that the back of our table will be raised by 280 mm, and the front will be lowered by 205 mm. Thus, a small DIY computer desk for a laptop will have a slope, which will make it very convenient for work.
The side parts are attached to the tabletop using self-tapping screws and are additionally reinforced with small corners. This enhances the strength and reliability of the structure. All that remains is to paint or finish it to your taste and preference. There is nothing difficult in such a design, and if a person likes to study or have fun while reclining, then why not think about how to make a laptop table with your own hands.
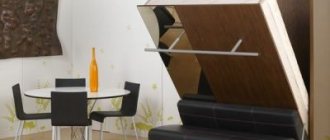
Another way: a folding table for a laptop
The folding design of the table is a little more difficult to make, but if you often move from place to place, it’s worth thinking about how to make a laptop table convenient and mobile. The following materials and components will be required:
- tabletop material;
- side wall material;
- screws or self-tapping screws;
- 4 folding fasteners with a lock.
You can use any material that is available. We cut out the tabletop 600x400 mm, the side legs - 400x310 mm. Using a ruler and pencil, mark the installation locations for the leg fasteners on the inside of the tabletop. We make holes for the screws, fasten everything securely and that’s it - our DIY computer desk, the photo of which you see, is ready.
As you can see, there are a lot of ways to make a computer desk with your own hands. The article discussed only the most accessible and simple ones. But there are craftsmen who are able to create furniture that you cannot find in any store.
Well, for clarity, watch the video on how to quickly and easily make a computer desk with your own hands, using the information from which you will cope with the problem easily and naturally.
Video:
Video:
Video:
Video:
Video: