0
2583
Owners of small apartments always feel a lack of free space. It is quite natural that when equipping a home, there is a need to select ergonomic furniture and work surfaces. Designs of standard sizes are not always suitable; you have to order their production according to individual measurements, which increases the cost several times. Meanwhile, having basic skills in working with a drill and a drill bit, it is quite possible to create the desired model of furniture yourself. A good solution for a kitchen or living room, where guests are often located, would be a table-book - it is quite easy to assemble with your own hands, the manufacturing process does not take much time. With a responsible approach to the task, homemade furniture will look no worse than factory furniture, in many ways even much more original and colorful.
Table-book: general information
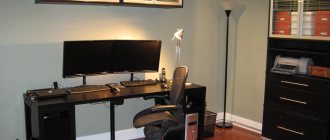
A book table is a portable table that can take the full size of a traditional table when disassembled, and fold down to the size of a small bedside table when assembled. This table is perfect for installing in apartments:
- studios, where one room contains all the functional areas of the room that a person needs;
- lofts, where, in principle, the presence of partitions is not implied;
- just small in size, where it is very important to equip the space to suit your needs, while unloading it as much as possible, because not everyone likes living “in a warehouse”.
Book tables can be modest in size even when unfolded
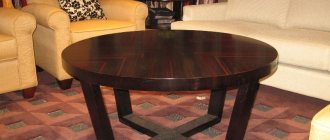
Depending on exactly what configuration your room has, and, in particular, that nook of it where there will be a dining or work area for which a table is needed (or maybe both at once), the tabletop of the product we are interested in can be selected according form, which happens:
- round;
- square;
- rounded, etc.
In addition, the table can be equipped, traditionally, with a main support, as well as legs protruding from its folding part.
There are many varieties of book tables on the market, however, as a rule, they are all very similar to each other, so you should not expect much variety
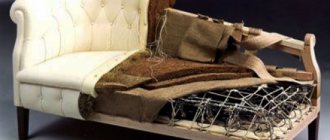
Disadvantages of book tables
Today, in furniture stores, manufacturers present a wide range of different book tables, however, the demand for them, despite their obvious functionality and convenience, as well as their attractive appearance, is not growing, and there are many reasons for this. Let's look at them in the table below.
Table 1. Weaknesses of commercially available book tables
| Weak side | Description |
| Quality | Unfortunately, book tables are becoming less and less common in high-quality designs. If previously such a piece of furniture could be purchased without fear that it would collapse after a few months of use, now when purchasing it you need to take literally everything into account:
|
| Price | It so happened that book tables were widespread during the Soviet Union. As a result, today they are completely unclaimed and unpopular, although they are extremely convenient. Therefore, this piece of furniture is represented on the market by the following items:
|
| Standardization | As we have already said, tables that are quite expensive look and are made to be truly unusual and beautiful, as well as of high quality. The body material for such products is usually real wood. However, due to the price, they are incredibly difficult to buy. Therefore, more and more often cheaper products are entering the market, which are all, as one, similar to each other. The size, shape, number of legs and even color - everything merges in a number of identical book-tables, and as a result it turns out to be easier to assemble such a product yourself, and even cheaper. |
Advantages of book tables
However, book-tables in general, and not just industrially produced ones, have, contrary to the above, many different advantages that you should definitely learn about. Let's look at them further as well.
Table 2. Advantages and strengths of book tables
| Dignity | Flaw |
| Compactness | Actually, it is precisely thanks to this quality that our book-table has become the hero of the article today, since it is simply irreplaceable in small spaces. There are, of course, other options for transforming tables, but assembling them, as a rule, takes much more time and effort, and the book sometimes folds in one or two movements. |
| Mobility | Book tables, as a rule, weigh quite little, as a result, they can be used not in one room, but in several at once, if such a need arises. |
| Simplicity | Pretentious book tables simply do not exist, and, as you know, today in fashion are interior design styles that require the most laconic furnishings of the room. |
| Ease of production | It’s really easy to make a book-table yourself, which is probably why the kitsch produced by companies on an industrial scale remains unclaimed and continues to be on store shelves. |
| Sustainability | Despite the extraordinary design, book tables are very stable. So, on them you can place a meal of several dishes, a computer, if you have created not a dining space, but a work space, a changing area for wrapping up a child, without fear that the offspring will fall from a height. |
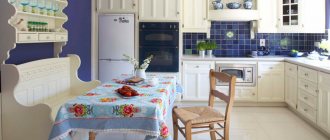
How to remake a table from the “ugly duckling” to Provençal style
1.
Let's free the table surface from the layer of old varnish. It holds tightly, only a grinder can handle it if you install a grinding disc.
2.
After such a surgical operation, the chipboard from which the table is made becomes covered with irregularities. This is where a primer comes in handy, and you will have to cover the surface with it twice.
3.
To make the table more interesting, you can use different methods. For example, completely replace the tabletop with a wooden one, in a modern style. But it’s not that simple, and it may not work out. It is to complicate the shape of the table that a relief corner beam is provided; we simply attach it to the existing tabletop. And it will immediately become noticeable that the table has acquired a less primitive appearance.
4.
Now we need to work on the boxes, because from prolonged inactivity they have lost their former ease of movement. Moldings are put into use here.
5.
Now the old table looks quite good, all that remains is to paint it. To make it fit better into the chosen style, we will use façade paint rather than traditional enamel. And we’ll take a brush with hard bristles so that traces of strokes are visible, because carelessness is in fashion today. In order to give the table an aged look, we will paint a thin layer only once. Then, in some places, bald spots will form, through which the soil will be visible.
Varieties of book-table designs
There are many types of book-table designs that we would like to talk about today. Let's look at them.
Table 3. Types of book-table designs
| Design | Description |
| Standard | The standard design of the table-book consists of the following components:
|
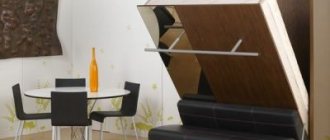
| Book table with folding chairs | So, the second type of book-tables are tables with the same folding chairs hidden inside. Such pieces of furniture are sold in sets and are the most convenient and ergonomic solution for studio apartments. Of course, such a product requires much more materials and accessories, so it will cost more, but instead of one table you will immediately purchase a dining set. |
| Table-book-transformer | So, there is another type of table-book, which is called a transformer. Although this sounds rather strange, because the book itself is also a transformer. This table simply accommodates additional interior items, for example, a small chest of drawers or a bedside table, a bar or any other devices for storing things, which the table will be in the assembled state. |
| Book table with empty support element | As a rule, the supporting element of book-tables is also intended for storing some things, however, in some models it may be deliberately not filled with shelves and even vertical partitions in order to save even more space. Therefore, you can also make it yourself or buy a table in the store, which has a kind of support in the middle and nothing else. |
As you can see, there are really many options for book tables. However, even with such variety, you may not choose any of the products on display for personal use, for the many reasons we mentioned above in this article. Well, in this situation you can only find the following ways out of the situation:
- refuse to buy such a table;
- order an expensive product with individual parameters;
- make a table-book with your own hands.
A book-table is a truly convenient solution for the home
You are free to choose any of the options presented, but in case you choose to make a table with your own hands, we have attached further instructions.
Prices for book tables
Table-book
What paint to paint the table
If you work with enamel, then before applying it you need to rub the surface with a candle. The paint will lie unevenly, which is what was required to be achieved. And in order to deprive it of its ceremonial shine, you will have to walk over the painted surface with sandpaper. But to get closer to the effect of Provencal furniture, it’s still better to work with facade paint.
Due to mechanical damage or wear of the kitchen countertop, a number of restoration works are required to help restore the countertop to an attractive working appearance. We’ll look at how to repair a countertop with your own hands in this article.
Design and purpose of a kitchen countertop
The countertop is an essential element of the kitchen, which performs several important functions:
- work surface for cooking, cutting food;
- using a countertop to place kitchen equipment;
- in some kitchens the countertop is used as a table;
- In addition to the main functions, there is an additional - aesthetic function of the countertop - decorating the kitchen.
Kitchen countertop requirements:
- resistance to scratches, impacts and mechanical damage;
- heat resistance - the tabletop must withstand high temperatures in the event of a spill of boiling water or the operation of heating electrical appliances;
- resistance to ultraviolet radiation, if the kitchen is located on the sunny side;
- a sink is mounted into the surface of the countertop, so another requirement is moisture resistance;
- The countertop should fit harmoniously into the overall design of the kitchen.
Types of kitchen countertops
Depending on the material from which the tabletop is made, there are:
- wooden table tops,
- plastic table tops,
- chipboard countertops,
- laminated countertops,
- glass tabletops,
- marble countertops.
1. Wooden countertops are made from natural wood. Such countertops have a number of advantages:
- variety of shapes,
- natural and natural appearance,
- easy restoration,
- warm and environmentally friendly.
Disadvantages of a wooden kitchen countertop:
- the ease of ignition of wood makes this item an unsafe element of the kitchen,
- a wooden tabletop gets dirty easily, so it requires additional coating with special products,
- when using softwood to make countertops, scratches and marks remain after cutting products or accidental damage,
- the cost of wooden countertops is quite high compared to countertops made of chipboard or plastic.
2. A plastic countertop is an inexpensive and simple option for the kitchen.
Advantages of a plastic tabletop:
- ease of care and cleaning,
- the ability to manufacture any structures, for example, wood or stone,
- affordable price,
- ease of restoration,
- resistance to mechanical damage.
Disadvantages of using a plastic countertop:
- plastic - highly flammable, therefore it is an unsafe material for the kitchen,
- the plastic tabletop does not withstand high temperatures and melts easily,
- A plastic tabletop cannot withstand heavy loads.
A chipboard tabletop is the most common option. There are two types of such countertops:
- impregnated with resin,
- with a plastic coating.
The first option is able to withstand high temperatures and allows you to place dishes with only cooked food without fear of the surface of the countertop.
A tabletop with a plastic coating is the most inexpensive and optimal option. These countertops come in matte and glossy finishes. The properties of the tabletop depend on the quality of the plastic. It is better to choose tabletops made in Italy or Germany. Three types of chipboard are used for manufacturing:
- laminated,
- melamine,
- laminated.
Laminated chipboard is environmentally friendly and harmless to human health.
Glass countertops create an attractive appearance in the kitchen and expand the space.
Using glass countertops has the following advantages:
- withstand heavy loads,
- absolute moisture resistance,
- the use of tempered glass, which prevents the risk of damage to the tabletop,
- resistance to high temperatures,
- variety of colors and finishes,
- anti-allergenic and harmless,
- kitchen design decoration.
Disadvantages of using a glass tabletop:
- the glass tabletop cannot be restored; if a crack appears, the entire surface will have to be replaced,
- when installing kitchen utensils, the glass makes characteristic sounds that many people do not like,
- the difficulty of caring for a glass tabletop is another disadvantage; glass must be constantly rubbed and treated with special means,
- The cost of glass countertops is quite high.
Table tops made of artificial stone:
- absolute water resistance,
- heat resistance,
- the absence of pores frees the countertop from dirt,
- strength and wear resistance allow the tabletop to be used for a long time,
- UV resistance,
- ease and simplicity of care,
- variety of colors and textures,
- presentable appearance.
The disadvantages of stone countertops include their rather high cost, which is compensated by many advantages and a long service life.
The marble countertop is distinguished by its beauty and uniqueness.
Advantages of marble countertops:
- environmental friendliness and harmlessness,
- water resistance,
- beautiful and presentable appearance,
- durability.
Disadvantages of marble countertops:
- careful care
- impossibility of placing hot objects on the tabletop,
- traces of spilled liquids,
- the need for periodic restoration.
Repair and restoration of wooden tabletops
Repairing countertops made of chipboard or wood is the easiest. Damage to a wooden countertop is most often caused by moisture or exposure to high temperatures. If the height of the tabletop increases or looseness appears, the tabletop should be repaired.
Instructions for repairing a wooden tabletop:
1. Start by removing any pieces of wood that were caused by the delamination of the countertop.
2. Then dry well and sand the surface.
3. Mix sawdust with PVA glue to form a thick mass.
4. The voids formed as a result of grinding should be filled with this solution.
5. Place the tabletop under a press for a day to dry completely.
6. After drying, cover the surface of the countertop with silicone and install it in place.
Tip: to get rid of deep scratches on the surface of a wooden tabletop, sand the tabletop with sandpaper and then sand it. To make the wooden surface glossy and shiny, use felt.
Repair of kitchen countertop made of plastic
The plastic surface is not capable of swelling or getting wet, but prolonged or strong mechanical impact leads to the formation of cracks or chipping of the corners of the plastic.
To repair a plastic tabletop, use a special glue for plastic. This glue is applied using a gun and holds plastic structures together well.
Tip: if the plastic surface is slightly damaged, it is not necessary to use expensive plastic glue; it is enough to glue the surface with superglue or Moment glue.
In the event of a large piece of plastic breaking off, the ideal option would be to use Titan glue. A piece of plastic must be ground into powder and mixed with glue. Cracks are sealed with this mixture.
Laminate countertop repair
The laminated countertop is a chipboard panel with a laminated coating. During use of the countertop, some areas of the laminated coating may swell or peel off. Most often this happens at corners or at the sink location.
If the laminated coating has come off, but the tabletop has not swelled, you need to treat all joints and corners with a special sealant or silicone. When installing a countertop, it is advisable to treat the surface on which it is installed with silicone. When installing the sink, seal all edges with waterproof sealant.
If the tabletop is not only damaged, but also swollen, a number of actions should be taken to restore the shape of the tabletop.
Materials for work:
- shavings or sawdust,
- several bars,
- saw,
- PVA glue.
Instructions for restoring a laminated countertop:
1. Take a hair dryer and heat the area where the countertop is swollen.
2. After drying the surface, remove the peeled coating.
3. The resulting bare areas should be coated with glue and left for 15 minutes.
4. Mix sawdust and PVA glue to form a homogeneous thick mass.
5. The mixture should sit for 10 minutes.
6. Pour a mixture of glue and sawdust into the recesses and compact them with a spatula.
7. Place blocks on both sides of the tabletop, which should be tightened so that the tabletop takes on the desired shape.
8. Remove unnecessary glue.
9. Leave the countertop to dry completely for 24 hours.
10. To glue the edge, it should be heated.
11. Place the tabletop in place. All places where moisture may enter should be treated with sealant.
Stone countertop repair
There are two types of stone countertops:
- countertops made of artificial stone,
- countertops made of natural stone, such as marble.
Let's consider repairing a countertop made of artificial stone.
To restore a stone countertop, you should perform a number of actions:
- reinforce the surface,
- treat damage
- matt the tabletop,
- degrease the surface,
- Small scratches should be repaired using repair acrylic or glossy solution.
When peeling off the corner fragments of a stone countertop, you should perform the following steps:
- prepare a set of tools from felt, four types of sandpaper and PVA glue,
- sand and polish the surface of the tabletop,
- mix glue with acrylic plastic and repair damaged areas,
- After the surface has completely dried, sand the tabletop with sandpaper,
- polish the surface using felt.
Another way to restore an artificial stone countertop, when performing it is better to use professional equipment such as a grinding machine.
The first stage is grinding and polishing the surface of the countertop, which will easily hide traces of use.
The next stage includes surface treatment with special restoring solutions.
At the final stage, the tabletop is polished and sanded again. Small cracks and chips become invisible, and the tabletop takes on a presentable appearance.
To repair a marble countertop, it is better to use the services of professionals. Marble is a natural and very demanding stone that does not tolerate humidity or too high temperatures. Therefore, even with the slightest contamination of the countertop, the stains remain for a long time. It is recommended to install marble countertops in dry rooms.
Instructions: how to make a table-book with your own hands
When choosing materials for the manufacture of instructions that interest us, remember that the main criteria that determine what they will be are, perhaps,:
- your initial capital;
- and your construction skills.
Exactly what the tables we are interested in, which you make yourself, will look like will depend on what your budget is and what your personal preferences are.
It is also worth thinking about the shape of the future table in advance. So, its tabletop can be:
- round;
- rectangular;
- square;
- oval, etc.
Before you make a table, you need to think about what it should be
Don't forget to take a look at the legs too. They can be equipped with wheels to make the table unfold better, however, in this case, you need to take care of the special stability of the mechanism.
The size of the table is another point that will have to be carefully considered, since you can make a table-book for lunch or work for one person, or you can make it for a whole family who loves to spend their free time eating and communicating with each other. If you have a small child, then the product will need to be made super-stable and not heavy, in case the child accidentally touches it carelessly.
You can immediately make a multifunctional transformer that will attract great attention from guests and family members
Step No. 1 - drawing development
The assembly of any piece of furniture begins with the fact that you develop its drawing. Initially, this may not even be a drawing, but a sketch, that is, the shape and appearance of your future table, embodied on paper or in a computer editor according to the parameters that you have designated for it.
At the very beginning it is necessary to develop a sketch of the future product
After the version drawn on the screen or paper reaches the desired parameters, you will need to begin its detailed disassembly, that is, drawing a real drawing, which will display the main details and required dimensions of the structure being constructed.
You can make your own sketch and also make your own drawing based on it, however, to speed up the work, we suggest that you use the material that we present in this article, or, as a last resort, carry out your own versions of the work by analogy with it.
Drawing of the future table with dimensions, presented in millimeters
From this drawing you can see that the table that we will make has quite standard parameters. Namely:
- height equal to 75 centimeters;
- width equal to 80 centimeters;
- the length of the tabletop when unfolded is 145 centimeters;
- total length when folded is 25 centimeters.
Having outlined the main dimensions, we move on to the preparation of building elements.
Step No. 2 – assembling the necessary materials
Now we need to list exactly what parts our product will consist of, so that it is clearer to you. In principle, everything is quite simple here; we will make up the table from:
- countertops, which are generally composed of three segments;
- sliding legs in the amount of 4 pieces;
- main supporting element.
Now we need to order table parts with the parameters we need from a furniture company
Of course, you can cut all the materials yourself, using, for example, laminated chipboards, since they are best suited for this work. But it’s best if you don’t have, for example, a sawing machine, make a detailed calculation of the parameters of each of them, and order these parts from a furniture company.
We will deal with specific calculations in the next paragraph, but for now pay attention to the table in which we will indicate exactly what parts of the fittings we will need to assemble the desired table.
Table 4. What accessories need to be purchased to assemble the table
| Detail | Quantity in pieces |
| Butterfly loops | Available in 16 pieces |
Straight rollers | Available in 8 pieces |
Self-tapping screws | Needed to attach hinges and rollers, it’s better to immediately buy a set of 100 pieces (4 by 16) |
| Confirmat | You will also need confirmations with parameters 75 by 5; you need to purchase only 45 pieces. |
| Metal corners | Metal corners in the amount of 4 pieces are needed to attach the tabletop to the legs. |
| Adjustable feet | We will also need 4 adjustable supports. |
Step No. 3 – detailed calculation of the size of our parts
So, let's start, perhaps, directly with the tabletop. You need to understand what size it will be. As you remember, it consists of three separate segments, each of which will have its own size. In principle, everything is simple here:
- two wide parts will have a size of 80 by 60 centimeters;
- the thin, narrow part of our tabletop will measure 80 by 25 centimeters.
First, let's calculate the parameters of the tabletop, separately determining the size of its wide or narrow parts
Now we proceed to calculate the size of the main supporting element, also taking into account the fact that it is equipped with sliding legs.
So, take a look at the drawing. The numbers highlighted in blue are those that indicate:
- racks that make up the sidewalls of the common support;
- ribs that give the structure the necessary rigidity.
Drawing needed to detail the parameters of our furniture elements
So, let’s first determine the parameters of the racks. Let's remember the overall height of our product. It is equal to 75 centimeters. The thickness of the tabletop that we are making will be equal to 1.6 centimeters, and the supports, which will subsequently be screwed to the bottom of the racks, will have a height equal to a centimeter. As a consequence, to calculate the height of the racks, it is necessary to calculate the following value: 75 centimeters - 1.6 centimeters - 1 centimeter. As a result, we get 72.4 centimeters.
The width of the part under consideration must be the same size as the similar parameters of the middle table cover, otherwise, instead of a book, you will get a structure that does not want to fold at all.
It turns out that the parameters of our racks will be: 72.4 by 25 centimeters; we only need to make 2 of these racks.
Now let's start calculating the stiffeners.
So, now we need to calculate the parameters of the table stiffeners
Take another close look at our drawing. We will make an indent of 3 centimeters from the racks and from the end part of the tabletop. That is why we will calculate the length of our stiffeners using the following formula: 80 centimeters – 1.6 centimeters – 1.6 centimeters – 3 centimeters – 3 centimeters. As a result, we get a value equal to 70.8 centimeters.
The width of the parts we are interested in should be such that the retractable legs can fit inside this segment of the table. That is why on each side we will leave about 7 centimeters for our needs, and the legs themselves will be made 6 centimeters wide. The remaining centimeter will be given over to the gap, which, as we know, has never bothered anyone.
Each table has stiffening ribs, as they are needed to give it stability
Prices for popular models of screwdrivers
Screwdrivers
So, it turns out that the width of our parts will be 25 centimeters - 7 centimeters - 7 centimeters = 11 centimeters.
The stiffening ribs with which we will assemble our table will be 70.8 centimeters by 11 centimeters. We will need to make three of them.
Now let's turn our close attention to the retractable supports. This is what they will look like.
So, the total height of one leg is 73.4 millimeters , since the total height of our product is, as we remember, 75 millimeters, and the thickness of the lid is 1.6 centimeters.
From the indicated height we will also need to subtract the parameters of the wheels that we will attach to the legs. As a result, we will only have 67.6 centimeters left. This indicator will be the height of our particle board structure.
You also need to calculate the size of the inset racks for this design. To do this, subtract 1.6 centimeters * 2 from the figure obtained above and get 64.4 centimeters.
So, the size of our future racks will be 64.4 centimeters by 6 centimeters, and we will make them in the amount of 8 pieces.
Extendable table supports, drawing
Now let's determine the width of the legs.
Inside our table, the distance between each stand we make will subsequently be 70.8 centimeters. In this case, you need to leave some distance for a gap under the loop folded in the closed state. This is only about 7 millimeters, we don't need more. In this case, a distance of one and a half centimeters will remain between the racks themselves.
So, he calculates the size of the horizontal overhead strip, and ultimately we get 34 centimeters. The width will be 6 centimeters. We will need to produce 8 units of planks of this size.
It remains to make the last calculations
There is only one thing left to understand - what dimensions will be the stiffener, which will subsequently be located on a retractable leg. Everything will be very simple here. You need to take the width the same as we calculated for the remaining stiffeners; as you remember, it is as much as 11 centimeters. But the length of this part will be calculated as follows: 34 centimeters - 1.6 centimeters * 2 = 30.8 centimeters.
It turns out that the parameter of our part will be 30.8 centimeters by 11 centimeters , and we will need four of these.
Step No. 4 - assembling the table
First of all, you need to connect the legs together, screw on the rollers, and then the hinges.
At the very beginning, we assemble the legs and install hinges on them
Then we assemble the supporting element of our table-book, and attach to it at the bottom the supports that we talked about at the very beginning of the article. It is not at all necessary that the supports look the same as in the picture; you can purchase some others, the main thing is that they are of high quality.
Do not forget about adjusting the supports, without them the structure will not be so stable
Now our table needs to be installed on the lid, then the tabletop should be brought together, complementing the middle element with the remaining parts on both sides, and the hinges should be placed clearly in the middle of our structure and then tightened. In the same inverted state, our table will need to be equipped with legs.
We attach the loops clearly at the junction of the attached parts
Continuing to hold the table upside down, attach the legs
At those points where the legs will reach their most extreme position, being open, you need to screw in special clamps that will not allow the table to “move” on its own.
These elements are needed to prevent the table from moving on its own.
Assembled book table
Product restoration
Restoring a tabletop involves returning it to its original appearance without visible changes in design. Many private craftsmen and companies offer their restoration services, but due to the high cost, this option is not available to everyone. The restoration process is long and painstaking, however, if you want to update the kitchen table with your own hands, you can do it at home. Before repairing the countertop, you need to prepare the following materials:
- glasses, respirator, gloves;
- sanding machine or coarse and fine grain sandpaper;
- art or paint brush, roller;
- impregnation and putty for wood;
- wood glue, liquid nails;
- acrylic or alkyd paint, stain, countertop varnish or wax;
- antiseptic and primer.
When the necessary tools are at hand, you can get to work.
Preliminary repair
Before covering a wooden tabletop, you should pay attention to the underframe and the general condition of the table: whether the legs are loose or whether some parts are missing. The new life of an old table begins first of all with the elimination of these defects, since the functional component is important for any furniture. It must be disassembled, the old coating removed from each part, sanded and put back together, secured with glue or liquid nails. Many restorers insist that the integrity of the table should not be damaged, as it will quickly become unusable.
Here, each case is individual. For flimsy structures, assembly can really be disastrous. A hammer drill may destroy the surface or cause chips. If the furniture is good quality and massive, then you should not be afraid of this. If assembled correctly, the product will become more durable and stable. After work, it is important to ventilate the room, since accumulated dust can subsequently settle on the kitchen table top. Dust stuck to the surface after painting will spoil the appearance, so general cleaning will not hurt.
Primary processing
A wooden table, like chipboard countertops, requires mandatory impregnation with an antiseptic, which will protect against pests and fungi. This substance will not allow woodworms to attack the product in the future. After treatment, it is recommended to leave the table to dry for at least a day. Next, you need to remove the old coating using a sanding machine. You can also use coarse-grit sandpaper at the beginning and fine-grit sandpaper at the end of sanding.
Kitchen countertop restoration
Before covering a wooden tabletop, you should carefully inspect the surface for damage and chips. Small cracks up to 3 mm are sealed with putty and then sanded again so that there are no tubercles. Large chips can be repaired using veneer. You must first make a stencil of the desired size. In order to make it correctly, you should cover the surface of the chipped part of the table with paint, then press it with paper. A clean place, untouched by paint, is the necessary stencil. Next, you need to cut the veneer along the contour and glue it to the surface with wood glue. Press the part tightly and leave to dry for 10–12 hours. How to cover the countertop after cosmetic repairs? Alkyd or shellac primer for wood. This will ensure even paint coverage. The primer should be applied in 2 layers and wait until completely dry after each treatment. After this, the surface can be sanded again.
Painting tables
Now you can start painting directly. Since restoration requires restoration of the original appearance, the correct shade should be chosen. Modern manufacturers offer a wide range of color palettes, but it is not always possible to find an absolutely identical option that was used before restoration. You can purchase several types of paints, mix them and arrive at the desired color. How to cover a wooden tabletop so that it lasts for many more years? There are a lot of options here, but the most common is water-dispersed acrylic paint. It is non-toxic, dries quickly and is quite moisture resistant.
Using a brush, apply a thin layer, leave to dry, then apply a second coat and also let dry. For dark shades, it is recommended to repeat the procedure three times. If the table will be placed outside, care must be taken to protect the surface from moisture and precipitation. Alkyd paint is suitable here. Despite the pungent toxic odor, it is successfully used for exterior decoration. It is moisture resistant and is not afraid of direct sunlight. The most budget option is oil paint based on drying oil. This material is suitable for restoring the tops of coffee tables that are not actively exposed to mechanical stress. Please note that after dyeing, the product will be ready for further processing after 3-4 days.
Protective covering
How to cover wooden countertops in the kitchen for long-term use? It is best to use a matte water-based polyurethane varnish. It will provide reliable protection from external influences and damage. The varnish is applied in 2-3 layers in one direction, after each it is necessary to dry the surface for 4 hours and sand it. How to varnish a tabletop so that there are no waves? You need to wait until it dries completely and clean out small spots with sandpaper. A white spot may form at the cleaning site, but do not be afraid of this, since after polishing the surface will become perfectly smooth.
The polish should be selected based on characteristics similar to the previous varnish. After the procedure, you can cover the countertop with wax. These are special wax sheets with a pleasant natural aroma. Before work, it should be softened (you can warm it up a little or leave it in the sun), and then rub it in in a circular motion using felt. This process is long and painstaking, but special attention should be paid to it, because the further service life and presentable appearance of the product depend on the quality of the coating.
There is another option for covering a wooden tabletop - this is ordinary wax, which is rubbed into the surface with a cotton cloth. This polished table looks very stylish and elegant, but is more suitable for a living room than a kitchen.
This is how the long restoration process is carried out. A little patience, diligence and creative approach - and an old piece of furniture will look like a photo from a glamorous magazine.
And in conclusion, a video with a detailed description of the process of restoring a wooden tabletop.
There is a category of citizens who do not tolerate old things in the house and immediately get rid of them as soon as they find a replacement. This primarily applies to furniture that requires space. But there are not many of them; as a rule, a completely serviceable table or chairs are taken to the dacha - maybe they will come in handy.
This “maybe” is completely justified today, because old pieces of furniture have come into fashion. Not even antiques, which have always been in demand, but simply things with history. It’s better if the wear and tear is noticeable right away, but if it’s not, then the furniture is artificially aged - there are special techniques.
A Soviet-made desk, a single-pedestal desk, at one time could be seen in every family with schoolchildren - it was a standard home workplace. And in production, they were in the plant management, shop engineers, planners and accountants.
In short, in many dachas there are compact old people dozing, still strong, but already out of print. Meanwhile, with a minimum of effort they can be given a fashionable look to furniture in the Provence style.
We will need:
- the hero of the plot is a single-pedestal desk;
- grinder and grinding disc;
- file;
- polyurethane moldings;
- corner relief block, which is used for construction work;
- miter box device for carpentry work;
- brown primer;
- façade paint, matte white;
- ceramic furniture handles.
Let's sum it up
A book-table is a very convenient device for the home, especially for small living spaces. Buying a table that suits your home is not so easy, but since the design of this piece of furniture is very simple, you can make it yourself. Purchase the necessary materials, make calculations and get to work.
Not a single apartment is complete without a dining table, and even modern bar counters cannot completely replace this traditional attribute. It is installed in kitchens or dining rooms; its dimensions and materials depend on the desires and financial capabilities of consumers. How to make a dining table with your own hands? Read in the special article.
Video – DIY book-table
Table assembly
When cutting out the bars, make sure that they are all even and of the same shape. Sand them thoroughly to remove chips, bumps and splinters. It is best to coat them with varnish before assembly, providing protective functions. The countertop also requires some preparation. If you are using an old board, you should clean it well and then use the same varnish. But. in general, plywood with an average thickness of 2 centimeters is quite suitable for this role.
When making a book table, be sure to use a drawing. Even small discrepancies can affect the strength of the final structure, and gradually becoming looser, it will serve you for a much shorter period of time.
To avoid the need for updating, use a tape measure and a building level in your work, and also tighten all screws tightly and additionally coat the joints with glue.