Making a floor lamp with your own hands is not at all difficult if you apply a little imagination and creativity. This task will certainly require some time, special tools and materials, but the end result will definitely please its owner. A lamp made independently will have individual features and features, since no one else will have something like it. This creative process allows you to create floor lamps of any required size and style that best suits the room. It is often difficult to find a suitable option on sale, and it will not be cheap, but in order to make a floor lamp with your own hands, you can use any available materials. Some difficulty may lie in installing wiring for lighting, but even the fairer sex can do this. So, let’s look step by step at all the processes of making a lamp at home, as well as various types of lampshade design.
Secret of success
Looking at the photo of a homemade floor lamp, it turns out that the secret of their universal adoration lies on the surface. The most original ideas and bold decisions produce the most attractive options.
So, clay, putty, liquid nails, and sealant can be used.
In addition, the floor lamp can be made from a vase, an ordinary umbrella, an old mesh with handles, or, alternatively, a denim skirt.
Original ideas
In addition to the basic materials, others can be used to assemble a homemade floor lamp, thanks to which the product will have a more original and attractive appearance.
In particular, some make floor lamps based on polymer clay. This material is good because it is easy to process, dries quickly and lends itself well to decoration. The base is made from a roll of paper or a paper box. What the base will be depends on what the lampshade will be.
The clay should be slowly squeezed onto a piece of paper or cardboard and left until it dries completely. And when the base is removed, you can further decorate the lampshade at your discretion. Polymer clay can be replaced with putties, liquid nails, construction sealants and more.
Another original option for making a lighting device is from an old vase. However, this is difficult to do, since the material is fragile, and making holes in it is very problematic.
A metal lid will need to be attached to the neck of the vase, on which a hollow pin will be installed. It will serve as a tripod. To make the structure stable, the lid must be secured with stops , which in size correspond to the widest part of the vase.
A cord is passed through the hollow pin, it passes through the hole in the lid and comes out through the hole at the bottom of the side of the vase. You need to attach a plug and socket to the wire. To make the lamp stable, you can pour sand into the vase. The lampshade is made from wire covered with linen or fabric.
It is recommended to install homemade lamps only in living rooms, bedrooms, hallways and other places where there is no high humidity. Accordingly, they are not suitable for bathrooms and toilets. It is unlikely that such devices will be able to provide reliable protection from moisture on their own, so it is better not to risk it.
Making a floor lamp with your own hands is not that difficult. The main thing is to follow the instructions and follow the recommendations for its manufacture. If you show your imagination, you can make a unique design object from inexpensive scrap materials that will decorate any room.
- Author: Maria Sukhorukikh
Rate this article:
- 5
- 4
- 3
- 2
- 1
(0 votes, average: 0 out of 5)
Share with your friends!
Personally made floor lamp
In order to find out how to build the specifics of the work, it’s worth, first of all, to familiarize yourself with the step-by-step instructions on how to make a floor lamp.
At the initial stage, we prepare the materials: an ordinary plastic bucket, a board, at least 100 cm, wood glue, a multifunctional adhesive, a lamp with an electric cord and plug, fasteners, and, in addition, a copper elbow and, of course, paint.
But the production of the frame will require a beam of 150 cm with a diameter of 3 cm and a copper tube of a similar size.
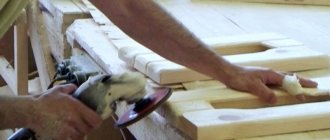
- Let's make the base. We divide the board into 2 segments so that one is approximately 2 cm larger than the other. Glue the boards together in the center. We retreat 5 cm from the edge and drill a through hole with a diameter of 3 cm.
- When making the frame, it is necessary to make a hole in the wooden post in order to thread a copper tube into it.
- On the opposite side, the pipe should protrude 25 cm. At the joint, drill a 6 mm hole.
- A wooden stand is inserted inside the hole in the base and fixed with glue. After which, a copper pipe is inserted towards the floor.
- An elbow is attached to the pipe, on which the lampshade is hung.
- A cord is threaded into the previously made hole so that it protrudes from the end elbow.
- Time to make a lampshade. We amputate the side of the bucket, and cut out the bottom so that the cartridge fits there.
- Paint the bucket in 2 layers. We apply the second one only after the first one has completely dried.
- The socket with the lampshade is attached to the wire.
Placing a floor lamp in the interior
A floor lamp is necessary when arranging a place for relaxation and reading. Such a place can be allocated in the bedroom, living room, hall in the kitchen.
In the relaxation area there is an armchair and a small sofa so that a person can sit comfortably after a hard day. A small table and, of course, a floor lamp are placed nearby. You can save space by purchasing a floor lamp with large shelves already equipped in it. There can be several of them, the shelves will serve instead of a coffee table.
For placement in the bedroom
Somewhere above the chair you can place shelves for books on the wall. Such a zone will turn out to be cozy, and the floor lamp will play one of the main roles in this. Here you can read books, sit with a laptop or knit. If the baby has his own room, then such an area can be organized for such purposes in the nursery.
You can place the lighting fixture in the living room in different ways, the main thing is that they do not interfere with the passage. The lamp is thus placed if it is necessary to create twilight in the room or add a bright accent.
Place it so that it does not interfere with the passage
Floor lamps are used to fill the emptiness of space and create coziness. For example, when there is space on both sides of a sofa, fireplace, shelving unit. Placing on both sides visually creates symmetry and some order.
These lighting fixtures are placed in bedrooms to illuminate the space near the bed. If you choose a model with built-in shelves, you don't need a nightstand. This lamp provides more light than a small bedside night light.
Can be placed on both sides of the bed
If the bed is double, then small floor lamps can be placed on both sides; if it is a single bed, there can be a table or bedside table on one side, and a floor lamp on the other . Such a move will be interesting, functional and convenient. When choosing a floor lamp for the bedroom, you need to pay attention to the built-in light level regulator.
A lighting fixture in the dining area will create a special atmosphere. For this purpose, lamps with lampshades of warm, “fruity” colors are selected, for example, apricot, light raspberry, peach. Not only the room, but also the dishes will seem more appetizing and more beautiful here.
Light for the dining area is especially important
Another way...
For those who do not sit still and want to learn several methods, we offer another option.
So, a DIY floor lamp:
How to choose a phase meter - review, purpose, principle of operation, scope of application + instructions for use with photosHow to make a transformer with your own hands - step-by-step instructions, diagram, drawings, list of materials + photo of a finished homemade transformer
Which hidden wiring detector is better? TOP 10 best manufacturers with photos and descriptions
- We form the stand from plaster. For this purpose, we take 3 - 5 kg of dry mixture, depending on the desired size.
- For the leg we choose an aluminum tube.
- We bend the mesh for the frame with a width equivalent to the height of the lampshade. We connect the edges with wire so that the required diameter is obtained.
- In order to create a stronger frame, we run aluminum tape along the entire circumference.
- We design the frame based on our imagination. This can be a macrame technique, or you can add black or silver wire to the frame and you will get a high-tech style lamp.
Repair and restoration
If you have an old floor lamp that does not work, then this greatly simplifies our task. You just need to adjust the dimensions and shape of the old lamp, if necessary, lengthen or shorten the height of the leg, paint and decorate the base as a whole.
Important! An obligatory step in creating a new floor lamp from an old one is replacing electrically conductive parts - cable, plug, socket, light bulb and switch.
And the most interesting thing remains - to make a lampshade for a lamp or to put in order the existing lampshade, which is easier, because the attachment to the base and the frame are already there, you just have to trust the flight of your imagination. As a result, from an old, non-functional lamp that was collecting dust in the pantry, you get a fashionable, original floor lamp.
Materials and details
In order to make a floor lamp with your own hands, you can use a wide variety of materials and parts that are available to you for sale or that you have at home. You can breathe new life into things that haven't been used for a long time.
When starting to create your unique design solution, you need to prepare the materials. The main parts you can’t do without:
- The leg of a floor lamp is a pipe of any shape in cross-section - metal, wood or plastic. Although, it is better to avoid contact of wooden parts with the cable.
- Electrical cable of the required diameter and length.
- Light bulb socket. The most common is E27, suitable for lamps with a standard base.
- Lamp. The best option would be to choose modern solutions - LED or energy-saving. Conventional incandescent lamps get very hot and consume a lot of electricity, which is not good.
Important! For the metal leg of the floor lamp, it is better to use a three-core cable.
You may also need materials to create a lampshade - paper, glass, textiles, depending on what design it will be.
Important! If you decide to transform an old floor lamp or make it from scratch yourself, you will probably like our other ideas with which you can refresh the interior and make it more interesting:
- DIY paintings from scrap materials.
- DIY false fireplace.
- DIY floor vases.
- DIY rugs made from old things.
- A selection of ideas on how to diversify the interior.
Base for floor lamp
The basis for a future product can be very different, but a mandatory condition must be met - its stability. The lamp must stand firmly on the surface, so the base must be heavy:
- Wooden base. A large round wooden block is a piece of log, the bars are fastened together in various ways. Alternatively, you can make the necessary shape from wood with your own hands. The finished product must be sanded. Then cover it with stain to contrast the wood texture or paint it in any desired color.
- Mineral base - concrete, cement, all kinds of building mixtures. Most often, the base for a floor lamp is made of plaster. To do this, you just need to dilute the gypsum mixture with water and pour it into the base mold, securing the floor lamp leg in it. To give the base a round shape, a springform baking pan is ideal. The hole in the leg must be closed. Paint the hardened part in the desired color or decorate it in any other way.
Important! For greater strength, you can add fiberglass, PVA glue and more water to the plaster to avoid cracks on the surface.
For the base, any massive solid material available, of the desired shape and with suitable holes is suitable.
Important! A floor lamp, as a rule, has one leg, but you can make a unique model with several support points, and then it will become a real highlight of the interior design, attracting the eye with its originality.
Shade
The lampshade is the brightest and most memorable part of the future lamp. It depends on how the floor lamp will shine and how it will fit into the room. Making a lampshade for a floor lamp is a huge field of ideas. The only limitation on the path of imagination will be the design style of your interior.
You will need a lampshade base. You can take a ready-made one from an old lamp. Or make a new one with your own hands from elastic wire, which will hold the given shape and the rest of the frame elements. The side elements are attached to the base so that the joints are as invisible as possible.
If you can't avoid this, don't be discouraged. All sorts of decorative options will come to your aid, which will cover up sloppy joints. Suitable for making side panels:
- Paper - plain, rice, corrugated and even wallpaper.
- Textile. Fabrics with high light transmittance.
- Tree. Wooden blocks are perfect for decorating in a rustic style.
- Glass elements, beads and other sparkles will add a mysterious shimmer.
Important! The outer surface is additionally decorated with ribbons, felt elements, beads and rhinestones, wooden parts, artificial flowers, and painting. It is necessary to avoid heavy, massive elements that will make the light dim.
You can make a lampshade for a floor lamp with your own hands from almost any available materials, even from those that, at first glance, are not intended for this purpose.
Product installation
When all the parts are ready, assembly begins. It is important to adhere to all safety rules when working with electrical appliances:
- The cable is threaded through the base and passes through the hollow leg.
- On the floor part of the base, it is better to make legs no less high than the thickness of the cable, and attach the cable parallel to the floor. As a result, this will have a good effect on the stability of the base of the floor lamp.
- We attach the lamp socket to the upper end of the cable, then the lampshade, and connect the lower end of the cable to the plug.
Important! All fastening points and connections of the electrical cable must be carefully insulated to avoid short circuits.
Let's create a lampshade
Making a lampshade for a floor lamp when the old one has become unusable will not be difficult. There are many options here, from the more classic to the trendy.
For example, you can use the decoupage technique and decorate the lampshade with beautiful openwork napkins or similar decorated elements.
Satin ribbons, all kinds of bows, chic gathered fabric, photographic film. There are actually a lot of ideas.
Fabric version
By the way, any fabric can be used. The main thing is to play with the idea beautifully.
Insulated dielectric screwdrivers up to 1000V - tips on how to choose the best manufacturerDielectric insulated tool for work - which one is better to choose? Review of manufacturers, photos + video
How to make an antenna for FM radio with your own hands - simple instructions for making a homemade antenna with photos and descriptions
You can create a collage from a wide variety of scraps, you can come up with small flowers or bows, or you can come up with a version with a piece of children's clothing.
Photos of beautiful DIY floor lamps
How to make and connect a thermostat yourself: principle of operation, instructions, diagram + photos of the best homemade thermostatsWhy do you need dielectric gloves - a detailed overview of the best options
How a temperature sensor for a heated floor works: instructions, diagram, types, general overview from the master + photo
Did you like the article? Share

1+