Shoes are part of a person’s overall image, and it is not surprising that people tend to buy a specific pair for each type of clothing. This is especially true for women who want to have perfectly matching shoes for every outfit. There are also men who consider it their duty to choose certain shoes to match a certain type of clothing. There are a lot of shoes in a family consisting of several people. And all these wardrobe items need to be stored somewhere.
How to make a shoe rack with your own hands
Many people store shoes in boxes and cabinets, which is very inconvenient. The ideal option is a special corridor shelf. Those sold in stores do not always meet expectations, and sometimes a person simply does not have the opportunity to buy a good, large-sized option. That’s why the question often arises: how to make a shoe rack with your own hands?
= What shelves can be made from:
| made of wood Example: DIY flower shelves 230 | from metal pipes Example: DIY pipe shelves | from PVC pipes |
| made of cardboard Example: Shelf rack made of cardboard boxes | from paper | from plasterboard |
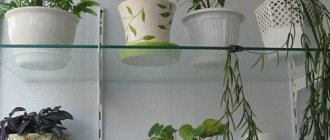
| from glass Example: Shelves in Art Nouveau style 180 do-it-yourself photos | from old boxes Example: DIY drawer shelves 120 photos | from pallets pallets |
| stainless steel | from glass | from old stairs |
| From bars | from bottles Example: Glass bottle shelves | from driftwood and branches Example: Bookshelf made of branches and driftwood |
| made of bricks Example: Bookshelves made of bricks and boards | from newspapers Example: Newspaper shelf | From cans Example: DIY kitchen shelves: 456 photos, drawings, instructions |
Making a shoe rack-bench
Step 1. From wooden boards in accordance with the diagram of the future shelf-bench, it is necessary to cut the shelf elements into appropriate sizes. In this case, you should get several parts - two supports, a seat and a crossbar for shoes, which will be attached under the seat between the two supports.
Future shelf elements are cut from boards
Step 2. Next, you need to make holes for the bolts from the edges of the seat. This is where the supports will be screwed.
Holes are made for the bolts
Step 3. Now you need to round the corners - this will make the shelf safer. You need to select some object that will allow you to draw a semicircle of the desired shape. Next, along the drawn line, you need to saw off the corners so that the corners of the seat are rounded.
A semicircle is drawn at the corner
Rounded corner
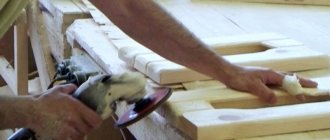
Step 4. All wooden parts of the shelf need to be sanded. The most convenient way to do this is with a grinding machine. The surface must be perfectly smooth.
Wood sanding
Prices for popular models of sanders
Sanders
Step 5. Next, all the parts of the shelf need to be assembled together using screws or dowels - whichever is more convenient.
Assembly of parts
You can use both self-tapping screws and dowels
Shoe rack assembly process
The shelf is assembled
Step 6. Now the shelf needs to be cleaned of dust and coated with protective varnish, then let it dry. That's it, the product is ready for use.
The shelf is coated with protective varnish
Video - How to make a banquette?
Materials
Plywood
The best option is to cut the existing plywood into small pieces of equal size, then thoroughly sand it and assemble it into a structure of the shape you need. U-shaped designs are usually preferred. As a result, we have a strong and attractive shelf that perfectly copes with its immediate function.
Tree
The traditional material for homemade shoe racks is good old wood. It will never let you down, is absolutely non-toxic and is perfect for processing. All you need is a plane, a hammer, a pencil, a grinder, as well as a tape measure and a saw.
Chipboard
Compared to untreated wood, it has greater visual appeal, but in terms of its main characteristics it is completely inferior to exclusively natural material. For production you will need a grinding machine. Irregularities and other imperfections of the workpiece are leveled out with sandpaper, and your shelf will acquire its final “marketable” appearance when you stick a special tape onto the sanded surface.
Metal
Metal is rarely used to make a shoe rack with your own hands, but similar options often appear on the Internet. As a rule, they are modifications of accessories that have already served their purpose.
Instructions for assembling the shelf
Assembly must be performed only on a flat and smooth surface.
It is necessary to put all the necessary dimensions and other features on the drawings in order to clearly see everything.
A clear example of a drawing for assembling a shoe stand, with all the necessary dimensions applied.
- Holes are drilled in certain places, following the instructions on the diagrams;
- A screed occurs;
- The marking of future fastenings begins from the lower rack;
- Along the edges it is necessary to measure exactly half the thickness of the material. You need to retreat fifty and two hundred and fifty millimeters from the back wall, respectively;
- Inside, the shelves must be supported on special shelf holders. It is imperative to drill holes. In order to make the deepening correctly, it is necessary to subtract the thickness of all partitions from the rack;
- Lids are usually placed on special metal corners.
An example of a design sketch for a shoe rack with size markings.
The boxes are assembled from calculated parts. In this simple way you can create a shelf with your own hands.
This shoe rack is not difficult to assemble with your own hands, and it will also help optimize the space in your closet.
DIY shoe racks: main advantages
Of course, there are many options for storing shoes, but nevertheless, classic shelves still remain relevant. This is because they have a number of advantages. First of all, this is the cost of such products. Of course, a designer design can have an impressive price tag. But don’t forget that you can make a shoe rack with your own hands. This is an excellent alternative when saving on a budget.
It should be noted that in interior design it is very important to select details that are similar in style. Only in this case will the room as a whole look harmonious. The same goes for the shoe rack. If you plan to do it yourself, then you will be able to take into account all the nuances, including the color scheme and even the shape of the structure. For example, lovers of the Provence style should pay attention to wood as the main material. In a room in a minimalist or high-tech style, designs made from modern materials will be much more appropriate.
If you wish, during the creation process you can use only environmentally friendly and safe materials. After all, you yourself will purchase them in a specialized store. In addition, the shelf can be made not only classic, wooden, but also metal or even cardboard. It all depends on your personal preferences and financial capabilities.The undoubted advantage of working independently is the opportunity to carefully think through all the details. For example, a shoe rack will be open or closed. You can also make fewer or more additional compartments. All this is very important, especially if the hallway is not too large.
DIY shoe shelves: the best ideas
Thanks to the wide variety of ideas, everyone will be able to choose the most suitable option for themselves. In addition, it is not at all necessary to repeat it completely. Add your own details and experiment with decor.Custom ideas for creating shoe shelves
Human fantasy is unbridled. She is really cunning with her inventions. And really, why pay for something you can do yourself, and even in an exclusive form?
An excellent shoe rack will be made from ordinary wooden boxes used as containers for vegetables. All that will be needed to organize it is to sand the wood and paint the boxes in different colors. Now you can put them on the wall in any order. Display your shoes and enjoy the order.
Bright shoe rack made of wooden boxes
By the way, this is an excellent option for those who keep animals in the house that don’t mind chewing slippers or dragging boots into a secluded corner. It will be very difficult for them to get the treasured pair from such a shoe rack in the hallway, because you can adjust the height of the blocks.
Plastic boxes will cope with this mission no worse, but they may turn out to be less durable in use.
You can get a chic shoe rack from an old sliding ladder. Add several rungs on the other side, placing them symmetrically to the steps. Paint the structure in a suitable color and place shelves cut out of wood on the resulting supports. You will receive a full-fledged shoe rack of custom design.
Shoe rack from an old ladder
Homemade picket shelves for the hallway will interest young people. The slim and practical design doesn't take up much space, so it can help organize space even in a cramped dorm room.
Shoe picket shelf
Pointed picket fences are attached to the transverse rail, mounted on spacer legs. They can be of any height. They need to be fixed not too tightly, so that the shoes hung on them can be placed freely, without overlapping each other.
Homemade shelves for the hallway
When deciding how to make a shoe rack, the master should evaluate his skills, select the necessary materials and prepare the tools:
- for woodworking you will need a hand or electric saw;
- when using metal or plastic tubes, a hacksaw will be useful;
- cardboard and plastic can be cut with a knife;
- fastening materials for a small product - screws for wood or metal;
- drill with drills and bits for self-tapping screws;
- to connect cardboard parts or decorate, you will need glue;
- You can finish the finished shoe rack with self-adhesive film, remnants of wallpaper, paint or varnish.
If the product is intended for outdoor use, it is advisable to protect the metal from corrosion and the wood from rotting. For this purpose, impregnation and enamels for exterior use are used.
Cardboard version
A budget and simple shelf will be made from a large cardboard box. To make it you need thick corrugated cardboard. Having measured the space for the shelf in the hallway, you need to determine the required width and length of the cardboard container. To ensure neat edges and greater strength of the product, the valves of the bottom and lid should not be cut off. It is better to bend them inside the box and glue them to the walls.
For tiered shelves, you need to cut rectangular parts from another box. Their width is equal to the depth of the body, and their length is equal to its length with 2 allowances. The dimensions of the latter must be determined individually: they must correspond to the distance between the tiers. Bend the allowances upward and glue the shelves inside the body. Treat the product with decorative self-adhesive film to protect it from moisture.
You can also make a shoe rack made of cardboard on the wall with your own hands, taking up minimal space behind the door leaf. To make it, you need to select several large boxes from which you can cut rectangles measuring 60x70 cm. Cutting and assembly is done as follows:
- Set aside 20 cm from the edges of the long sides. Draw lines that will divide the workpiece into 3 parts.
- Set aside 25 cm from the top of the workpiece along the short sides and connect the points with a straight line. The workpiece will form a T-shaped figure that needs to be cut out.
- Along the top of the cardboard letter T, set aside 11 cm from the edges and mark these points.
- Connect each mark to the corner formed by connecting the crossbar of the T to its leg. You should get 2 slanted lines.
- Pressing the cardboard with a ruler, bend the workpiece along all existing lines, bending the parts upward. It’s easy to roll cardboard into a fragment of a future shelf. In this case, the triangles on the edges of the crossbar need to be placed on the wrong side of the leg of the letter T.
- Using silicate or any universal glue, secure the triangles. If you do everything correctly, you will get a convenient pocket with a protruding upper part. Make as many such pockets as necessary to create a shelf.
- Decorate the details to your taste: cover with film or wallpaper, paint, add the necessary details. Connect the fragments, bringing the parts protruding above the pocket to the wrong side above the tier. Use glue for fastening.
Make holes on the topmost pocket for hanging and place the shelf on the wall.
If you cut out many identical parts representing the type of shelving of the required dimensions from the facade, and then glue them all together, you will get a product in the spirit of European fashion designers. Between identical slats you can install spacers made of small pieces of cardboard. Then the shoe rack will turn out to be openwork.
Pipe construction
Metal tubing can be used in a variety of ways. Shiny chrome parts will help create an interior accessory in a high-tech or minimalist style. These parts are used to assemble the basis of the structure - the frame struts. They can be connected by tubes of smaller diameter or chrome-plated utility shelves-grids. For connections, use self-tapping screws and bolts with nuts.
For a fashionable loft or techno, do-it-yourself shoe shelves are assembled from pipes in the form of a pipeline. The craftsman needs skills in working with metal and taps for cutting threads. Pipes can be connected using plumbing fittings of various shapes.
Craftsmen assemble bent and forged products from profile pipes. But such work can only be done with cold forging equipment. Parts of the structure are welded or connected with threaded fasteners. Elegant forged shoe racks made from pipes are appropriate even in classic interiors.
Plastic construction
When the sewer system in an apartment is replaced, scraps of new large-diameter PVC pipes are used to make various organizers. A shoe rack in the hallway, made in this style, will take up minimal space. It can be placed on the floor or hung on the wall. The length of 1 fragment should not exceed the shoe size of the apartment owners. You can determine this parameter individually or cut the PVC pipe into pieces 27-30 cm long.
Film, wallpaper, and paint are used for decoration. You can connect the parts of the structure with bolts or short self-tapping screws, or use superglue for PVC. The segments are placed on top of each other or form a honeycomb structure of any shape. When the assembly is completed, it is advisable to fix the shelf by attaching the upper part to the wall.
A small hallway space can be easily used rationally by attaching the lower parts of large-diameter plastic bottles directly to the door, the wall behind it, or the wall of the furniture. With this method, you can occupy a small partition near the door, placing the bottom parts of the bottles one above the other to any convenient height. The easiest way to fasten is with self-tapping screws, screwing them into the bottom of each part.
It is easy to build a rack-type structure from scraps of plastic pipe and panels (wall, window slopes, etc.) by attaching straight shelves from the panels to racks from pipe sections. The design is also suitable for outdoor use, as it is not subject to corrosion and rotting. A more complicated version will require connecting vertical and horizontal pipes using fittings. By using scraps of transparent polycarbonate, you can give the shelf some airiness. Plastic parts are easy to connect with self-tapping screws.
Metal shoe rack
From the remnants of the metal profile for installing drywall, you can also assemble convenient shelves for shoes in the hallway with your own hands. The design will be strong enough to serve as a seat, under which you can place several tiers for storing slippers and boots.
It is required to make 4 parts of vertical posts of the same length. To connect them, you will need 2 short and 2 long crossbars for each tier. A variant of a simple design is a product made from racks that are connected by ready-made lattice shelves or parts from old household appliances (refrigerator, oven, etc.).
Using soft welding wire (up to 1 cm thick) for work, it is easy to imitate a forged product by connecting bent parts by welding or clamps made of thinner wire. It is easy to bend pieces of welding wire without special equipment, using only a vice and pliers.
To shape the end parts of the parts, the wire must be heated in the flame of a gas burner and processed with a hammer. The design of the shoe rack is chosen at your own discretion, but its basic principle is a rack of twisted decorative vertical posts and horizontal crossbars connecting them.
A metal shelf can also be built from empty tin containers (coffee cans, paint, etc.). The parts are attached directly to the wall, as indicated for the shelf made of plastic bottles. Using cans of different sizes, you can create not just a shoe shelf, but also a decorative panel that has additional functions of a shoe rack. To make it mobile, you need to attach the tins to a plywood base.
Wooden shoe design
Making a shoe rack out of wood with your own hands is not too difficult. The simplest design is based on the principle of a rack: 4 racks made of bars, connected by boards or the same bars. Beautiful shelves are obtained by combining wood and transparent plastic (for shelves) or lattice metal parts.
If you have a jigsaw and a lathe, the craftsman is able to create beautiful shelves for shoes made of wood with decorative posts or carved sides. For minimalist interiors, it is enough to cut 2 identical boards without decoration for the side parts and several tiers connecting them. For the door, you can use a panel made of chipboard or MDF or a rectangle of plywood. To open such a door, small furniture hinges are used, installed on its lower edge.
An interesting solution for plywood shoes
It is easy to assemble a carousel shoe rack from thick plywood (1.5-2 cm). Its basis is a drum with compartments for shoes. It is made from 2 identical circles with a hole in the center. The diameter of the round parts is 60 cm. For separate nests where you can put boots, cut out several rectangular parts of the required height. If desired, you can make several of these drums and install them in one housing.
The body consists of 2 sides, a bottom and a lid. Horizontal parts need to be cut so that they extend slightly beyond the vertical sides.
To assemble a shelf with your own hands, you need self-tapping screws and 1 metal stud with threads and nuts. Assemble the shelf like this:
- Strengthen the drum partitions around the central hole, along the radii of the circle. Fastening with self-tapping screws. Install the second circle, securing it with self-tapping screws.
- Drill holes for the pin in the center of the lid and bottom. Assemble the body using self-tapping screws, placing the sides between the bottom and lid parts. The distance between the sidewalls is 1-2 cm greater than the diameter of the drum. Attach legs 2-2.5 cm high to the bottom part. They can even be made from plastic bottle caps.
- Pass the pin through the holes in the cover, drum and bottom. If there are several drums, they should be separated with washers. Screw nuts onto the ends of the studs.
The dimensions of this shoe rack are at least 65x65 cm, so it is only suitable for a spacious hallway.
Corner shoe rack
In the partition behind the door you can place racks for shoes: you make them yourself from waste scraps. To make the simplest model, screw supports made of bars or metal profiles onto adjacent walls. On them you can mount triangles or squares made of boards, plastic, lattice parts, etc. planes on which it is easy to place 1-2 pairs of shoes. The height of the structure is dictated only by the convenience of the apartment owner.
To make a movable corner shelf for shoes, cut out rectangular sides and triangular parts for the lid and bottom from plywood or chipboard. They should be slightly larger than the corner formed by the sidewalls. If internal tiers are needed, the dimensions of the legs of the parts must correspond to the internal length of each sidewall.
Assembly begins with the sides and connects them with self-tapping screws and a furniture corner. The bottom and lid are attached in the same way: with self-tapping screws through holes in the plane of the parts. The fasteners must be driven into the edge of the sidewalls and screwed in flush. For shelves, you can install supports from thin planks or fasten the parts to the corners.
Shoe rack made of pallets
Pallets made from boards are a good material for making various furniture. A shoe rack can be made in 2 simplest versions:
- Paint and decorate a pallet with wide gaps between the slats. Install it vertically so that the planks are horizontal. It is convenient to insert shoes into the gaps without additional alteration.
- Saw the pallet along the planks into pieces of the required width, install them on top of each other and secure with self-tapping screws.
A variant of such a shelf is tiers of different widths.
https://www.youtube.com/watch?v=WAOenOTeoKo