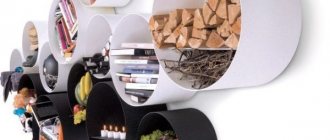
People's lives are closely connected with the world around them. Trying to bring nature as close as possible to themselves, they bring a piece of it into their houses and apartments, fill the interiors with various plants and flowers, growing them in pots. For many, growing home plantings turns into a hobby, and the flower stock increases so much that there is no longer enough space on the windowsill or table to place the next green favorite. At this moment we have to seriously think about organizing new areas. To solve the problem, flower shelves are often used. Finished products can be bought in specialized stores, or made with your own hands.
Arrangement of flower shelves
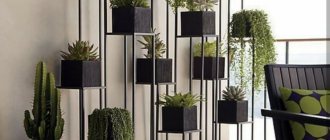
Brackets allow you to adjust the height between shelves
A shelf for flowers on a windowsill is a plastic, wooden or steel structure installed in a window opening. The device helps to compactly install flowers in order to obtain the necessary light and warmth from the sun. Shelves for flowers on the windowsill are arranged:
- strong connection of carefully planed boards (chipboards, fiberboard);
- rectangular details reminiscent of a staircase;
- forging of a vertical axis equipped with fastenings;
- plastic corner fragments (often used in bathrooms).
Flower shelves on the windowsill, similar to a flight of stairs, located on both sides of the window, directed inward, look attractive.
Wooden flower shelves
Wood is one of the most reliable materials used in construction.
Properly assembled and secured wooden racks or shelves can accommodate any number of plants, regardless of size. When choosing wooden wall shelves, you can limit yourself to the simplest option. To do this, take a beam of the required length, coat it with varnish or paint and attach it to the wall using metal corners.
If you replace the fastenings with leather straps, you get a creative design approach that brings individuality.
- Wooden floor racks are made for plants in large flowerpots. They can withstand a lot of weight, allowing you to combine different types of colors.
- A corner shelf can be easily assembled from scraps, even if they are of unequal length. Flowering bushes diversify the boring life of corners with their bright colors.
- For those who like unusual options, we offer wooden shelves that combine several different materials.
- The method of assembling wooden shelves or racks is the same as in the version with plywood.
Advantages and disadvantages
Openwork flower shelf for windowsill
Shelves for flowers on the windowsill are distinguished by a number of priorities:
- the useful part on the windowsill is freed;
- have a unique colorful design;
- bronze appliances will last a long period;
- steel and plastic are easy to clean;
- plastic and metal stands for pots are not exposed to moisture.
Corner shelf with brackets for plants
Cons of shelves:
- racks made of steel can be rocked;
- the wood deteriorates by absorbing incoming moisture.
Shelves for plants and seedlings with height adjustment and plant lighting
When looking at a product, carefully weigh the pros and cons of all your preferred options.
Plywood shelf for small flower pots
Corner shelves for flowers
To create a corner shelf, you can use all the materials listed here. For small products there will be enough leftover materials.
The technology for creating corner shelves with your own hands is very simple.
- A surface of the required size is cut from a sheet of chipboard. A galvanized pipe is threaded into the prepared holes and the entire invention is connected to each other with flanges. Using brackets it is fixed to the selected surface.
- The next stage is treatment with varnish or paint.
- To create a green corner, an interesting solution would be a kind of corner shelving. As they grow, the shelves become smaller, representing a pyramid. On this design you can arrange flowers of different sizes using climbing plants on the sides.
How to make the right choice?
Stand-rack for flowers on a windowsill made of laminated chipboard
Professionals make shelves and bookcases using modern means at hand. The design must be chosen carefully.
DIY flower rack made of wood
Advice from experienced designers
- Focus on the existing decoration of the living room where the winter garden is located.
- When looking at the design, compare the size of the plants with the weight of the pot.
- Heavy pots need a reliable, stable system that can support significant weight. Small, light vessels will be suitable for products made from any selected material.
Beautiful airy glass shelves are suitable only for small plants with light pots - Take into account the ingress of irrigation water, choose moisture-resistant products.
- If you want to draw attention to an unusual element, emphasizing an interesting design technique, purchase or create extraordinary high-quality shelves.
Original shelf in the form of a ladder for flowers - Forged openwork stands favorably emphasize the classic style of the living space, attracting with their unusualness. Flora lovers will admire the extraordinary stands that complement the elegance of the apartment.
The spacer stand decorates the window opening with an amazing composition of flowering plants
Each system is easy to use and has an original design, so choose the one you like.
Forged flower stand in Provence style
Floor models
We offer to study the manufacture of multi-level floor flower shelves from different materials.
From furniture panels and bars
Scraps of glued furniture panels can be found in furniture workshops and bought for pennies. After all, shelves require very small pieces that are difficult to find other uses for. But you can also buy a sheet of the appropriate size. This material is practically no different in appearance and characteristics from solid wood, it is just as easy to process and also requires a protective finish to increase resistance to moisture. The proximity to which is inevitable when placing living plants on shelves.
Step 1. Decide on the number and shape of the shelves, draw their outlines with a pencil on the furniture panel.
Marking
Step 2. From the wrong side we cover the outline with adhesive tape or adhesive tape to prevent chips from breaking off during cutting.
Step 3. Cut out the parts with a jigsaw.
Sawing shelves
Step 4. We secure the workpieces on the table with clamps and process their edges with a milling machine, rounding them or giving them a shaped shape.
Drilling holes for racks
The holes must be in the shelves and stand
Step 5. Remove all irregularities and minor defects by sanding. To avoid abrasive scratches on the surface, sanding should be done along the grain of the wood fibers.
Surface treatment
Step 6. We also process the bars for the legs with a milling cutter, rounding the corners, and grind them until a smooth surface is obtained without scoring or burrs. If there is a desire and opportunity, they can be given a curly shape. If not, normal processing is sufficient. Also, instead of bars, you can use ready-made balusters for stairs and railings.
Milling
Step 7. Turn the bottom shelf over, evenly space the legs on it and trace each one at the base with a pencil. Then in the center of the drawn square we drill a hole with a thin drill so that we can see where to screw in the self-tapping screw from the front side.
Making legs
Step 8. Coat the ends of the legs with glue, set them in place according to the marks and fasten them with self-tapping screws using a screwdriver or screwdriver.
Installing the feet
Step 9. Determine the position and height of the second shelf. It moves relative to the bottom to the side, so you will need two legs of different lengths: one to the floor and the second to the plane of the bottom shelf. We calculate these dimensions, saw off the bars of the required length and fasten them according to the already known pattern.
Assembling shelves
Step 10. We attach the third tier, one of the legs of which rests on the bottom shelf, and the other on the second.
Assembly is carried out using self-tapping screws
Step 11. We cover the finished structure with paint or varnish or impregnate it with a protective impregnation in two or three layers.
The finished product can be tinted with stain or varnished
Three-tier flower shelf
Prices for different types of stains
Stains
Video - Multi-level shelf flower rack
Made from laminated chipboard and chrome tubes
Externally and in design, these models are similar to the previous one, but the use of other materials makes adjustments to the manufacturing process. Although many stages are similar.
Shelves made of wood and metal
In addition to laminated particle boards, which may well be second-hand (a disassembled old cabinet or shelving unit), it is necessary to purchase an edge for processing the ends. It comes in different types - adhesive-based, flexible plastic T-shaped and U-shaped edges.
Furniture edging: types
And to attach shelves to pipe supports, you will need flanges of the appropriate diameter.
Furniture flange
Advice. Since laminated chipboard is a rather heavy material, it is better to place a structure with many shelves on furniture wheels so that it can be conveniently moved when cleaning or moving plants to another place.
Low profile furniture wheels d30 mm
Step 1. Cut out the required number of shelves from laminated chipboard. The bottom one will serve as the base, so it needs to be made quite large.
Step 2. Sand the cut ends and finish them with an edge: glue with an iron in the case of PVC tape or hammer with light blows of a rubber mallet in the case of a U-shaped edge. With the T-shaped one, the situation is more complicated: under it, at the ends of the workpieces, you need to cut a groove for the middle edge profile. This is done using a milling machine.
Prices for laminated chipboard
Laminated chipboard
Video - How to fill a T-shaped edging. Homemade flower stand
Step 3. In accordance with the design diagram, we make holes in each part using a milling cutter or Forstner drill of a suitable diameter. Moreover, at the top and bottom they should not be through, but approximately half the thickness of the material.
Note. When making through holes, you need to drill from both sides to maintain the integrity of the laminated coating. To do this, start drilling from one side and, when the tip of the drill passes through the entire thickness of the chipboard, the part is turned over, the drill is inserted into the resulting central hole and work continues.
Video - Shelves. Manufacturing
Step 4. Insert the pipes into the hole in the bottom shelf and secure them with flanges.
Step 5. We string the next shelves onto pipes according to the diagram, installing flanges on both sides - both bottom and top. We tighten them well with screws and tighten them.
Step 6. Before installing the top shelf, we first make markings on its reverse side and screw the flanges, and then we place them on the ends of the pipes and tighten them.
Step 7. Screw the legs or furniture wheels to the base of the stand.
Video - Assembling a shelf for flowers
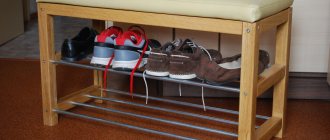
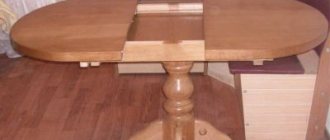
Wooden stand with drawer shelves
To make such a stand, you need planks and bars, as well as ordinary self-tapping screws for fastening the parts. A miter saw with a cutting angle setting feature will be very helpful in your work. But you can get by with a hacksaw and a miter box.
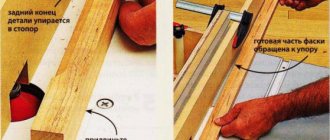
Step 1. Cut the planed edged boards for the bottom and sides of the drawers to size. To make beveled edges, turn the saw 45 degrees.
It is necessary to cut boards for the sides and bottom
The first blank can be used as a template
The sides of the top drawer are beveled, the boards (2 pieces) are cut at an angle of 45 degrees
Trimming a corner that protrudes beyond the bottom of the shelf
Trying on parts
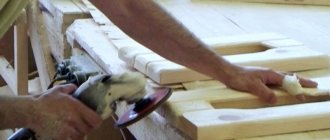
Step 2. Sand all the parts, focusing on the corners and cuts.
Sanding
Step 3. We knock down the boxes with small nails or twist them with self-tapping screws.
Simple rectangular bottom drawer
We assemble from the bars two symmetrical A-shaped stands with two crossbars on which the boxes will rest. And we process them with sandpaper.
Assembling drawer stands
A-frame stands
Step 4. Assembling the structure.
Assembly of the structure
Step 5. We cover it in several layers with antiseptic stain, allowing each layer to dry and sanding the surfaces to remove raised lint. If desired, we further decorate the product.
Flower shelf after painting and decorating
Wall shelf
A small hanging shelf can be made from any sheet material or wide board. Let's consider manufacturing from laminated chipboard, as the most difficult material to process.
The structure will consist of the following parts:
- a base that will be adjacent to the wall;
- the actual shelves, the number of which can be any;
- supports for shelves in the form of right triangles with a straight or figured hypotenuse.
First, as with any other model, a product diagram is drawn up to determine the dimensions and amount of material.
You can schematically draw the shelf yourself according to your taste
Then all the elements are cut out from the laminated chipboard using a jigsaw. Markings are made on the base for attaching shelves and supports to it. Holes for self-tapping screws are drilled along the marking lines. The parts are first glued to the base with universal glue, and then screwed into the ends on the back side of the base.
The elements are connected with self-tapping screws and wood glue
Shelf assembly
After the glue has set, the ends of the chipboard and the joints are puttied with wood putty. This is an excellent alternative to edges that are difficult to apply to curved cuts, especially if they are not made very carefully. All unevenness can be easily eliminated with putty.
Sanding and puttying the shelf
When the putty has dried, all surfaces are sanded with fine sandpaper or sanding mesh and painted in the chosen color.
Shelf after finishing
View from above
This is how, without much effort and professional skills in making furniture, you can literally make a useful and beautiful thing for your home in just a few hours. Having made it exactly what is needed in terms of functionality and decorative design.
Master Class. Plastic flower stand
It is impossible to list all the ideas that craftsmen have when making various crafts from driftwood. We will focus only on a few fairly simple but effective decorative products. Read on our website - crafts from driftwood: furniture and decor with your own hands.
Which material is better to choose
There are several types of raw materials for constructing shelves:
- metal;
- plastic;
- tree;
- glass;
- combined material.
Metal structures are very durable and can withstand a lot of weight. This configuration looks expensive and solid. But it requires special care and special treatment, otherwise corrosion may occur and the flower shelves will deteriorate.
It is almost impossible to build a plastic cabinet yourself.
It can be ordered in stores or online. They are unpretentious and very easy to use. Sections can be chosen in any shade. Since plastic is very flexible, crafts made from it can have different shapes and sizes. They are easy to wash and move as they are lightweight.
Wooden crafts are very popular. But the furniture is not convenient to use. When watering plants, water often gets on the surface of the stand or board, which can rot and swell.
If you decide to build a shelf out of wood, it must be carefully processed and the surface well coated with a special varnish.
Glass structures have a simple, elegant appearance, but to build it you need to have experience working with glass. They need special care. And you can’t put a lot of weight on such stands. They are good if you need to place one or two pots.
Combination sections include several components. Usually it is wood with metal or glass with metal. The crafts have an unusual appearance. They can withstand a lot of weight due to the combination of materials, and are not very fussy about cleaning.
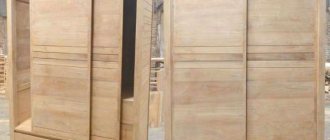
Necessary materials
To make a classic shelf you will need:
- board made of wood, chipboard, MDF, plastic or metal;
- plywood;
- screws;
- plugs;
- additional tools;
- paint for decoration;
- varnish (when working with boards).
Additional tools can also be used to decorate the structure. If the furniture is floor-standing, you may need legs or wheels to secure the cabinet to the floor.
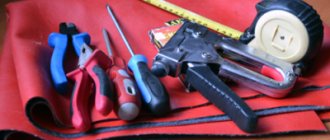
Required Tools
To assemble the configuration you will need the following tools:
- screwdriver;
- building level;
- electric drill;
- saw;
- pencil for marking;
- hammer;
- screwdriver;
- roulette;
- ruler.
The choice of fasteners will depend on the raw materials of the future configuration. The heavier the raw material, the more powerful the fastening is needed. If you plan to install a wall-mounted flower rack made of metal, then you must use a welding machine for fastening.
Otherwise, there is a chance that the stand will fall soon.
The final stage is decoration
When creating a rack, you can come up with your own product design. By choosing the right materials and spending a little time, you will get a unique masterpiece!
- For example, a plastic product comes in different palettes. To make the design original, you can attach decorative handrails to it.
- The wooden shelf is coated with glitter varnish. This gives shine and shine to the product.
- Glass shelves are often decorated with patterned metal elements.
In addition, for a craft to become beautiful, it is not necessary to paint it or attach anything to it. It’s enough just to place pots and beautiful pebbles, toys, and shells on it. Furniture can also be decorated with various fakes and toys.
Don't be afraid to experiment! Create new masterpieces and improve your skills! A rack for indoor flowers is just the beginning. Nothing decorates your home like handmade items.