Let’s say right away that you rarely see a plywood cabinet on sale; in most cases, such furniture is made to order or independently. The fact is that the cost of plywood is significantly higher than laminated chipboard - a traditional furniture material. As for the performance characteristics, there is no noticeable difference, but it is easy to make furniture of any configuration from plywood.
Plywood cabinet
DIY glass decor at home
In many homes you can find a cabinet with glass doors.
It is considered an excellent item for implementing design at home, since glass is a decorative element that can be easily processed. Today there are two popular ways of finishing it:
- liquid glass painting technique;
- decor without the use of paints.
In addition, craftsmen often use a combination of glass with metal, polymer clay, plasticine and other materials. In order to make the glass look unusual, you will need to prepare sea salt, unground coffee beans, glue, and acrylic paints. Coffee beans, as a rule, are glued either in a specific order or randomly. It is preferable to apply the composition to the bottom and top of the glass.
Cabinet doors will also look stylish if you decorate them with sea salt. To do this, coat the outer part of the glass with glue, and then apply salt and wait until it dries completely.
Glass is decorated in no less original ways using plasticine. Before you start designing, you will need to draw design templates and select its color. Then a picture is formed from different shades of plasticine. Such decoration will fit well into the interior of children's rooms; it will help to unusually complement the marine theme, where sea salt turns into drops of water, plasticine into fish and algae, and shells serve as the seabed.
As for the broken glass finish, it is considered a real masterpiece and will decorate the doors of any cabinet. Broken pieces of material are glued using special glue.
Before applying the patterns, you will need to prepare glue, broken glass and acrylic paints, and the order of applying the decorative elements is thought out in advance. First of all, cover the working surface with a thin layer of glue, fix the decorative pieces and wait until it dries completely. Then the resulting ornament can be painted with acrylic paints and varnished.
Painting polished furniture
Interior items made from natural wood and coated with a polished layer can be given an unusual look using cabinet paint. An old product, refined in a modern design, will become the central element of the room and give the room a special charm.
How to paint a cabinet or decorate a wardrobe:
- For work use acrylic paint with a matte effect.
- To degrease the base, use acetone or white spirit.
- To apply paint you need brushes, and for decoration you need new pens.
- Old fittings are removed from the cabinet, shelves and drawers are taken out.
- All surfaces are treated with a sanding machine.
- Coarse and fine-grained sandpaper is selected for the tool.
- If there are large chips on the surface, they need to be puttied.
- Treat the furniture with white spirit or acetone and dry it.
- How to paint a cabinet - Apply a thin base coat of paint.
- After drying, rub over with fine-grained paper.
- Remove dust with a dry cloth, apply the next layer and dry.
- Rub again and apply another layer until the desired effect is achieved.
Using this method, you can transform an old polished cabinet into original vintage furniture that will decorate a classic interior. The fittings are screwed into their original places.
For exclusive work, you can use not full painting, but dot painting - a pattern is applied to the furniture facades with a marker and the design is drawn with acrylic paint.
Preparation
Before developing a cabinet design, you need to clearly determine what items it is intended for and how many things will be stored. The dimensions of the room are also taken into account.
Kinds
The main purpose of a wardrobe in the hallway is to store shoes and clothes, hats and even household appliances. There are the following types of wardrobes:
- free-standing . Roomy and massive, fully equipped: there are walls, ceilings, floors, doors. The design is easy to disassemble and transport;
- corner . Suitable for small rectangular and square rooms. The back wall can be designed for various shelves;
- built- in They have internal partitions, side doors and walls, and shelves. There are no back walls or ceilings.
For one person or a small family, a one-door wardrobe is enough. The number of sections is two. The internal content should include shelves for shoes or shoe boxes, drawers for hats and small wardrobe items, stands for hats and umbrellas. You need hanger bars and hooks for everyday clothes, and a mirror is a must.
When creating a diagram you need to consider :
- the width of the shelves is about 80-90 cm. If the room is very small, you can make narrow shelves from 40 cm;
- the crossbar for hangers must be placed across the cabinet;
- the height of the wardrobe for upper clothing is at least 140 cm;
- There should be decorative shelves for small items.
In large hallways there are two-door or three-door wardrobes.
They are convenient for storing not only seasonal shoes, hats and accessories, but also bed linen, towels, and magazines. The width of the shelves is variable - from 40 cm or more. The height between them is from 250 to 350 mm. Important! The greater the depth of the shelves, the greater the distance between them and vice versa.
Scheme and drawing
When drawing up a diagram, you need to take measurements of the parts and draw everything on paper.
Reference . There are no specific rules for drawing up diagrams. It is advisable to make a cabinet design using ready-made drawings that are easy to find on the Internet. Or you can draw a sketch of the future product yourself, carefully thinking through all the details.
The material will be cut according to the drawings.
Sequence of circuit development:
- Determine the dimensions of the cabinet, taking into account the location. The standard length of material for walls is usually 277 cm (based on the size of the apartment’s ceiling).
- Sketch the general appearance of the product.
- Divide the interior space into vertical and horizontal sections.
- Decide in which compartments to install drawers.
- Determine the dimensions of the doors of the sections that will be closed (if any), the location of the mezzanines.
It is necessary to mark the ends for gluing furniture edge tape and select fittings. Put all dimensions on the drawing. To make the task easier, you can use a free computer design program - for example, SweetHome 3D.
According to the selected dimensions, you need to prepare 6 important parts of the case:
- top and bottom bars;
- back walls (2 pieces);
- side walls (not required if we are talking about a built-in wardrobe).
Apartment walls and floor can be used as side panels, back wall, bottom and lid of the cabinet . This will help save on materials.
Important ! If the walls are made of plasterboard, this solution is not acceptable.
What to make it out of so that it is cheap and beautiful?
The construction market offers a wide range of materials with which it is possible to implement any design solution. It is not necessary to make a cabinet from solid wood. It is expensive and difficult to process. It is better to buy practical, inexpensive materials that are easy to work with.
Laminated chipboard panels are the best option for making a piece of furniture with your own hands.
Advantages of chipboard:
- affordable price;
- strength and reliability;
- environmental friendliness;
- ease of processing.
Wood boards are lightweight, so they do not require fittings or reinforced fasteners.
A wide selection of textures will allow you to realize any design ideas. Plywood sheets are durable, lightweight and have stable shape. The material is several times cheaper than wood.
MDF panels are an analogue of chipboard, and are inferior to them in fiber pattern and quality. Such furniture is less expensive. MDF with imitation of valuable wood species is available for sale.
Advantages:
- easy processing;
- fire resistance;
- moisture resistance (the material does not swell);
- ample opportunities for creating furniture.
Fiberboards have excellent performance characteristics. For the manufacture of load-bearing cabinet structures, medium or high density fiberboard is suitable.
The facade of the sliding wardrobe can be made of wood, glass or sheets of chipboard, MDF. Laminated panels with a mirror or regular surface, with tinted auto film, are suitable.
When choosing a material, take into account financial capabilities. If your budget allows, you can make a cabinet from natural wood. The most durable is mahogany . Alternative options are beech, Karelian birch.
You need to purchase the necessary accessories:
- end hangers;
- euroscrews with plugs;
- handles for doors and drawers;
- guides for drawers.
The quantity and type will depend on the number of sections and drawers in the closet.
Important . The fittings must be of high quality so that the doors do not jam.
Tools
Before carrying out work, it is advisable to prepare in advance all the necessary tools and equipment. Namely:
- tape measure or ruler;
- pencil or marker;
- glue;
- edge tape;
- ratchet wrench;
- screwdriver or drill;
- pliers.
If you plan to cut cabinet blanks at home, you will need an electric jigsaw.
Repair and decor
All work on the restoration of an old Soviet cabinet can be divided into two stages - repair and decoration. The first is common to cabinets of any type, while the process of giving furniture a unique design directly depends on the tastes and skills of its owner.
Tool
In order to carry out repair work, you will need the following types of tools and materials:
- emery cloth;
- hammer and furniture nails;
- primer and putty for wooden surfaces;
- brush and spatula;
- screwdriver and a set of fasteners;
- various types of fittings;
- glue and pencil.
After preparing all the necessary materials and tools, you can proceed directly to the procedure for restoring the old cabinet.
The procedure for carrying out repair work
- First, you need to free the interior space of the cabinet from foreign objects and place it in the central part of the room, which will allow you to have access to the interior item from all sides.
- The next stage of restoration work on a varnished cabinet is to check the strength of the connection of its elements. To do this, you should carefully inspect the furniture and, if necessary, replace old screws with new ones.
After completing this procedure, you should thoroughly wipe the surface of the cabinet with a damp cloth. Then you need to treat it with a primer, and after drying you can begin to eliminate cracks and scratches.
Large indentations can be masked with putty, while small scratches can be easily removed by applying clear furniture wax.
Having carried out such procedures, you can apply a paint coating to the surface of the furniture (with further polishing) or decorate the cabinet using other available means, which we will discuss below.
Also in our photo catalog you can see some other options for decorating an old cabinet that do not require much effort on the part of the owner of such a piece of furniture.
Decoupage cabinet
The decoupling procedure will allow you to turn an old wardrobe into an original piece of furniture that will look great in a bedroom or children's room.
In order to decoupage such furniture, you will need:
- a pair of paint brushes;
- varnish (colorless);
- napkins with a pre-selected pattern;
- warm water;
- glue;
- paints (acrylic).
After everything you need has been prepared, you can proceed directly to the decoupling procedure itself.
First, using masking tape, you should cover those elements that will not be subject to restoration.
Then you need to shake the pre-prepared paint and apply it to the primed surface of the piece of furniture.
After the paint coating has dried, cut out a design from napkins, apply it to the painted surface and trace it with a simple pencil.
Having finished marking the surface, lower the design cut out of napkins into warm water and leave it there for thirty seconds, then remove it and place it on cellophane.
While the napkins are drying a little, apply PVA glue to the gluing area and place the designs one by one on the prepared surface.
The final stage of restoration and decoration of the old cabinet will be the application of colorless varnish, which will protect the decoupage areas from possible mechanical damage.
Craquelure
Another common way of decorating a renovated cabinet is single-phase craquelure, the essence of which is to give the furniture an artificially aged look by applying a special varnish. First, the surface to be decorated is covered with a layer of acrylic, which will appear through the cracks of the craquelure, giving the furniture the desired effect.
After the base layer has dried, a craquelure varnish is applied, over which a transparent varnish is applied.
As you can see, restoring an old cabinet is not such a complicated procedure, which will give your furniture a unique design and significantly extend its life.
Simple tips for quick furniture restoration
It is not necessary to spend a lot of time and money to give old furniture a new attractive look. So, there are quick and simple methods for updating interior items:
- Cover with clear or white varnish. Light wood can simply be sanded and then coated with a new layer of furniture varnish. For dark wood, you can use the “dry brush” technique - the surface is also sanded, and then white varnish or paint is applied on top, as a result of which the dark base appears through the finish coat.
- Just paint it. If the purpose of restoration is to change the appearance of the furniture, it is enough to repaint it. To do this, you need to remove dirt from all surfaces, sand with medium-hard sandpaper, and then apply a wood primer and paint one or two layers. If the furniture is not damaged, the result will be excellent.
- Draw an ornament. Scratches, chips and roughness on some furniture can be disguised by painting it with various ornaments. You can depict both abstract patterns and full-fledged scenes - it depends on your artistic skills. If you don’t know how to draw at all, it’s easy to find various stencils on the Internet and simply transfer them to furniture. The drawings are made with acrylic paints and secured with colorless varnish.
- Decorate with decoupage. The decoupage technique involves transferring various patterns onto furniture from old newspapers, already worn but beautiful geographical maps, from magazines, and also using special decoupage napkins. Furniture decorated with decoupage looks especially good in Provence style interiors.
The decoupage technique is very often used when remodeling furniture.
Self-restoration of furniture allows you to update your favorite interior items as you wish. This solution is suitable for those who are not ready to spend money on purchasing new furniture, or want to keep things dear to their hearts.
As practice shows, the issues of restoring pieces of furniture are quite solvable even in an apartment, and the process of work can be mastered by every person who knows how to hold the simplest carpentry tool in their hands. Simple work takes one or two days, but if it is carried out according to all the rules - the master is in no hurry, carefully follows all the instructions, then the result will be excellent, and old unsightly furniture, given a new life, will delight the eye for many years to come.
Color selection and design
You can update an old cabinet and give standard furniture an original design by painting. Using materials, you can make the surface glossy or matte, perform monochrome decoration or combine contrasting shades, as well as complement the finish with artificial aging and decoupage. When choosing a shade, you must take into account the color scheme of the room.
The classic option is to paint the furniture white. This will add freshness and light to the interior; the item will become a bright accent in the room. White furniture can be painted antique with your own hands by combining bleaching and sanding.
Rich shades can prolong the use of old furniture. Popular colors are green, yellow, red, orange, etc. When using bright colors in furniture design, designers recommend painting the walls in neutral tones. Cream, gray, powdery shades will become the background for rich colors. The colors of the facades are harmoniously combined with the neutral texture of wood.
Furniture painting is used to create an interior in the Provence style. Powdery pastel colors are popular in decoration. You can create a rare product by adding craquelure varnish. The material will give a lightly worn effect to wooden surfaces.
You can change the design of your kitchen by painting the kitchen cabinets; this option is simple and economical. The buffet can be monochrome or multi-colored - with a combination of bright and neutral colors.
Typical furniture can be transformed using the decoupage technique, creating a model in a retro style. Painting a rack will be an interesting design solution when using stencils, unusual color combinations, and artistic painting.
Useful tips
It’s a pity if you have to throw away old but high-quality furniture, especially wooden ones. But such products can be updated and used for more than one year
To choose the right decoration method, it is important to take into account the material and degree of wear of the old cabinet
Natural wood
Previously, wooden furniture was made of very high quality. Before updating, remove dust with a dry cloth. Then check the fasteners and if they are broken, they need to be repaired or replaced. It would be nice to treat the inside of the cabinet with an antibacterial agent; a more budget-friendly option is simple vinegar. It will destroy the unpleasant odor.
Then the choice of decoration method is made.
Toning. First, all surfaces are leveled using wood putty, matched to the color of the cabinet. After the layer has dried, uneven areas are sanded with sandpaper. Treated and even surfaces are treated with a special structuring tinting for wood. Choose a decorative tinting color darker than the original shade of the cabinet. This treatment will completely transform the appearance of the product.
Aging. Furniture made from natural wood can be “aged”. The antique-worn effect of the cabinet surface is achieved as follows: light wood tone is painted in any dark shade depending on the color palette of the room. Then, after the paint has completely dried, you need to rub several fragments with a candle, after which light paint is applied, for example, beige, white, cream. When the second painted layer is rubbed with sandpaper, abrasions will be visible through some light areas. which are darker. When decorating a dark cabinet, make craquelures. To do this, apply craquelure varnish to the surface. After it dries, small cracks form, which are highlighted using dry pigment or oil paint of the desired shade.
Painting. This option involves pre-painting with furniture paint of a light shade. After drying, the cabinet fronts are painted with acrylic paints. If you do not have drawing and painting skills, you can paint the cabinet using a stencil.
If the cabinet is in good condition, it will be possible to use the same decoration options that are used in the design of wooden products, excluding tinting. A cabinet in poor condition requires replacing the doors.
Dark polish. In our country, the iconic model of such a cabinet was extremely common. The decor of this product is very difficult to modernize, since the synthetic dark varnish, previously used for polishing furniture, is almost impossible to remove. In addition, other decorative materials do not stick to it. Here you need to make a strong-willed decision and replace all the doors if they are in poor condition. A well-preserved cabinet can be repurposed in one of two ways:
Furniture restoration styles
To decorate such decorations, interesting and very expensive materials are often used that will last for many years. A distinctive feature of this style are various geometric patterns. They use bright colors for the interior, which at the end of the work are diluted with lighter and softer tones.
This style is mainly used only on wooden surfaces. It involves gluing cut-out figures and patterns, finishing them if necessary. A common and original way in this style is to use napkins with patterns and secure them with acrylic varnish in several layers.
- Covering with regular self-adhesive film
The name speaks for itself; various patterns are created using self-adhesive film. Stencils are often used. One of the easiest and most effective ways to restore old wooden surfaces.
This interesting method, on the contrary, emphasizes the antiquity of your furniture using a special craquelure that creates cracks on the surface. The main thing in this style is to create deeper and wider cracks; for this it is necessary to apply thicker layers.
When starting work, inspect the location of your furniture, what colors and tones should be chosen.
Let's talk in more detail about the last method.
Wooden cabinets dry out, causing cracks to form. Our job is not to hide, but, on the contrary, to give beauty and elegance to the cracks. There is a huge variety of varnishes now. It’s up to you to choose the color that suits your interior. Once you have chosen the desired color, you need to prepare for work.
The main advantage of restoration at home is that the bulky cabinet does not have to be taken outside its abode.
If you still doubt whether you made the right choice in the direction of this style, you can experiment on some small wooden things. Only the surface should be wooden and preferably antiqued, for a more convincing effect.
The second plus is that you watch the whole process yourself and it’s easy to make any changes.
Materials for decorating the surface of an old cabinet:
- acrylic paint;
- craquelure varnish;
- matte acrylic.
When restoring a cabinet without the help of specialists, you estimate the cost of the work, which also has a positive effect on your budget.
The main thing is to approach all the work creatively and then your closet will take on a newer and brighter life.
Tools for restoring the cabinet surface:
- brushes (different sizes);
- pieces of fabric without fine lint;
- container for diluting the product.
Only creative people can cope with such work, since they need to choose the right tones, shapes, and more.
To quickly dry the surface, you can use a hair dryer, but it also helps to increase cracks.
When purchasing materials, be sure to check their quality. The varnish should be quite liquid. When applying, do not shake the bottle under any circumstances, otherwise subsequent application will be of poor quality if there are bubbles.
They use bright colors, which at the end of the work are diluted with lighter and softer tones.
Do-it-yourself cabinet restoration consists of the following steps:
- replacing cabinet fittings;
- cleaning old cabinets;
- necessary repairs;
- decoration in craquelure style.
Wooden cabinets dry out, causing cracks to form.
You can check how dry the furniture is with your finger; if it sticks slightly but leaves no marks, the surface is ready.
Cabinet for equipment
A glass cabinet for equipment does not clutter up the space and visually makes it more free, and a TV, DVD-meep or stereo system looks elegant on it. Despite the fact that there is a huge selection of cabinets in stores, their cost is quite significant. Additionally, it can be difficult to find the right size and design to match your decor and fixtures. You can solve these problems by making a glass cabinet with your own hands.
To make it, you will need a chrome pipe with a diameter of 50 mm, fittings for pipes, glass 10 mm thick for the top shelf and at least 5 mm for the lower ones.
- Cut glass shelves to the required size. Process the edges of the workpieces
- Cut the support parts from the pipe: four 150 mm long, four 550 mm long and four 50 mm long. Dimensions are approximate and can be changed to suit your project.
- Attach the top shelf to the supports using glue, as described earlier.
- Assemble the cabinet upside down. To do this, place the top shelf of the cabinet with the top supports glued on a flat surface. Screw threaded rods into the threaded holes of the upper supports. Fasten the 150 mm long support parts to the studs.
- Secure the middle and bottom ones using break knots. To do this, drill holes with a diameter of 10 mm in the corners of the shelves. Insert cylindrical thrust bushings into the lower part of the supports. Screw the flat supports into the bushings as described in
- her. Hold the cabinet by its supports and carefully turn it over.
Glass furniture in interior design, thanks to the play of sunlight, can enliven any environment and create a feeling of weightlessness, airiness, extraordinary comfort and coziness. Cabinets, tables and coffee tables, cabinets and other objects made entirely of glass or combined with glass elements do not clutter up the space at all, but, on the contrary, visually expand it, which plays a significant role in the arrangement of small rooms. Thanks to the transparency and clarity of designs, glass can be called a real find, allowing designers to bring to life many different ideas and solutions.
Other ideas for DIY cabinet restoration
- Some take the easier route and simply paint the polished cabinet a matching color. Painting can be done using a roller, brush or spray.
- You can resort to gluing tape, which also comes in different colors and textures. There are many types of self-adhesives with imitation of different coatings.
- Covering the frame with fabric or wallpaper. Today this is the most popular type of furniture finishing.
It is worth noting that you should not choose very fragile materials for large-scale restoration of a cabinet with your own hands. Use reliable elements, then the polished cabinet will serve you for many years, only now it will be stylish, original and with a thoughtful design!
Cabinet Painting Tools
To paint a cabinet yourself, you need to assemble a set of tools. You will need sheets of sandpaper, spatulas, a grinder, primer, putty, solvents, masking tape, a paint tray, glue, and a hair dryer.
Painting is done with brushes - narrow or wide, rollers - velor or foam rubber. A spray bottle or electric spray gun will help to apply the layer evenly. The equipment is used to process large surfaces.
For work you will need protective equipment: special clothing, glasses and gloves, as well as auxiliary materials: soft rags, sponges.
Updating chipboard cabinets
Furniture made from particle boards loses its attractiveness over time, no matter how carefully it is used. You can restore the beautiful appearance of products and add fresh colors to the interior by painting old chipboard cabinets
It should be taken into account that chipboard does not absorb paint well, since the furniture is covered with a moisture-repellent laminated layer.
In addition, if the condition of the cabinet fastening elements is unsatisfactory, it is recommended to replace the fittings and further strengthen them. How to paint an old chipboard cabinet:
- All removable elements are removed from the furniture so that an empty frame is left for painting.
- Using coarse sandpaper, remove the layer of old paint (if any) and varnish.
- The surfaces must be rubbed carefully so as not to damage the base. The cabinet is swept with a dry rag to remove dust.
- Corners, edges, joints and protruding elements are treated with fine-grained sandpaper.
- Water-based acrylic paint is a better option than painting chipboard. The color scheme is chosen according to your taste.
- Before painting, a chipboard cabinet must be primed so that the paint is less absorbed into the material.
- The primer is applied in a thin, even layer and the composition is allowed to dry - usually acrylic primers dry in no more than 12 hours.
- Apply several layers of paint with a roller or brush (preferably a brush), each time drying the coating before painting.
- When the furniture is painted to securely fix the coating, after complete drying, the chipboard cabinet is treated with varnish, and the product is assembled using new fittings.
When painting furniture, choose only high-quality tools that do not leave lint on the painted surface. The more layers of paint are applied, the richer the color of the decorative coating will be. You need to repaint with a brush in one direction - from top to bottom, apply the paint with a roller in a cross-shaped motion.
On video: detailed instructions for updating an old chipboard cabinet.
Preparing for painting
Before painting lacquered furniture, you will have to work hard. Wood coated with varnish certainly looks advantageous. But such a piece of furniture is not suitable for the modern Scandinavian style. How to repaint a closet is up to everyone to decide for themselves. Some limit themselves to the facade, leaving the insides in their original form. If you want to completely transform the closet, you must remove the doors. Take out the built-in lamps and wrap them with tape. Carefully remove the doors with the mirror. In order for paintwork to adhere flawlessly, you need to carefully prepare the surface. The old layer is removed completely until smooth. Mechanical processing is used. To remove the old coating, liquids are not used to prevent the wood from swelling. Sanding should be done with light circular movements, without damaging the veneer or laminate layer. Remove the entire layer of varnish, resin, paint. To soften thick, too old coatings, it is allowed to use the aerosol product “Paint Destroyer”. Defects on furniture are puttied with special compounds, cracks and traces of fastenings are covered up. If you screw hardware into an old hole, the doors will quickly become loose. After sanding, the surface is thoroughly degreased. Remove all substances that impair adhesion to paintwork materials. The kitchen cabinet is first cleaned of old grease, using a knife and steel wool.
Before painting it is necessary to remove the old layer of paint
Deep damage must be puttied. Pay attention to: Painting chipboard furniture at home: tips for beginners.
Applying primer
Do-it-yourself cabinet painting is often done without priming. Soil is used in two cases:
- to create a perfectly flat surface;
- when they want to reduce the consumption of paint and varnish material.
A thick layer is not needed; the primer is applied in a thin layer. They cover the furniture, preventing smudges and without gaps. It is recommended to prime the chipboard to strengthen the surface being treated.
Primer for wood
Restoration of an old wardrobe
Very often, old furniture becomes so deeply rooted in our lives that there is practically no way to part with it. This is exactly the situation that happened with an old wardrobe from the beginning of the last century. The world around him had changed, the apartment acquired a modern look, and the closet stubbornly stood in its place, not wanting to give up its place to its modern counterparts.
The old wardrobe absolutely did not correspond to the general style of the room, did not fit in with the surrounding furniture and had a dull reddish color. But still, a bold decision was made - to restore the old man and leave it in its original place. A quick inspection revealed a lot of cracks, chips and chips.
The first stage of restoration work is always the removal of all loose elements and old varnish, if any. In order for the old varnish to completely come off, it is necessary to apply a special remover for varnishes and paints to the entire surface of the cabinet. The wash is applied with a brush or steel spatula. After 20-30 minutes, the remover will dissolve the old varnish. After this, you need to thoroughly clean the surface with a spatula and then hard sanding paper. The cabinet surface is now uniformly clean, dry and rough.
Now you need to painstakingly and carefully “heal” all the cracks and scratches on the surface of the wood. To do this we need a special wood putty and a soft rubber spatula. All defects are rubbed over with putty and, as they dry, sanded with fine sanding paper.
Next, cover all surfaces with liquid tinted stain.
To achieve a uniform effect, you will need 3-4 layers with intermediate drying for 2 hours. After the final layer of stain, it is necessary to dry the wood for 20-30 hours at room temperature. Now you can begin the initial varnish coating. For this, it is best to use modern water-based acrylic varnish. Apply varnish evenly to all surfaces of the cabinet.
The varnish is applied to the surface using a special brush with hard natural bristles. The direction of movement of the brush should be from top to bottom, and never vice versa.
Once the varnish has dried, you can begin decorating the cabinet. To do this, we need a self-adhesive furniture edging with a “gold” effect. With this edging we decorate the side walls of the cabinet, the facade and especially the central door of the cabinet.
If necessary, you can replace the inner outerwear tire. In modern stores you can choose a metal or wooden tire and fasteners for it.
Now we begin the final varnishing. For this purpose, a special ultra-glossy varnish in an aerosol can is used. This varnish is applied very easily and evenly and gives the product newness and chic.
Furniture edging scraps can be used to decorate interior drawers and shelves.
It only takes 3-4 days to do all these pleasant chores, but now my great-grandmother’s old closet has found a second life and fits perfectly into the modern interior.
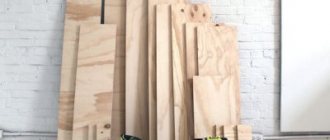
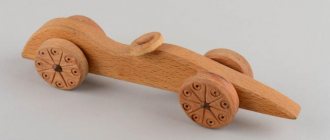
Step-by-step instructions for making a cabinet from plywood
We will make a simple cabinet with only shelves; drawers are difficult for beginners to make, but it’s not worth the risk yet. A cabinet with two hinged doors, the back wall is also made of plywood to increase durability. The thickness of the material is 18 mm, one surface is polished and does not require finishing. If desired, the cabinet surfaces can be coated with clear varnish. The assembly is done with confirmations, the shelves are inserted into the grooves. Before starting work, you need to take measurements of the furniture, draw a sketch, and buy all the necessary materials.
Work begins with drawing up a drawing and preparing materials
Step 1. Start making the side walls of the cabinet. Place a large sheet of plywood on the sawhorses and think about the cutting pattern.
The plywood sheet is laid horizontally
Professional furniture makers strongly recommend, if the overall dimensions of the sheet allow, not to cut the doors one at a time, but one large piece for two. Why?
- You can make all the technical cuts on two doors at once under one ruler and after one measurement. Due to this technology, even the theoretical possibility of asymmetry of the cabinet sides is eliminated. If you make a mistake with the location of the shelves by a few centimeters, the slots will be the same in the sides, the cabinet will be assembled, no problems will arise.
- Work is almost doubled. Each installation of a cutter or hand saw or ruler is done once, not twice. Only the length of the cut increases, and this parameter has almost no effect on the speed of cabinet assembly. Only one copy is made with small dimensions, the length of the cuts is insignificant.
- Improved build quality. The more accurate the parts, the better they fit into their seats, the easier it is to fix them, the more reliable the design.
For convenience and time saving, identical blanks are cut simultaneously using a large sheet of plywood
Prices for the popular range of circular saws
A circular saw
Step 2. Place a cutter with a diameter of 18 mm on the hand router; if your plywood thickness is different, then adjust the tool to suit it. The cutting depth should not exceed 0.5 sheet thickness. If you fulfill all the conditions correctly, the sawn sides of the cabinet will withstand the same loads as whole slabs. The shelves should have slight tension and take on some of the effort.
The cutter is set to the size of the sheet thickness
Step 3. Mark the locations of the grooves for installing shelves. Set the stop ruler taking into account the distance between the edge of the cutter and the edge of the body. The sawing depth can be measured using sections or using a special device for adjusting the tool. Clamp the ruler with clamps and saw through the landing sockets one by one.
Cutting grooves for the shelves of the future cabinet
Step 4. Make quarter bevels along the edges of the walls to secure the back wall. We have already mentioned that it is made from the same plywood as the entire cabinet. Due to this, the stability and reliability of the furniture increases.
Chamfers are made along the edges of the workpieces
Prices for a linear series of milling cutters
Fraser
Step 5. Cut the slab into two equal halves, so the sides are completely identical and ready for further use.
Cut the slab into two parts
Step 6. Use a compass to adjust the remaining scraps to fit the dimensions of the shelves. There won't be enough of them, we need to make more. To do this, cut a piece of the required width and length from a large sheet and proceed to preparing the remaining parts. You can work with a hand-held circular saw using a stop ruler.
Blanks for shelves are cut from the remaining plywood.
Almost advice. You should not saw off important furniture parts without a ruler; do not rely on the steadiness of your hand and the accuracy of your eye. It is possible to insert such shelves after correcting the errors, but the strength of the structure will no longer be the same. The parts will not accept the forces for which they are designed. Experienced furniture makers, after working with a hand saw, always pass them on a compass machine; this is the only way to guarantee the ideal quality of the elements.
Use the same technology to prepare all the shelves, bottom and top. Don't forget that you also need to select a quarter in them. The front edges along the perimeter of the cabinet frame can be rounded with a milling cutter, this will improve the appearance and eliminate the possibility of injury while using the furniture.
Milling of front edges
Step 7. Place one side panel on the goats and insert all the shelves into the grooves one by one. They should fit tightly without gaps. Place the second side panel on their ends and connect the elements. To hammer, use a wooden mallet, do not rush. If the parts do not fit into place, then you need to find and eliminate the reason, and not hit with a hammer with redoubled force.
Assemble the side walls with shelves
Step 8. Screw the roof and bottom to the sides. Call an assistant and remove the frame from the trestles, place it on a flat surface with the back wall facing up.
It is necessary to lift the structure with an assistant
Practical advice. In this state, the frame does not have sufficient strength and may crumble when moved. For insurance, tighten it with temporary jumpers in several places; later, as the stability of the structure increases, they are removed.
Step 9: Cut the back wall to size and screw it to the cabinet frame. You can use nails or small screws, there is no big difference in reliability.
Stuff the back wall
Now we need to make the doors, these operations are a little more complicated, we should talk about them in detail.
Making doors
First you need to prepare two templates. One is made from an ordinary lath, with marks for the location of the loops on it. The second template is used to drill holes for the hinges. Ours is made of organic glass and a stop made of a piece of chipboard. Three holes are drilled in the glass: two for self-tapping screws and one for drilling a seat for a hinge.
Template for marking holes for hinges
Step 1. Place the door blank on the trestles, and press the wooden strip on one side with clamps. Mark the location of the loops. Then the same rail must be used during the manufacture of the second door. If you need to make multiple cabinets, these tools will be of great help.
The location of the door hinges is marked on the blanks
Important. Make sure that the hinges do not fall on the shelves; choose a free place to fix them.
Step 2. To guarantee, draw a line at a right angle and mark the loops. To make drilling easier, it is advisable to make small indentations with an awl.
Mark the drilling locations
Prices for the range of drills
Drill
Step 3. Drill holes for the hinge, secure it with self-tapping screws in the selected location.
Insert and screw the loop
Step 4. Place the door on a lining approximately 0.5 cm thick; it will provide the necessary gap for opening/closing. Attach a rail with marks for the location of the hinges to one side panel, transfer the dimensions and drill the mounting holes.
On the cabinet wall, markings are also made according to the template.
Step 5. Using the same algorithm, install all the hinges and hang the cabinet doors.
Hang both doors
All you have to do is screw on the handles and the cabinet is ready. If you wish, you can perform a special finishing of furniture surfaces. If you don’t want to, let the cabinet have a natural look, if plywood can be called a natural material.
Video - Plywood cabinet
The plywood cabinet you made is installed in the bedroom. This room requires a special approach when decorating the interior; it should not only relax as much as possible before bed, but also provide the opportunity for proper rest. What's a holiday without TV today? No. So, make a TV stand out of plywood and install it in the bedroom. There is an excellent article on this topic on our website.
How to decorate at home
To restore a product yourself, you should choose the technique you like and follow the rules of the procedure.
Decoupage
To use this method, it is recommended to do the following:
- Sand the surface of the cabinet and coat it with several layers of primer.
- Place the napkins on the cabinet and think about their placement.
- Moisten a cloth with water and apply to the surface. Carefully smooth out all wrinkles.
- Use a thin brush and special glue to treat the paper.
- After the layer has dried, cover the surface with varnish.
Decorative plaster
To use this technique, follow these rules:
- The composition should be applied to the restored product.
- To imitate the desired texture, the cabinet is painted in a shade that is close to the color of the plaster.
- Contrasting coloring will help achieve a craquelure effect.
- Decorative plaster should be applied with a brush or spatula.
Fabric decor
To decorate a closet with fabric, it is recommended to use different textures. Smooth silk will fit perfectly into an elegant interior, and coarse linen will complement the Provence style. A classic product can be achieved using lace. Regular PVA glue will help to apply textile elements to the cabinet.
Stages of restoration using painting
Before studying a master class on painting clothes storage products, it is recommended to carry out preparatory work on wood. These include cleaning and sanding the old coating
It is important to achieve a smooth surface so that when painting the brush applies the composition evenly
For small areas, use sandpaper; for larger areas, use a sander. The final stage of preparation always involves using the finest grain sandpaper.
As soon as work with defects is completed, decorators advise moving on to primer. This stage is no less important than the painting itself. It is necessary to restore an old cabinet with your own hands with high quality, so primer will be an excellent solution: it will hide all the cracks and fill the pores. In addition, the coating treated with primer will absorb less of the coloring composition.
After waiting for the product to dry completely, we restore the cabinet using paint:
- unscrew all the fittings that will prevent the brush from penetrating into narrow places;
- those elements that cannot be removed are sealed with masking tape to preserve their original appearance;
- When painting wood, it is better to use special acrylic compounds - they adhere better to the surface and create a protective layer of film. Pour the paint into the roller container and get to work;
- First we process all the internal elements: shelves, compartments, mezzanines. After this, we proceed to painting the facades, as shown in the photo;
- After the first layer has dried, apply a second, and if necessary, a third layer of paint. This is necessary to achieve color brightness and complete coverage of all gaps;
- The dried cabinet must be opened with varnish in several stages.
Restoration experts advise you to use your imagination and make the cabinet not in a single color, but add several colors to the facades. The simplest option is geometric shapes. To do this, use masking tape to cover some part of the facade and paint the remaining area a different color. For originality, you can decorate the cabinet in a contrasting design.
Removing old coating
Sanding parts
Chips are repaired with putty
Surface primer
Painting parts
Varnish coating
What you need for painting
The most time-consuming and financially consuming process is preparing an old cabinet for painting. You may need:
- Sandpaper of different grits for sanding the top coat for better adhesion to the paint, a sponge and a brush for removing dust.
- Metal brushes for brushing if the cabinet is made of solid wood and the goal is to make the wood texture more expressive before painting.
- Grinding machine for automating sanding and brushing. By the way, you can use a screwdriver or drill with special attachments for this.
- A heat gun and a scraper/trowel if the old cabinet has been painted in the past.
- Wood putty for filling holes and irregularities, spatula.
- Solvent, primer, paint tray, masking tape, gloves and other protective items (apron, goggles, respirator, etc.).
- Narrow and wide brushes for painting, foam or velor rollers. Ideally, a spray gun.
Before the advent of chalk paints, acrylic-based compositions were most in demand. Acrylic paints have many advantages: they are diluted with water and mix easily, dry quickly, do not have a strong odor and are resistant to abrasion. Optimal for painting cabinets in children's rooms, bedrooms and kitchens.
To comply with safety precautions, painting should be done in the fresh air or in a well-ventilated area, away from flammable objects and potential sources of fire.
Main stages of work
To restore an old chipboard or solid wood cabinet, it is important to do the work in stages. The master will have to take the following steps: Preliminary determination of the final furniture style
Here you need to look around, evaluate the color scheme of the room. Understand her general style. After all, as a result, the furniture should fit into the overall interior.
Preliminary determination of the final furniture style. Here you need to look around, evaluate the color scheme of the room. Understand her general style. After all, as a result, the furniture should fit into the overall interior.
Dismantling an old cabinet. It is necessary if the doors do not fit tightly or sag. In addition, you will have to disassemble the furniture in order to change the drawer pull-out mechanisms and check the fastenings of the shelves. If necessary, change them too. In general, disassembly means removing all moving parts.
Minor repairs. At this stage, all elements of the cabinet need to be washed, cleaned of dirt, soot, and dust.
It is important to take the old fittings and go with it to the store to purchase new ones. Be sure to stick to the style you choose for your new cabinet.
Tip: to ensure that the sliding mechanisms are purchased correctly, measure the depth of the drawers in advance.
As soon as the most difficult stages of repair are completed, you can begin decorating.
Decor
Furniture is painted in one or more colors. Another decor option is patterns. They are applied using a stencil or masking tape. An interesting effect is created using lace. It is fixed on the surface of the furniture and then covered with spray paint.
Many different materials are used to decorate old furniture. You can decorate the closet using self-adhesive film, decoupage cards, fabric, and decorative plaster. Wallpaper is also used to update furniture.
Pasting with film takes the least time. Another advantage of this method of decoration is a large assortment of designs. The film can imitate the texture of wood or be produced in the form of panels. Experts recommend buying material with a protective layer, as it will last longer. The film is not only glued to the cabinet body - it is often used to decorate the interior space and drawers.
Master class on cabinet restoration using self-adhesive film:
- Remove all dirt and loose elements.
- Degrease the cabinet surface with white spirit.
- Cut the film with a margin of 2 cm.
- Carefully glue the sheets to the surface of the furniture, moving from top to bottom. The backing paper should be pulled slowly with tension to avoid wrinkles.
- The bubbles resulting from the gluing process must be pierced with a needle and then straightened out.
Decorative plaster
There are a lot of decorative materials on sale that can be used in furniture reconstruction. Interesting results are obtained when using different types of plaster. There are compositions for creating a craquelure effect, simulating marble stains or wet silk.
Features of working with decorative plaster:
- It is recommended to apply the composition to already restored furniture.
- To imitate the texture of stone or fabric, the cabinet should be painted in a shade close to the color of the decorative plaster.
- The craquelure effect is created by contrasting coloring.
- To apply decorative plaster, use a brush, spatula or trowel.
Decoupage cabinet
You can also restore an old cabinet with your own hands using decoupage. The easiest way to decorate already repainted furniture in this way.
For decoration you will need:
- decoupage napkins or cards;
- scissors;
- PVA glue;
- acrylic paint to match the cabinet finish;
- varnish;
- brushes and sponge.
Work order:
- Cut out the elements necessary for decoration.
- Apply glue to the surface of the cabinet.
- Separate the top layer from the decorative elements. Glue them to the cabinet and straighten them with a damp sponge.
- Apply glue over the decor. Let the PVA dry.
- Apply a small amount of paint along the contour of the decor using a sponge.
- Cover the dried surface with varnish.