Modern glazing technologies imply careful attention to every detail, so questions about how window sills and slopes are designed also do not go unnoticed by the craftsman. Proper repair of these structural elements of the window will provide it with a longer service life and prevent the risk of cold air entering the home. Let's talk further about how the interior window slopes are finished, and what materials need to be used for this.
The need to finish the slopes inside the window
The relevance of finishing window openings indoors and outside the house with sandwich slabs, plaster, etc., as well as the front door with decorative stone, is very high. Internal factors, the action of which can negatively affect the quality of the window itself and its slopes, include:
- increased humidity indoors;
- the appearance of condensation on the window due to a significant difference in temperature outside the window and inside the house.
External factors that have a destructive effect on the window and its slopes include:
- precipitation, wind, sunlight;
- sudden changes in ambient temperature;
- mold, mildew, harmful insects.
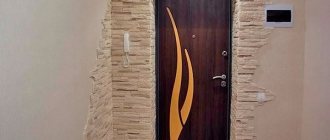
Proper finishing of windows and doors with decorative stone allows you to raise the level of resistance of the window structure to the influence of the described factors to the highest possible level. This will ultimately extend the service life of the windows, improve the appearance of window openings in particular, as well as the facade of the house as a whole. You can see a window with high-quality slopes inside the room in the following photo.
What are the advantages of PVC slopes?
- They are durable and wear-resistant - the service life of a window and a properly installed slope are equal;
- They are a finishing touch, they do not need to be painted - the window immediately takes on a finished look;
- They are warm to the touch - you can stay by the window for as long as you like without fear of catching a cold;
- They have a smooth, moisture-resistant surface that is very easy to care for. It is enough to simply wash it with detergent without abrasive particles. It also does not fade or deform.
PVC slopes are not just panels, but a collection of elements. They ensure efficient operation of windows. This includes the sandwich panel itself, corners and sealing system.
Drywall
Most often, the decoration of indoor slopes and entrance doors is done using plasterboard. This is a finishing material with high performance parameters, which allows you to quickly and with a minimum of effort make slopes perfectly smooth and resistant to external influences.
Drywall is lightweight and its installation on vertical surfaces is not particularly difficult. It is beautifully painted in the current color shade. In addition, such materials, when properly treated with antiseptic compounds, can prevent the risk of mold and mildew developing at the joints of slopes and window frames. Window finishing with plasterboard is shown in the following photo.
Material selection
You should not think that you can choose any type of drywall to design slopes in your house. The material should be selected taking into account its operational parameters. And they differ for different types of drywall, which should be taken into account by the master before materials are purchased and window repairs begin.
Types of drywall
Absolutely any window is a source of moisture in the form of condensation, which is formed due to the large difference in temperature in the house and outside. As a result, the materials used to repair slopes must certainly be resistant to this factor. This means that you need to select only moisture-resistant plasterboard sheets, on which the presence of condensation will not have a negative impact. Otherwise, the repair will retain its functionality and attractive appearance for only a short period of time. In addition, it is worth using antiseptic compounds to cover the surface of the material, as well as special paint for its finishing.
Measurements
Finishing the slopes of plastic windows in a house should always begin with taking measurements, for which you will need to stock up on a measuring tape. The final results of the master’s work largely depend on the quality of this stage of work. If the slope does not fit as tightly as possible to the window frame, there will be a risk of developing such negative consequences as:
- the appearance of mold and mildew outside and inside the premises;
- the appearance of microcracks through which frosty air will begin to penetrate into the house during the cold season. Gradually, without adequate measures to eliminate the problem, the cracks will grow, and with them the costs of heating the premises;
- reduction in the service life of the window structure, its rapid wear both in quality and aesthetic terms.
Taking measurements
Installation of slopes
Finishing slopes with plasterboard begins with an analysis of the measurements taken. All window parameters are transferred to plasterboard sheets, from which you need to cut out pieces that are ideal for the window opening.
Drywall cutting process
Installation of such canvases can be carried out on the lathing, on the profile, or without them. The choice of technology should be determined by the fact in which state the slopes are. Visually evaluate whether they are processed with high quality, as well as what quality the double-glazed window itself has.
Installation of drywall is carried out using a special adhesive composition if the walls are perfectly even. If not, you will need to first bring them to this state.
Next, you need to attach the strip to the window profile or frame, which will securely fix the drywall on the side of the double-glazed window. Plasterboard panels are installed on top of the planks, carefully treating the resulting voids with sealant. Then the structure will be devoid of cold bridges.
Removing excess polyurethane foam
Installation of a slope corner
Metal sheathing
Installation of drywall boards
Ready-made plasterboard slope
Window slopes made of plastic: self-installation - 2 methods
After installing plastic windows, the window opening does not look the best: foam, pieces of plaster stick out, and the wall material is visible in places. All this “beauty” is closed in various ways, the most practical, fast and inexpensive of which is plastic slopes. It is better to make them from sandwich panels (two layers of plastic with polypropylene foam between them). They are dense, durable, made of good material.
There are two main methods for installing plastic slopes: with and without a starting profile. Both come with step-by-step instructions and photos. Decide for yourself how to attach slopes to plastic windows. Both methods give good results.
Installation of slopes from sandwich panels without starting profiles
This method is suitable when the window is installed so that the distance from the window frame to the opening wall is too small. In this case, installation with a starting profile (see below) is either very difficult or - usually from the hinge side - completely impossible.
After installing the plastic window, the following picture was observed.
The installation of slopes for plastic windows begins with preparing the opening: we cut off the remaining foam with a stationery knife. It is easy to cut, just don’t overdo it, cut it flush and don’t cut it out - the foam both holds and insulates the frame. Pieces of plaster that interfere and protrude are also removed. If they hold up well and do not protrude beyond the plane of the future slope, you can leave them - the foam will slide less.
Then, around the perimeter of the window we nail (we place it on dowels if the wall is concrete) a thin strip - 10 * 40 mm - with the wide side facing the slope.
Usually they don’t level it, they nail it as is, but if you want, you can make it level by placing pieces of plywood, thin boards, etc. in the right places.
Next, we cut the foam around the perimeter of the frame so that the sandwich panel fits there. It should go in about 1 cm. We cut off the foam carefully so that there are no residues on the frame, but without damaging the plastic.
Now you need to cut the plastic panels correctly. You can do it in a standard way: using measurements, you can make a stencil. It seems easier with a stencil. Take a sheet of paper larger than your window (I had old wallpaper). Apply to the slope, crimp, bending the excess. Cut along the curved lines, try on, adjust as necessary.
It is more convenient to start from the upper part of the opening. Having made a paper stencil, we outline it on the plastic. Considering that about 1 cm will go into the foam groove, add this centimeter along the edge that will be inserted there. We cut it out with a small margin - it’s easier to cut it off than to cover it up later.
We cut it with a hacksaw and a metal blade, try it on, adjust it so that the plastic stands up straight, without bending. We level it so that the panel is flush with the plaster. The edge turns out to be almost even; where necessary, we trim it with a file.
Having removed the tried-on and adjusted strip, along the outer edge that will be nailed to the plank, we drill holes according to the thickness of the nails, retreating about 0.5 cm from the edge. This will make it easier to attach and will not damage the plastic.
We put it in place again, take a balloon with mounting foam and short “sprays” to fill the gap with foam. We try to get as deep as possible, but don’t pour too much: when it swells, it can distort the plastic.
More on the topic Plastic windows A class
There are several points to consider when working with polyurethane foam. If the plastic is smooth, the foam does not have a very good grip on it. To improve it, either treat the surface that faces the wall with sandpaper, and/or prime it with something to improve adhesion. The second nuance: for normal polymerization of the foam, moisture is needed.
Therefore, before installing the plastic, the slope is sprayed with water from a spray bottle. Naturally, there should be no dust on the wall - it should be swept away with a brush or removed with a vacuum cleaner. If the plaster or mortar is loose, the opening is pre-treated with a penetrating primer, which will bind the concrete particles together.
Then we lift the panel, pressing down the foam, insert the nails into the holes and fasten the outer edge to the bar. The inner one rests against the window frame.
Using the same technology - cut out a paper template, try it on, transfer it to plastic - cut out a plastic side. Here you need to be especially precise so that the gap between the slope panel and the window sill (upper slope) is minimal.
To do this, the edge will have to be sanded. To make the edge smooth it is easier, it is more convenient to process it with sandpaper attached to a smooth block, a file or a sharpening stone (half a circle, as in the photo).
We adjust it until it matches perfectly (as best as possible) at the top and bottom, and install it in place, driving one edge into the groove near the window. When the result is satisfactory, we level the outer vertical edge to the same level as the wall plaster.
You can do this with a stationery knife on the spot, or you can draw a line on the panel (with a pencil, a thin marker, scratch it with something sharp) and then modify it with whatever is convenient.
Having removed it, we also drill holes for nails along the outer edge. We install the panel in place, take foam, and fill the gap from bottom to top.
Too much foam is not good here either, as it can bend the plastic. Therefore, we fill it in short portions, trying to fill it as deeply as possible.
On the vertical parts of the slopes, you can do it differently: apply foam to the panel ready for installation along the far edge, which goes under the frame, before installation. The strip is made continuous or applied as a small snake.
Only you need to do this not from the very edge, but stepping back a little. Then the plastic part is inserted into the cut-out groove, positioned as needed, and the rest of the gap is filled with foam (do not forget to wet the wall before installation). Once filled, press, level, and secure with nails into the bar.
To prevent the foam from moving the edges of the slope during the polymerization process, tape the joint at the top and bottom with masking tape. No matter how hard you try to adjust the plastic evenly, gaps, albeit small ones, remain. They can be covered with acrylic. It is sold in foam-type tubes and placed in the same mounting gun.
Squeeze the strip into the gap, rub it, level it, remove the excess with a damp soft cloth or sponge. This operation needs to be done in small areas and wiped carefully - completely clean. As long as the acrylic has not hardened, it cleans up well.
Then - with great difficulty. It is more convenient to start sealing cracks from the top - immediately - the horizontal panel of the slope, then the joints, then move down first along one side, then along the other. The last to be sealed are the joints with the window sill.
After drying - 12-24 hours, depending on the sealant (written on the tube), acrylic can be pulled into the seam - this is if the cracks are large. Go through all these places a second time using the same method.
After the second layer has dried, if there are any roughness or unevenness, they can be smoothed out with fine-grain sandpaper, folded in half. In general, it is better to carefully level it while it is still wet, otherwise you may scratch the plastic.
More on the topic How to fix plastic windows?
That's it, the plastic slopes are installed. After the final polymerization of the foam, the bevels must be puttied, leveling with the surface of the walls. After this, you can remove the protective blue film. As a result, the window will look something like this.
When installing these plastic slopes, sandwich panels were used. These are two layers of plastic, between which there is a layer of foamed propylene foam. Using the same technology, you can make a window frame from inexpensive plastic window sills or white PVC wall panels.
The most unreliable material is panels: even wall panels are pressed through quite easily, and if the front layer of plastic is thin (cheap), then the jumpers are visible in the light. This is not the case with sandwich panels and plastic window sills. And it takes a lot of effort to push through, and there are no jumpers even for clearance.
We install plastic slopes with a starting profile
The installation of plastic slopes using this technology begins with the preparation of the window opening. We cut off the foam evenly, remove everything that does not adhere well, clean off the dust, and if necessary, go over the opening with a primer that improves adhesion.
A wooden block is attached along the perimeter of the opening, but already near the frame. Choose the thickness depending on the distance: it should almost fit the frame. One side of the block must be worked with a plane, making an inclination. The angle of inclination of this face is equal to the installation angle of the slope. You can saw it off, but it’s more difficult to make it straight unless you have a circular saw with an adjustable angle.
We screw the treated block to the walls around the perimeter of the opening. The mounting method depends on the wall material. If the wall is brick, you can try using self-tapping screws; in a concrete wall, you need to install dowels.
You buy a starting profile in the store, install it with the long side to the block, and fasten it. It is more convenient and faster to fix it to the bar with staples from a construction stapler; if you don’t have one, you can use small nails or self-tapping screws with flat heads.
When choosing a starting profile, choose a dense one. It’s more expensive, but you only need three meters per window, maybe a little more. A dense profile will hold the plastic well, a soft one will bend and the appearance will be ugly. Another point - when installing the profile, press it as tightly as possible to the frame so that there are either no gaps at all or they are minimal.
At the top, when joining vertical and horizontal profiles, you need to be especially careful and cut them exactly at an angle of 45°. If there are small gaps, they can be sealed with acrylic.
Using this technology, it is more convenient to start installing reservoir slopes from the sidewalls. Insert the panel into the fixed starting profile. It is also better to take them from expensive and dense ones, with a thick layer of plastic. If you install cheap ones (ceiling), then the front wall is thin, and in bright light the jumpers will be visible. In addition, such plastic can be pressed even with your finger.
The width of the plastic panel should be larger than the slope. If the width of one is not enough, two are joined. But then at the junction you will need an additional vertical strip to which the first strip will be attached.
The panel inserted into the profile is usually longer than the opening. Holding it with your hand, mark the line of the opening. After removing, cut along the marked line.
We install the panel again, move it a little away from the wall and fill it with foam, trying to fill it without gaps, but without excess. To make this happen, we start from the far bottom corner - draw from bottom to top near the nailed bar. By the time we reached the top, the foam below had expanded a little.
Draw a line with foam again, but closer to the edge. The closer to the outer edge, the less foam is required - after all, the panel is installed under a slope, so make the paths thinner. Having reached the middle, make a snake on the rest of the surface and press the panel the way it should stand.
Align and check. Secure to the wall with masking tape. The second part and then the upper part are installed in the same way. It can also be cut out using a paper template, and the edges can be adjusted to a perfect (or almost) match using sandpaper.
Having installed all parts of the slope and secured with masking tape, leave until complete polymerization. Then, in order not to putty the gaps between the slope and the wall, a white plastic corner is glued onto liquid nails.
The main task is to cut exactly in the corners. It is easy to glue: apply a thin strip of glue to both shelves of the corner, press it, moving your hand along it, hold it for a couple of minutes. This is how they are installed around the entire perimeter, then, before the glue dries, they are also glued with masking tape and left.
After a day, we remove the tape, the plastic slopes are ready.
If there are gaps somewhere, they are sealed with acrylic, as described above. Don't use silicone. In the light it quickly turns yellow. In a year or two your windows will look terrible. Look for white acrylic sealant and mask it with it.
Source: stroychik.ru/okna/okonnye-otkosy-iz-plastika
A newly installed window, no matter whether it is plastic or wooden, has an unfinished appearance. And even after installing the window sill, almost nothing will change. And in order for your window to acquire an aesthetic appearance, it is necessary to install slopes.
Today, plastic slopes for windows are popular. Slopes are part of the window opening on the side and top of the window. After replacing a window unit or installing a new one, finishing the slopes is an obligatory stage of work, along with installing a window sill.
This is like the final touch to installing the window and giving it a noble, light and bright look. Slopes can be plastered, plasterboard, or plastic.
PVC panels
No less popular today is the repair of slopes in a house with PVC panels on the profile and doors with decorative stone, thanks to which the entire structure acquires a solid appearance. Such repairs, as shown in the photo below, have a long service life and retain their properties for a long time.
PVC panels
Plastic panels are selected taking into account the size of the window opening, as well as its technical parameters. Before starting repairs, you will need to prepare the surface of the slopes. Then, PVC parts of the current size are cut out, which will be mounted around the entire perimeter of the window on wooden slats and profiles.
If you want to insulate the house, the space between the wall surface and the panels should be filled with a layer of mineral wool or construction foam. Finishing slopes with PVC profile panels is also advantageous because PVC materials have a smooth surface, are produced in different color shades, and look harmonious in the interior of a private home. This allows you to save on the final painting of the slopes.
Another attractiveness of this method lies in the fact that all elements of the window structure (window, slope) acquire the same expansion coefficient, which will ensure they fit tightly together and prevent the risk of cracks forming.
Scheme for finishing a slope with PVC panel
Surface preparation
To install plastic slabs on a slope, you need to carefully prepare the surfaces. To do this, I carefully cut off the excess mounting foam using a utility knife, and the surface itself is cleaned of dirt and dust, coated with an antiseptic, and primed. Next, you will need to install a metal frame made of guide profiles.
A hairdryer can help remove paint from walls.
Installation of the guide profile
Measure the profile along the outer edge using a construction tape, and then its outer width and the distance from the top edge of the window structure to the surface of the window sill. Take a U-shaped profile of the current width, cut it into pieces using metal scissors, according to the window measurements. Next, the sections are screwed at intervals of 20 cm using screws along the outer part of the window frame. The top and side profiles are mounted in the same way.
Metallic profile
Installation of the starting profile
Lathing
To organize the sheathing, you will need wooden slats with a cross-section of 20x40 mm, which are fastened on the far corner of the slope from above and on the sides with dowels in increments of 30 cm. The sheathing must have perfect evenness, for which the thickness of the wooden slats is trimmed with a plane and the work is checked with a building level.
Fastening the sheathing
Panel installation
Finishing with plastic plates can be easily done with your own hands. To do this, cut the material with a jigsaw, then fix it on the upper profile and secure it to the sheathing using self-tapping screws.
The side profile is mounted in the same way as the top bar. And the gaps between the window frame and the wall need to be filled with construction foam, for which the surface is first moistened with water. After this, you need to lean the plastic panel against the base and secure it to it with metal screws.
Fastening PVC panels
Installation of F profiles
The F profile is cut and inserted along the edges of the panels. In those areas where the corners come into contact with the fasteners, you will need to make a small cut. At the same time, the slopes of the front door should be decorated with decorative stone, which looks very expensive. At the end of the work, you need to fill the joints with white sealant, carefully filling the gap with the compound, removing excess volume.
These measures will not only make the window even more attractive, but also protect it from mold, mildew, and rapid wear.
F profile for slopes
Plastering slopes - technology for performing the work
At first glance, plastering slopes with your own hands is a difficult task, but this is not entirely true. It is important to follow some recommendations while working and know the basics of technology. Ultimately, you can get smooth slopes that can be used for many years. To complete the work, you will need to prepare a standard set of plasterer tools:
- The rule is small (the length should be enough to cover the width of the slope).
- Spatula, it is recommended to prepare several different sizes.
- Construction level,
- Master OK.
- Grater and grater.
To prepare the solution you will need a container. To ensure that the resulting mixture is homogeneous and elastic, it is recommended to use a mixer or drill attachment. This will speed up the preparation time of the solution and make the material better quality.
Preparation of the solution
Today, to perform plastering, you can purchase a ready-made mixture in dry form in construction stores and only dilute it with the required amount of water. You can also prepare such a mixture yourself and save your budget. To do this you will need to prepare cement, sand and water. When preparing the solution, a proportional ratio of materials of 1 to 3 is observed. First, dry materials are combined with each other and mixed well, after which water is added in small batches. This will allow you to obtain a solution of the desired consistency. There are several types of solution:
- "normal" plaster will stick to the trowel a little.
- “greasy” plaster is characterized by very strong adhesion to the working tool.
- The “lean” mixture does not stick to the tools at all during preparation or collection.
If, for example, you put too much binder (cement) into a solution, it often cracks during drying. This occurs due to shrinkage of the material. A “skinny” mixture is characterized by too much sand in the composition. After drying, such a surface will be quite fragile and crumble very much. This is why it is important to maintain proportions. For interior work, you can prepare a mixture that includes cement, alabaster, sand -1:1:2. Observe the proportions strictly. In order to improve the technical characteristics of the prepared solution, various additives can be used. In the purchased mixture they are already added by the manufacturers. Such additives make the solution more plastic, which is very convenient during work, and increase the thermal insulation qualities and resistance to the formation of fungal infections. You can purchase such additives at a hardware store.
Do-it-yourself plastering of slopes
It is necessary to prepare the solution only before starting to apply it so that it is not high and does not lose its original qualities, but before this it is worth doing the preparatory work. The first thing preparation begins with is cleaning the opening from dust, dirt, and other foreign objects. In order not to stain the window, it is recommended to seal it with film using masking tape. The cleaned surface of the slopes must be treated with antiseptic agents. Today, primers of this composition are sold in any hardware store. apply the product using a brush. It is important not to miss a single place. After the primer layer has dried, re-processing is carried out. The primer not only helps prevent the formation of mold, it enhances adhesion between the surface of the opening and the plaster mortar.
To ensure vapor barriers, it is necessary to cover the areas of the mounting foam with a special film. As an alternative, you can simply treat the surface with silicone sealant. After this, you can begin arranging the beacon system. It is the basis of the plastering process and is used in finishing areas of any size. It is important that the guide profiles along which the solution will be applied are installed evenly relative to each other and the wall. An unevenness of 2 mm per meter of plane is allowed. The beacon can be special metal profiles or wooden slats of the same size. Then you should set the angle. A special metal profile is also used for this. It is installed at an angle of 90 degrees relative to the window sill. At the same time, all other planes are checked. It can be fixed to the wall using self-tapping screws or a small amount of mortar.
The next stage of the work is applying the plaster solution. The prepared solution is spread over the treated area using a trowel. It is recommended to start work from the top. The solution is applied from the edges to the center and leveled using the rule. If cement mortar is used, the layer should not exceed 2 centimeters. If a gypsum composition was prepared, the thickness of the layer can be increased to 5 centimeters. The following layers can be applied only after the previous one has completely dried. Layer alignment is performed by a rule. All excess can be removed with a spatula or trowel.
After the top plane is completed and has dried a little, you can begin to make the side slopes. The work is done using the same method. The solution is poured in small quantities between the beacons from bottom to top. Then, using a rule, everything is leveled out. It is important to press the rule tightly against the beacons to obtain a flat surface. It is necessary to finish finishing the slopes with a trowel. A special tool that will allow you to remove all the irregularities in the wet solution. Afterwards, the metal beacons must be pulled out when the solution has set a little and the voids must be filled with the solution and everything should be leveled again. It is important to remove beacons, especially if they are metal guides. This is due to the fact that under the influence of moisture over time they will begin to rust and stains will appear on the surface.
All subsequent finishing work can be carried out only after the surface has completely dried. To obtain a perfectly smooth surface, it is recommended to apply a few words of putty on top of the plaster. If the surface turns out to be smooth, you can use the universal option. Before applying the putty, the plastered surface is primed with the same antiseptic composition. The putty is applied with a spatula in a thin layer. You can also prepare the solution yourself or buy the mixture ready-made and immediately use it in your work. After the putty has dried, it must be sanded. For this, fine-grained sandpaper is used. After the finish has dried, you can perform the final stage - painting. Water-based paint is often used. It is completely environmentally friendly because it is water-based, odorless and dries very quickly. It is sold ready-made. It is possible to make any color using special tinting compounds. Also, the painted surface can be repainted over time, updating the appearance.
Sandwich panels
Repair of window and front door slopes can be done with sandwich slabs, as shown in the following photo. The window sills and windows are decorated with sandwich slabs, and the door slopes are decorated with decorative stone. Sandwich slabs retain their visual appeal and original performance parameters for a long time.
Sandwich panels
In accordance with all the rules and regulations, repairs of window structural elements can increase the degree of resistance of windows to the negative effects of negative factors inside and outside the house. The distance between the wall and the sandwich plate must be filled with construction foam, which will act as additional insulation for the structure.
Installation of such plates is not particularly difficult. The sandwich board is fixed to the base using liquid nails, which will provide the connection with high practicality, density, and durability. Check the angles of the slopes for compliance using a small tool.
Installation of sandwich slabs should be carried out on wooden blocks, which will give the surface of the slope ideal evenness even if there is a deviation of the slope from the vertical. To ensure a neat appearance for the joints of the plates, they need to be treated with silicone.
Installation diagram of PVC sandwich panels on window slopes
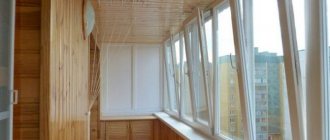
Wood finishing
Requires filigree precision in the design process. You will have to involve specialists so as not to spoil the expensive material. In addition, this design requires careful maintenance. A more acceptable option, which you can do yourself, is cladding with veneer boards or MDF.
This type of slopes is performed after the installation of wooden classic windows. To highlight the interior design. You can use this method to decorate a metal-plastic window laminated to look like wood.
Plastering
Finishing window slopes outside or inside the house is often done by plastering the surface. But applying this method is only relevant if the slopes are perfectly even. The layer of plaster mass should not exceed 2 cm in thickness, otherwise the slopes will quickly crack and become unusable. This type of finishing goes well with finishing door slopes with artificial stone.
| Stages of work | Target |
| Slope preparation | Removing greasy stains, dust, applying antiseptic |
| Slope primer | Increases adhesion of finishing materials |
| Applying the first leveling layer of plaster | The plaster is sprayed with a spatula and leveled using the following rule: |
| Slope reinforcement | To impart stability to the structure outside the house, you can use a reinforcing mesh on the slope, which is pressed into the first layer of plaster |
| Applying a decorative plaster layer | Finishing the base, giving it texture, painting |
Applying plaster
Advantages of plastic slopes
- aesthetic and finished look;
- installation of plastic slopes is an almost clean and quick procedure;
- long service life - slopes are made of the same material as plastic windows so that both windows and slopes have the same service life;
- steam- and moisture-proof - plastic slopes can be washed without worrying that water will damage them;
- ease of maintenance - they can only be wiped off from dust, and the plastered slope has to be painted periodically;
- unlike plastered ones, plastic slopes do not crack;
- ideal for plastic windows, resulting in a monolithic structure.
Of course, it is not without its drawbacks. Plastic window slopes are often scratched, and the same applies to plastic window sills. But if you treat them with care and care, the slopes will last a very long time.
As for the myth about the dangers of plastic products, as our beloved Shurik said, “And nowadays it’s easier to get poisoned with sprat from a jar.” PVC slopes are not much more harmful than varnish or paint. Plastic slopes have good thermal insulation, unlike plastered ones.
They have an air layer (plastic panels) or a layer of polyurethane foam (sandwich panel), and due to installation, PVC slopes can receive additional thermal insulation. If plastic slopes are installed on polyurethane foam, in this case the free space under the panel is filled, resulting in improved thermal insulation and protection against fungus.
They can also be installed using PVC-based glue. Liquid PVC glue helps to make an almost monolithic structure of slopes and windows.
Finishing window slopes with hollow plastic panels will cost less, but it has its drawbacks - a thin layer of thermal protection. A slope made of sandwich panels is a more preferable option in this regard. They are more durable, warmer and can be used to finish wide slopes - up to 1.5 meters.
The disadvantage of such slopes is the high price. Finishing window slopes is not an easy process; if you take on this work yourself, without experience, you can ruin everything. And installation will cost you twice as much. Therefore, if you do not have confidence in your own abilities, it is best to turn to professionals.
The price of plastic slopes depends on the height and width of the product.
Laminated slopes (with color coating) will cost more than regular ones. For example, the price for a plastic slope made of a sandwich panel 150 mm wide will be around 150 rubles per linear meter, colored “sandwiches” - 1,200 rubles per m/p, and the cost of panels 600 - 800 mm wide: 600 and 3,000 rubles, respectively .
The price for installing plastic slopes can be 400 - 500 rubles per linear meter, depending on the width.
If you still think that plastering window slopes is more profitable than sheathing them with plastic, remember the advantages of PVC slopes. Plastic window slopes will not turn yellow over time, will not crack and do not require periodic painting.
Source: proevrookna.ru/otkosy-na-okna/plastikovye-otkosy-na-okna.html
Common mistakes
It often happens that the finishing of window slopes inside is carried out in violation of technology, which entails a number of negative consequences. In other words, these structural elements of the window opening acquire low resistance to the effects of negative factors indoors, which entails rapid wear of the slopes. This is why it is so important to identify the most common mistakes made by inexperienced builders when finishing window slopes:
- incorrect measurements of the base for installation of sandwich or PVC panels, plasterboard, etc., which leads to a loose fit of materials to the slopes;
- neglect of antiseptic and sealant increases the risk of mold and mildew developing under sandwich panels, drywall and other finishing materials for decorating slopes;
- When using plaster mixtures, inexperienced craftsmen often try to correct defects in the base by applying an excessively thick layer of finishing. And this is unacceptable, since plaster more than 2 cm thick may crack after drying;
- When finishing door slopes with stone, you should not give preference to too cheap material. Decorating even with artificial stone cannot be too cheap, because such savings affect the quality of the finish.
Types of slopes
- Plastered slope - a rough layer of mortar (cement-sand or gypsum) is applied to the surface; after drying, a finishing layer is applied and painted.
- Slope made of plasterboard - the surface is covered with plasterboard, primed, puttied and painted or covered with wallpaper.
- Plastic slopes - the window opening is covered with plastic panels.
Plastic slope for windows can be of two types
- Hollow panels that have stiffening ribs inside;
- Sandwich panels are two plastic panels connected to each other by foamed polystyrene.
Purpose of internal slopes for windows
They are needed not only to improve the appearance of windows, as it may initially seem. According to their functional purpose, internal and external slopes are a single whole. Serve for sound insulation and heat and moisture protection. Incorrect installation (or absence) of a slope leads to a sharp reduction in the service life of a plastic window, even if it itself is of very high quality. Such a window is also prone to drafts and mold.
Very often, a layer of insulation is laid between the finishing material and the wall.