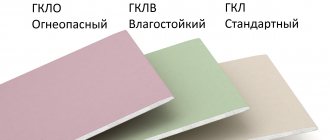
Some general information about doorways
The front door will look complete only in one case - if the walls next to it are finished. As a rule, it is installed in a small recess in the opening in the wall, and on the sides of it completely ugly elements are formed, which need to be covered with something or somehow finished off. But the design process often depends on what shape the doorway is in the apartment.
Entrance door slopes: finishing options
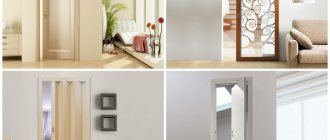
Finishing the doorway with MDF panels
Table. Types of doorways.
| Type | brief information |
| Classical | This is the usual rectangular entrance that is most common. Any option for finishing slopes is suitable here, and various materials can be used, which will be discussed below. Despite the general simplicity of finishing such a doorway, many are faced with certain problems, which are most often associated with the choice of the most suitable and easy-to-use material. In general, designing a classic doorway is not so difficult, since there are no complex or curved lines here. |
| Arched | This version of the doorway looks much more impressive than the usual classic one, and is a rectangle with a rounded top in the form of an arch. Doors that fit it are more difficult to install and technically more difficult to design. Typically, sufficiently elastic materials that can be bent or plaster are used to finish slopes. Often, the door comes with special linings that precisely match the shape of the door. In general, finishing such an entrance is much more difficult than a regular one. |
Types of materials for arched openings
Advice! If you want to have an arched entrance to your apartment, but install an ordinary rectangular door, then there is a way out. You can simply install an arched lining at the top of the doorway from the inside, but the door will look like a regular one from the outside.
Drywall slopes are a very common type of slopes.
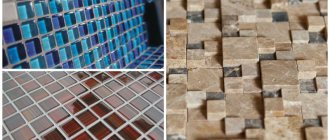
Finishing a window opening with artificial stone
Decorating windows with stone looks no less impressive than decorating doorways. An important condition is the size of the elements. It is necessary to trim the window slope with a small facing stone so that the finished window opening does not look massive.
It is recommended to use small products for window cladding
Window slopes must be leveled and primed outside and inside. When using artificial material, reinforcing the surface of the slope, even if it is made of plasterboard, using reinforced mesh is not required.
The material is laid on the windows using the monolithic method, starting from the bottom of the slope. When the lower fragments are securely fixed, you can continue laying out the upper rows. Corners should be formed by trimming the end sides of the facing products at an angle of 45 degrees.
What are slopes?
The door frame is usually called jambs, but not everyone knows that the end part of the wall where the door (or window opening) is located is called slope . By the way, some decorative overlays that are used to finish the opening are also called slopes.
Door slopes
The slopes themselves can have different sizes, but in any case, according to their parameters, they must fit the end part of the wall where the entrance door is installed. In general, they can have different thicknesses, but if we are talking about decorative overlays, then in order to avoid deformation and damage to the material, its thickness should be at least 1 cm.
The easiest way to design a slope is to use “L”-shaped panels
The purpose of finishing and installing slopes is to achieve a beautiful frame for the door. In any case, when the door itself is installed, the slopes will be damaged, and in general the end part of the wall does not look beautiful - it is either concrete, or brick, or any other material that becomes visible to everyone. Usually the ends are quite uneven, and simply covering them with wallpaper will not work - some preparation will be required. The slopes will also help to hide the mounting foam, anchors and other elements and substances that were used directly when installing the door. Only if there are slopes or their proper finishing can the door look beautiful and the doorway look finished and neat.
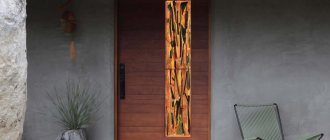
Stone decoration of the arch in the hallway
On a note! Slopes will help achieve a certain level of heat and sound insulation - apartment residents will hear less sounds coming from the entrance. Do not assume that slopes are just a decorative component.
Seamless material laying technique
This is a rather painstaking technology for laying decorative stone, but the finishing itself is much faster than with the suture technique. In this case, all coating elements are applied tightly to each other. The result is a monolithic coating.
The adhesive or liquid nails are applied directly to the back of the product. When performing seamless masonry, it is necessary to immediately remove excess glue, as it hardens quickly; it is especially necessary to ensure that it does not get on the front side of the coating. The glue is prepared in such a volume that the master can use it within a maximum of 25 minutes.
Before laying tiles, it is imperative to install a boundary profile under the building level. This is necessary to obtain clear boundaries when laying decorative elements from top to bottom. And when finishing from bottom to top, the profile will serve as a reliable basis.
Cladding the wall, as in the first case, starts from the corner, but it is only done much faster, since there is no need to ensure the evenness of the seam. All factory facing materials of the same batch are produced strictly the same size, with smooth edges. Therefore, during the installation process, the individual elements fit tightly to each other without additional trimming or adjustment.
The final stage of finishing work is impregnation of the finished coating with a special composition that increases the strength of the structure and resistance to adverse external influences.
So we told you how to properly decorate your front door with decorative stone with your own hands. Numerous photos in the article only confirm that this is one of the most beautiful ways to decorate the front doorway.
Basic information about door installation and design
In general, finishing the front door includes three stages:
- threshold design;
- finishing of slopes;
- installation of platbands and additions.
Types of door frames
All this work is carried out after the installation of the door leaf itself. As for the threshold, it must be strong enough and resistant to various types of loads. It is usually made of wood, metal, concrete. These types of materials are much more stable than the now so common PVC and can last for many years until the next door replacement.
As for platbands and extensions, they are usually used to achieve neatness in the design of the doorway. Thus, they help to hide imperfections and irregularities when the physical parameters of the wall and the very door frame that is being installed do not match. Without them, the door will look crooked and sloppy. Quite often, these elements are made from MDF, and then you don’t have to think about leveling the slopes themselves with putty. The voids between the extensions and the wall are simply filled with polyurethane foam.
Accessories for interior doors
On a note! Platbands and extensions will also help protect the door from subsidence that may occur in the future.
The slopes are finished after the door is installed. This can be done in various ways:
- sheathing;
- finishing;
- plastering.
Finishing the entrance door slopes
The last option is considered the best, as it allows you to achieve ideal evenness of the end of the wall and seal the doorway. Also, if you use your imagination, you can create an interesting unique design. And excess dust will not accumulate on top of the finishing materials.
Find out how to insulate an iron entrance door from the inside with your own hands in a special article on our portal.
Prices for various types of door frames
Door frames
How to properly make slopes for the front door from the apartment side
The question: “What is the best way to make front door slopes with your own hands?” is very relevant for those who do the repairs themselves. To properly design door jambs, they measure the opening, mark it, and trim the trim. Afterwards, the box is assembled, installed, framed with platbands and the result is evaluated.
The purpose of installing this element is to give an elegant appearance to the door and doorway, as well as to complete its outline.
Advice: to make the product look aesthetically pleasing, it is important to seal all the cracks and irregularities.
Measurements
First, it is important to measure the height and width of the door frame, the parameters of the slopes on the side of the room, their “depth,” that is, the future width of the panels. To work you will need a metal tape measure, a building level, and a pencil.
The obtained parameters are transferred to the material - MDF, wood, PVC, laminate.
Tip: if the panels are mounted on a frame, its thickness is also taken into account.
Marking for the dimensions of the extensions
Extensions are parts used to decorate both entrance and interior doors. They are purchased at a hardware store and cut to size. Markings are applied to the walls - this is especially important if it is decided to decorate the space with many small details.
The variety of options allows you to choose the most suitable ones.
Trimming extensions
After leveling the slopes and applying a primer, the parts cut to shape are applied to the installation site.
If necessary, trim them slightly and try them on again.
Box assembly
The box can be assembled separately and installed as a whole. The parts are fastened with self-tapping screws and perforated corners on the “wrong” side. The finished structure is tried on at the installation site and adjusted.
Frame cladding involves the preliminary installation of a metal (aluminum) or wooden profile around the perimeter of the doorway.
Installation
Install the product using special glue and foam. To ensure that the panels do not bend and the gluing is reliable, homemade spacers are installed inside, under the edges of which pieces of rubber are placed so that there are no dents left.
Thermal insulation and sound insulation are the functions of the front door, which partly depend on the type of finishing of the slopes.
Framing with platbands
The construction of the structure with platbands begins after installation of the box. They are made from the same material as the slopes themselves. It is permissible to make such a decorative element more voluminous; when using “hollow” structures, wiring is drawn inside them and LED lamps are installed.
It is important to consider that finishing materials have not only their own characteristics that affect thermal insulation, but also their weight.
Selection of materials
Yes, the slopes perform a protective function, but no one took away their decorative function. And you can use a lot of different materials to decorate them. The main requirement for them is the absence of fragility and tendency to mechanical damage. The slopes must be finished so that they can last for many years without the need for repairs, not even major repairs, but cosmetic ones. Moreover, it is worth considering that the doorway is the place where all family members pass every day, and more than once, something constantly falls here, the door and the slopes themselves can be subject to impacts. So the material for finishing them needs to be one that can withstand all these loads for a long time and not deteriorate.
Finishing the opening: slopes, extensions
Choosing masonry design
There are many options for laying, but they all come down to two: seamless and with preservation of the seam.
Seamless finishes:
- under granite;
- marbled;
- imitation of a rock formation;
- rocky pile;
- alpine slate (you will learn what a decorative stone slate is from this article).
Facing with preservation of the seam:
- under brickwork;
- bassoon with multi-colored brick-imitation tiles;
- walls of an ancient fortress.
Plastering
This is a classic and the most common design option for a doorway. This method probably originated back when the very first front door was installed. A slope finished with plaster will serve faithfully for many years without complaints. The material is not afraid of temperature changes, damage, and plaster will perfectly hide and fill all the unevenness of the end of the wall (no other material can compare with it in this regard). Using this material you can achieve a perfectly flat plane at the end of the wall.
Plastering slopes - a method proven over the years
You can paint the plaster for beauty, cover it with wallpaper, or put some kind of pattern on it. In general, there is a lot of scope for imagination here. The main disadvantage of this method is the appearance of a large amount of dirt during the work. Also, the disadvantages include high labor costs, and it will also take time for the material to dry. If you have no experience working with plaster, then it is recommended to carefully study this issue or even invite a specialist - working with the material is not easy for a beginner.
Advice! In order for the slopes to look finished, after plastering they need to be sanded and puttied.
Plastering slopes
Prices for popular types of plaster
Plaster
Advantages of finishing
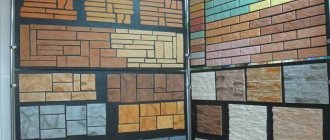
Natural stone is very beautiful and luxurious. However, recently many people prefer a man-made analogue. The reason is that natural stone is too expensive and heavy. The advantages of this material are as follows:
Light weight compared to natural material. This significantly reduces the cost of work, since there is no need to worry about additional strengthening of the foundation:
- Durability. In this respect, composite materials are not inferior to natural ones;
- Variety of shades, configurations and textures. Imitation of granite, shell rock or marble is possible, and very realistic;
- Easy to install. The back side of the artificial stone tiles is completely smooth. This is how the man-made version compares favorably with the natural one;
- Versatility. The decor can be mounted on walls made of wood, brick or concrete;
- Fire resistance. Thanks to this, fireplaces are decorated with artificial stone;
- Hydrophobicity. This allows the material to be used for decorating walls in swimming pools and bathrooms. In addition, surfaces lined with decorative stone are unattractive to fungi and molds;
- Resistance to temperature changes and solar radiation;
- Good compatibility with other materials. These are plaster, wood and forged elements;
- Easy to care for (a soft cloth and a detergent solution without abrasive elements is enough).
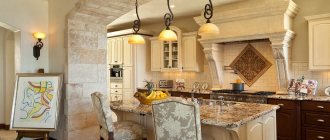
Stone is also suitable as an accent of interior elements (arch, column, fireplace, niche, separate “accent” wall. However, laying all the walls completely with stone is, to put it mildly, not the best idea. The result will be some kind of ancient knight’s castle, and not a stylish modern one room.
Plasterboard finishing
This material is loved by many craftsmen, and it is readily used in construction and repair work. It is universal and easy to use, and therefore can also be used for finishing slopes. This option is also called dry plaster.
Plasterboard finishing
The main advantages of using drywall are increasing the speed of work and simplifying it. If necessary, drywall will perfectly hide all the shortcomings. In general, the work on using it to design slopes looks like this:
- The surface is primed after cleaning it of debris;
- a metal frame is formed from the profile;
- moisture-resistant wall plasterboard is cut into pieces of the required sizes and fixed to the frame, forming a box;
- after installing the sheets, the cracks and the sheets themselves are puttyed (it will not be possible to glue anything onto untreated sheets of drywall or cover them with some kind of decorative composition);
- when the putty dries, you can decorate the doorway.
Installation of plasterboard elements
On a note! If necessary, under the frame on which the drywall is fixed, you can lay insulation - then the apartment will be warmer.
Advantages of choosing artificial material for finishing work
Artificial stone is available in different but standard shapes. Different product models differ in design solutions. Externally, the material can resemble not only natural stone, but also brickwork and other materials. Therefore, the main advantages of the facing coating are the ease of installation work and the ability to select the material for any design project.
The main advantages of finishing entrance openings to residential and public buildings with artificial stone:
- The coating does not affect the microclimate of the living space and has a special hygienic quality certificate;
- This is a fairly light material when compared with natural material. Therefore, it does not place a large load on the load-bearing walls of the building;
- Absolutely non-flammable material, fully meets established fire safety requirements;
- More expensive products are not inferior in strength to natural stone;
- The material is resistant to moisture, it can even be used to equip baths and saunas;
- Artificial stones have the same dimensions and absolutely smooth edges, which greatly facilitates finishing work;
- The components used to give the material natural shades penetrate its structure, so the coating does not fade, i.e. its original color remains unchanged throughout its service life.
Finishing doors with decorative stone is possible even for an inexperienced beginner. All decorative tiles have the same thickness and fit easily onto the surface. It is enough to control the evenness of laying the rows using a building level. Damaged artificial material can be restored.
MDF slopes
This is also a very popular option for decorating a doorway. At the moment, MDF finishing is considered perhaps the most common. The material is resistant to various influences, does not require additional decoration, has a lot of color variations and can be matched to the installed door. Veneered MDF as a whole is indistinguishable from natural wood.
MDF slopes
Advice! If the door slopes are designed not only inside the apartment, but also outside, then it is worth purchasing a moisture-resistant MDF version.
Installing this option is simple - even a beginner can handle it. You can buy materials in advance - all that remains is to adjust them to the required dimensions, assemble the box and install it. The cavities are foamed with polyurethane foam.
Prices for polyurethane sealant
Polyurethane sealant
Stages of preparing a slope for installation of MDF panels
Unfortunately, MDF is not cheap, and it is easy to scratch. So you need to handle slopes made of this material carefully. Plus, it tends to absorb odors, and fat on it easily leaves stains.
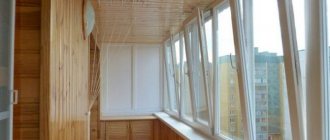
Cladding
An excellent option for those who want as much natural wood as possible in their home. By analogy with MDF paneling, you can decorate the ends of the walls near the front door. They will look very beautiful and noble.
Lining
Installation must be done on top of a wooden sheathing. So narrow slopes cannot be covered with clapboard. Natural wood is not cheap, so you need to be prepared to shell out more money.
It is also worth considering that with changes in humidity and temperature, natural wood tends to deform. Before installation, it must be coated with protective compounds to prevent rotting and the spread of insects. It is also better to impregnate it with a fire retardant to reduce the level of flammability.
After installing the front door, to complete the repair it is necessary to refine the doorway
Advice! Instead of varnish, it is better to coat the lining with a special wax-oil composition. She will look better and more noble.
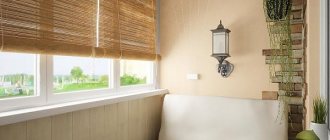
PVC slopes and polyurethane linings
Wherever PVC is used now! So the front door can be framed with it. Installation is quick, and the price of PVC slopes is quite low. But this material does not have many advantages.
PVC is fragile and easy to break. Sometimes it’s enough to just lean on it and all the work will go down the drain. The slope cannot be repaired; it will only have to be replaced. And in general, the service life of the material does not exceed a couple of years. Some people cover plastered slopes with plastic, but in reality it looks ugly and cheap.
Plastic slopes
It is recommended to use plastic for finishing slopes only as a temporary option. It is better to change it as soon as possible for something more worthy and practical.
By the way, you can also decorate the slopes with polyurethane overlays, which can imitate stucco. This option looks decent. But the price for such overlays is high. You need to glue the overlays on a flat surface, so you will still have to pre-plaster or cover the ends of the walls with plasterboard.
Tools and materials for finishing slopes
Work such as finishing slopes requires accuracy and precision. Suitable materials and tools are used accordingly.
Plastering work is being carried out. Need to stock up:
- primer;
- finishing putty to finally prepare the surface;
- plaster mixture (you can use regular cement mortar);
- a perforated metal corner, which will be required to align the corners;
- a stationery knife, self-tapping screws in case of using drywall;
- sandpaper (from coarse to fine grain);
- spatulas (wide, medium);
- a shortened rule to cut out slope surfaces;
- a container suitable for mixing the solution;
- a drill with a special attachment (for mixing the solution);
- level and plumb.
If panels made from different materials are installed, then the following may be required:
- material for panels (you can purchase products ready for installation on slopes);
- platbands (decorative corners) to cover the joints of the panels;
- when installing lining - timber (section options 1.5x3 or 2x3 cm);
- small nails;
- special holders for lining;
- dowels to secure the timber to a wall or panel;
- if the walls are concrete - a hammer drill (a drill with a hammer function);
- measuring instruments;
- self-tapping screws to attach panels;
- screwdriver, jigsaw, knife, hacksaw, hammer, etc.
When all the required materials and tools have been collected, surface preparation and subsequent installation can begin.
How does the process of decorating slopes with MDF panels take place?
Step 1. First of all, you need to prepare all the tools. This includes a tape measure, a square, a pencil, a miter saw, a sharp knife, a hammer, masking tape, a screwdriver, and a drill. You also need fastening materials and polyurethane foam.
Tools required for work
Prices for popular models of screwdrivers
Screwdrivers
Step 2. Next you need to take measurements. The procedure is carried out after installing the door - you need to measure the width of the end part of the wall, as well as the width of the doorway. It is better to take measurements at several points vertically and horizontally.
Taking measurements
The width of the opening is measured
Step 3. Now you need to make markings on the MDF planks according to the obtained dimensions. The edge along which the cut will be made must be taped with masking tape. If this is not done, unsightly chips may appear on the panel during sawing.
Marking MDF panels
The edges of the cut are taped with masking tape
Step 4. Using a square, you need to draw an even cutting line.
The cutting line is drawn
Step 5. Using a miter saw, you need to cut the workpieces.
Blanks are being sawed
Step 6. Now you need to assemble the received additions into one design. Use a drill to drill holes for the screws. It is not recommended to screw them in directly with a screwdriver - the fasteners can damage the panels. The holes are made in several pieces at a distance of 10-15 cm from each other.
Assembly of accessories
Step 7. Next, the resulting box needs to be installed in the doorway. You need to install it evenly so that the gaps between the frame and the door are equal on all sides.
The box is installed in the opening
Step 8. Now you should make about 10-12 spacer elements from a wooden block.
Manufacturing of spacer elements
Step 9. Spacer elements need to be hammered between the wall and the box. About 3-4 pieces are hammered vertically, and 2 pieces along the upper and lower borders of the box. The block should not stick out; it must be hammered in tightly.
Spacers get clogged
Step 10. Now you can install the platbands. First you need to attach the trim and measure the desired length.
Installation of platbands
Step 11. Next, you need to use a saw to cut the trim to measure at an angle of 45 degrees.
Trimming trims
Step 12. Before installing the platbands, the gaps between the wall and the box must be foamed with foam. It will help further secure the box and provide sound and heat insulation. Excess foam can be cut off with a knife after it hardens.
Gaps are filled with foam
Step 13. Next, you need to secure the vertical trims to the extensions using small decorative nails.
Vertical trims are nailed
Step 14. Now you need to measure and saw off the casing at the top and bottom, and then secure it with nails.
Platband is measured
Step 15. After the structure has been assembled, you need to fix it on the door frame with masking tape for about a couple of hours. Once the foam is completely dry, the tape can be removed.
The structure is fixed with masking tape
Video - How to make slopes?
Installation of door slopes
The corner slope can be installed using a frame or installing the trim with mortar or glue. It is more difficult to work with the frame, so this process will be described step by step below. For the frame, wooden slats or a metal profile are suitable. You can install the frame on dowels; the slats are fastened along the entire perimeter of the opening, two slats on both sides, as shown in the photo:
Frame installation
To strengthen the slope, several slats are mounted in parallel; they can be installed at the lower, upper and middle points. If drywall is used, then it is simply attached to the profile with self-tapping screws around the perimeter, recessing the cap, and the space between the wall and the gypsum board can be filled with insulation. A perforated corner is installed on the edges of the material, and the joints must be sealed with sickle tape. Next, everything is puttied and smoothed with sandpaper. At the very end, the dust is removed and finishing is carried out.
If MDF is used, then installation on the frame should be carried out with small nails or self-tapping screws. Corners and fastening elements are covered with platbands. Laminate flooring is very easy to install, the first lamella is carefully fastened with nails directly into the groove, and the rest are installed in the lock. The last plank must also be attached.