Of course, the work in this area of the façade does not end with the installation of window frames. Ahead lies a rather complex and responsible operation of finishing window slopes. And this is not only to give the appearance of the building a finished look, the intended design. There are also more important, from a practical point of view, reasons.
Finishing window slopes outside
Finishing of window slopes from the outside can be done using several technologies and using different materials. To decide on their choice, you need to consider the most affordable options for doing it yourself.
Description of finishing material
Plastic corners belong to construction fittings, which are often used for decorating external protrusions. These can be slopes, niches, boxes, columns and other architectural elements with 90-degree turns. The material is used to solve the following problems:
- masking installation seams;
- transition between different finishes;
- protection of corners from mechanical damage, penetration of moisture, dust, dirt.
In most cases, a plastic corner is installed on slopes. This gives the opening a finished look. The polymer product is not afraid of moisture, lasts 20-25 years, and is easy to wipe clean. The advantages also include light weight, a wide range of colors and sizes, simple installation, and low cost. But scratches become a place where dirt accumulates, and if excessive pressure is applied to the workpiece, irreparable deformation of the soft strip occurs. It is worth noting the release of toxins when the polymer burns and gradual fading under ultraviolet rays.
Variety in color Source sense-life.com
Installation
Installation of slopes can be done using the following methods:
Since MDF is a sheet material, it is easy to mark elements on it. There are times when for installation you need to join two panels on the wall. Here you can use the frame installation method. But if the installation can be done with solid elements, then it is quite possible to get by with the adhesive method.
How to mount the frame
When constructing the frame, a wooden sheathing is used, which also serves as a support. According to the technology, it will be necessary to install the slats on the wall in a horizontal position in increments of thirty centimeters, and attach them with dowels. The voids between them are filled with thermal insulation or construction foam.
Next, MDF panels of the appropriate size are attached to this frame. They are fixed with self-tapping screws, followed by special overlays.
Important: The integrity of the entire panel will depend on the accuracy and high-quality filling of voids.
Gluing method
The adhesive method is used mainly when the wall surface is perfectly flat and the laying seam is minimal in width. Also, when gluing panels, it is not always possible to use insulating material.
Important: When gluing MDF panels, all existing cracks and seams must be carefully sealed, and the surface treated with a special primer.
Using a level, beacons are installed in all directions, for which a solution is first applied. It is applied to the slopes and leveled along the beacons with a spatula. The solution is left for two days until completely dry.
The adhesive composition is applied to the inside of the parts, which are then applied to the wall.
Gluing of MDF elements should be done with special adhesives. This way you will be sure of reliable adhesion of surfaces and strong adhesion of materials. This will also eliminate the possibility of elements falling off in cases of mechanical stress and temperature fluctuations.
Kinds
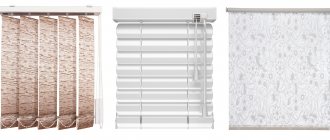
The determining criteria for choosing plastic corners are color, size and types of fittings. The main classification is based on the cross-sectional shape of the products. The classic equal-flange option is most in demand. The width ranges from 10 to 50 mm in increments of 5 or 10 mm. There are three more versions:
- L – 5*17, 10*20, 15*25 mm;
- F or P - used as a profile to protect the end edges of sheet or cladding trim;
- T – connecting element of dissimilar materials in one plane (12-22*10 mm).
There are also 90/105 degree turns, straight/rounded/curly shelves. Separately, monochromatic (solid) corners or with a pattern (for example, imitation wood) are considered; products with a textured surface are less common. For those who like to change their interior frequently, manufacturers offer detachable fittings. The front part is fixed in the stationary part using a snap lock.
Split corner profile Source rewik.ru
For convenience, you can find samples with an applied adhesive composition, which is protected with a waterproof protective film. This option is sold in the form of rolls of 50 meters, which allows you to purchase tape of any length while minimizing excess after installation.
Scope and advantages of window corners
The plastic window corner is suitable for both internal and external finishing of slopes. At the same time, it goes well with all the main facing materials - wallpaper, painted putty or plaster, plastic sandwich panels, plasterboard lined with various materials and decorative panels based on MDF. Thanks to these elements it is possible to:
- form ideal joints between walls and internal or external slopes;
- reduce the negative visual effect that uneven surfaces adjacent to each other sometimes create;
- protect internal and external corners of slopes from impacts and precipitation;
- maintain assembly seams.
The corners have an affordable price and a long service life, and also retain their color during use. The disadvantages of such elements include the impossibility of their use in areas where there is a risk of fire, and the fragility of the material, which requires careful handling of these products when cutting and installing them. However, these disadvantages are conditional in nature, since they do not affect the main characteristics.
As an alternative to window corners, it is recommended to consider the platbands included in the set of special slope systems. However, you must immediately be prepared that such finishing will cost more.
Glue selection
Before gluing corners to slopes or other architectural elements, it is necessary to select the correct installation composition. Today there are 4 solutions to the problem. Let's look at each of them in more detail.
See also: Catalog of companies that specialize in decorative forms.
Liquid nails and sealant
In modern construction markets, sealants with liquid nails are presented in gun tubes or tubes. Moreover, they have the same volume. Buyers often get confused in this variety.
For installing lightweight plastic, only 2 options are suitable: liquid nails or adhesive-sealant. Here it is necessary to pay attention to the fact that the composition also exhibits good adhesion to the base. So, for absorbent surfaces you can use acrylic-based or neutral adhesives. They practically do not emit odor, can be wet cleaned before drying, and dry quickly. If work is carried out on concrete, plastic, metal or glass, you will have to make a choice in favor of universal compounds.
Universal composition Source stpulscen.ru
Sealants are often used to install corner profiles. This is justified by additional waterproofing. However, this approach is incorrect due to the weak adhesive ability of the material, and the dry residue can only fill the voids. A corner fixed with sealant does not always last for a year.
Liquid plastic
Liquid plastic is sold in the same containers as liquid nails. But the cost of the composition differs significantly from them in a larger direction. This is justified by high performance and technical characteristics. So, among the advantages the following are highlighted:
quality indicators and shape remain unchanged 10 years after installation of the fittings;
color change under the influence of ultraviolet rays, oxidation does not occur over time;
Due to minimal shrinkage during the drying process and good adhesion, a monolithic structure is formed, which additionally protects the base from moisture penetration.
Liquid plastic Source pvcwindow.ru
Liquid plastic belongs to the group of universal building materials. They can be used for gluing corners on slopes and filling/sealing joints between the window frame and adjacent planes. In addition, the composition is characterized by high mechanical stability, which allows it to be used for fastening window sills and sheet finishing of the opening. The only drawback against the background of numerous advantages is that the use is limited to PVC bases.
Polyurethane glue
Before gluing the plastic corner to the plastic panel, you should find out in advance about the color of the synthetic glue from light beige to dark brown. If the work surfaces are white, then the excess will be visible here. It can only be removed using organic or special solvents until it dries. Before using the material, you also need to find out about the working time of the glue in the open state.
Classic version of polyurethane glue Source sdelais.ru
The main advantages of polyurethane adhesive are as follows:
- resistance to biological damage and corrosion, which is important for areas with variable humidity;
- low thermal expansion allows the glue to be used in conditions from -60 to +150℃, which is not typical for the listed analogues;
- resistance to oils and organic solvents allows the composition to be used for finishing in laboratories and industrial enterprises;
- plasticity helps maintain the characteristics of the dry residue under vibration load;
- high adhesive ability determines the versatility of the glue to work with any substrate.
They also note the uniqueness of the polyurethane composition regarding the drying process. The higher the relative humidity, the more active it is. This allows you to install decorative corners for slopes in the bathroom without prior ventilation.
Advantages of plastic
In the finishing process, in addition to plastic, corners made of other materials can also be used, but plastic ones are superior to them in many respects. This is expressed in the following advantages:
- light weight;
- relatively robust design;
- resistance to chemicals;
- a certain elasticity;
- smooth surface;
- variety of sizes;
- variety of colors.
The basis for decorative corners of this type is PVC plastic. The material itself can be considered an environmentally friendly material due to the fact that under normal conditions it does not emit substances harmful to the human body, which is important when installed indoors. Given the dimensions and thickness used, the weight of the corner is minimal, which is important when installing it on window slopes. The surface of the plastic is absolutely smooth. On the one hand, this prevents the appearance of persistent stains that would be impossible to wash; on the other hand, it eliminates the development of fungus and mold, which is a bonus.
PVC tolerates contact well with most chemicals used in everyday life. This makes it easier to maintain and allows you to wash the corner using a regular soap solution or compounds containing chlorine. The corner is elastic, which allows it to be given curved shapes, for example, if the window opening is made in the shape of an arch. The dimensions are selected depending on the purpose that should be achieved by using the corner. Manufacturers produce corners in various colors. In this case, coloring can be done throughout the entire structure through the use of pigment during production. There is an option with an applied film, which is glued to the finished white corner.
Installation technology
Before gluing the plastic corner to the corner of the wall, the base must be freed from dust, dirt, and debris. If old fittings are replaced, then any remaining adhesive must be removed.
Elimination of excess before installing corners Source myremontnow.ru
The profile is sold in its pure form, but it is better to wipe it with a damp cloth or degreaser (recommended) and dry it.
After trimming wallpaper, drywall with panels, and polyurethane foam, protrusions often form. It is important to inspect the corner for their presence, since depressions and chips can be hidden, but not obstacles to the tight fit of the fittings to the slope. In the case of wallpaper, it is worth noting the need to remove it by half the width of the corner shelf. Then gluing will occur to the canvas and the base, which gives a better and more durable result.
Next, the workpieces are cut. To form an internal joint, the planks are cut with the thickness of the corner subtracted. External ones are done in three ways:
- overlap;
- joined at right angles;
- cut the planks at an angle of 45 degrees.
Apply glue to the shelf in dots or in a continuous stripe. The first option allows you to save on adhesive composition and speed up installation. This approach is relevant in places with the lowest possible mechanical load. The second method gives better results in terms of strength and durability. The main thing here is not to apply a lot of glue and try to place it closer to the center.
Glue in a tube for a gun Source www.severdol.ru
Press the corner for slopes from the center with gradual pressure on the shelves. This reduces the risk of bending flexible fittings. Until it dries completely, it is recommended to additionally secure the plank in several places, especially at the ends, with strips of paper (painting) tape. It is better to use an inexpensive narrow strip, as it can be peeled off more easily without damaging the finish.
Often, in the case of a trimmed joint, the edges are not perfectly even. Because of this, dust accumulates in the gaps, and over time the seams begin to stand out due to darkening. To avoid this, you can sharpen the edges with a knife in advance or sand them with fine sandpaper after installation. The void is filled with sealant or liquid plastic in the color of the fittings.
Preparatory stage
The preparatory stage is not too difficult if the main finishing has already been completed. If it has not been done, then you will need to pay special attention to the external and internal corners of the slopes of plastic windows. For external corners, a 90-degree outlet is required so that the overlay can be fixed along the entire plane. When working you will need the following tool:
- construction knife or hacksaw with fine teeth;
- roulette;
- marker;
- glue.
If gluing the corner will be done on a painted surface, then it makes sense to prime it. This is necessary to increase adhesion and to reduce the amount of glue that goes into the pores of the putty. It is necessary to prime exactly the area on which the corner will be glued, since traces may remain from the primer. It is important to calculate the total length of the pads that will be required. This applies not only to the external corners of the slopes, but also to the internal junctions of the windows to the slopes and the window sill to the slopes. It is necessary to proceed from the fact that the standard length of one strip is within three meters; more often, manufacturers produce corners with a length of 270 cm.
Additionally, you need to decide what kind of glue will be used to attach the corner. It is common to use clear silicone. It has excellent adhesive properties and does not react with PVC, and is also low cost. The disadvantage of the composition is the loss of its properties over time. The best solution is to use a special glue for PVC, which also interacts well with other materials. This glue is also called “liquid plastic”. In this case, the choice should also fall on a transparent composition, which will eliminate the appearance of stains.
Briefly about the main thing
Plastic corners come in different colors, sizes and cross-sectional shapes. They are intended for decorating external and internal corners, end edges of sheet finishing, and installation joints in one plane.
To glue the fittings, liquid nails, adhesive-sealant, polyurethane glue or liquid plastic are used. The compositions differ in technical characteristics and color.
According to the technology, installation is carried out in 3 steps: preparing the base and corners (cleaning, cutting), applying glue, fixing the planks.
Ratings 0
How to trim and install platbands correctly
After installing the extensions and the glue has hardened, it is necessary to cover the ends of the slopes and the foam seam with platbands. The method of fastening them for different shapes of the box profile and accessories may differ.
Telescopic platbands are installed with a comb into the groove of the box or extension; fastening can be reinforced with concentrated PVA glue or liquid nails. Such trims can be installed only after the glue or foam on the boards has completely hardened, otherwise they may come off.
Smooth trims are attached to the extensions with small furniture nails with an anodized coating and without heads. Their installation is possible within 1–2 hours after installation of the extensions.
The trim should only be cut using a miter box or a cutting saw. As for the cutting angle, platbands with a semicircular shape of the front surface are cut at 45°, and rectangular ones are cut strictly perpendicularly. In this case, the contour of the platband is formed according to a pattern opposite to the assembly of door frames: two vertical posts and a crossbar between them. Thus, the cut points will not be visible, since they are facing upward.
How to reliably glue a PVC corner
After the wallpaper is pasted and painted, you can begin placing plastic corners for PVC slopes on the corners of the window and door openings. The installation of the corners itself consists of several stages:
- At the initial stage, you should remove the remains from previous operations and trim the wallpaper to the size of the corner shelf, otherwise the element will not stick to a solid base, but to the material from which the wallpaper is made. Before applying the glue, it is necessary to remove any remaining grease so that the glue works at full strength, and correct removal of the wallpaper is achieved by applying corner to corner on the wallpaper. Using an ordinary pencil, draw a line along which the edge of the wallpaper is trimmed under a metal ruler with a sharp knife. The operation must be repeated on the other side and on top. To reduce the likelihood of getting gaps between the PVC corners, you need to start by gluing the corner on top.
- The second step is to trim the corners after carefully measuring the length. It is important to accurately measure the dimensions and transfer them to the corner. You should use a hacksaw or tin snips to trim the sides.
- The third stage is applying glue. This process depends on what kind of glue we have. If the solution is in a tube or tube, then you should apply it with a dotted line on the inside of the corner in the middle of the shelves. The distance between adjacent islands of glue should be 1-2 cm. For better adhesion, you can apply it in a continuous line, but so that when pressed, the excess does not stick out from under the corner. In addition to the adhesive, you need to have a rag on hand.
- The stage of mounting the corner consists of pressing it tightly to the corner and securing it in a stationary state with masking or regular tape. After a day, you can remove the tape to see how we managed to glue the corners.
You can see how to trim a corner correctly in the video.
A new product on the market is in great demand - the self-adhesive option. It is versatile, since there is no need to buy glue separately for it. In addition, these corners are flexible, making installation as easy as possible. Another advantage of such a product is that they are sold in roll-type packaging up to 50 m long, which means you can purchase almost any packaging required in length in each specific case to avoid any joints. When working with such a corner, you should tear off the protective layer, press the product to the corner and press down along its entire length.
From the presented material you can see how to install corners on slopes. With enough attention and the availability of tools, you can adjust the plastic corner for the slopes in such a way that the joint lines will be practically invisible, and windows and doors will take on a different, more attractive look.
Corner sizes
The use of slopes is an important stage in the final finishing of the surface, which allows you to give the room a finished look and sparkle the interior with sophistication of style without much difficulty and large investments of money.