A major renovation of a balcony involves not only finishing the walls, but also replacing the flooring and covering the ceiling. If you put in the effort and choose good materials, renovations will not only improve the design. Proper cladding will allow you to change the purpose of the room: to equip a recreation area or a study. Finishing the inside of the balcony will allow you to insulate the structure using sheathing and panels.
Requirements and standards
The materials used to decorate the balcony must meet certain requirements. They must be resistant to ultraviolet radiation, have low thermal conductivity, and be safe for the human body.
When choosing a color scheme, preference should be given to natural shades. Dark colors allow the sun's rays to heat up a room faster, but they can only be used for flooring. Therefore, types of materials that reflect rays are often used for walls.
Sheathing materials
There are many materials offered on the building materials market for interior finishing of balconies. The most popular of them are finishing the balcony with laminate, corrugated sheets and PVC panels. These are artificial materials made using modern technologies. However, the classic options for finishing a balcony with plaster remain relevant. For those who love environmental friendliness, it is better to decorate the balcony with brick or stone. Suitable for a cold balcony.
Glazing and finishing of loggias or balconies is an important part of the renovation. To protect the structure externally, you will need the exterior finishing of the balcony with a block house.
Lining and eurolining
Increasingly, craftsmen prefer finishing balconies with wooden paneling. This is a classic finishing option that has been used for decades. This material is selected due to its quality characteristics. The most famous of them:
- environmental friendliness;
- practicality;
- long service life;
- a variety of decorative uses, subject to the necessary processing of wooden panels.
When finishing a balcony with eurolining, it is worth taking into account the length of the tenon and the low level of humidity in comparison with the usual version of the finishing material.
Since wood has always been considered a fire hazard, it is treated with fire-resistant impregnations to minimize risks.
MDF lining
Finishing a balcony using MDF panels is more reminiscent of plastic panels in design, but they do not contain adhesive additives. This material is considered moisture resistant, although it is not recommended for use on a cold balcony without glazing.
The main advantage of the panels is the wide variety of colors. The range includes the following shades:
- oak;
- Apple tree;
- nut;
- cherry;
- pear.
To install MDF panels, it is necessary to install sheathing. This design makes it possible to carry out insulation.
Balcony finishing with plastic panels
The use of plastic panels remains relevant. The plastic-clad room looks laconic and modern. Plastic has many advantages:
- ease of care;
- service life exceeding 25 years;
- ease of installation;
- choice of colors;
- practicality.
- panels are produced in widths of 25 and 38 cm.
Note! Narrower strips are more resistant to temperature changes, so when covering a cold balcony it is recommended to use just such products.
When choosing facing materials, you should not believe the fears of those who believe that plastic is toxic. In most cases, plastic must be heated to a temperature of at least 300 degrees to release harmful substances. This probability is negligible.
Wood boards
Various wood slabs are used to decorate warm balconies. Such panels react negatively to high humidity. They quickly lose their shape and swell. Therefore, they are used only in high-quality insulated rooms.
Decorating a balcony with natural wood will be very expensive. Therefore, wooden boards made from shavings or sawdust are used: chipboard, MDF, fiberboard and OSB. They are more affordable and suitable for all types of material cutting. They are attached to the sheathing, after which the joints are masked with decorative elements.
Wooden slabs are suitable for flooring. They are laid on logs located across the slab.
Cork panels
If you want the comfort and warmth of natural material, but don’t have the funds to purchase wood, you can use cork panels. They are made from the bark of the cork tree. The advantages of the material are:
- Fire safety;
- ease of cutting;
- environmental friendliness and safety;
- resistance to rotting;
- waterproof (subject to waxing of the top layer);
- no electrostatics.
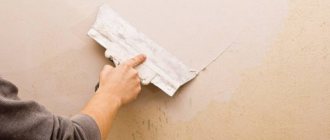
Before starting installation work, the surface to be treated is carefully prepared. Leveling the walls is considered the most labor-intensive stage of work.
To create a flat surface for further work, drywall is used. It is attached to the sheathing using self-tapping screws. Cork panels are glued to the base using cork glue.
Important! Cork glue sets quickly, so it is important to install the panels correctly right away. Otherwise, it will be impossible to move them.
Corks are available in sand, beige coffee and brown shades. Even a small palette of materials allows you to choose the color you need for a cozy interior.
Ceramic tile
Ceramic tiles are a classic option for interior decoration, affordable and simple. This option is used on those surfaces that are susceptible to contamination.
In some cases, the entire room is tiled. However, more often when decorating a balcony, ceramic tiles are combined with wallpaper and various panels. This is relevant when combining a balcony and a living room.
Tiles have many positive qualities:
- practicality;
- ease of installation;
- not exposed to aggressive substances;
- sun resistance;
- a variety of colors and textures allows you to create unique interiors.
Ceramic tiles, due to their composition, are considered environmentally friendly, so they are perfect for residential premises.
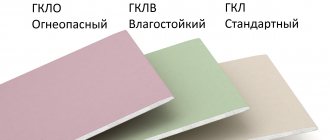
Drywall
Drywall can act as the main finishing of the loggia. When choosing a material, you should pay attention to its level of moisture resistance. For such work, green slabs with blue markings are selected. Finishing the balcony using plasterboard allows you to level the surface. And on top of the sheets you can stick any finishing materials.
Ceramic tile cladding
Cladding with ceramic tiles The tiles are easy to clean, easy to care for, durable and aesthetically attractive. The material is resistant to cold, moisture and fire. There are hundreds of decorative ceramic tile options in different styles, colors, shapes and sizes.
Ceramics are laid both on insulated balconies and on cold ones. You can put other building material on the floor to prevent your feet from getting cold.
The difference between a balcony and a loggia is that the first is an open area adjacent to the outer wall. The loggia is surrounded on three sides by walls, it is buried inside the building, and its floor is part of the load-bearing slab. Thus, it is not advisable to make the balcony heavier, but the loggia can even be completely decorated with tiles.
Tile installation
Laying tiles
The masonry technology is simple, even for a person without experience in finishing work.
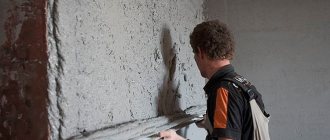
- First, make sure the surface is even. If necessary, extend the walls with plaster. Check the parameter using a building level
- Tile adhesive adheres well to the primer. Apply a layer before laying and wait until dry
- Begin laying from bottom to top, and the entire future picture depends on the evenness of the bottom row
- To prevent the tile from sliding down (if it does not start from the floor), temporarily attach an aluminum profile under the bottom edge
- It is better to buy ready-made glue in diluted form. It is applied to the inner surface of the tile with an even spatula, and the excess is removed with a serrated
- Place the square against the wall and press, gently tap until it sticks completely
- To ensure that the gaps between the rows are the same, use special calibrators in the form of crosses
- A day after laying, when the glue has dried, spread the grout and fill the seams with it. Wipe the tiles with a cloth
When purchasing tiles, always buy 10% more. This will come in handy as usually a small portion of the material will crack or break.
Finishing the balcony with siding
On unglazed balconies, metal sheets called “siding” are used for decoration. It is attached to the frame, and therefore allows you to insulate the structure. To work with finishing you need the following materials:
- scissors;
- hacksaw for metal;
- Bulgarian.
The material has a drawback: it quickly loses its original color when exposed to constant sunlight.
Finishing process
To decorate a balcony with your own hands, you need minimal knowledge in the field of construction. Step-by-step instructions consist of several steps:
- Preparation.
- Basic finishing work.
- Final operations.
Each of them is important to obtain a quality result.
Preparatory stage
First you need to determine the main purpose of the room. This could be a relaxation area, a sleeping area, a study or a greenhouse.
Then the degree of insulation of the balcony is selected. Next, the main slab is inspected. If such defects are detected (destruction of the edge of the slab, peeling of the concrete layer), they are eliminated, repair work is carried out and enhanced protection from moisture is organized.
The next step is to remove all the old decorative finishing, including the layer of flooring up to the slab. This allows you to inspect the condition of the screed. If it is in order, it is left, and if not, it is replaced. After completing the preparation of the floor, they proceed to insulating the walls of the balcony (front and side). At the same time, the old frames and door block should be replaced.
When planning, the location of cabinets and other furniture is thought through. This is important for routing wiring under sockets.
PVC paneling
PVC panels can also be installed on the balcony. This material is easy to use, simple and aesthetic. Work on sheathing with PVC panels begins with the installation of sheathing made of wooden beams or metal profiles. Wooden components are pre-treated with antiseptics to prevent rotting.
Mounting points are marked on the finished frame. The building level and plumb line will help you determine them correctly.
The panels are installed starting from the corner near the window frame. They are fastened with brackets and connected to each other using a tongue-and-groove system. If necessary, panels are cut for installation under window blocks.
Additional method of fastening the slats
This method allows you to use thin slats comfortably. It makes it possible to adjust their location relative to the frame and wall. For such work you will need a U-shaped perforated profile. It is mounted on the wall, and numerous holes make it possible to adjust the location. When using a pobedit drill, you can drill a hole in the wall and the batten at the same time.
Frame around windows and doors
These are areas that require special care. This is where the slats are located, onto which the corner and end parts of the panels are fixed. The distance between the dowels is 30-40 cm. If a crack appears on the rails during installation, you will have to replace the rail completely. Otherwise, the deformation will increase over time, which will reduce all efforts to nothing.
Drywall
Covering a balcony with plasterboard is only permissible if painting, decorative plaster, liquid wallpaper, and so on will be done in the future. This material is quite popular for interior decoration, despite its fragility and soiling.
The positive aspects of drywall are as follows:
- Relatively low cost.
- Fast and easy installation.
Important! This material is made on the basis of gypsum, so it requires preliminary waterproofing.
Drywall is often used for cladding balconies, but only as a base for decorative coatings
Covering balconies and loggias with plasterboard
Before covering the balcony with plasterboard, you need to prepare the surface and install the sheathing:
- Draw a line in the center of the ceiling and several perpendicular to it.
- Draw lines along the perimeter of the room at a distance of 5 cm from the ceiling.
- Make marks on the ceiling through 1/3 of the length of the sheet of building material.
- Cut the metal profiles to the required size using scissors.
- Using dowels, secure the guides to the wall and to the ceiling using an anchor connection.
- Starting from the corners of the balcony, install the profiles on the ceiling, and then on the walls with dowels - in increments of 40 cm on the ceiling and 60 cm on the wall.
After this, you can begin laying heat and sound insulation materials and, if necessary, utilities. Cut sheets of insulation are installed between the sheathing and the rough surface. The resulting structure is covered with foil, securing it with a stapler. Now you can sheathe the inside of the balcony with plasterboard.
The order of work is the same as in the case of lathing: first, work is carried out on the ceiling, then on the walls.
- The first step is to prepare the material. To do this, the sheets are cut to the required dimensions and chamfered (the edge is lightly filed to make it easier to putty the seam later).
- The first element is mounted 20 cm from the corner on self-tapping screws in 15 cm increments. The cap needs to be recessed into the surface, but it is important not to overdo it so that the sheet does not crack.
- The remaining sheets are installed in the same way on the main area of the ceiling and walls. At the end, small fragments of material are mounted in the corners and the puttying begins.
- A primer is applied to the finished coating, and after it dries a thin layer of putty.
- While the material has not yet dried, serpyanka is laid on it and covered with a thicker layer of putty.
- Finally, the surfaces are primed again to prepare for further finishing.
Balcony covered with plasterboard, ready for further finishing
Insulation methods
Balcony insulation is usually carried out indoors. However, in this case, the area of the internal space decreases. Therefore, it is recommended to insulate small balconies from the outside.
Various materials are used for insulation:
- Foam is often used as a heat-insulating material. Sheets are available in different sizes and thicknesses. Therefore, everyone chooses the most convenient dimensions of the plates for the job. Polyfoam does not react to increased humidity, so it can be used even in regions with harsh climates;
- expanded polystyrene is a type of foam with increased strength, moisture resistance and fire safety characteristics. Its advantage is the possibility of plastering with various mixtures, including decorative compounds;
- mineral wool is a hygroscopic material with insulating properties. Insulation work becomes more complicated, as it becomes necessary to use vapor barrier and waterproofing layers.
The use of insulation significantly improves the quality of stay on the balcony.
Finishing the external walls of the loggia
Exterior decoration is no less important. Its main purpose is to protect the structure from environmental influences (primarily to prevent moisture from entering).
The most popular options for exterior finishing are:
- Plastic lining. This is a budget finishing option that allows you to cover the external surface of an insulated or extended balcony. Positive properties include low price, ease of installation, moisture resistance and a varied selection of colors. However, it should be borne in mind that plastic lining is a material intended for interior work.
- Siding differs from plastic lining in appearance. It is attached horizontally to the sheathing. At the same time, siding has high resistance to weather conditions. Other advantages include ease of installation and moisture resistance. Don’t forget about easy care and resistance to mold and mildew. Thermal insulation and sound insulation of the material, strength and resistance to temperature changes, and service life are also important.
- You can sheathe the structure with corrugated sheets. It is not so aesthetically pleasing, but it is accessible and practical. It protects from moisture and dust, but does not provide the necessary degree of heat due to the lack of an insulating layer inside.
Any of the options allows you to protect the structure from premature deterioration.
Don't forget about insulation
To create a relatively stable microclimate in the balcony room and protect the apartment from strong winds and frosts, it is recommended to insulate the balcony room from the inside. The following are used as thermal insulation materials:
- mineral wool;
- expanded clay;
- foam boards;
- extruded polystyrene foam;
- foamed polyurethane foam;
- foil penofol.
Of all the options listed, expanded clay is suitable only for floors, the rest are suitable for both horizontal and vertical surfaces. Before insulation, cracks and crevices are filled with sealant or foam. Insulation begins from the ceiling. If the apartment is on the top floor, this surface is insulated more thoroughly. Then move on to the side surfaces and the floor. The heat insulator is fixed with glue or placed between the lags of the sheathing.
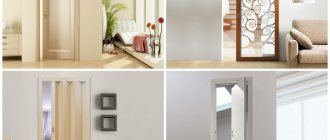
Balcony design ideas
Designers offer different interior ideas for decorating a balcony. It is important that the finishing option matches the interior design of the apartment. Such a room is decorated in the following ways:
- Combining a balcony with a living room, kitchen or bedroom. This is an opportunity to expand the free space and add the necessary furniture.
- A small space allows you to organize a place to relax and sleep.
- If there is no possibility of organizing a separate office in the living space, you can set up a workplace on the balcony.
- A balcony with panoramic views creates the illusion of open space. This option is suitable for both wide balconies and small compact ones.
- For a studio apartment with a balcony, you can use non-standard ideas and use the room as a dressing room.
The use of any interior design of balconies is appropriate in a city apartment. The main condition for a comfortable stay in the room is reliable insulation and neat finishing. To do this, you should think through all the options and choose the one that is suitable in terms of cost and labor costs.
How to decorate the ceiling on the balcony?
Ceiling surfaces are insulated and sheathed in the same way as walls. But we must take into account the specifics. There should be enough space between the casing and its base so that lighting fixtures can be fixed to the ceiling.
On a low balcony, it is better to cover the ceiling surface with cladding several shades lighter than the wall surface. This will visually increase the height of the walls and allow household members to feel more comfortable in the room.
How to decorate the inside of a balcony? What is the best way to decorate a loggia - PVC panels, clapboard, tiles? The choice is yours. Is it difficult to decide? Contact our consultants, call a surveyor. A specialist will help you select materials and calculate an estimate.