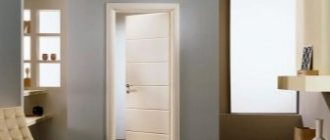
GOST requirements for standard doorways
The dimensions of the interior door (door block) must strictly correspond to the dimensions of the opening in the wall between the rooms. In fact, it is the opening parameters that are prescribed in construction standards and GOSTs. And in accordance with them, you already have to select the thickness and width with height for the door frame and the door leaf inside.
If you are creating a unique designer interior in a private house, then the doors to the rooms can be made whatever you want. It is only necessary, at the project preparation stage, to provide openings in the partitions and load-bearing walls of the required sizes. But then door products will have to be ordered according to individual parameters for more money than standard options.
When creating an exclusive interior, do not forget that a door can complement the style if you approach the issue correctly
With city apartments the situation is fundamentally different. All of them are built according to standard design solutions, in which openings for interior doors are initially laid out to standard sizes. And in the vast majority of cases, expanding this hole is prohibited. Here it remains to select the door design only according to existing realities. And knowing the requirements of GOST, choosing a door in a store will be simpler and more error-free.
What is the door structure made of?
Marking of interior doors
When choosing an electric generator or a submersible pump for dirty water, you have to carefully study many parameters in the technical data sheet for this equipment. The power of the unit, productivity, and other quantities are important there. With an internal door everything is much simpler. The accompanying documentation indicates a set of numbers and letters that fully describe the width and height, as well as the design features of the product. Based on their design and method of opening, door blocks are divided into several main types:
- “G” is a blank wooden panel.
- “O” – canvas with glass insert.
- “Rp” or “Rl” – right or left swing door.
- “K” or “P” – swinging or sliding structure.
Design options for interior doors
In addition to these letters, the marking also indicates:
The above standard contains a table that lists the standard sizes of interior doors. More precisely, the reference dimensions of openings in walls and partitions are indicated there. It is these standard sizes that door block manufacturers start from. According to them, the height of the opening can be 1870, 2070 or 2370 mm, and the width from 710 to 1950 mm.
| Brand | Dimensions, mm | |||
| Box | Canvas | |||
| Height | Width | Height | Width | |
| 21-7 | 2071 | 670 | 2000 | 600 |
| 21-8 | 2071 | 770 | 2000 | 700 |
| 21-9 | 2071 | 870 | 2000 | 800 |
| 21-10 | 2071 | 1170 | 2000 | 900 |
| 21-12 | 2071 | 1170 | 2000 | 1100 |
| 21-13 | 2071 | 1272(1298) | 2000 | 1202(1204) |
| 21-15 | 2371 | 1472(1498) | 2300 | 1402(1404) |
| 21-19 | 2371 | 1872(1898) | 2300 | 1802(1804) |
Finishing the opening with plastic panels or siding
Plastic panels have long gained immense popularity. In addition to the fact that they have excellent performance characteristics, they also boast a variety of colors and textures. Panels that imitate the structure and surface of natural wood are very popular. Plastic panels are very easy to install. Even those who hold the panel in their hands for the first time can cope with the process. In addition, in this case you can simply glue the strips with glue.
If the opening depth is small, you can replace PVC panels with siding. It is stronger and more durable, and much narrower in width. To give the opening a finished and neat look, you should glue a decorative plastic corner around the perimeter, which will hide the ends of the plastic. Please remember that PVC is a synthetic material that can release toxic substances.
Do not buy too cheap panels for finishing inside your home. Take care of your health and choose materials from trusted companies. In addition, more expensive plastic has greater thickness, which means higher strength, and it looks more believable. Plastic finishing is one of the cheapest and most economical ways to transform a doorway. You will also be pleased with the ease of care of this material. It is enough to periodically wipe the panels with a damp cloth. And if you accidentally damage the panel, it can be replaced without much effort. To avoid any difficulties in purchasing the same panel, purchase a couple of strips in reserve.
Dimensions and thickness of the canvas
The width and height of the door leaf are usually made 70 mm smaller than the dimensions of the door along the outer perimeter. 30–35 mm on each side goes to the box (frame). But there may be other options that are far from these standard values. Manufacturers are free to choose the dimensions of the product parts themselves in accordance with the design and materials from which it is made.
Building codes recommend the following sizes of interior doors with frames according to the width of the door being opened:
- for the kitchen – 70 cm;
- for the bedroom and other rooms – 80 cm;
- for the living room - double-leaf model 120 cm;
- for the bathroom – 60 cm.
Typical sizes of interior doors for different rooms
The standard height in all cases is assumed to be within the range of 1800–2000 mm, and the thickness of the canvas is 30–40 mm. At the same time, it is recommended to install doors in a bathroom or bathroom that are a little thicker and with a more moisture-resistant coating than in ordinary rooms.
How to correctly measure the height of doors with a threshold
An open doorway - a design move or a necessity?
Open doorways can increasingly be found in the interiors of modern apartments. Sometimes this is truly a design technique that is designed to add originality to the overall atmosphere. But more often than not, this is a very right move to visually expand the space and save free space. At the same time, no one says that such an opening cannot look interesting and unusual. Standard swing doors take up a lot of space, especially if they open into a small room. Depending on the width of the opening, the door can “eat up” up to 1 square meter of the total area. Immediately there are restrictions on the placement of furniture or decorative elements and a host of other inconveniences.
Sometimes sliding structures are used instead, which are undoubtedly much more compact. However, they do not always look aesthetically pleasing. If the door guides are not enclosed between the walls, they must be mounted on one of them. Thus, the appearance of a wall in one of the rooms may look spoiled. Therefore, in some cases, it would be advisable to decide to dismantle interior doors. In this case, the line between two adjacent rooms is automatically erased and a single space is formed.
Sometimes this is really appropriate, for example:
- In case of increasing the size of the room by adding a balcony or loggia to it. In any case, such actions are accompanied by the dismantling of the balcony block, otherwise the whole plan will not be brought to life;
- If you plan to combine a living room and hallway. Organizing an open-type portal in this case will blur the line between two rooms that are completely different in purpose, but still maintain a conditional separation. A small living room will seem much more spacious;
- If you have organized a dressing room in the bedroom, sacrificing the size of the bedroom, it is better not to use solid door leaves. Leave the opening without doors, and we will teach you how to decorate it beautifully.
Many people use a similar technique when connecting a living room to a kitchen. Most often, the opening is made in the form of arches of various shapes. Undoubtedly, this is the most aesthetic way of combination. But do not forget that if you use the kitchen for its intended purpose and are actively preparing food, then all the smells accompanying this process will instantly spread throughout the apartment.
Also, dismantling door panels in a children's room, bedroom or office would not be the right All these rooms require separate space. Of course, an exception may be the case when you live alone and, in principle, there is no one to retire from. In all other cases, doorways without doors can expand the space. Therefore, you can especially often find them in small apartments.
Standard box sizes
The width of the box should ideally completely match the thickness of the wall. If the door is thicker than the interior partition, it will be difficult to secure it in the opening. Plus, there will be unsightly gaps on the sides under the casing. In the opposite situation, when the wall is too thick, you will need to install additional additional elements (extensions).
Design of interior doors with extensions
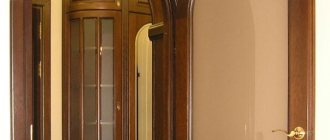
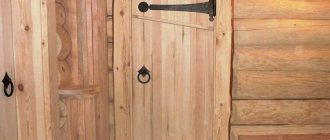
Wooden portals
Finishing doorways with natural wood is one of the most expensive and noble methods. The wood texture itself is very beautiful and aesthetically pleasing. Therefore, elements are often simply coated with clear or tinted varnish. Custom-made portals can be made to order, complemented by artistic carvings.
Of course, valuable types of wood look chic and rich, but they also cost accordingly.
To make the finishing less expensive, you can choose the simplest varieties, for example, pine or birch, but at the same time polish the surface well and cover it with several layers of varnish. Also, openings with small decorative shelves or built-in lighting can be made to order. Wooden openings can be additionally decorated with stained glass.
When choosing this type of finish, remember that natural wood requires careful care. As for the rest, it all depends on your financial capabilities and imagination. The color of wooden openings should be coordinated with the color of the floor or baseboards. You can also rely on the color of the furniture.
The design style also plays a role. After all, not all modern trends welcome the use of such “warm” materials. For example, loft or minimalism prefer plastic or metal.
Opening sizes
Typical dimensions of doors with frames and openings for them are described in GOST standards. House designers and door block manufacturers try to follow these standards to make it easier for builders to select materials. However, often constructed buildings have deviations in height or a slight slope.
How to measure a doorway correctly
An opening for an interior door that differs from the standard dimensions in domestic high-rise buildings is far from uncommon. When measuring it before going to the store for the door block, you should measure the width and height of the existing hole in the wall in several places at once. It will still need to be leveled strictly vertically. If you make an error in the measurements, then it is unlikely that the product will be installed in accordance with building regulations.
Necessary measurements for interior doors
Other design methods
It is permissible to use other methods to design doorways. They consist of using screens or decorative curtains. This method is considered accessible and simple; among other things, it does not require complex work.
Various options are allowed:
- Fabric curtain. They can be an excellent addition to any interior. The composition is placed so that it does not create disharmony with other interior elements and is combined with the window decoration.
- Bamboo curtains. If the room is made in eco-style, this option will come in handy.
- Curtains in the form of threads. Such products are used when they want to give a room an unusual look.
Doors with hidden frame
Owners who want something unique in the interior often refuse standard models and prefer to install doors with a hidden frame. In these blocks, the door leaf is flush with the surface of the wall, and there are no platbands as such. The dimensions of interior doors of this design are selected according to the same scheme as ordinary ones. Only in thickness they should ideally correspond to the parameters of the interior partition, so as not to protrude from it even by a centimeter.
How to correctly calculate the required dimensions for a door with a hidden frame
Advantages and disadvantages of doorless doors
Once we've figured out when it's appropriate and when it's not to use free doorways, it's time to talk about the clear advantages and disadvantages of this technique. Let's start with the disadvantages:
- When dismantling door frames, there is no clear demarcation of where one functional area begins and another ends . Using the example of combining a kitchen with a living room in a similar way, we realized that this is not always appropriate. Of course, there are exceptions. For example, when you visit the kitchen in the morning to make coffee or in the evening to have a light snack. However, this same effect of blurred boundaries in other cases can be an advantage;
- If we consider that the lack of private spaces for a person who lives alone is not critical, then there are still rooms in the apartment where doors are simply necessary. For example, in bathrooms. This lack of open openings is not critical, however, it does occur.
Now let's talk about the advantages of organizing portals:
- First of all, this is a simple and “painless” way to visually expand the space . This does not require any radical measures. For example, redevelopment or complete dismantling of partition walls;
- By freeing the opening from the door leaf, you will allow sunlight to penetrate unhindered into the adjacent room. This is especially true in the case of combining the living room and hallway. After all, usually the corridors are narrow, long and dark;
- From a financial point of view, we can also say that this is a profitable solution . Even if you decide to decorate the opening with expensive finishing materials, it is unlikely that this will require more money than buying decent doors. And don’t forget that you will need to spend money on installation work. While you can finish the opening yourself;
- With the help of open openings it is very easy to implement zoning . This technique is especially relevant in apartments with an open plan. In this case, in order not to clutter up the space, but to mark its boundaries, plasterboard partitions with wide open openings are erected;
- A room with doorways without doors, especially if they are played correctly, will instantly become more interesting. This is a great way to enliven and diversify a boring interior;
- The indoor microclimate will be more favorable due to improved ventilation and air circulation.
Examples of calculating the proportionality of door frames and passages into rooms
To correctly calculate the dimensions of the door, you need to measure the opening in several places with a tape measure and select the minimum figure for width and height. Just before measuring anything, you should completely clear the end of the wall of any construction debris.
Necessary measurements for installing the door leaf
Decorating door slopes
Door slopes and through openings can be lined or sheathed with absolutely any material that is used in wall decoration. How to trim a doorway was discussed in general terms in the previous chapter.
Now we will look in more detail at those options that are quite possible to implement on your own without incurring large financial costs.
Plasterboard slopes: what is the advantage
What is good about additional trim strips is that they allow you to do without leveling and further finishing of slopes. But, as mentioned above, this is not always possible due to the discrepancy between their widths - and in terms of money it is quite expensive. In general, judging by the cost of the materials used, a plaster slope is the cheapest.
- Only this saving is eaten up by the need to purchase special tools: a cutting rule, a trowel, a grater, wide and narrow spatulas, which are unlikely to be found in the home of a person who has never done such work before.
Stone cladding of an arched doorway
- For independent execution, this is the most difficult option, and hired craftsmen charge separate money for openings. Please also note that prices per linear meter of slope are usually higher than for plastering one square wall. So, if you want to get real savings, line the openings with drywall.
It is impossible to do without a plaster screed only if you plan to later line the opening with tiles or stone, which is what we see in the example presented above. Such finishing is carried out only on a base base - and it is leveled not with gypsum, but with cement plaster.
False slope made of gypsum plasterboard
To install sloped walls made of plasterboard (see Making door slopes from plasterboard), the only special tools you will need are a roughing and edge plane, which in total will cost a little more than 1,000 rubles, and a knife with a reinforced blade. GKL sheets should be taken with a thinned edge, 12.5 mm thick, and a length that completely covers the height of the opening.
If the installation will be carried out using the adhesive method, the consumable materials you will need are universal gypsum putty, plaster corners and spacer dowels.
So:
- The blanks are cut and then adjusted by dry fitting, first on the sides of the slope. The strips should be solid, but you need to pay attention so that the thinner edge of the sheet is on the outer perimeter of the opening. This is only necessary so that the protective profile installed at the corners is flush with the surface of the plasterboard cladding element.
Plasterboard sheets with thinned edges, type UK
- Fitting the parts is to prevent the formation of gaps between the workpiece and the door frame. Most often this happens due to the fact that the walls of the slope are somewhat turned to the sides. The gaps can be eliminated by trimming the edge of the part adjacent to the inner corner with a plane.
- It will be possible to eliminate unevenness of the base base during the process of gluing the element, increasing, where necessary, the thickness of the gypsum putty. If there are any cracks on the rough slope, they must first be sealed with foam. But at the time the installation of the cladding begins, the foam must dry, and its protruding parts must be cut off.
Cutting the blank for the slope
- When installing any plasterboard parts using a frameless method, putty not only prepares the surface for painting, but also uses it as glue. They apply it randomly to the wall, in small beads, and then install the cladding element. It is lightly pressed to the base, the excess putty squeezed out from under the drywall is taken away and distributed over the surface of the slope with a spatula.
- Visually control the position of the slope part, the easiest way is to use a plaster rule, but in the absence of one, for this purpose you can use a flat strip or board that needs to be attached to the outer corner. To prevent the facing element from slipping, it must be fixed to the base.
Finishing with drywall
- This is why expansion dowels are needed. The holes for them are drilled directly through the drywall, also randomly, in increments of 35-40 cm. The dowels are carefully inserted into the holes - at first not completely, after which the screws are screwed into them. With their help, you can also level the position of the plasterboard part: where necessary, press it harder, or vice versa, loosen it.
- After the adhesive layer of putty has hardened, the dowel heads protruding outwards are completely hammered in with hammer blows. The cladding of the horizontal part of the opening begins after installing and securing the side slope walls.
When the entire perimeter of the opening is lined, you can begin installing the corner profile. Its only function is to protect the corner from mechanical damage. You will learn how to properly prepare an opening for subsequent painting by watching a video on this topic. It is best to install polyurethane trims on plasterboard openings using glue.
Wooden openings
Along with plasterboard sheathing, one of the most budget-friendly options for facing slopes is finishing doorways with chipboard.
Of course, chipboards with a laminated coating are more expensive than gypsum boards. But given that when using them there is no need for finishing, in the end this option turns out to be even more profitable.
- Most often, laminated or veneered sheet material is used to finish the entrance opening. Since it has the greatest thickness, it is almost impossible to pick up additional parts there. In addition, the hallway usually contains cabinet furniture, which, together with the doorway, baseboards, or even wall cladding in the form of wooden panels, creates a single interior ensemble.
Decorating openings: how to decorate an opening
- If you use factory-decorated sheet material for cladding slopes, then the blanks must be cut in such a way that the cuts end up in the inner corner, since its ends are already painted or covered with edging plastic. Most often they are covered by the casing, but sometimes they are still visible.
- The finishing of doorways with MDF or laminated chipboard, in terms of the method of attaching the cladding elements to the base, is not too different from the same drywall. If the base is fairly level, these materials can also be installed using the adhesive method - only instead of putty, foam is used here. If the opening is problematic, with differences and unevenness, the cladding is made using a frame constructed from an aluminum profile or wooden slats.
- Each master selects the cladding technology himself, based on specific working conditions. The only difficulty for those who do not have professional tools may be installing the platband. There will be no problems with overlay strips, but they don’t look so good, because they have to be attached to the slope lining with nails.
Veneered MDF: doors, opening cladding and wall decoration in the office
- Therefore, many people prefer to deal with telescopic platbands. They have an L-shape, the bend of which fits into the groove of the door frame or additional strip. If you undertake to make the extensions yourself, then the grooves for the telescopic trims need to be selected at their ends using a hand router.
- This is done after the fittings and fitting of the blanks for the slope have been carried out. When adhesively installing elements made of rigid sheet material, such as MDF or chipboard, a slightly different procedure is followed. In this case, the horizontal part is installed first, and then the side posts.
The sidewalls support the upper cladding element and securely fix it in the desired position. Wooden wedges are inserted between the improvised extensions and the rough slope, and the space between them is foamed. When the facing of the slope is mounted on the sheathing, its cavity can be filled with insulation, which eliminates cold bridges and also perfectly eliminates noise penetrating from the outside.
Plaster finishing
Plaster finishing
Plastering slopes requires a certain skill. As in the case of drywall, after rough finishing the opening must be puttyed, painted or wallpapered (or choose another finishing option). But the coating will be short-lived and difficult to care for. The disadvantages of plaster are also that working with it is “dirty” and takes a lot of time. The adjacent wall can be covered with wallpaper, painted or decorative plaster applied to it.
Finishing with decorative plaster
A variation of the point above. “Decorative” is applied to a previously plastered surface. If the decorative plaster is textured, then the rough layer does not need to be laid out perfectly evenly. You can choose plaster with colored stone chips - it is very durable.
;
Extras
This option is especially good if the hallway has several doors (interior and entrance). In this case, all boxes and slopes can be finished with the same material. The extensions are relatively easy to install. But the material itself is more expensive than chipboard, laminate and other analogues. To install extensions on the front door with your own hands, you will need a minimum set of tools:
- level;
- hacksaw or jigsaw;
- mallet;
- pencil.
First you need to saw off the excess height. To do this, measure the required distance and use a jigsaw to cut off the unnecessary material. To install the simplest models of extensions you will need nails and foam. To begin, fix the element in the opening and nail it so that the nails enter the wooden base, which can be a door frame or an additionally laid strip. Then foam the space between the wall and the trim and install special spacers in the opening so that the finishing elements do not move under the pressure of the foam.
Telescopic extensions are the easiest to install. In order to secure them in the opening, you just need to bring the element to the box and insert the tenon into the prepared recess. Then the extension is extended to the required width. On the reverse side, platbands are put on in a similar way. In general, applying polyurethane foam is not necessary, since all elements snap together and are firmly fastened together. However, the presence of glue, foam or sealant will provide a tighter connection, eliminate gaps between the wall and the cladding, and also provide additional heat and sound insulation, which is especially important for the front door.
;
PVC panels
Such slopes look very “simple”. But the material is inexpensive, durable, not afraid of moisture, and easy to care for. In addition, it is easy to work with - installation of panels does not require much skill.
Usually, to decorate slopes with plastic with your own hands, you use a simple white material, since this is essentially a neutral option, or a beige color. For wooden doors, it is also important to select a material in the appropriate color and with a similar wood pattern. Thanks to the range of modern finishing materials, this is not a big problem.
There are several ways to install plastic slopes. The finish may look like:
- Straight overlays. This is the simplest option. In this case, you just need to select appropriately sized PVC pieces and secure them vertically on the sides and horizontally along and on top in the opening.
- Horizontal arrangement. This method is suitable for cases where there are pieces of plastic left after repairs. They are laid on the frame across the wall, masking the joints as much as possible.
- Lamels. If you want to highlight the slopes, then try making this option yourself. First, a frame is constructed, and then plastic is placed on the slats, positioned across it, as in the previous version. In this case, it is better to use embossed material, like siding.
Installation of plastic slopes can be done with your own hands in several variations:
- First, you should consider the simplest and most advantageous option, namely slopes made of ready-made sandwich panels. It is best if one of their edges has a protrusion with a corner, which will allow you to simultaneously fix the trim on the wall itself from the outer corner and draw even contours of the opening.
- The easiest way to install it is on foam. To do this, you need to attach the panels cut to the width and length of the opening to the place where you are going to attach them. Level and install spacers. Then you need to apply a small amount of foam into the gap.
- Once the foam has dried, the finish will be securely fixed in place. This can be done in advance if the PVC trim blocks access to the back side of the plank.
Another DIY installation of plastic slopes on a door involves the use of profiles. You can take the same PVC material or use aluminum, as for drywall.
- First of all, you need to make a frame around the perimeter of the opening.
- After installing it, you can do the front finishing yourself.
- The plastic is screwed with self-tapping screws, and then the fastening points along the edges are closed with a PVC corner set with glue.
;
Artificial or natural stone
This method of finishing slopes has already gone out of fashion. What was good about it was the durability and high wear resistance of the material, ease of installation. The downside is that the process of “applying” the stone is lengthy. Another drawback is that adjacent walls can only be painted or covered with decorative plaster. Other finishing options (wallpapering, installation of MDF or other panels) will require the involvement of virtuoso repairmen.
- We have chosen an area to work on (the area has already been prepared for work in advance - no old paint, the surface is flat, primed)
- We make markings on the wall showing how the wall will be covered with decorative material. Don’t forget the rule mentioned above – there is more on the bottom of the stone and there is less on top.
- Use a roller or brush to prime the selected area of the wall (the priming agent is selected in the store).
- After it dries, see the instructions for the primer; we recommend treating the wall surface with concrete contact.
- We lay the tiles on a flat horizontal surface in order to select the optimal tone combinations.
- We start attaching the tiles from the bottom and from the corner.
- We determine the horizon with a level, 3-4 cm away from the floor. We attach the strips of stone to the wall using liquid nails, tile adhesive or another composition suitable for these purposes.
- The corners of the walls, when facing with decorative stone, should be done in a special way. They use a joint butt to joint, at an angle, connect to a wooden base, and so on. More often they use the connection of the end edge slabs of one side of the corner to the rear edges of the slabs of the other corner.
- After completing the work, time is given for the glue to dry.
- Next, they begin to decorate the surface of the stone.
- The last stage in finishing doorways with decorative stone is attaching baseboards to the floor and trim around the doorway.