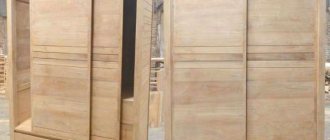
Often, when designing apartments or houses, small spaces appear in the form of a niche. In most cases, such recesses are simply empty, since placing any pieces of furniture in them does not seem convenient. In this case, an excellent solution is to install a compartment door in a niche to create, depending on the location, a full-fledged enclosed dressing room, bookcase or kitchen cabinet.
Preparation for installation
The main convenience of the niche and the main advantage is the presence of all the walls necessary to create a cabinet. Thus, the only need arises for the manufacture of doors and their installation. The only disadvantage of this solution is the systematic non-compliance with proportions and the curvature of the walls in the niches.
Based on this, it will not be possible to simply install a sliding door into a niche; in almost all cases, significant distortions will arise. The door leaf will either have a huge gap at the junction with the wall, or it will begin to open spontaneously. Eliminating such defects by simply adjusting the sliding system will be very problematic.
Elimination of irregularities
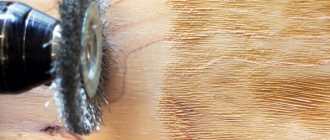
For this reason, for proper installation of the sliding system, it is recommended to level the walls. It is best to do this during the process of renovating the room, since subsequent decorative finishing will easily hide all the shortcomings.
If it is impossible or impractical to carry out full repair work, there is another option. It is enough to secure the leveling bars of laminated chipboard to the wall surfaces where the niche doors will be installed. Such bars 10-15 cm wide, called feathers, act as false walls. Thanks to them, all existing surface irregularities are smoothed out.
To ensure the reliability of the structure, the installation of feathers is carried out in the most protruding areas. If necessary, such beams can be mounted on the surface of the floor and ceiling. Often such measures are sufficient to create a suitable opening.
If there is a significant distortion with the formation of gaps of more than 2 cm, it is necessary to align the installed beams using a grinding machine. Checking the correctness of the alignment procedure is carried out using a building level.
Visual correction of niche irregularities
If there is no grinding machine or it is impossible to carry out all the necessary procedures, there are ways to visually correct niche distortions. These include:
- Doors to a niche should have a simple design in the form of mirrors or lamination. The use of stripes of any direction in the design will certainly emphasize all existing irregularities;
- The width of the door leaves should be calculated based on the greatest distance between the walls of the niche. This way they will be as close as possible to each other;
- The height of the door is determined by the smallest dimensions. Otherwise, the door leaf will most likely get stuck during use;
- After installing the door leaves with their final adjustment, the interchangeability of the leaves is unacceptable.
It is necessary to install the most even sliding door leaf at the front of the structure. Thanks to this, the curvature of the second canvas will become visually less noticeable.
Sliding doors: do-it-yourself installation
To design and install sliding doors with your own hands at home, first of all, you need to understand what they are. This design involves one or two movable sliding panels, where glass or a mirror can additionally be mounted. Rollback is carried out along steel guides using mechanisms in the form of rollers. The canvas is most often a panel made of laminated chipboard or wooden slats covered with MDF, although other options are possible.
Necessary carpentry tools for installing sliding doors at home:
To design and install sliding doors with your own hands at home, first of all you need to understand what they are
- hammer drill (can be replaced with an electric drill);
- manual frezer;
- circular (circular) saw and/or jigsaw;
- electric drill and/or screwdriver;
- a set of drills for wood (with a countersink) and for metal (differ in sharpening);
- set of nozzles;
- construction corner;
- construction knife;
- construction hair dryer (for PVC), iron (for melamine);
- rags;
- felt roller;
- small hammer for fastening glazing beads;
- building level (long);
- metric tape and pencil.
Necessary materials for installing sliding doors:
- a panel made of laminated chipboard, which can cover the doorway with a margin of 5-7 mm. The optimal thickness is 25 or even 28 mm;
- furniture edge (PVC, melamine) for fabric;
- “Moment” glue (if there is no adhesive coating on the edge);
- solvent;
- a block of 50xxx50 mm, the length of which will correspond to double the width of the finished canvas;
- 2 boards 50×100 mm along the height of the opening with a lintel between them (in the form of a door frame);
- additional strip (instead of the door frame);
- platbands;
- colored or corrugated glass or mirror (optional);
- curly glazing bead (if necessary);
- aluminum guide;
- fittings for moving units;
- internal (mortise) door handles;
- fastening material as required.
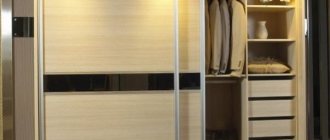
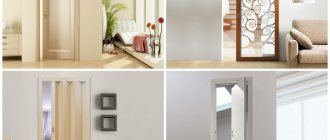
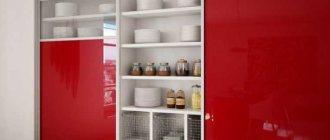
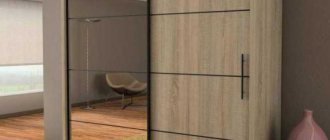
Types of installed doors
In the process of making a door, almost any type of material can be used to cover the resulting niche in the wall. This can be either natural wood and wood-containing materials, or glass and plastic. In addition, it is possible to use a combination of materials.
However, it should be taken into account that the use of glass implies some risk of scattering of fragments in the event of damage to the product. To avoid such troubles, the glass inserts of the doors are covered with a special protective protective film. So, in case of damage, all fragments will be held on it.
The door itself does not require any special production techniques or methods. In fact, in most cases, the doors are simple dimensional sheets with a decorative and protective coating. Structures can weigh up to 160 kg. A special feature of the products is the use of a special set of fittings and fasteners, thanks to which sliding doors not only have a complete appearance, but are also easily installed in a niche.
Fittings elements
All fittings for installing sliding doors for a niche are conventionally divided into mandatory and optional elements. Optional parts include various components that expand the functionality of the sliding system. These include:
- Straight stop. The part is applicable for decorative design of the vertical part of the leaf in the area where the door structure adjoins the wall;
- Shaped stop. Used in framing the upper part of the canvas or opening as an additional wall of chipboard sheets;
- U-shaped profile. Used to decorate the end part of the product.
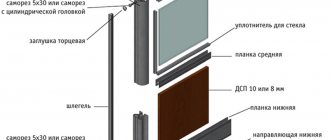
The list of required elements installed on interior sliding doors in a niche contains quite a lot of various details. These include the side handle posts, which have several types of design, guide profiles of the upper and lower orientation, as well as door frames.
Roller systems of any of the available types can be installed as moving elements:
- Symmetrical;
- Asymmetrical;
- Lower support mechanism with adjustment function.
For long-term and effective use of the entire structure, silicone seals and tape-staples must be installed. The main functions of these products are to soften vibrations and shocks when using the structure. In addition, seals help protect the internal contents of the resulting cabinet from dust accumulation.
What is needed for production
In fact, making interior compartment doors yourself is not difficult. Moreover, not much material is required. We will consider in detail the necessary structural elements, and then we will be able to figure out how to assemble and install it ourselves.
- Laminated chipboard. You can make a door leaf from chipboard. To do this, it is better to choose a canvas with a thickness of at least 16 mm. If it is thinner, then during operation the door will sag, and as a result, after a while the door will lose its presentable appearance. You will also need an aluminum profile for edging the chipboard around the perimeter. This will extend the service life of the compartment doors, as it will add rigidity to the structure.
- System of rollers and guides. This one is simple. You should purchase a ready-made set of rollers and guides. To do this, give preference to a reliable manufacturer. You can also meet many DIYers who will design a roller system on their own. Moreover, it is necessary to decide whether the system will be suspended or on a rail. A suitable system is selected accordingly.
- Accessories. This includes a mortise lock and handles. They must also be reliable and of high quality. The lock for sliding doors does not have the usual tongue that sticks out from the leaf of a regular swing door. It has a special locking mechanism. The lock design has a special movable hook.
Handles for sliding doors
- Fasteners This means self-tapping screws or dowels that can be used to secure the roller system and guides to the floor or ceiling.
- Extensions and platbands. They will be needed in order to disguise all the fasteners, and to make the frame of the doorway itself beautiful.
Coupe door mechanism
In fact, this is the entire set of material that is necessary for the manufacture of sliding doors. As for the tools, the set consists of the following:
- Electric jigsaw.
- Screwdriver.
- Drill.
- Hand-held circular saw.
Tools
- A hand router, which is necessary for cutting grooves.
- Screwdriver Set.
- Pliers.
- Hammer, etc.
If you have all this, you can proceed directly to assembly.
Installation of doors in a niche
After all possible alignment procedures have been carried out, the door leaf is installed. Due to some fragility of the products, their installation must be done very carefully. Sliding doors assembled according to the compartment type have two types of guides: ceiling and floor. In this case, the floor is the main one, holding the entire weight of the canvases. The upper guide is designed for an even vertical position of the door leaf in relation to the floor and adjacent walls. However, despite this, installing a ceiling guide is only possible on a hard, not suspended ceiling.
The procedure for installing the top rail consists of drilling mounting holes for screws or self-tapping bolts. The holes are prepared strictly on one conventional line and at an intermediate interval of 45-60 cm. After preparing the holes for installation, the guide is installed.
The lower guide is fixed to the floor in the same way. The installation procedure is carried out only with the top rail carefully prepared and adjusted. After installing the guides, the canvas is inserted into the grooves using carriages and they are finally fixed to the surface.
In most cases, roller mechanisms are equipped with a special rubberized coating. This ensures not only the absence of noise when using the structure, but also allows for a long period of operation without lubrication of the wheel mechanisms of the structure.
Homemade sliding doors
Any door leaf can be installed on rollers and will work as a sliding door. The guide and all other components - rollers (carrying and flag), stoppers, stops - can be purchased. Hang on them at least a piece of plywood or a door assembled from several boards. This will be the simplest and cheapest option. But making the mechanism yourself is a more difficult task. One of the options for a sliding door mechanism made from scrap materials (from round pipes of different diameters) is in the video. The system was intended to be installed in a closet, but judging by the design, it can easily withstand even a solid oak door.