Lampinfo
Popular
What to do if the backlight of the VAZ 2114 instrument panel does not light up
Home › LEDs
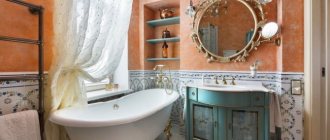
Decorating a bathroom with lighting fixtures allows you to create an original and stylish interior with your own hands. In addition to decorative value, installing additional lighting also has a purely practical effect. Making a backlit mirror with your own hands means creating additional local lighting, improving visibility, getting the opportunity to shave cleaner, and performing cosmetic and hygiene procedures more efficiently.
Options for implementing mirror lighting
The easiest way is to purchase a ready-made illuminated mirror. However, it is not always possible to find an option that is suitable in size and style, so you have to use your own imagination and skills, creating an original version of the design with your own hands.
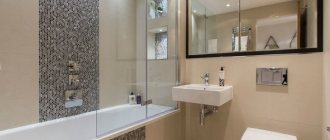
There are many options for mirror illumination, but the most successful of them is the use of an LED strip. It allows you to create a soft halo of light around the reflective plane, decorating and complementing the interior of the room.
LEDs are optimal in the bathroom - they are unpretentious, do not consume a lot of electricity, and have a long service life. Other types of lamps are significantly inferior to them in all respects.
A mirror with an LED strip should not have a complex shape. The best option is a rectangle with LED lighting around the perimeter or along the top and bottom edges (you can also use the sides). There are no fundamental requirements for the shape or size of the mirror, but practice has shown that the most advantageous results are demonstrated by the simplest solutions.
Important! The tape is installed from the inside, on the back side of the mirror sheet. This creates a soft and unobtrusive stream of light, does not irritate the eyes and does not dazzle when looking at your reflection in the mirror. You can use a special box, but it is easier and more effective to install the backlight directly on the glass surface.
How to connect?
The nuances and order of connecting backlit mirror surfaces depend on the type of lighting elements that were used during its assembly.
If the manufacturer has provided lighting sources, you will not need an electrical circuit for connecting the light source to the mirror surface. Just follow the instructions in the package.
If there are no instructions, no problem. The whole process can be done independently, the main thing is to be extremely careful and approach this task responsibly.
LED strip or cord with socket
If the mirror model has lighting, all structural elements are already protected from moisture and its negative effects. If not, think about this before installing a backlit mirror:
- When installing it yourself, high-quality tape is most often used; it can be used to secure the LED strip. But the most reliable method of fastening is the self-adhesive layer, which is already on the model itself. This will reduce the risk of peeling due to high humidity.
- To connect a strip or cord with LEDs to a 220V power source, you may need a stabilizer for safe and high-quality operation of light sources and a switch. When connecting the tape directly without a transformer, the service life may be shorter.
If all rules are followed and installation is carried out correctly, with high quality and reliability, strips and cords with LEDs can last more than 50,000 hours .
How are battery devices connected?
Such light sources are among the most inexpensive and easiest to install. The manufacturer has already assembled the entire structure for you; your task will be to correctly install the mirror sheet and insert the batteries into the compartment intended for this.
Rules for working with battery devices:
- Install batteries from the same manufacturer, with the same power, in a special compartment.
- When choosing a battery or batteries, carefully read the manufacturer's instructions to know exactly what parameters they must meet.
- If the batteries are damaged and stop working, simply replace them with new ones. There is no need to beat them, gnaw them, or expose them to high temperatures in order to restore functionality for some time.
Lighting devices can be turned on and used for their intended purpose immediately after installing batteries or an accumulator in them and turning on the button located on the surface of the device.
LED cords and strips are the most inexpensive option for light sources , which consumes a small amount of electricity and has a long service life.
Battery-powered lighting is a temporary solution, intended more for decorative purposes than for permanent illumination. If you need a constant and powerful light source, give preference to options powered by electricity rather than batteries.
Tools
To create the backlight you need to prepare:
- mirror;
- brackets for hanging;
- glue for fixing the box to the glass (or tape to the glass, if necessary);
- LED strip with power supply and connecting elements.
In addition, you will need:
- ruler, square and marker for marking;
- electric drill with special drills for making holes in tiles;
- a hammer drill with a drill, the diameter of which corresponds to the size of the holes in the tile;
- dowels and screws;
- soldering iron with solder for connecting contacts;
- screwdriver, pliers, etc.
The listed tools represent a minimum set; additional devices may be needed during work.
How to make lighting yourself?
A dressing room mirror with light bulbs is not too difficult to make with your own hands. For this we need:
- a screwdriver or a not too powerful hand drill with an adjustable speed;
- electric jigsaw. In principle, a small circular saw can replace it;
- flat and Phillips screwdrivers;
- self-tapping screws or self-tapping screws;
- ruler and tape measure;
- metal corners;
- universal glue;
- electrical equipment: wires, light bulbs, sockets;
- plywood, the thickness of which should be at least 10 mm. Instead, you can use a treated board - it can be thicker, for example 15-18 mm;
- the mirror itself. You don’t have to buy it, you can find a suitable “donor”.
To make a dressing room mirror, it is necessary to perform a certain sequence of work:
- According to the size of the mirror glass, a frame is assembled from a board or plywood on which all the parts will be installed. The end parts of the frame are sawn at an angle of 45 degrees and connected to each other using metal corners, glue and self-tapping screws. If the screws are longer compared to the thickness of the plywood, then the parts protruding from the other side should be cut down using a grinder or other similar tool at hand. As a result, the mirror should fit freely into this frame, and there should be enough space around the edges for the subsequent installation of light bulbs.
- Holes are drilled in the side parts of the frame, the diameter of which must match the dimensions of the cartridges. They are inserted into the frame and secured with special glue.
- Now they take any decorative material such as laminated chipboard or MDF. Exactly the same frame is assembled from it to hide the wires and cartridges under it. The mirror needs to be fixed in the main frame. To do this, you need to use special fasteners.
- Next we deal with the electrical part of the structure. The cartridges are connected to each other using wires, the connection is made parallel. With a serial connection, if at least one bulb burns out, not all of them will light up, and finding a burnt-out element to replace will not be so easy. When all the elements are connected to each other in the correct order, they are connected to the power cord and brought outside the mirror.
- At the last stage, they check how correctly the entire structure works. To do this, all the light bulbs are installed in their places. If everything turned out well, the back wall, which will not have a very neat appearance, can be covered with a regular sheet of plywood. That's it, our illuminated makeup mirror is ready.
Visually, such a design will make the room more spacious and attractive. The room will look new. In principle, such a mirror with light bulbs around the perimeter will fit well into any room, but most often it is installed either in the bathroom or in the hallway.
Selecting LED strip
Choosing a ribbon is an important and responsible procedure, on which the success of the entire event largely depends. There are a large number of LED backlights on sale, with different power, type and number of LEDs, glow color, etc. There are a lot of options, so you need to firmly decide in advance what to choose so as not to waste time choosing in the store.
Attention! It is necessary to take into account the operating conditions of the backlight. The bathroom is a wet room, so you should buy tape with a high humidity protection class (IP67). In addition, you should decide on the brightness and power of the tape. In this matter, you need to be prudent and abandon powerful models, since the backlight will be right in front of your face.
Excessive brightness will be unpleasant and will not allow you to look normally in the mirror. The best option is a summer with a power of 4-8 W/m, with SMD 3528 LEDs, the number of elements is 60 pcs/m.
power unit
LED strips require a separate power supply. They are connected to their own power supply, which converts alternating mains voltage 220 V 50 Hz into direct current 12 V. The choice of power supply is made according to the power indicator of the tape.
Here you will have to make some calculation - the power per linear meter (indicated in the technical specifications) should be multiplied by the total length. The power supply is selected with a margin of 15-25%, but not more than 50%, so as not to overload the LEDs. This is dangerous for them and can put them out of action ahead of time.
Mounting method
The best option is to hang the mirror with your own hands on self-tapping screws installed in the wall, through the holes in the tape box. This is the most convenient option, since the box will still have to be made. 2 holes are made in the top bar of the box, the distance between which corresponds to the distance between the screws (or hooks) fixed to the wall. It is necessary to accurately measure the height so that the mirror is located in the correct and comfortable position for all family members.
There are various types of ready-made mirror mounts available for sale. If necessary, you can use them, but it is advisable to choose a design that best matches the size and other features. It is important to remember that the box located on the back side will create a gap between the glass and the wall.
Important! The mount must be selected taking into account this distance, otherwise it will be impossible to use it and you will have to make the brackets yourself.
Illuminated mirror: operating tips
Before purchasing, make sure your eyes can tolerate the sight of light bulb filaments. If you feel discomfort or tearing, it means that the lighting is too powerful and aggressive. If you have to change light bulbs, then choose identical ones, otherwise the look will be catastrophic. The pendant above the mirror is usually installed from 198 to 203 cm from the floor. This height is suitable for family members of any height to use it effectively. One thing to keep in mind is comfort, diffuse lighting that provides a suitable display.
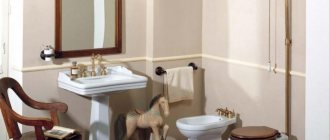
The mirror is an integral element of the design of the bathroom, bedroom and hallway. You use it every day, so you should take care of good lighting.
Network connection
Under normal conditions, you connect the tape yourself to the network via a power supply - the device is plugged into the network, and the tape is connected to the 12 V output. In this case, there may be different connection options. For example, if you need to automatically turn on the mirror lighting when you turn on the general lighting in the bathroom, the power supply is simply connected to the switch.
However, some users find it necessary to start the mirror illumination themselves and not use it constantly. To do this, you need to install a button (microswitch) on the frame (box), which will turn the lamp on and off at the request of the owner.
What kind of lighting should I use?
There are quite a few varieties of it; you can consider only the most popular options:
- the use of so-called spots, which are point-type lighting devices. They are placed on special brackets, and if necessary, they can be rotated in any direction. As such equipment, you can use lightweight sconces or single lamps with an adjustable angle of rotation. Thanks to these lighting devices, you can get a directed beam of light that will fall well on a person standing or sitting in front of the mirror, and also additionally illuminate part of the room;
- special lighting devices that will direct light specifically to the human face, and in this case special LEDs or LED strips are used. Their main distinguishing feature is that they will not blind a person standing in front of the mirror. The light from them can be made even softer by adding tempered frosted glass to the design. Often, a similar design can be found in mirrors, which are a small cabinet;
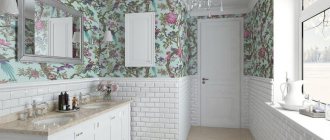
- a mirror with light bulbs around the perimeter can perform a purely decorative function, in the case when the lighting elements are located behind the frame, creating a light areola around the mirror. If the lamps are located on the front side of the frame, then not only the mirror itself will be illuminated, but the light will also reach the person. In both cases it looks quite remarkable, it can bring a certain variety to the interior of the room and give it its own style.
Step-by-step instruction
Let's look at how to make LED lighting for a mirror with your own hands. Procedure:
- Develop a project or at least a working drawing. This point should not be treated as a waste of time, since careful consideration of details and advance calculation of all necessary materials and tools will help to quickly and efficiently complete the work and obtain the expected result.
- Assemble a box for the LED strip according to the size of the mirror. As a rule, it is a frame glued to the surface on the reverse side. Its size is 8-10 cm smaller on each side than the length and width of the mirror - this ensures hidden installation of the lamp. The easiest way to do this is to use duralumin corners or a rectangular pipe. Some difficulty will arise when cutting corners at 45°, which is best done on a pendulum machine or, which is somewhat worse, manually using a miter box.
- Drill holes in the top bar of the box (frame) for hanging on the wall. (This item is necessary if special fasteners or brackets are not used).
- Place the mirror on the front side. Glue the frame on the back side, ensuring an even distance from the edge on all sides.
- Glue LED lighting to the outer sides of the frame. You can use your own adhesive layer provided on the tape. Double-sided tape or waterproof glue will also work.
- Connect the parts of the tape with connectors, attach the wires and hang it on the wall.
- Connect the wires to the power supply, and connect the unit itself to the network. Use one of the options for turning on the backlight - either from a general light switch or from your own button.
- Perform a test run, and if any problems are detected, correct them using the appropriate method.
The specified procedure is given as an example; in each specific case, deviations or additional points are possible.
Lighted makeup mirror
When you are in front of a mirror, the direction of light should be from the front. You may be offered directional lights in the module on top. No, this is not the best idea, but it also gives a good effect in the room. You won't know how to tilt your head to see yourself without shadows. Choose direct and soft lighting for an easy, quality facial treatment. It will be convenient for men to shave, and for women to apply makeup. Several side lighting models are available for better effect.
Main conclusions
Do-it-yourself illumination of a bathroom mirror using an LED strip allows you to decorate the room and complement its interior with a stylish and effective element. Installation and installation of lighting is not fundamentally difficult; all that is required is care and thoroughness in performing all operations.
The result will not only decorate the room, but will also make using the mirror more convenient, improve visibility, and improve the quality of all hygiene procedures. If you have your own options for making the backlight, you can outline them in your comments. Both experienced and novice craftsmen need new ideas.
Previous
LEDsTechnical characteristics and features of choosing two-pin LED lamps for cars
Next
LEDsHow to measure and improve LED efficiency