The dimensions of a modern bathroom do not always allow the room to be fully equipped with the necessary set of furniture, so designers use various architectural solutions to make maximum use of the free space. One of the most spectacular elements of the interior is considered to be a shallow niche in the bathroom, which is an unusual structure for storing cosmetics. It will also help hide utility lines and create a relaxed romantic atmosphere.
Purpose
A unique structural element has been known since the times of the Ancient world: small recesses were intended for storing figurines of a religious cult. Nowadays, niches in the bathroom are used more rationally - this allows you to create a practical and functional storage system that can replace a small pencil case or bedside table. A convenient plasterboard structure will be an ideal place for installing spotlights.
Main advantages of the design:
- capacious storage system - a small recess ideally copes with its direct responsibilities. A niche is used instead of an open shelving unit or pencil case, but unlike traditional pieces of furniture, it looks aesthetically pleasing and attractive;
- rational use of space - in a small combined bathroom the problem of free space is especially acute, so designers often use the area above the toilet or bathtub;
- decorative element - if you plan to hide all the wiring that ensures the operation of plumbing equipment - a niche is an excellent decorative element that hides water pipes that spoil the appearance.
There are also some minor disadvantages:
- limited functionality - the design is not intended for large objects, it carries more of a decorative load. Textiles, as a rule, are in plain sight, so it is difficult to protect towels from water and dust;
- the presence of certain skills - making a decorative niche yourself will not be difficult: you need to make all the calculations, choose the shape, the necessary building material;
- complex dismantling - in order to disassemble the structure it is necessary to perform complex dismantling work. After this, you will need to carry out minor restoration work or completely replace the wall decoration.
Materials for making shelves
In hardware stores you can purchase various materials intended for making shelves. It is important to consider that not every one of them is suitable. There is always high air humidity in the bathroom, which is why some wooden products can quickly become deformed. In any case, it is necessary to evaluate in advance the advantages and disadvantages of each material, and only then begin making the shelf.
Table No. 2. Materials for making shelves.
| View | Description |
| Plastic | It is the most practical material, which is often used in the manufacture of various designs for the bathroom. Another advantage of plastic is the variety of colors. It does not absorb moisture and is easy to wash. Typically, such products last for many years. |
| Metal | As in the previous case, this material can be called quite practical. Such structures can withstand a lot of weight. It should be borne in mind that not every craftsman without special skills can cope with the manufacture of metal shelves. In addition, over time, rust may appear on the surface, so such products should be protected from constant contact with water. |
| Glass | This is a fairly practical option for making a bath shelf. The main disadvantage of the material is fragility, and due to large overloads, cracks may appear on the surface. Therefore, experts recommend choosing durable glass options for such purposes. |
| Tree | When installing any wooden products in the bathroom, it is important to ensure proper operation of the ventilation system. Of all the options presented, this option is less practical; it quickly deforms when in contact with moisture. Special treatment of wood with moisture-repellent agents will help to avoid such problems. At the same time, wood is often used to make shelves at home. |
| Drywall | Making shelves from plasterboard has become very popular. This material has an aesthetic appearance, but is also quite durable. |
| Fiberboard and MDF | As in the case of wood, shelves made of this material are subject to deformation due to moisture accumulation, so it also requires special treatment. |
Types of niches in the bathroom
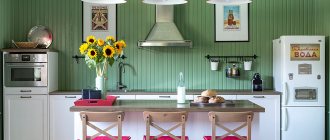
A decorative element can be placed above the washbasin; mirror surfaces will help visually expand a small space. A niche made directly above the bathtub will be an excellent place to put multi-colored scented candles, small figurines or cosmetics. Pots with moisture-loving plants placed on an open shelf look especially stylish.
A room for evening relaxation can be decorated in a picturesque marine style: round decorative openings imitate ship portholes. Classic interiors amaze with their luxury and chic. Unusual arched niches framed by false columns with a capital will become a bright accent of the interior. Minimalism or hi-tech are distinguished by laconicism and severity of forms, so recesses in the wall, as a rule, have a clear geometric design.
By location
If the bathroom has a low ceiling, the most correct solution would be to install a vertical recess. In a narrow room, niches are located strictly horizontally - a simple trick will help visually expand the space.
Before you start arranging a comfortable, practical niche, you need to think about its design. It is especially important to determine the most comfortable height of the structure so that you do not have to stand on a stool to reach the desired item. In addition, it must be durable, reliable and safe, especially if small children live in the house.
The dimensions of the recess are selected based on the dimensions of the room. In a small bathroom you can install a vertical mini structure with two compartments. In this case, shampoo and hygiene products will be literally “at hand.”
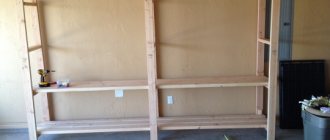
A spacious room has more opportunities to create additional storage spaces. The horizontal structure can be mounted above the bathtub, near the washbasin or shower. A high niche, as a rule, has more than three spacious shelves.
Vertical
Horizontal
According to the material of manufacture
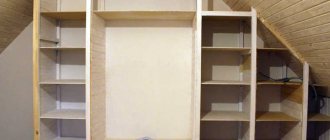
Today, several options for arranging a decorative opening are widely used. The easiest way is to have a ready-made architectural niche. The tall structure is divided into several sections using glass, plastic or wooden shelves.
If the niche is not provided for in the project, you can make it yourself. To perform work in rooms with high humidity levels, you can use sheets of plasterboard, chipboard, plywood or plastic panels.
Moisture-resistant drywall (GKLV) is considered the most ideal building material for creating niches of various sizes and configurations.
Advantages of finishing material:
- variety of forms - the building material allows you to realize the most daring author's ideas and projects. The structure made of dry gypsum plaster takes a variety of shapes: rectangular, round, square or arched;
- ease of installation - with the help of finishing material you can get rid of unevenness of the base base and create a perfectly flat surface. This does not require complex plastering work;
- low cost - durable material is particularly durable and low cost. The designs look laconic and have great functionality.
How to choose and assemble a shelf for your bathroom with your own hands? Examples with photos
DIY bathroom shelves. Quick guide.
The moment has come when the bathroom renovation has already been done, the old plumbing has been replaced with new ones, the furniture and washing machine have taken their place. But the impression remains of incompleteness or, on the contrary, everything seems to be arranged, but suddenly it turns out that there is not enough space for storage. It can be not very convenient to use a closet or cabinet just to brush your teeth in the morning or get soap. Bathroom shelves exist for these purposes.
In this, of course, they have no equal. The most common and most convenient option is to place the shelf above the sink, at the same time as the mirror. There are options for mirrors along with a shelf. In general, it can be placed in a variety of places that are most suitable for a particular bathroom, in order to ensure a more comfortable pastime in the bathroom. In addition, this is not only additional storage space for all kinds of vials, bottles and bottles, but also an additional accessory to your bathroom. And if you also add lighting to the shelf, everything will look original.
You can beautifully complement the interior with an unusual shelf. You can make it yourself, and installing it certainly won’t be too difficult. To do this you will need:
- Roulette.
- Pencil or marker.
- Drill.
Mark the places for fastenings on the wall, check that the fastenings are at the same level. Drill holes, insert dowels and secure fasteners. Now you can install the shelf directly.
Types of bathroom shelves with photos.
Today's market provides a huge range of furniture and accessories for bathrooms, and shelves are not far behind in this variety. Of course, we understand that when choosing a shelf, as well as when choosing furniture, you need to adhere to the basic rules: shelves must be made of high-quality materials that will not be susceptible to moisture and large temperature changes. Main options:
- metal;
- wooden;
- plastic;
- glass.
The difference can be not only in materials, but also in the types of shelves, the method of their installation and the method of operation. The types of shelves are:
- fixed and removable;
- wall and corner;
- floor and wall mounted;
- open and closed;
- under the washbasin and under the bathtub.
How can you not get lost in this variety and make the right choice? Very easy. Answer yourself a few questions and you can make the right choice. What function will your shelf serve, purely decorative or for direct practical use? Which shelf is most suitable for the design of the room? Where should the shelf, wall or corner be installed? What is the size of the room? For example, glass shelves are very suitable for a very small space; they create the effect of floating and weightlessness. But if you try to make a shelf for the bathroom, look at the options in the photo, with your own hands, then in any case it will turn out to be exclusive.
This accessory has become so integral to our lives that it is impossible to imagine any apartment absolutely without shelves, much less a bathroom without a shelf. It is this room that needs it the most, because through it we increase functionality, add a dose of individuality and saturate our favorite bathroom with comfort.
ogodom.ru
How to do it yourself
To independently arrange a niche in the bathroom, you should adhere to a certain work plan:
- initial stage - to build the frame, you should purchase sheets of moisture-resistant plasterboard, a galvanized metal profile, self-tapping screws or a pair of dowels;
- preparing the walls - the base base must be cleaned of the remnants of the old coating, after which markings are applied to the prepared surface for installing guides;
- creating a sheathing - a metal profile is attached using dowels or self-tapping screws. A rack profile is installed in the guide profile. If you plan to use a niche to hide utility lines, this must be done at this stage of work.
- covering with finishing material - the necessary details of the niche are cut out of a sheet of plasterboard. All elements are securely attached to the metal profile with self-tapping screws.
After completing all installation work, the finished structure needs to be given a decorative, presentable appearance.
For work in the bathroom, only moisture-resistant plasterboard is used
Tools
Marking the contours of a niche is an important stage of preparatory work
Guide profile
Installation of a metal frame
Sheathing with plasterboard
Finishing a niche with tiles
Practical niche for the bathroom
Whether it's a renovation or a remodel, a bathroom niche is a great way to free up space in your bathroom. The alcove or shower shelf is easy to install and provides the perfect space for your bathroom. This article will give you a quick installation guide and ideas for designing a drywall niche in your bathroom. Such trays are undoubtedly very practical and have many advantages. The most obvious is that you get much more stable and reliable memory than otherwise. You no longer need to use the floor for all your shampoo bottles, soap bottles and everything else. All these items do not have to be in the corners of the bathtub. Having a niche in your bathroom solves all of these problems while also having very versatile and adaptable options.
Determine the position and size of the bathroom niche
You can make the bathtub niche as big as you want, and even stretch it along the room. It can be used to connect adjacent walls and add contrasting tiles with color. For example, the blue and white combination looks really fresh and beautiful. However, for best results, please plan your installation for your bathroom niche carefully as the exact instructions vary depending on the type. We also recommend that you install your shower niche, preferably by trained personnel, in accordance with building regulations.
First, it is best to place the kit in the desired location in the room. If necessary, we recommend installing a niche in the bathroom in the middle of two studs. Then mark the outline or cut lines on the wall with a pencil. Carefully cut out the cavity using a saw or angle grinder. Also make sure you have enough depth in the wall to accommodate the niche.
Clean work area and apply sealant
Before starting installation, check that the work area is clean. Make sure the surface is clean and free of adhesive substances. Apply sealant to the wall to secure the kit. Use the kit to ensure a completely waterproof installation. You can also apply a self-adhesive waterproofing membrane. Before applying the sealing membrane, ensure that all surfaces are clean and free of dust, acid and grease. Start by applying the vertical self-adhesive membrane and finish with the horizontal membrane so that both membranes overlap.
After the composite tile adhesive has dried, the walls can be tiled around the niche. The tile may overlap the flange of the kit. Sealant can then be applied to the rear flange of the niche and this part can be inserted into the installation kit to secure it in place. If you're planning on remodeling your existing bathroom to gain more space, integrating a bathroom niche or shower room into your new design is a great way to create more storage space. These unique designs can be adapted to almost any room - from the smallest and narrowest bathroom to the largest and most luxurious.
Bathroom niches are usually suitable for drywall as well. Therefore, these container wall niches can be placed in plasterboard and used in existing wall structures and newly constructed walls. Shower and wall niches come in a variety of colors and finishes, so you can easily choose a design that's perfect for your home. Whether you choose the timeless elegance of stainless steel, the understated elegance of white and cream or the unique modern look of anthracite. Your bathroom gets a whole new look and you can enjoy the results every time you take a bath or shower.
Various designs and materials
The bathroom niche is also available in a variety of styles and options, so you can easily integrate this unique upgrade into your existing space. There are also different shower materials available. Stones, strips, and tiles usually look great when you look at the type of building materials the shower is made from. In addition, in the bathroom niche there may be glass shelves that are practically invisible. Because they are so simple and versatile, showering is a natural fit for almost any type of shower. Whether you have a Roman shower stall or some other type, you don't have to give up this convenient feature.
For example, shower stalls also provide ample space for niches, but the design must be well thought out. Place your bathroom niche at the right height from the ground so that you don't have to climb on stools to reach them and also so that children can use them safely. Depending on the size of the shower, the niche also adapts to the size. First of all, make sure you measure your shampoo bottles and anything else you want to store so they will fit.
If you imagine a bathtub with a shower, then the bathroom niche becomes even more practical. Design them so that you can easily use them and reach them both during bathing and showering. In this case, a horizontal design will work best. In fact, the benefits of showering extend beyond the shower itself. You can also use niches and lighting in other places in the bathroom, such as above the bathtub and even in front of a stylish vanity. This could really be a smart design.
Compact bathroom niche with style
It is usually better to have three shelves in a niche than two. Somehow this design looks better and you also have more space to organize all your shampoo bottles and soap dishes. This niche fits well into the bathroom design. In fact, everything here follows the same pattern, including the ceramic chair and tiles.
Showers also offer aesthetic benefits. By this we mean that you can use decorative tiles and pair them with other accents and details in the bathroom. You can also try bold color combinations and even mix surfaces and textures in different ways.
In the bathroom you can also enjoy symmetry. A glass divider divides the room into two zones, one of which is a shower without a door. The bathroom niche adapts to the accent of the adjacent wall, with both having the same dimensions. To highlight a niche, you can use accent lighting. This can be both a useful and aesthetic element that makes your shower look classy and classy. However, the design and decoration should remain simple.
While the colorful corner seat is clearly the centerpiece of this shower, it's not the only interesting or attractive feature. The bathroom niche looks the same, especially because it doesn't stand out from the main color, but still stands out. A shower table can basically be any shape as long as it is practical and not complicated.
It can also be divided into items in various ways. So think carefully. Of course, you can have more than one niche in your bathroom. Instead of one, which is divided into two compartments, you can install two separate ones. Whether this is more practical or not is up to you to decide.
Share:
Original design
In classic interiors, it is preferable to decorate the plasterboard structure and the entire room using finishing materials of the same color and texture. You can make a decorative niche a bright element of the interior using a contrasting color palette and a material of various qualities. In this case, you need to strictly observe the combination of shades used. Niches painted in dark colors against a light background can create an undesirable black hole effect.
Spotlights installed in a plasterboard structure will provide an excellent backdrop for personal hygiene items located in a niche. When thinking through the design of a niche, you need to take into account many important aspects, such as size, configuration and depth. A decorative niche can have strict geometry or, on the contrary, take on fancy shapes.
Glass bathroom shelf
Homemade glass shelf for the bathroom
A DIY glass bathroom shelf is one of the easiest options to create. In addition, it is a beautiful interior element that is very suitable for the bathroom.
- To implement them, first of all you need to decide on the size of the shelves and the place where they will be located.
- Having decided on the size, all that remains is to order pieces of glass from a glazier, or cut it yourself. You can also buy ready-made glass shelves in the store, thus the safety issue is immediately resolved, since they are made of special shockproof glass.
Tip: If you decide to do everything from start to finish with your own hands, you can get by with ordinary glass. For safety, it is enough to cover it with a special film.
- All that remains is to securely fasten the glass shelves. For this purpose, special holders with a glass clamp are usually used. Such fastening of shelves in the bathroom can be ordinary or with decorative finishing. They are mounted on the same horizontal level, along the width of the shelf, using dowels.
Photo
Types of shelves
You need to choose a suitable shelf design for the bathroom and decide on the mounting method. Based on the method of fastening, the shelves are:
- mounted;
- corner;
- telescopic;
- floor;
- built-in
Built-in
Mounted
Floor
Telescopic
Corner
According to the location of the shelves there are:
- installed under the bathroom;
- installed under the washbasin.
Based on external data, the shelves are:
- open;
- closed;
- with retractable drawers.
Based on the materials of manufacture, bathroom shelves are:
- plastic;
- metal;
- wooden;
- glass;
- plasterboard.
From plasterboard
Another option for shelves is a tabletop made of plasterboard, which is easy to make with your own hands. To make products of this type with your own hands, you need to select moisture-resistant drywall. In addition to this, you will need some more materials and tools:
- arched and metal profile 50x25 mm;
- slats;
- self-tapping screws;
- dowels and spacers;
- moisture-resistant drywall;
- primer.
- mounting grid.
- standard set of tools.
For finishing work the following may be useful:
- brushes;
- spatulas;
- sandpaper.
Work plan
In most cases, the base of the shelves is a tabletop, in which there are one or two holes. One has a sink, and the other hole is for a faucet. Instead of one sink, there will be a whole rack where the washbasin will be located, and under it you can place several shelves or drawers for bath accessories.
The work process consists of the following points:
- determining the shape and design of the tabletop;
- choosing the method of installation and fastening of the structure;
- if this is a floor-standing option, then you need to decide on the number of shelves in this design;
- determining the method of closing the siphon and sewer drain;
- performing preliminary measurements, as well as drawing up a drawing;
- determining the required amount of materials;
- installation and assembly of shelves;
- Finishing work;
- installation of sink and faucet;
- connecting the mixer to the water supply systems and the sink to the sewerage system.
Tabletop plan
Frame installation
Before installing the shelves, you need to make a frame and cover it with plasterboard:
- First you need to mark the future shelves on the wall surface, mark the places for fastenings and prepare holes for them. If the structure will be used for heavy objects, then it must be strengthened with traverses and a frame;
- It is recommended to use a screwdriver to fasten the frame. With its help, the profile is attached to the wall;
- The next step is to install the guide rails. For strength, they need to be fixed to the floor and reinforced with jumpers;
- All that remains is to cover the frame with plasterboard.
Tabletop installation
As soon as the frame for future shelves is made, you can begin making the tabletop. Depending on which sink you will install in the countertop, it may have a hole for the faucet, if it is separate from the sink, or without it, if the faucet is installed on the washbasin structure:
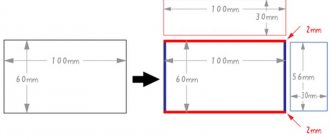
- the first thing to do is to take the necessary measurements, on the basis of which to draw up a drawing. When calculating the parameters, it is necessary to take into account not only the size of the washbasin, but also the presence of facing materials on the wall surface, as well as the model of the washbasin, which can be equipped with a free-standing mixer;
- according to the calculations, you can mark the base of the tabletop and cut it out;
- now you need to turn the washbasin over, place it in the middle of a sheet of drywall and outline its outline with a pencil;
- According to the drawn outline, you need to cut a niche for the washbasin using a jigsaw and, in some cases, also cut a hole for the mixer;
- now you need to treat the internal places of the cuts with moisture-resistant glue or laths so that they are not exposed to the harmful effects of moisture;
- for the same purposes, the sides of the base are sanded using sandpaper for these purposes, after which they are covered with a layer of primer;
- You need to apply silicone to the edge of the sink and insert it into the prepared hole on the countertop; this must also be done with the mixer;
- install the tabletop using the side corners;
- mosaics can be used as finishing, but its elements must be mounted on moisture-resistant glue;
- connect the mixer pipes to the water supply system, and the siphon to the sewer system.
Plasterboard table top
How to make an internal niche for shelves
When the frame structure is installed, an internal niche will appear. This space is usually used to install shelves. Their number is selected based on the size of the structure and the requests of the apartment owner.
It is immediately necessary to think about the location of the fitting outlet levels; it is necessary that the communication pipes do not interfere with the installed shelves. The optimal location of pipes from the water supply to the mixer is considered to be the level of the middle shelves; this rule also applies to the sewage system. If the sewer pipe comes out of the floor, then a special hole will have to be made in the structure for a corrugated hose going to the siphon.
Worktop under the sink
To save useful space, it is recommended to place sewer and water outlets to the mixer at the same level, taking into account that the drain hole in the washbasin must coincide with the top surface of the shelf.
In the inner niche you can install drawers that will help keep your items in order. The retractable design of the drawers can be very diverse, it will depend on the direction in which the drawers will be installed, vertical or horizontal.
The retractable design is very convenient, thanks to roll-out mechanisms that allow you to easily reach the furthest objects in the drawer. The most convenient designs are vertical pull-out products.