Popsicle stick bird feeder
What do you need
- Wooden ice cream sticks;
- paint and brush or spray paint;
- scotch;
- glue gun;
- scissors;
- ribbon or yarn.
How to do
Paint the sticks in any colors and dry. Place several sticks on a straight surface to form the bottom of the feeder. For reliability, secure them with tape.
tCraft YouTube channel
Glue one stick at two edges of the shape opposite each other. Attach another stick at the other edges. Fold a few more rows in the same way. Glue four sticks vertically on the outside.
tCraft YouTube channel
Then make two pieces for the roof as shown in the video. Separately glue two sticks edge-to-edge and glue the made parts to them. Attach the resulting roof to the vertical supports.
tCraft YouTube channel
Place three sticks together and glue another one horizontally in the center. Cut the sticks on three sides and glue the part to the bottom of the feeder. Stretch ribbon or yarn under the roof, tie it in a knot and hang the feeder.
tCraft YouTube channel
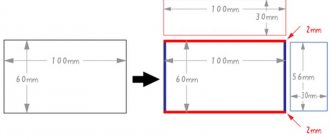
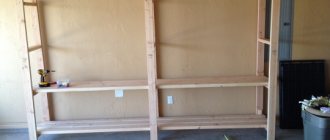
You can also build a more durable house from wood. True, you will have to work hard:
With dispenser
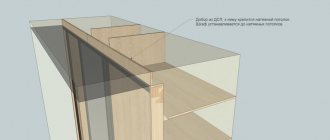
The idea is suitable for those craftsmen who not only want to make a decorative decoration for the garden, but also show sincere concern for their feathered friends. The peculiarity of the design is that there is a dispenser that automatically adds food to the birds as it decreases. In addition, grains and seeds are reliably protected from dampness and retain their nutritional value for a long period of time.
It is worth examining the technological map of a wooden bird feeder with a dispenser in more detail. Projects are produced according to a standard scheme. The main elements are the base and the roof, which are connected to each other by support posts. An option is possible when a rope passes through the roof and floor, which serves as a connecting link and a hanging element. Sides and walls are not needed for the structure. To feed birds, 4 recesses are formed at the base of the feeder: one on each side, located closer to the center.
A dispenser is installed above the prepared recesses. The easiest option is to use a liter plastic bottle with a screw cap. Holes are drilled in the bottom of the bottle, which should coincide with the recesses in the base. The dispenser lid extends through the roof to make it convenient to add seeds to the birds.
Important! Considering that products with a dispenser are completely open, it is better to use durable wood or moisture-resistant plywood for manufacturing.
Feeder made from a plastic bottle with poured food
What do you need
- Plastic bowl;
- scissors;
- awl;
- plastic bottle;
- small tray;
- bolt with washer and nut;
- knife;
- bird food;
- wire;
- pliers.
How to do
If the bowl is too tall, trim the edges. Make a hole in the bottom of the bowl and in the lid of the bottle. Make a hole in the tray where the structure will be installed. Connect the lid, bowl and tray as shown in the video.
Cut a small piece above the neck of the bottle so that food can pass through it. Pour it into the bottle and screw on the cap with the attached parts. Screw a wire to the bottom of the bottle and make a hook out of it. Details are in the video.
Turn the feeder over so the bottle is upside down. The food will gradually pour out of it into the bowl. To add food to the bottle, simply open the cap, pour it in and close the container again.
The bottle can be attached to the board to make it even more comfortable for the birds to sit:
And this video shows how to make a similar design from two bottles of different sizes:
Advantages
You can make a feeder from almost any available material. For this, plastic bottles, paper boxes, pieces of tin and plexiglass are often used, but wood is the best option for manufacturing.
Compared to other materials, a bird feeder made of wood has the following advantages:
- accessibility - building materials can be found at any summer cottage (off-cut boards, plywood, even sticks - everything is suitable for a bird canteen);
- simplicity - wood is easy to process and does not require special skills and knowledge in handling tools;
- safety - despite the apparent fragility, wooden feeders have a good margin of safety, so they can easily withstand the weight of even large birds (products made from paper boxes and bags cannot boast of this feature);
- original appearance - the wood can be decorated with carvings and supplemented with any decorative elements (the designs look much more elegant than a cut-off plastic bottle);
- ecology - contrary to popular belief, birds are not attracted to all feeders: the strong chemical smell of plastic can scare away birds, but wooden products are not afraid of such problems.
Wooden products also have some disadvantages. The material is very sensitive to external factors: it dries out from the heat, and can become moldy at high humidity levels.
Important! To ensure that the product retains its appearance longer, it is better to paint the wooden bird feeder, covering it with a protective layer of varnish with a neutral odor. The coating will have to be corrected at least once a year (before the onset of the autumn-winter period).
Feeder house made from a plastic bottle
What do you need
- Knife;
- plastic bottle;
- jute twine;
- glue;
- scissors;
- braid;
- lace;
- plastic spoons;
- paint and brush;
- glue gun;
- wooden stick;
- wire.
How to do
Cut two windows opposite each other at the bottom of the bottle. Wrap the bottle with twine, attaching it with glue. Glue braid around the windows and lace at the bottom.
Paint the spoons, dry them and glue them to the top of the bottle as shown in the video. Make a hole under the windows and thread a wooden stick through them. Also make two through holes under the bottle cap, thread the wire, twist and hang the feeder.
You can decorate the house in different ways, for example like this:
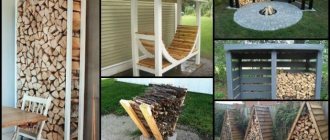
Decorative elements for a wooden feeder
These are the words that can be used to describe other bird houses.
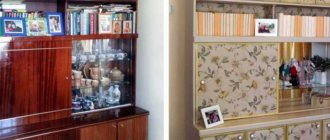
This wooden feeder doesn’t even require wood. After all, it is located on the counter. In addition to this bird canteen, there are two boxes in which you can plant greenery or flowers. Take a block of wood for the main post and secure its lower end in two perpendicular boards. To do this, you need to make a recess in the center of 1 and 2 boards and compare them. But first make through holes in the middle of each one the diameter of the bar. Now connect this lower part of the feeder using self-tapping screws. Look at how the roof is constructed.
As you can see, it is parallel to the feeder itself. To secure some of the pieces of this bird canteen to a wooden beam, you need to drill holes in them, as well as in the timber. Place the edgings on the glue, inserting them into the holes made.
The elements that you will attach to the edges must be secured using clamps. Hold them until the glue dries.
Once the stand is done, all that remains is to paint it. Fill wooden boxes with soil and plant flowers there.
The next wooden feeder is fixed on a tripod, and the house is made in the form of an open gazebo. Down, food spills out onto the floor. Birds fly here and feast on it.
The next wooden feeder is also an item for decorating the area.
From two small planks, make a cross on which the timber will be attached.
Install it in the holes made and secure it with small oblique blocks.
Cut out 2 oval pieces and make 3 holes in one.
You can insert containers into the holes into which you will pour bird food.
Fasten together a solid oval part and with holes. Place food containers on top. They must have a mechanism that allows the birds to retrieve food.
If you know how to cut wood, then use a jigsaw to make shaped edges for the next structure. This will also be a wonderful decorative element.
Log bird feeder
What do you need
- A small log about 40 cm long;
- drill;
- jigsaw;
- 2 wooden disks 2–3 cm thick;
- hammer;
- nails - optional;
- 2 metal hooks;
- large chain.
How to do
Make holes in a circle on both flat sides of the log with a long drill bit. Remove the cut core from the log. Use a jigsaw to cut a hole as shown in the video.
Insert wooden discs along the edges of the workpiece and tap with a hammer. In order for the discs to fit tightly, their diameter must match the diameter of the hole in the log. Instead, you can nail wooden circles to the outside. Then they should be the diameter of the log itself. Screw the hooks on top, attach a chain to them and hang the feeder.
Bird feeder made of plywood and branches
What do you need
- Saw;
- thick and thin branches;
- drill;
- 2 square pieces of plywood;
- self-tapping screws;
- pruner;
- roofing felt;
- construction stapler.
How to do
Saw off two identical sections and two smaller sections from thick branches. You will also need five short pieces of medium-thick branches.
Drill one hole at a time in the corners of the plywood using a thin drill bit. On the reverse side, drill with a thicker drill, but not all the way through. Screw thick branches into the corners, one medium one on one side, and two medium ones on each side. Details are shown in the video.
Weave a fence from thin branches around the screwed bases. Cut off the excess with pruning shears. Make holes in the bottom. Attach a second sheet of plywood on top and cover it with roofing felt.
Attach the bottom of the feeder to a long, thick branch and stick it into the ground.
Bird feeder out of the box
What do you need
- Cardboard box (for example, juice or dairy products);
- paint and brush or spray paint;
- scissors;
- wooden ice cream sticks;
- glue gun;
- wooden stick;
- a thread.
How to do
Paint the box any color and let it dry. Cut the wooden sticks in half and glue them to the top of the box. Make the front and back parts of the roof out of them, as shown in the video.
Cut a window in the box, make a hole under it and at the very top of the box. Insert a wooden stick under the window and a thread at the top. Tie it in a knot and hang the feeder.
Edible bird feeder
What do you need
- 7 g gelatin;
- 60 ml hot water;
- 150 g bird food;
- spoon;
- cookie cutters;
- needle;
- threads;
- scissors.
How to do
Dissolve gelatin in water. Add the food and mix thoroughly. If the mixture turns out runny, add more food. Place the food into cookie cutters and compact.
Leave for several hours for the mixture to harden. Remove the figures from the molds, thread a needle and thread through each of them, tie the thread and hang the feeder.
Vertical models
The crafts resemble multi-story houses and are designed to simultaneously feed a large number of birds. Considering that the model is quite complex, it is better to first prepare a drawing of a bird feeder made of wood.
The construction of a two-story building is carried out according to the following scheme:
- The base is prepared - a rectangular piece of board is cut out in accordance with the planned dimensions.
- Walls are made - there can be two or three of them, depending on the type of structure. The walls are installed at the ends of the base, and small slats are nailed in the middle.
- The roof is installed - the element can be flat or gable. In the second case, the upper part of the walls is cut out in the shape of a triangle to simplify the assembly process.
- Overlapping - a plywood partition is placed on the prepared racks, dividing the feeder into two levels.
All that remains is to coat the structure with waterproof varnish, pour in food and wait for the birds to arrive. The number of floors is at the discretion of the master. Using a similar scheme, you can create three- and four-level crafts.
Orange bird feeder
What do you need
- orange;
- knife;
- 4 wooden sticks;
- 2 plastic plates;
- thick needle;
- scissors;
- thick threads or yarn.
How to do
Cut the orange in half and scoop out the pulp. One orange will make two feeders. Pierce each peel half with two wooden chopsticks in a cross pattern.
On each plastic plate, make one hole in the center and four holes opposite each other on the sides. Cut four lengths of thread or yarn and tie each one to a stick next to the peel.
Using a needle, thread the threads through the side holes on the plate and then into the center hole. The plate should be turned down, forming a roof. Level it and hang the feeder by the threads.
The feeder can be simplified by simply hanging the orange peel by threads: