82406
The apartment has a Soviet-era wall made of high quality natural wood. But over time, the facades became warped, the fittings failed, and the appearance became unpresentable. It’s a shame to throw away this piece of furniture, so many people have a question about how to update an old furniture wall with their own hands and they study photos before and after restoration.
Required tools and materials
Before starting any work, you need to prepare everything you need - buy material, tools. The list consists of the following:
- Furniture fittings;
- Putty material for wood;
- Facades, if necessary;
- Paint or stain (preferably spray);
- Construction knife;
- Construction hair dryer;
- Screwdriver;
- Sharp scissors;
- Iron;
- Self-adhesive furniture film;
- Wax for furniture of different consistency;
- Candle;
- Spatulas;
- Rags, clamp;
- PVA glue;
- Wood varnish;
- Felt pen;
- Edge for processing ends.
This is not the entire list of materials and tools, since you can update old furniture in several ways, each option has its own specific set of necessary tools.
Interesting interior solutions
Before you update an old furniture wall from the times of the USSR, you need to make sure that its fasteners are intact and, if necessary, replace them. The set can acquire a more modern look if you do not display all its modules in one row, but distribute them in different corners of the room or apartment.
If the cabinets will stand as a solid wall, then you should do the following:
- remove mezzanines, glass and other doors, leaving only the lower shelves and drawers closed;
- attach cornices to the top of the wall;
- Decorate the side parts with columns.
You can beat the Soviet wall in a modern interior if you leave the bottom row of cabinets, above which you hang shelves and racks at different levels.
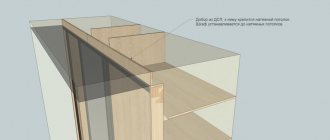
If the set is topped with mezzanines, you can update the old Soviet wall by making a fashionable hanging wall out of them. To do this, remove the doors and the back. The resulting sections are hung vertically or L-shaped. The shelves in such a module will have to be redone and, when filling them, the strength of the wall will have to be taken into account.
Types of update
If you don’t know how to update an old furniture wall with your own hands, before and after photos can be found on the Internet. In addition, we present several methods that can be used to give a second life to any furniture.
Restoration of an old wall
If old furniture is dear to you as a memory, but its appearance has been severely damaged by time - chips, creases, deep cracks have formed on the surface - it can be restored. After spending a minimum of time, you will receive an updated piece of furniture. For repair work, a standard set of materials and tools is used. For quality repairs, it is enough to perform the following steps:
- The working surface must be cleaned and washed with a solution of water and soap, and dried well - this will help increase the adhesion of the material to the wall facade;
- To rid the surface of deep scratches, they are filled with melted wax. After the fill has hardened, you need to take a felt-tip pen to match the wood, apply strokes to the wax that will imitate the structure of the wall material. This is not difficult to do; just continue an existing drawing. After this, take a clean rag and carefully rub it over the frozen wax, slightly smearing the lines. As soon as the desired result is achieved, the plane is coated with furniture varnish;
- If severe abrasions are visible on the facade, they are painted over with varnish of the desired shade from a spray can;
- If there are cracks and delaminated areas on the facade, you can update the old wall using basic means - PVA glue, a medical syringe and a fixative. You need to fill the syringe with glue and inject the required amount of the composition into the crack. Then press the split and remove excess glue. Using a clamp, press the area and leave to dry for 24 hours;
- Are there many chips on the façade? The same melted wax will help you deal with them. First, you need to use a spatula to trim the edges of the chip and fill it with wax. Once the wax has dried, buff the area well with a clean, dry rag. Then perform the same steps as when filling scratches and apply varnish.
After this treatment, the wall will not change its design, but its appearance will become much more attractive.
We remove dirt and dust from coatings
Treating cracks with wax
Repairing chips with glue
Painting over abrasions
Transforming a wall with furniture varnish
If the interior of your apartment has changed, and simple restoration does not suit you, then you can radically change the old furniture with your own hands. There are several ways to update furniture, the choice of which will depend on artistic skills, preferences and the amount of free time.
The easiest way is to varnish. The process is not complicated, provided that the procedure and restoration technology are followed.
The set of tools is standard, but for a good result you need to follow the following algorithm:
- Take a photo of the wall before starting work. This will help you assemble it later after the update without confusion;
- Disassemble the structure. It is necessary to remove the fittings and doors;
- Wash the wall and all components with soapy water;
- Remove dust and soot deposits in the corners using a toothbrush or toothpicks. This stage should not be ignored, since the quality of the final result depends on preparation;
- Inspect the condition of the facades. If the surface is not badly damaged, then it will be enough to simply coat it with varnish;
- If the facades are in poor condition, there are a lot of chips and deep scratches on them - the old coating is removed without leaving a trace. To make the work go faster, you can use special compounds that help remove varnish, or use a regular spatula;
- As soon as all the exfoliated areas are removed, the old varnish is removed, you can begin restoration with wax - how to do it is described above;
- Using fine-grain sandpaper, sand the surface and remove dust;
- Cover the wall façade and all components with 3-4 thin layers of furniture varnish. It is worth remembering that when applying a thick layer, drips may form that will spoil the appearance of the wall;
- As soon as the varnish coating has dried, the wall should be assembled and the fittings replaced with new elements.
By updating old furniture in this way, you can add a few more years of life to the wall in your interior.
Removing dust and dirt
We remove cracks
Removing old varnish
Varnish in several layers
Installing new handles
Application of self-adhesive wallpaper
Today there are a lot of materials that can be used for restoration. Updating old furniture with self-adhesive wallpaper is one of the easiest options. This material is easy to work with and inexpensive. In addition, the range is so wide that you can choose material to suit every taste. The film is waterproof, so it can protect the wall from environmental influences. The algorithm for performing the work is as follows:
- Make preparations as in the previous method - remove the fittings and disassemble the structure;
- Clean the facades, wash them, and after drying, treat the surface with white spirit to degrease;
- While the facades are drying, we cut out the material. Sheets of film should be 10 mm larger than the original size on each side. This is necessary in order to eliminate gaps in the finishing;
- The surface on which you plan to stick the material must be moistened. Apply the film to the top edge and carefully peel off a small strip of the protective layer. The film is pasted gradually, slowly moving down;
- After gluing, you need to level the material with a soft rag, moving from the center to the edges;
- As soon as the entire wall is covered, you need to heat the iron and iron the plane through the fabric - this will help the film adhere tightly to the surface;
- Replace the doors and fittings and apply edge tape.
It is not necessary to use wood-look film; you can choose any color. A competent design combination of different shades will help turn an old wall into a real masterpiece.
We disassemble furniture
Cleaning the surface
We moisturize the coatings
We glue the film
Putting it back together
Restoration using staining
Repainting an old wall will change its appearance beyond recognition, while the main outlines will remain unchanged. You don't need any artistic skills or special tools. The work is not difficult to complete, just follow the basic rules:
- The wall is completely disassembled and the fittings are removed - this makes the restoration process much easier;
- The old coating must be completely removed, obvious flaws must be repaired with wax;
- Sand the surface after it has dried with sandpaper or a soft rag;
- Painting is carried out in several layers, and care must be taken to ensure that no sagging or smudges appear. As soon as the painting is completed, we leave the structure to dry, after which the wall should be assembled.
If a sagging has formed during the work, which was discovered after drying, it should be cleaned with sandpaper and additionally coated with paint. For a complete understanding of the painting system, watch a master class for beginners on updating furniture with your own hands.
Tips for repainting an old wall
One of the easiest ways to make old furniture look new is to paint it. This way it will have an attractive appearance, moreover, the work will not take up much of your time.
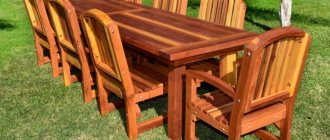
- In order to get started, we will need to choose a certain type and color of paint. If the furniture is made of simple material, it is quite acceptable to use absolutely any paint. In the case where you want the final result to be shiny, use enamel varnish paint. To achieve a matte surface finish, use an oil version. One of the best options for painting is acrylic (preferably water-based). Aerosol cans have proven themselves to be good for home work with furniture. When working, they lie well and evenly on the surface and do not create drips.
- If you are painting old garden furniture, then it is recommended to use paints and varnishes. They are well suited for metal objects, but do not forget to pay attention to the fact that they have an anti-corrosion effect. When painting aluminum objects, buy special paint for them. In order not to confuse anything in the types of material and paints, it is best to check with a consultant before purchasing this or that product choice.
- Speaking directly about the paint application itself - here you can use a brush, roller or spray gun. Please note that before applying paint, you will need to degrease the furniture and carefully inspect it for any damage. If necessary, replace fittings, locks or handles before starting work. Next, get rid of the old varnish and sand the entire surface with sandpaper. It is best to use fine-grain paper for this job. Alternatively, you can use a grinder instead. She will also be able to cope with the task perfectly.
Related article: Servo drive for heated floors: connection procedure
- Another important point before applying paint will be the work of applying primer. If necessary, use putty to eliminate problem areas. When the primer is completely dry, apply alcohol or vodka to the surface to completely degrease the object.
- The final stage will be applying paint to the surface. This is done slowly and carefully, the coloring itself is carried out in one direction of the brush. It is best to apply several layers of paint - then the result will be much better. It is recommended to use painted furniture no earlier than a week after work.
Work technology
Carrying out work for any type of restoration has one general technological sequence - preparation and actual updating.
Preparatory work
Before you decide to remake old Soviet-era furniture, you need to understand that such a process is only justified if it is made of wood. It is not advisable to renew old furniture made of chipboard, since the service life of these structures is not long, and perhaps the wall is no longer suitable for restoration. So, there are preparatory activities that must be carried out before any restoration:
- Clean the surface from dust and dirt, while dismantling all decor and fittings;
- The old layer of paintwork must be removed. This can be done with coarse sandpaper or a sanding machine. A solvent solution can also be applied;
- Grout deep cracks with a special material;
- Fill chips and dents with wax and sand;
- Prime the surface with a wood compound. It is advisable to use acrylic compounds that fill all microscopic cracks.
The preparation stage is very important, since the final result depends on the quality of surface cleaning.
Removing dust and dirt
Remove old paint or varnish
We erase the deformations
Prime the surface
Update instructions
Before you restore old furniture, you need to decide on the design you want to get. Let's consider the most popular updating method at the moment - decoupage. The preparatory work has been carried out successfully, and restoration can begin. The algorithm for performing the work is simple and will not cause difficulties even for a beginner:
- Cut out the desired design, or take special napkins for decoupage. If you are doing the work for the first time, take pictures of medium size relative to the surface on which they will be applied;
- Apply PVA glue to the surface, you can use a blending composition. Do not coat the entire wall at once, as the glue may dry out while you are covering one area, so you need to work in stages;
- When gluing a pattern, you must strictly ensure that the edges adhere to the surface. Drawings can be pasted overlapping each other, so the decor will be voluminous and original;
- If you need to paste over a corner, the material just neatly bends around the corner, there is no need to cut anything. Smooth the picture with your fingers or a rubber spatula to remove air bubbles and leave to dry;
- The next stage is varnishing. Apply a thin layer of clear furniture varnish with a brush or lint-free roller and let it dry. We repeat the process 3-5 times;
- After the last layer of varnish has dried, you need to rub the surface until it shines; this can be done with a soft cloth. Polishing should be done in a circular motion without pressing.
In the before and after photos you can see how to update an old furniture wall with your own hands.
If you follow the instructions and apply designer methods of decorating furniture, you can get a great result that will be the pride of the apartment owners.
We cut out the elements and cover the furniture with glue
Paste stencils
Varnish
Ideas for updating an old wall and other things
Since the principle of working with the surface of old furniture will be approximately the same, it is not necessary to focus exclusively on it. This way you can bring other important household items back to life.
Related article: Do-it-yourself spring crafts in quilling style (20 photos)
Here are some useful ideas that may come in handy at work.
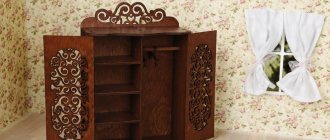
- With a little work on the surface of the old cabinet, you can give it a new life, and such a new thing will become a beautiful item in your home interior.
- An old chair like this will be a bright accent in the design and decoration of your home.
- A desk with drawers that hasn't been used for a long time will be transformed into a modern workspace. It can be decorated to your personal taste.
- A bulky sofa can be turned into a beautiful and comfortable soft ottoman, which can be placed in the hallway without any problems.
- The former table on wheels will become a fashionable, stylish cabinet that can be moved to any desired point in the house.
- Even earlier, a rough and uncouth chest of drawers, after gluing, will become a modern, light and functional piece of furniture.
- An old, seemingly unnecessary nightstand will turn into a wonderful bedside table that will decorate the design of your bedroom.
- The dressing table, which at first could simply be written off, will turn out to be an excellent work desk, also with the presence of bedside tables.
- With a little work on an old carved sofa back, you can end up with a wonderful addition to a mini-sofa.
- Decorate a nondescript cabinet with a tabletop and a door - you will get a good and useful full-fledged cabinet for various items.
- Use paint to turn an unnecessary coffee table into a real work of art with unforgettable oriental motifs.
- If you have some fabric left and an old chair, feel free to turn it into a new design project that will undoubtedly be a success.
- Work with a nondescript bedside table, after which it will be a highlight in the interior design of one of your rooms.
- A large chest of drawers can easily be updated and converted to one of the French motifs.
- You can easily transform your grandparents' old wardrobe into a modern one using regular wallpaper.
Photo
Design tips
Thanks to simple restoration methods, you can find a use for the mezzanine and refresh the appearance of other old furniture. You should build on the existing design. If the wall is wooden, this can be emphasized with varnish. It is worth pre-coating the surface with stain to give the appearance of oak or other wood.
Modernization of the wall can be carried out using metal color and mirror inserts. Fittings play a big role. You should select gray or black elements. Coziness is created by decoupage using wallpaper. This method of restoration can turn the living room into a Renaissance room. With the help of simple ideas and materials, you can harmoniously fit Soviet furniture into a modern interior.
Why is the effect of aging furniture done?
As already mentioned, antique furniture looks very elegant in the interior. Buying such a decorative item is not affordable for everyone, since truly authentic antique items can be very expensive, and it is not always possible to find them.
Artificially aged furniture with a vintage look will add interesting notes to the interior design of your home.
And self-aged furniture is inexpensive and not difficult to make. Moreover, the advantage of this design is that it is essentially new and durable, it just looks like an object from another era.
To properly age furniture with your own hands, you need to know several important secrets of this art.
But a real vintage one will be very fragile and will have to be handled carefully so as not to damage it. Therefore, many resort to the artificial method. Aging furniture is not only a beautiful process, but also very exciting.
For what styles is this technique used?
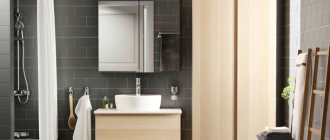
The interior with antique furniture is decorated with extreme care. If you enter an item incorrectly, you can ruin the entire design. This type of room decoration is used only in historical styles, such as country, chalet, Provence, vintage, shabby chic and in some cases classic, hi-tech and minimalism.
During the arrangement you can use several rules:
- Classic style looks better when using furniture made of valuable wood (oak, ash). A suitable technique is patination. Patination produces a matte surface that looks great in a classic-style interior.
- High-tech and minimalism, although more modern styles, also use aged furniture. Large echoes of antiquity are not used, but only small and almost invisible ones that complement the room and give it elegance. Dark shades are preferred.
Pay attention to the little things!
You can age furniture with your own hands very simply and do not require any special skills. The main thing is to follow all the steps of the process and follow safety precautions.