Even the most modern exterior can become much more comfortable if it contains garden furniture. Undoubtedly, country furniture differs from pieces of furniture intended for furnishing residential premises, so it can even be made from improvised materials. It is enough to study a few tips, show imagination, perseverance, a little work, and furniture will appear in your garden plot that will become the pride of the owner and the envy of the guests.
In this article we will tell you how to make garden furniture with your own hands from wood, pallets, metal, demonstrate drawings, diagrams and photographs, as well as video instructions for making garden furniture.
Peculiarities
Garden furniture usually belongs to one of 3 types, which include portable, permanent and folding. The first category includes chairs and tables, some versions of swings. If something happens, there is a place for them under the terrace cover, in the garage, basement or inside the house. Permanent furniture can only be dismantled. The folding type is the most difficult to implement, but the resulting structure can be reduced in size if necessary, sometimes several times. Living up to its name, it is made by movable joints. Folding furniture can be either permanent or portable. If possible, it is better to assemble structures for the garden indoors with a workbench and a large table for work. Then the accessories will be protected from moisture, and the storage of waste materials will be convenient, and there will be better opportunities for recycling.
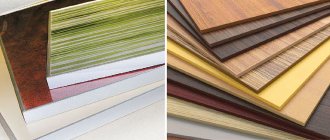
Material
When it comes to the question of what you can make garden furniture from, you should highlight several budget options:
- pallets - you can find free ones, but sometimes their quality leaves much to be desired;
- polypropylene - cheap and economical;
- rattan is a good reason to learn how to weave;
- technorattan is synthetic, but will last longer and is easy to weave;
- wood - wooden blocks and panels, if you have 5-10 thousand rubles to spare, you can create excellent eco-friendly furniture with your own hands.
Read here - How to restore old furniture with your own hands: amazing ideas for updating furniture without extra costs. 85 photos of furniture after restoration
It is worth noting that in cases of natural material, it is important to comply with the standards for its processing. The tree quickly dries out in the sun, just like rattan.
Garden furniture style
Rustic is the first on the list of justified options. The main milestones of the style were wood, rounded lines, relief and slight negligence. Proponents of perfectionism will more like crafts in a somewhat similar loft style. The rustic style will help in arranging a natural environment for spending free time in peace and quiet. Furniture in the English style is made with classic “notes”, balanced proportions and lines. The combination with small unevenness in the landscape will be organic. The Japanese trend in design involves the observance of straight lines and, in fact, Japanese motifs, designs and patterns. Decorative plants will complement the street ensemble. The garden in the spirit of French classicism is furnished with sophisticated products. At the same time, symmetry should be maintained in the arrangement of furniture.
Other relevant styles in this context:
- eco-style;
- Oriental;
- Mediterranean.
Selection of source material
The harmonious arrangement of garden furniture and successful combination with other objects of the surrounding design largely depend on the material of their manufacture. Most often it is recommended to use wood as the main material. Branches, twigs, logs and trunks become excellent raw materials for the manufacture of unique products.
However, not only wood can dominate in the choice of materials for the manufacture of garden furniture. You can do the thing yourself using concrete blocks and metal. Even old car tires can become raw materials for making original things.
What to make from
Everyone can find more or less suitable materials. Wood, metal, plastic and unnecessary old things contained in the basement or garage are, one way or another, stored for future use, but sometimes these materials are forgotten about. The first step is to carefully inspect all storage facilities. There will definitely be blanks for several original homemade products there. Old fabrics are useful in creating screens, curtains, and seat upholstery. Sheets, boards, beams, sections and solid wood are sold in most hardware stores, although sometimes you have to order blanks, and sometimes it makes sense to make them yourself. The required metal structure is more difficult to find. Metal products stored on site, as well as their parts, only occasionally suit the shape, quantity and aesthetics of the coating. Additional materials and fasteners are selected in advance, almost simultaneously with the main workpieces.
Metal
The best solutions for DIY production:
- bronze;
- aluminum;
- brass;
- steel;
- stainless steel;
- copper;
- cast iron;
- iron.
A long service life coupled with the anti-corrosion properties of modern products is what makes the material suitable for manual assembly and, accordingly, additional savings. Metal tables and chairs fit perfectly into the green background of bushes and trees. It is better to assemble your own products from aluminum - it is not for nothing that it is considered the best. Seats are often made of plastic or wood, but the qualities of aluminum are also suitable for creating a comfortable seat. The legs can be made from heating pipes. For fastening you will need welding or bolts. Pipes are bent using a car disk. To prevent the workpiece from cracking, sand is poured into the cavity and sealed with small blocks. For countertops, QSB sheet and treated boards are suitable. The seats are often made of foam rubber, covered with vinyl leather or dermantine.
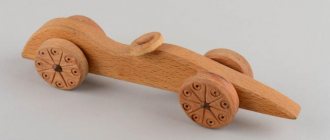
Tree
The popularity of wood is guaranteed by its natural beauty and environmental friendliness. Wooden products remain among the most prestigious. For garden furniture, slats, bars and boards are usually chosen, that is, materials that are easiest to work with. It is not recommended to use coniferous wood in open spaces, as it damages clothing with the resin it produces. The raw materials can still be simply deresined. Logs make massive benches. Working with the material is not easy, but with pre-processing it is possible to assemble mobile structures, sometimes without a single fastening element. Coffee tables, armchairs and sofas can be assembled or finished using sections of tree stumps. Some take the idea further and drive the stumps themselves into the ground, treating them appropriately to ensure a tight connection. Solid wood, driftwood and firewood will make interesting designer furniture; you just need to add some imagination.
From unnecessary things
Old, unused items will make the task of organizing your garden even easier. Thanks to thoughtful presentation, shabby and broken furniture will become the hallmark of the yard. The beds will be used as low fences, and the cabinets will be used as doors or gates. A broken piano will play the role of a secret bar, and the cabinet will serve as a tiered flower bed. Old shelves are turned into stands for flowerpots. A skilled craftsman will assemble a whole set of medium-sized furniture from tires: tables, chairs, sofas. The tires are converted into comfortable poufs, having previously been covered with rope and installed on the legs. There is definitely room in the yard for an additional table made from an old door. And if desired, you can install a trellis from the door leaf on the site. If there is a sufficient amount of raw materials, a gazebo, a country shower, and houses for animals can appear at the dacha.
DIY garden furniture made from pallets
List of convenient options for assembly without the help of specialists:
- Dinner table.
- Coffee table.
- Armchair.
- Sofa.
- Bench.
- Chaise longue.
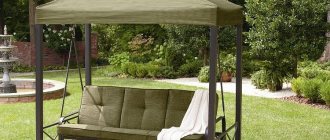
- Swing.
- Bar counter.
The structure of the pallet is ideal for the installation of rectangular structures. Painting will hide the wear of the material and emphasize its shape. Medium-sized products are mobile, and the increased number of fasteners provides them with an adequate service life. Chairs and tables are moved to a convenient place on the site at the first need. Pallets must not be used without first being cleaned. They are also polished and treated with various compounds. Pallets are assembled into work tables, flower stands, and pet houses. The site is equipped to suit any needs. Sometimes entire sets are assembled from pallets, starting with ottomans, coffee tables and ending with benches and long sofas. All you need is time, material and desire - and an obstacle course or an interesting play area will be assembled from old boxes.
How to handle pallets
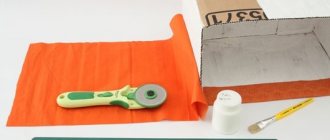
Pre-treatment is mandatory and ends with the application of a protective layer. Pallet preparation includes 5 stages. First of all, it is cleaned of dirt - using detergent, water and washcloths. There is no point in treating new pallets this way; simply wiping them with a damp cloth is enough. Then the boards are sanded to remove roughness and splinters. In this case, processing open areas will be enough. A small pallet should be processed manually with sandpaper. Special attachments for drills and grinders are also suitable. It is advisable to choose a well-ventilated area for work. After this, the wood is given water-repellent properties, for example, by applying a primer. For use in the garden, the oil solution will not be enough. The best solution is acrylic primer. If desired, the pallets can be painted, and preliminary priming will make this process easier and save paint. The treatment is completed with varnishing.
Coffee and dining table
To create a coffee table you will need the following tools:
- clamps;
- electric drill;
- metal mounting strips;
- connecting bolts;
- Grinder.
The coffee table is made from just 1 Euro-size pallet. Euro pallets do not take long to process, because removing irregularities from the corners and ends is enough. The tabletop is usually a sheet of plywood, which is attached to the pallet, after cutting off the excess. The fragment is screwed to the top of the box with four bolts. After installing the planks, you will also need glue. The structure is fixed with clamps, and then proceed to similar processing of the lower surface of the pallet. Pallets are used to make nice-looking dining tables. In addition to the tools for the coffee table, you will need a long pallet (more than 1.5 meters), wood sealant, 2-8 cm screws, ready-made metal supports, etc. First, the long pallet is sanded and treated with sealant. The size of the boards for the tabletop is adjusted to the dimensions of the pallet. The boards are glued to the pallet and secured with clamps until the glue dries. Then confirmations are used. Metal plates are installed at the bottom corners, and legs are placed on them.
Chaise lounge
First, visually form the back of the lounger. We place one pallet on top at an angle, and then remove several boards from the top pallet. We reduce the width of the lower pallet to a value equal to double the thickness of the end. We take into account that the opposite side ends of the upper structure do not always have the same thickness. We carefully remove the boards of the upper pallet that need to be dismantled, because they can be useful for modifying the design of the finished chaise lounge. Next, we place the backrest on the legs, and connect the seat and backrest with a few more fastenings. We choose movable fasteners to adjust the backrest, but a regular, awkward chaise lounge looks good. The finished product will need to be carefully processed and painted. As an alternative, you can make a different pattern for the back, and form the base for it as a continuation of the lower tier.
Stylish armchairs, sofas and benches
Benches are made in the following way: a standard pallet is divided into two unequal parts. A fragment with four boards will serve as a seat, and an element with three will serve as a backrest. The parts are fastened with screws or self-tapping screws, single or double fastening. Reinforcement of fasteners is carried out using bars. From the remaining boards, 4 legs are obtained, ideally wide and low. They are connected not only with hardware, but also with corners. At the end, the back is decorated: it is given a rounded shape, sometimes painted. The chairs are made in a similar way, but assembly can be done by stacking pallets on top of each other and highlighting a small backrest. U-shaped, corner and straight sofas are also assembled from pallets. For this purpose, pallets are combined into a line of the desired shape, in two vertical tiers. After this, the question about the legs will remain open. You don't have to do them. At the end, the backrest is attached, choosing the optimal height based on the parameters of the pillows.
To fasten pallets together, a hybrid of a nail and a self-tapping screw is sometimes used.
Garden swing
It is better to make supports and fastenings for a mini-attraction in the form of the letter “A”. In this case, operating the swing will be easy and the risk of injury will be reduced. The structure itself is made portable or stationary. A large tree is usually chosen as a place for a rocking chair. In the absence of such opportunities, you will have to be content with a stationary swing. For the second option, you will need a frame with an angled connection. Before installing the structure, prepare a place for installing the crossbar. The soil is compacted, after which the stationary posts are immersed to a depth of half a meter. Concrete and gravel are added to the pit. Assembly of the backrest and seat usually begins from this point. They use 2 pallets, and to create the back, one of them gets rid of everything except the bottom. Fixation of 2 elements is carried out at a slight tilt back. Sometimes the part “under” the seat is assembled from several pallets. Then load-bearing beams are installed underneath them.
Bar counter in the garden
For those who prefer to spend long periods of time outdoors, a garden bar will come in handy. Material consumption will directly depend on the scale of the project. The side base of a C-shaped counter is made from at least four connected pallets placed vertically. A linear structure is assembled from 2-3 or more. The foundation itself is constructed from approximately the same number of pallets. It is made with a depression, and the soil is strengthened with gravel. The tabletop is assembled from wide and thick elements, not from pallets. The boards are nailed to the top tier of pallets or to vertically standing boxes on the side base. The height of the bar counter must be selected taking into account the standard length of the pallet - 1.2 m. For ease of use and ergonomics of the product, it fits perfectly. You will need chairs for the counter. It is better to collect them not from pallets, but from waste boards for the tabletop. For this reason, when making the latter, you should think about the cutting points in advance.
What are the drawings for?
Garden furniture, also called outdoor or patio furniture, is specifically designed for use outdoors or under cover. Such garden furniture can be both original and functional.
It is usually made from weather-resistant materials. Designing it is quite simple, but it takes some effort.
Like any other act of design, creating garden furniture with your own hands for a summer house begins with an idea displayed in drawings, sketches and models, often with the help of computer tools. To begin with, you just need to draw an idea in pencil as a sketch, and then try to structure it technically, thinking through details, materials and finishes. When developing any model, human ergonomics is taken into account.
All sizes must be conveniently calculated - this is a guarantee of success. For example, if you are designing a dacha garden bench, you need to estimate how many people can sit on it so that they don’t feel crowded. When designing a table, you can use existing standard dimensions. Do not forget that the shape of the simplest garden furniture for a summer house is primitive - a cube and a parallelepiped, they can be made from a variety of available materials: pallets, boxes, an old cabinet, etc.
A new wooden model is traditionally made according to a drawing from pine, oak or plywood, then it must be coated with high-quality paint. Sometimes, to produce a country bench, you may need a drawing of only one part - the legs, which will help the model look unique.
Do-it-yourself drawings and diagrams made to scale are much more practical than any non-scale drawing, because the required size can always be simply measured with a ruler. Those new to working with scales will need some basic tips or explanations. Although the principle of making an object smaller in size is very simple, many people who have never drawn may find the process difficult. A scale of 1:2 means that on paper the object will be depicted with a reduction of exactly 2 times. Scale 1: 10 - 1 centimeter on paper corresponds to 10 cm of the object, etc.
Confucius once said, “Your words must be good enough to be better than silence.” You can try to apply this old saying to a DIY garden design. Sometimes it’s absolutely not worth “reinventing the wheel”; it’s better to use someone’s ready-made drawings for production. They are well thought out and so detailed that they are not always accompanied by text. Many of them are presented in feet and inches.
1 inch = 2.54 cm, 1 foot = 12 inches. To convert such dimensions into centimeters and meters, it is most convenient to use a calculator or converter. Often, designers use isometric drawing in their drawings - this is a way of representing a structure in three dimensions (at an angle of 30 degrees). Axonometry and perspective are also used for volumetric images.
Furniture made from treated boards
Working with prepared materials takes less effort, and, therefore, you can work longer and more carefully on the final result. An example of a processed material is planed boards. To assemble garden furniture, choose dry solid lumber of the highest or first grade. Then the boards will not warp or move. For a garden near an expensive house, furniture is assembled from radially cut boards with minimal texture. Conventional garden options are made from fragments of tangential or semi-radial cuts. To emphasize the natural beauty of wood, radial cut boards with distinct concentric rings are used. They are additionally varnished or waxed, but almost never painted. The material makes beautiful tables with attached chairs, armchairs, partitions, shelves and stools, as well as gazebos and sandboxes.
How to choose the ideal option?
As a rule, the issue of selecting material is resolved quite simply. Most garden owners prefer using wood. Some people make individual elements made from pallets, while others use improvised materials such as vines from branches growing from trees or stumps. Everything will depend on the required result, as well as the availability of free time. If you pay as much attention as possible to the planning, preparatory stage and assembly of garden furniture, the result can be even better than commercial samples. A distinctive feature of wooden furniture is that it is a completely environmentally friendly material that amazes with its beauty and texture diversity.
Benches and tables made of stumps and logs
The log elements are connected with dowels: into through holes made with a 20-25 mm Lewis drill. The cups in the logs are not full-sized. For benches, trunks without resin pockets and a minimum number of knots are selected, and resin particles are also removed from the surface. It is better to refuse coniferous species in principle, especially if there are no special wishes for them. The adjacent halves of the table are chamfered, and then they are firmly attached, again with wooden dowels. Stumps are used in different ways to create furniture. Firstly, on the territory itself, after the trees are cut down, stumps remain, which at any moment “will become” a chair or its likeness. But benches and tables are assembled from driftwood and stump cuts. The tops of the stumps are decorated with mosaics. Wide ones are cut so that there is both a seat and a back. A croaker is placed on top of the stumps - the bench becomes suitable for use.
Details
Definition with construction
Before you start making garden furniture yourself, you need to have a very clear idea of the final appearance of the structure as a whole. Even a small sketch is enough to roughly calculate the required amount of material. You can make garden furniture very quickly, the main thing is to use high quality materials for such purposes. Most often, they make chairs, tables, loungers or beds, storage shelves or racks with their own hands.
Tools and materials
On the one hand, to create most pieces of furniture you can get by even with improvised means, but to create more durable and reliable furniture you may need special tools:
- Grinding machine.
- Electric screwdriver.
- An electric jigsaw (you can use a hand saw), and also a circular saw.
- Drill with a drill for wood to fit the dimensions of the self-tapping screws.
To create a simple interior item, the following tools will be enough for you:
- Fastening furniture corners.
- Pencil.
- Construction tape.
- Sandpaper.
- Self-tapping screws.
- Screwdrivers.
- Hammer.
The advantage of garden furniture is that even in its uncontrollable form it will look appropriate. What can we say about the high-class approach - this homemade garden interior can surprise even the seasoned.
Making a project and drawing up a drawing
When creating garden furniture with your own hands, diagrams and drawings should first of all be based on the visual appearance. When determining the future type of furniture, it is necessary to move on to a new, extremely important stage - the production of drawings.
Please note that the more thoroughly you approach this process, the better the final result will be.
When drawing up a drawing, you need to carefully calculate each of the details; this will not allow you to lose sight of even the most insignificant nuances. Next, work out the fastening methods, and also calculate the number of required fastenings. The dimensions of garden furniture are important, and at the end of this process it is recommended to carefully look at the resulting plan again - if you do not make adjustments to it now, it will be extremely difficult to do so later. And if you are completely satisfied with the drawn up scheme, you can move on to implementing your plans. Yes, the production of garden furniture for a country house will begin with an idea that is displayed in sketches, drawings and models.
MK for arranging garden furniture with your own hands
As noted earlier, the process of creating garden furniture from wood with your own hands is quite exciting and responsible. Afterwards we will take a closer look at the most popular and frequently collected interior items. To make the seats comfortable, you need to bandage them using removable cushions.
How to make a garden chair
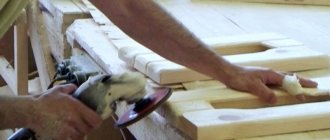
A garden table can be made even in the simplest form, like a base screwed onto a stump in the form of a seat, or you can approach this process more thoroughly. For the assembly process of a garden chair, use a pre-selected type, as well as the size of the tree. It is recommended to buy bars with dimensions of at least 4 cm on one side. This provides reliable support for a person with an average weight of 80-90 kg. If you need to place a person with a large weight on such furniture, the size of the timber will increase to 6-8 cm. If you have a carpentry workshop that is equipped by modern standards, making a garden chair from wood with your own hands is quite simple. Mark the material using a tape measure and pencil according to the drawn up drawing.
Then proceed to sawing. In this process, you can use hand tools, but faster and better results can be achieved using a jigsaw or circular saw. For the frame, bars with a square cross-section are usually used, for the base and back - rectangular. Additional joints between elements can be treated with wood adhesive, and such an assembly will be professional. It is better to sand the wood surface as best as possible before starting the assembly process; this will prevent the pattern from getting a splinter under the skin both during the assembly process and in future furniture use. Mark the attachment points with a drill and begin the final assembly process.
Please note that if you plan to use such pieces of furniture outdoors, the wood must be coated with a protective composition against moisture - a special paint and varnish material.
Instructions for creating a table with a bench
The final type of such a product will directly depend on the design, as well as human capabilities. In its simplest form, this table and benches can be stumps that are covered with a wooden base. Most often, this issue is taken much more seriously, because the outdoor set will be used for large companies, and the more thoroughly you approach the issue of creation, the better the end result will be. The most popular option would be a rectangular table with a table closed on all sides. To make it, make a frame from bars and cover the total area of the side surface with wood. Prepare the material in advance - sand it and treat it with compounds that allow you to use pieces of furniture in outdoor conditions, which you can buy in construction and furniture stores.
You can assemble such furniture in just a couple of hours and decorate your garden with beautiful tables at which you can have lunch and picnics. Assemble benches according to the dimensions of the table. Their length should be commensurate with the table, the width can vary depending on the planned budget and the materials at hand. To make it comfortable for a person to sit on a bench, we recommend making its width at least 0.2 meters.
Chaise lounge
Diagrams and drawings with dimensions of garden furniture are important to have an understanding of its final appearance before assembly. It can be an easy-to-assemble chair with fabric and a fabric base that acts as a seat and backrest.
You can also make a monolithic reclining version of the chaise lounge. The first will be more acceptable for those cases when you plan to replace its location, and the second, due to its high weight and inconvenience of moving, will be installed in a specific location and is rarely moved. A chaise longue is a lightweight and comfortable chair design that is used for relaxation areas (on the beach, by the pool, an integral part of country house decoration).
In each case, a wooden frame is required. A small sitting chair requires a beam of 0.25 * 0.3 meters. You need to make a couple of long legs and a couple of short ones. Connect them together, and if necessary, leave the structure in such a form that it can be assembled - in the simplest form, it is enough to secure the screws for fastening with nuts with lugs. Connect the legs with slats to each other, and pass fabric through them, ideally it should be burlap - it is more durable for outdoor use. The lower and upper legs need to be additionally reinforced with metal spacers - to do this, just insert a metal rod into two legs on both sides. For a large sun lounger, the first step is to assemble the base, which will then be covered with rectangular slats. It is important to sand the front part of this structure and cover it with a protective layer - varnish or furniture paint.
Table made from pallets
When making a table, you should pay special attention to the quality of materials. old pallets will look quite unpretentious, and they do not differ in quality, and even more so if they have been under the influence of moisture for a long time. For this reason, the main recommendation would be the use of new pallets. Wooden pallets are a building material that allows almost limitless freedom for ideas and creativity. To assemble the simplest of the different options, three pallets are enough - a pair of legs and one for the lid. Most often, pallets are used as a cover, fixing them together, and the legs are made from additional building materials - wood blocks, tall stumps, or tree trunks - left over after sawing.
When assembling a table, the main thing is high-quality grinding of all its components, and especially the surface cover. Fasten the pallets together using long self-tapping screws. It is also recommended to additionally prepare the surface of the resulting product with varnish or paint to protect it from the effects of negative environmental factors.
Wicker furniture
Wicker garden furniture without diagrams and drawings is quite problematic to assemble. For this reason, if you decide that you need such an interior item, you must first carefully think through the drawing, and based on it, calculate the required amount of the required material. If you have no experience in making such pieces of furniture, then you can find ready-made diagrams on the Internet and use them to purchase all the necessary materials. Rattan or wicker can be used as a base for such pieces of furniture. When weaving individual elements, continuous weaving is usually used - with this method, individual twigs will be woven into perpendicular posts in turn, bending around the twig on one side or the other. The resulting weaving is extremely durable and reliable. The back and seats are usually made with openwork weaving, because this type of workmanship is very beautiful in itself. By purchasing high quality material for weaving, you can guarantee the durability of your furniture pieces. No additional processing is needed.
How to care for wooden garden furniture
Wood actively responds to weather shocks, as well as to sudden changes in environmental conditions. After frequent rains combined with high temperatures, mold appears. The scorching sun causes color fading, wooden furniture to dry out, and cracks to form. It will not be difficult to periodically treat all wooden surfaces. Caring for different types of wood is almost the same, but the compositions are used only for a specific option. In any case, the furniture is first washed of dirt; sometimes it is immediately wiped with vinegar to “drive out” the pests. When everything is dry, a special oil is applied to the tree - different for each species. The procedure is not required if the furniture is coated with paint. Sometimes a plaque forms on the surface of the wood - wet wiping followed by the use of fine-grained sandpaper will solve the problem. Additionally, means are used to create a protective film.
Wooden furniture for a dacha or veranda
Wooden garden furniture is extremely popular. It fits more organically into the natural landscape than other options, is aesthetically attractive, impeccable from an environmental point of view, and with proper care can be successfully used for many years.
Wood is a noble and practical option.
The following types of wood are used to create it:
- Teak is a durable, wear-resistant structure that is not prone to cracking and rotting. Teak furniture can be kept outdoors throughout the holiday season. The only drawback of teak products is their high cost;
- Larch is the second “champion” in terms of durability after teak. It is a difficult-to-work wood with a reddish hue;
It is suitable for making almost any item.
- Beech is a fairly durable option, but beech products should be protected from moisture so that they do not warp or crack;
- Oak is also a wear-resistant wood that resists moisture well, but is not easy to process;
This is a classic version of garden furniture that you can make yourself.
- Acacia - it produces strong, reliable furniture that is minimally deformed by moisture and heat;
- Pine is a budget option; pine is prone to deformation if it gets wet and dries quickly. But it is suitable for lightweight portable products that can be hidden from atmospheric precipitation indoors;
Tables, chairs, benches and even garden sofas made of wood, with proper care, will serve you faithfully for a single year.
- Rattan - this exotic is elastic, resilient and durable, but it should be protected both from excessive humidity and from overheating (it changes color, and from the proximity of an open fire, which is very likely in dacha conditions, it can ignite). Rattan products can withstand loads well, but rough mechanical impacts cause scratches and chips on the surface;
- Vine - wicker furniture is strong and durable if handled with care; it can be damaged by moisture and UV rays.
Even a novice craftsman can make a simple bench.
Important! Rattan and wicker furniture are most often sold with a surface treated with protective agents. Furniture made from solid wood in the low and even mid-price segment may go on sale untreated with special compounds and varnishes - the owners will have to take care of this themselves. Otherwise, it will quickly lose its appearance and will not last long. It is worth studying the manufacturer's recommendations for caring for individual types of wood.
Professionals can turn furniture into a real work of art.
Furniture made of metal and wood
In everyday life, you often see a combination of a wooden table top and metal legs. There is no point in changing anything in this combination. In the case of shops, sometimes they act differently. In design options with an abundance of technological forms, metal often “turns out” higher. The thickness of the seat is then kept to a minimum so that it does not warm up excessively in the sun. It wouldn’t hurt to decorate furniture that is interesting in terms of geometry. For example, internal lighting. Excellent combinations of wood and metal are found in the designs of gazebos, recreation areas, and terraces. Combinations can be diluted with stone, glass, plastic, epoxy resin. It wouldn’t hurt to fill a table with a metal mesh as a support under the tabletop with stones. In the garden, you should allocate an area for storing accessories such as shelving, and it is better to do it using metal and wood.
Barrel furniture
Washbasins are installed in the garden or lawn. Sometimes the material is a metal barrel, and the option looks better with a dark color and matte texture. Tables with compact tabletops and chairs with the same small seats are made using the same principle. The “cherry on the cake” will be multi-colored metal barrels with cut-out holes for seats and backs from the resulting fragments. Moreover, the products will fit perfectly into a closed environment. Wooden barrels are used much more often. Parts for large and small furniture are cut out of them. Wine barrels become part of chairs, sofas, tables. Planters for large plants, a portable cooler, or an ice bin are also great options for the warmer months. Even such an unremarkable device as a garbage can is also sometimes made from a wooden barrel.
Other good options for using barrels:
- sports equipment;
- container for hot food;
- tank for summer shower.
From cable reels
Coils of wire find a place in interesting design objects. Original chairs with round sides, reminiscent of a rocking chair, are assembled from rounded boards. Coils are sometimes trimmed to give the shape a custom look. Stands and small tables are sometimes attached to the boards. The very shape of the spools “hints” at the possibility of being used as a tabletop and at the same time as a table base. A set of garden furniture can be assembled entirely from spools, with a minimum number of cut parts. Then there won’t be many options for decoration, but any metal products that are mounted on a wooden surface will become decorations. A minimum of effort will be required to assemble the pouf. All you need to do is sand, polish and paint the drum, then cut out the fabric and prepare the filling. Furniture is finished using furniture staplers.
From tires/tires
Garden furniture is made from tires in several ways. In one embodiment, the tires are connected without changing their shape. The second approach involves obtaining strips from blanks. Well, the last method is to cut the tires into different parts. An ordinary table is assembled from just 2 tires superimposed on each other and a tabletop made of wood or glass. One tire with a disk is enough to make a swing. If you assemble a partition with hangers and chains, then the tires on them will act as flowerpots. Original chairs are made from tires. One technique involves using a cut ring to form the back and armrests. In this case, the supporting legs and the back part of the backrest are formed from rigid half rings. The legs are placed on metal supports. The seat is made either from a round wooden board or from a plexus of rubber flaps.
Tires should be coated with a special fire retardant compound!
Master classes on making creative models
Homemade garden furniture has a number of undeniable advantages: a laconic, yet unusual and stylish design, the absence of fragile or easily dirty parts, and reliability. In order to successfully implement your own or borrowed project, it is not necessary to achieve high surface quality. Much more important is originality, the unexpected use of familiar objects in a new quality. Below are several interesting options that can serve as an example or impetus for developing your own garden furniture projects.
Bench made from old chairs
Old chairs that have served their purpose can still perform their main function for some time, only in a slightly different capacity. They make simple, convenient benches for the garden, which even inexperienced home craftsmen can assemble. To make such furniture, you can simply connect several chairs assembled in a row with one common seat. Or use the second method of creating a bench, when the base is two chairs facing each other. Their backs in this case play the role of armrests. Assembling such a garden bench is somewhat more complicated, since it is necessary to remove the drawers and make longer common crossbars.
You can approach creating a product even simpler. In this case, you will not have to remove the front legs, which will increase the strength of the structure and speed up the process of assembling the bench. The back of a piece of furniture can be made from a wooden strip attached to the upper parts of the armrests. After this, fill it with a plywood board, or install several horizontal planks to form a supporting plane.
Summer cutting table made from pallets
Pallets are convenient and affordable blanks for creating any home improvement items. They make successful furniture, easily transformed or disassembled into separate fragments. A simple garden cutting table can be made from three pallets, two of which are installed on an edge - they serve as supports. The third is fixed at the top and represents a lid (table top).
This design is as simple as possible, but the main drawback is instability. Meanwhile, creating a more durable connection is inconvenient and impractical, since this will result in the mobility of the furniture and the ability to quickly disassemble the summer country table being lost.
Experienced craftsmen advise using a slightly different option for assembling the cutting surface, which is practically devoid of the disadvantages of the method described above. Such a homemade product is good because it allows both rigid connection of pallets with subsequent grinding and finishing, and simple stacking of them on top of each other until the desired height of the product is obtained.
In addition to tables, sofas or armchairs are made from pallets. The assembly process is not difficult, and the surface relief can be made the way the owner wants. A common solution is sanding and painting the product. Alternatively, you can leave the pallets in their original condition to emphasize the camp style of the furniture.
Characteristics of garden and dacha furniture, main materials of manufacture
Folding table with benches
A good option for making furniture for a summer house is a folding table with benches. If necessary, it can accommodate several guests; if not needed, the furniture can be folded and put away in the barn. You can make a separate table with folding legs and two benches, or you can assemble a transforming structure, where a bench with a back turns into a table with benches on the sides.
A ready-made drawing of a folding table with benches allows you to consider the operating principle of this garden furniture and avoid errors during assembly.
Ordinary furniture bolts are used as hinges. The back of the bench “tips over” onto the seat, one half of which slides back and turns into a second bench. You can make all load-bearing furniture elements from wood or use a rectangular metal pipe. The choice of base depends on what tools and skills the master has.
The tabletop and seats of the product are in any case made of wood. The easiest way is to use boards with a thickness of 25 mm (“inch”), which must be planed and carefully sanded. It is recommended to choose deciduous wood - poplar, birch, aspen or alder. If softwood boards are used - pine or larch, you should carefully inspect them for resin pockets. They will release resin that will stain clothing or get on your skin. It is not practical to use such blanks for making garden furniture yourself.
A completely wooden country table is assembled using self-tapping screws, only the moving parts of the product are attached to furniture bolts. If the supporting structure is made of metal, the assembly is carried out entirely on threaded connections.
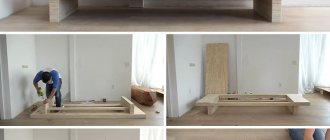
Drawing of a set of wooden elements for making a transforming bench
Typical drawing of a transforming bench
Bars for legs Boards for frame
Screwing the legs to the slats
We connect all the elements with self-tapping screws
Wood element
Ready-made wooden transforming bench assembled and disassembled
Hanging chair made of hoop and rope
This version of garden furniture is suitable for macrame lovers. The main supporting structures are two hoops connected at an angle to each other. One of them forms the plane of the seat, and the second is a unit that combines the back and armrests of the product.
The hangers are made from nylon cord, braided using the same technique as filling the seat and backrest. For the seat, a hoop with a diameter of 70 cm is used, for the back - 110 cm. The length of the hangers for the garden chair is chosen based on the existing conditions. Typically, the support is thick tree branches or (more often) horizontal beams installed on supports between two adjacent plants, buildings or other structures. To make a chair you will need to prepare:
- about 900 m of cord for weaving;
- slings for suspensions (about 12 m);
- metal-plastic pipes - about 6 m.
The production of the structure occurs according to the following scheme:
- The hoops are made from a metal-plastic pipe with a diameter of 35 mm. The length of the workpiece is calculated using the school formula (for hoops of the indicated sizes 110 and 70 cm, you will need 345 and 220 cm of pipe, respectively).
- The ends of the blanks are connected with inserts made of wood or plastic, which are fixed with self-tapping screws.
- First, the surface of the hoops is tightly wrapped with cord. Then the area of the smaller one is filled with mesh.
- After this, both hoops are connected so that on one side they are connected tightly, and on the other they form an angle of lifting the backrest.
- Next, the side vertical surface is filled with weaving, the method and pattern of which are selected to suit your taste. The slings of the hanging garden chair are braided in the same style as all other surfaces.
For the seat of a hanging garden chair, it is worth making a soft, removable cushion; it will simultaneously serve a decorative and practical function.
Universal bench-stand for summer residents
The universal “upside-down” bench is a favorite piece of country furniture for all those who like to grow gardening plants. The product serves as a good assistant at work, as a means of relaxation, and can perform other functions.
Making original garden furniture with your own hands, examples of decor
In one position, such a country bench is an ordinary seat, and if you turn it over, a comfortable knee rest appears. For production, wooden boards or polypropylene tubes are used. The choice of material is determined by the preferences and skills of the dacha owner. Assembling a wooden universal bench is not difficult:
- Three blanks are cut out - a seat and two side supports.
- The bench parts are assembled using glued dowels or metal corners. For reinforcement, it is recommended to glue wooden bosses to prevent the structure from swaying diagonally.
The disadvantage of a bench made of wood is the lack of elasticity and rapid loss of rigidity of the joints, which is why most dacha owners prefer plastic products. To assemble a “changeover” from polypropylene, you will need to purchase 4 m of tubes with a diameter of 32 mm. In addition, you will need angles and tees (fittings) - 8 pieces of each. The assembly process is carried out according to the instructions:
- Using a hacksaw (or a regular saw with a fine tooth), cut six pieces of length 24 and 14.5 cm. Then 4 pieces each - 34.5 cm and 3 cm.
- Using a plumbing soldering iron, the middle part of the product is made - from 14.5 cm sections and two 24 cm crossbars.
- Then 4 vertical supports of 34.5 cm each are attached to them, onto which corner fittings with 24 cm crossbars are soldered.
- At the bottom of the bench, 3-centimeter inserts with fittings and the same crossbars (24 cm) are attached.
The last step is to install plywood platforms on the working surfaces. You can glue pieces of tourist foam to them to make it softer to sit on or rest on your knees. This garden structure is lighter, stronger and not susceptible to moisture.
Cut two trapezoidal legs
Make holes for ease of carrying and operation
Drill holes for the pins Make holes in the sides
Drive in the pins, coated with glue, and connect to the sidewalls
Finished bench
Made from PVC pipes
PVC pipes are a good option for high chairs. First of all, the elements themselves are studied in order to create an accurate installation drawing along with the mounting option. Individual pipes are prepared and, if necessary, cut. The frame is assembled using glue and fittings, and if necessary, soldering. Then prepare the seat: a thick fabric option is suitable - for example, for a folding version. You will need to check the strength of the seat with the frame. Painting of pipes is carried out before final assembly. In most cases, it is better to leave the original color, especially since the external imperfections of furniture in an open space can be presented as an original solution. A product made of polyvinyl chloride is sometimes decorated with decorative self-adhesive film. Painting and curly slots will add originality. In addition to chairs, it wouldn't hurt to try your hand at creating a swing. Then there will be even more options for decor.
How to create chairs and benches for a picnic?
Soft outdoor chair
Unobtrusive style, soft pillows, sewn by yourself - that convenience for the garden that is beyond competition. It’s easy to secure it for yourself by studying the drawings of this chair. For convenience, all dimensions can be converted into centimeters, for example, 23 1/4 ”= 59 cm, etc.
General instructions:
- First you need to take all the necessary measures to guarantee safe and convenient work. You must work on a clean surface without defects or debris.
- To make your own garden furniture, you should always use straight boards.
- The assembly is checked after each step.
- Before connecting parts with screws, holes must be drilled.
- For secure fastening, glue is used.
- Before painting or varnishing, the wood is sanded.
- To level the surfaces, you can use wood putty.
- The wood must be treated with special compounds that will prevent it from rotting.
Dimensions:
Step 1. Making the first part with your own hands, as shown in the picture.
Step 2. Assembling the front frame.
Step 3. To create the seat, the two previously made parts are joined together using two more boards. After this, bars are attached that will make the legs of the chair stable.
Step 4. Now the back of the chair is assembled, as shown in the drawing. It should be remembered that the lower part of the chair will be located at an obtuse angle in relation to it in order to create an ergonomic backrest angle.
Step 5. Now you can attach the backrest to the seat.
Step 6. After this, you can begin making the armrests; they are also placed at an angle for convenience.
Step 7. And finally, you can begin installing the slats on which the pillows will be laid.