Toys surround a child from the first days of his life. Parents constantly buy them and give them to relatives. As the baby grows up, rattles and rubber rings are replaced by cubes and pyramids, dolls and cars replace soft models. The collection of gifts is constantly growing, and if you do not organize a system for storing toys in time, you will have to collect them from all corners of the house or apartment.
There are many ways to properly arrange children's things. You can use drawers, racks, shelves, boxes, baskets. It is very important to teach your child order from an early age. This will not only save the mother from headaches, but will also help instill in the child such qualities as accuracy, neatness, attentiveness, and organization. After all, every parent wants to raise a neat and clean person.
Consumables
“You can make a box for children’s toys with your own hands from almost anything”
What exactly can you work with to get a really cute craft that will attract your baby's attention? As the photos say, you can make a box for children's toys with your own hands from almost anything. Its role can be played by:
- carton boxes;
- wooden container;
- plastic boxes;
- baskets;
- buckets.
You can make a children's toy box from almost anything.
In the end, toy storage can simply be cut out and assembled from leftover fabric. Let's see what can come of such foundations.
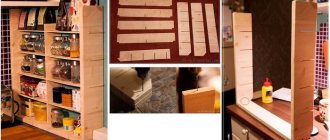
Storage racks
A very convenient option for storing many toys is to make a wooden rack (open). In it, each shelf can be occupied either by pull-out cardboard boxes or standing books, lying soft toys and many children's necessary items. The main thing is that the child can take them out independently and subsequently put them back.
The rack is made of wood with square cells. At first it can be placed horizontally (while the child is small), and then turned over and placed vertically (when he grows up). Subsequently, such racks can be installed in several different sizes and heights, resulting in a whole furniture system for storing not only toys, but also necessary items for study.
Idea for making a toy box (1 video)
Summer vegetable cake
Summer vegetable cake - you'll lick your fingers! Better than any snack! Ingredients Eggplants - 2-3 pcs. Carrots - 2 pcs. Tomatoes - 3-4 pcs. Onion - 1 pc. Garlic - 2 cloves. Fresh herbs - dill, parsley. Salt - to taste. Cooking method Step 1 Cut the eggplants into thin slices, add salt and fry in oil. Step 2 Cut the onion into half rings, grate the carrots on a coarse grater and fry everything together. Step 3 Line a deep pan with cling film. Step 4 Next, lay out the vegetables in layers: tomatoes cut into slices, then carrots and onions, eggplants, chopped dill and parsley. Sprinkle the layers with salt and finely chopped garlic. Repeat layers until all vegetables are used. Step 5 Place the vegetable cake under a press for 1 hour. Step 6 And then carefully turn the mold over onto a plate and remove the cling film.
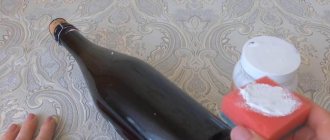
When arranging the interior, we often face the question: where to put the mountain of necessary little things so that it is easy to get, but at the same time they are not visible? The answer comes naturally: boxes-boxes-baskets-and-so-on. And in order to fit the box into the interior, you need to give it an aesthetic appearance: paint, sheath, tie or paste over it. Today we will answer the question: how to sheathe a box
cloth? For ease of shooting, I will show the process using the example of a small box.
So, how to cover a box with fabric?
You will need:
Let's work on the outside of the box first. Wrap it in fabric like this:
As you can see, I glue the fabric to the “Moment” to the box in one place - at the back (you can see this in the first photo of three), and sew up the seam with small stitches (third photo). The glue still saturates the fabric, so the choice was made in favor of a needle and thread, despite the fact that gluing everything would be faster.
Then we will bend the allowances and shape the bottom:
It's not finished yet, but let's leave it for now and move on to the top of the box. Fold the top allowances inward and secure using “Moment” like this:
Let's move on to the inside.
Fold one of the long sides by about 1 cm.
The folded side will be on top. We begin to sew our “lining” to the box around the perimeter as follows:
We also sew the inner joint with small stitches or glue it. We see that the inside of the bottom of the box is not at all beautiful, but now we will fix that!
Take a piece of cardboard the same size as the bottom of the box; it should fit tightly into the box and not fall out. We cover it with fabric.
And put it inside the box.
And the final touch - glue a piece of paper to the bottom from the outside to cover the fabric sections and protect them from falling off. This time we glue it with PVA glue. It is important to coat the edges of the paper well.
Monday, December 31, 2013 02:48 ()
In a children's room, there are no drawers for toys. The child stores his “riches” in them. Gradually, such wealth becomes more and more. The problem arises where to put it all. Of course, you can simply purchase special toy boxes in the store. Or you can make them yourself. The simplest and most affordable option is to give new life to an old cardboard box.
A few ideas on how to make a toy box with your own hands
Transformation of a cardboard box
You can make a box for toys from any box, even a shoe box, but given that the child will use the container several times a day, it is still better to take something stronger and larger. To do this craft you will need:
- scotch;
- glue;
- a set of colored paper;
- scissors.
Cardboard toy box
Sequencing
Work on creating a toy box with your own hands begins with removing unnecessary parts from the workpiece. It is necessary to cut off the top part, that is, remove the elements that form the lid of the box. Then holes are cut along the side edges for future handles.
Next you will need to strengthen the bottom and rib joints. This is done using tape.
Cover the surface of the box with PVA glue
Now we paste over the blank with colored paper, sitting it on PVA. To simplify the task, you can use self-adhesive film. It is more practical and dirt can be removed from its surface.
Cover the box with colored paper
When choosing a color scheme, focus on the main interior colors used in the decor of the room. Then a hand-made box for children's toys will not look like an absurd element of interior decor. You can assemble a whole set of such colored boxes and provide separate storage of balls from cars and construction sets.
DIY toy box
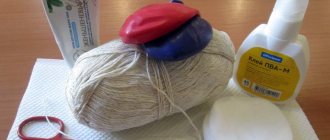
Soft container
An option that meets all the requirements for arranging a nursery. How to make such a toy box with your own hands? You need to start by creating a frame. Traditionally, it is made from rigid wire, boiled from thin rods, and knocked down from wooden slats.
Textile box pattern
The fabric is cut according to the dimensions of the frame. There will be two patterns: one for the outer cladding, the second for the inner. It is recommended to place a denser material on the bottom, such as tarpaulin, teak or burlap.
Cut the fabric
Do-it-yourself work on the toy box will continue by arranging soft walls. Between the fabric layers you should lay a thick layer of foam rubber or replace it with padding polyester pillows, hand-sewn according to the existing dimensions.
Turn out the finished structure
In the first case, to securely fix the foam, the sides need to be quilted. You can use large, beautifully designed buttons. Thus, the issue of decorating the product will be resolved. For ideas on creating beautiful soft toy boxes with your own hands, see the photo.
Example of fabric toy boxes
Wooden container
The most durable model, which can store toys for more than one generation. If inheritance is not part of your plans, then it will not be difficult to retrain a wooden box into a piece of furniture with other functionality, for example, convert it into a mini chest of drawers or a comfortable pouf for sitting.
What you will need and how to make a box for children's toys with your own hands from wood?
Suitable consumables:
- boards;
- elements from already unnecessary furniture;
- durable plywood.
Required Supplies
It is clear that it is better for dads to work with such consumables. It will be easier for them to find the ideal option for fastening elements in each specific case and solve wood processing issues.
Algorithm of actions
To ensure that your homemade toy box is of high quality, do not be lazy to sketch the future design on a sheet of paper indicating the dimensional parameters and method of movement.
Next, prepare everything you need for your work: fasteners, hinges, saw, screwdrivers, hammers, drill, etc. Stock up on wood glue. It will add strength to the structure.
Look at the photos of handmade toy boxes. There will definitely be options with lids. This is very practical, as it will allow the piece of furniture to appear in several forms at the same time. To assemble them, you need to prepare 6 parts: 4 side walls, a bottom and a lid. All elements except the last one are connected with screws and glue. The lid is fixed on hinges.
Decorate the assembled box
The wood used in the work must be carefully sanded with your own hands so that the toy box does not have any roughness or splinters either inside or outside. This is a child safety issue, so take it seriously.
If it was planned to make the structure mobile, it would have to be placed on furniture wheels.
How to decorate such a thing? A matter of taste. It is permissible to preserve the natural grain of the wood and simply open the box with several layers of varnish. You can paint it in the most unpredictable colors or paint it with thematic designs.
An interesting idea is how to design a toy box with your own hands using the patchwork technique. For this, paints will again be used.
For mobility, attach furniture wheels
It is considered a classic to paint a container with plain paint and decorate it with animal figures, geometric figures, and letters cut from wood.
You can attach a soft mattress in a cheerful color to the lid of the box, then you can also sit on it comfortably. In a small nursery, such a piece of furniture can easily replace a chair.
DIY wooden toy box
Recommendations for organizing toy storage
A convenient place to store toys is a low open shelving unit with many compartments. Bears, dolls, cars, and boxes containing smaller accessories will fit perfectly on the shelves.
Source: remokit.ru
Source: besplatka.ua
If there is not enough space in the room, you should use free corners and vertical surfaces. It is recommended to install brackets on walls and cabinet facades and attach baskets and buckets to them. In the corners it is convenient to store toys in bags, bags on frames, boxes. If you make boxes with lids and equip them with wheels, then use the space under the table and bed.
Source: roomester.ru
For convenience, it is better to divide large boxes into several compartments with partitions.
DIY creative boxes for children's toys and more
“A hammock made by yourself will be a worthy alternative to a toy box.”
In principle, you can store toys in anything, so use your imagination and go ahead!
Rare suitcase
A suitcase discovered in the depths of my grandfather's pantry is a real find! You can turn it into a magnificent element of interior decor and, at the same time, make a toy storage box out of it with your own hands. All you need to do is change its design in any convenient way. When thinking over finishing options, keep in mind that the appearance of the product should resonate with the overall interior design. This will make it easier to fit into the nursery’s decor.
Toy box from an old suitcase
Plastic containers
How to make a box for children's toys from it with your own hands? You can assemble containers into a single structure, building something like a chest of drawers. But in this case, you will have to work on creating a wooden frame, which not everyone can do.
There is an option to simply place them around the room. However, it will look a little boring, even though the elements are bright and colorful.
Rack for toys from boxes
A child’s room with chaotically stuffed toy boxes on the wall will appear from a completely different perspective. This composition will create a picturesque mess and serve as an excellent storage for children's treasures. Moreover, the child will have the opportunity to choose what and where to put it. For example, he will collect cars in a red container, and books in a green one. To prevent the baby from getting confused, each box can be labeled with corresponding pictures.
Separate boxes by color
Car tires
The idea is more suitable for a summer residence. In order to assemble such a box for children's toys with your own hands, it is enough to place two or three tires on top of each other. To make them more decorative, they can be painted in different colors or decorated in another original way.
Tire storage box
Wooden container
Seemingly unsightly designs can be turned into a real masterpiece. There are a lot of design options for wooden boxes. For example, decor with book spines looks interesting.
Another creative one is the skateboard box. The product is painted and placed on the running platform of the skateboard. Such a toy warehouse will be easy to move to any corner of the house. How else to make a toy box with your own hands, the photo will tell you.
Functional toy box
Textile storage
Instead of a box, you can make a soft structure for storing toys in the form of a bag. It will not be difficult for even the smallest child to untie the string and remove the contents. An excellent solution are transparent bags made from fabric and vinyl film. Transparent walls will allow you to quickly find the desired item, without spilling all the contents on the floor.
Transparent toy bags with drawstrings
A hammock made by yourself will be a worthy alternative to a toy box. It is often hung above the head of the bed and soft toys are stored there. This is done so that the baby can always reach his favorite bunny or dog. Sleeping in the company of fluffies is much calmer.
Hammock for soft toys
Car parking
Does the boy have a substantial collection of small cars? Invite him to park them in the beehive garage. The structure is a multi-tiered structure constructed from load-bearing bases of toilet paper rolls. How you can assemble an alternative to a toy box with your own hands, look at the photo.
Rack for machines made of bushings
In principle, the process is not labor-intensive. Cardboard reels are glued together sideways. To prevent the cars from falling out, the back wall can be covered with one common piece of cardboard.
Something similar, but in the appropriate decor (with ribbons, bows, rhinestones) can be offered to girls. After all, you don’t have to build a whole box for children’s toys with your own hands if you only plan to store some little things in it.
Organizer made of sleeves for storing small items
Fun buckets
The mission of the toy storage system can be entrusted to plastic and zinc buckets. It would be good if the containers were initially multi-colored. Otherwise, you will have to decorate them yourself. The applique will stick well to plastic, but unsightly zinc buckets will have to be painted. You can work on decorating them with decorative tape. This material will allow you to realize any fantasies. Look for ideas on how to make a box for children's toys from buckets with your own hands, in the photo.
Bright buckets for storing toys
Video description
The video talks about how to better organize the storage of children's developmental material:
It is difficult for boys and girls to focus on two or three objects at once. Their eyes perceive one thing. Therefore, it is useful to sort the gaming instruments and put the cars separately, educational games separately, and put soft toys in a row on the shelf.
A narrow rack for storing typewriters will not take up much space Source yandex.net
The height of the cabinet and shelving should correspond to the height of the child Source yandex.net
You can sew pockets. They are also sold ready-made in the accessories sections. They look like a piece of large fabric with comfortable indentations formed on it. They fit dolls, small soft bears and bunnies well. A piece of fabric is usually attached to the side end of the furniture. The child can come up at any time, get what he needs, and then put it back in its place.
Pockets for storing small items Source yandex.net
A very simple and very convenient storage system Source lachat.ru
It is important to avoid complex designs. Transformable furniture is not for a child. It's more suitable for a teenager. It is difficult for a child to use the shelves hidden in the podium. For preschoolers, you need to organize very simple storage of children's toys - ideas and tips for organizing it are given below. In the meantime, let's continue to understand the basic principles of organizing the gaming space.
The simpler the furniture, the better Source yandex.net
There is no point in dreaming about perfect order in a house where small children live. They are constantly on the move and play with several of their favorite toys at once, so a pile piled on the floor is the norm for them.
Toys on the floor are the norm Source decorateme.com
Photo gallery - DIY toy box
Some tips for beginners
The most important thing you should remember is that you are making furniture specifically for children. Therefore, if, for example, you are making a chest, then you definitely need to put shock absorbers on its lid, since children at any age can simply pinch their fingers. On hinged cabinets, it is also advisable to use mechanisms for soft opening and closing of doors, since this is also a high-risk area.
No matter how beautiful the sharp and even corners are, it is advisable to round them for children's furniture. Even if a child accidentally hits such a corner, it doesn’t matter, he won’t cut the skin, but just get a bruise on his forehead. And this is not such a big problem, since simple bruises do not leave scars.
You should pay special attention to the quality of materials. After all, children are very mobile and they don’t yet know how to handle things carefully. If a simple box has a sufficient margin of safety, then the fittings should be as reliable as possible. Since the service life of the entire structure depends on this. Therefore, you should not save on this accessory, because such savings will result in large expenses.
Otherwise, you can choose the design, material and manufacturing method yourself. The most important thing before starting work is to think through the design of your product, and based on this, buy the materials necessary for manufacturing. And the most important thing is not to rush in your work, since haste never leads to good results.
Walls as storage space
If you don't like shelving or don't have room for classic cabinets, then there's only one word you need to know - pegboard. Fashionable, cheap, practical, unusual, in a word, all the advantages!
A pegboard is a perforated panel for wall storage of various items. The holes are intended for fastening hanging elements, shelves, baskets, hooks, etc. Next time you are in a mass market store, take a closer look, they use the same principle. You can move the shelves whenever it is convenient and do it for different tasks. By and large, you can even hang a child’s bicycle on such a wall so that the wheels don’t stain the floor.
In the hallway you can hang jackets, caps, hats, and belts on a pegboard. In the nursery, this will become a space for imagination: hang the shelves in a chaotic manner and experiment with books, games, and stationery. After all, the pegboard does not have to be on the entire wall, it can be a mini pegboard for creative supplies (hang scissors, tape, shelves for boxes with stickers and felt-tip pens - the child knows best, let him design it himself).
Design Features
Before choosing a shelving unit for a child’s room, it is necessary to take into account the specifics of the room and its intended purpose. The design of the room and all furniture are selected according to the age and gender of the child.
In the room of a little princess, shelving can be installed in the form of a castle or a small house, for a boy - a ship, a garage or a fortress. For a school-age child, the façade for the shelving can be decorated with a map of the world or the starry sky. During the game they will be able to gain knowledge and explore the world around them.
If the furniture has closed shelves, then it is appropriate to equip them with round holes. This way, a child at any age will be able to effortlessly open the doors and get out the item that interests him. You can also use them to see what toys are there to reduce the time spent searching for your favorite game or book.
It is necessary to take into account the specifics of the room and its intended purpose
When buying a shelving unit for a child’s room, you need to maintain a certain system of order on its shelves, niches and drawers.
This way things will look much neater. This will help develop responsibility and cleanliness in the child.
In order not to overwhelm the rack, it should be supplemented with various boxes, baskets, boxes, drawers, pull-out structures and similar sections. This will help organize all items and create a unified storage system.
Advice It will be more convenient for a child to stack his toys if all parts of the furniture are made of different shapes and sizes.
You can stick a specific picture on each segment or designate it with your own color. So, small boxes are suitable for small cars, and drawers are suitable for books and creative activities.
Easy to do it yourself
Wooden box
This option is a little more complicated, but looks pretty nice. Outwardly, it resembles an ordinary food storage box. To work, you will need boards of a certain size, plywood for the bottom, a hammer and nails.
On the plywood you need to fix four equal bars in a vertical position. They must be firmly secured. Then you need to fill the boards on them from the bottom, moving up. This is done around the perimeter of the frame. You can make gaps between the boards - large or small, as you wish. So, the box will be ventilated.
Advice! You can nail a piece of plywood to the bottom on both sides and fill it with planks. So, you can make legs for the structure. Another option is to use rollers.
Use only dry wood that has been completely processed. If it is not sanded, do it by hand so that no knots remain. Additionally, protect the wood with varnish or stain. The box itself can be decorated with the children. Use stencils, draw yourself, glue the decor - here your imagination can run wild.