In the article “Beautiful Storage of Spices,” we told you how to organize your spice storage system and give it a beautiful and tidy look, so that many different jars and bags do not spoil the overall impression of the kitchen. One of the most convenient and rational storage options is special shelves. We decided to collect interesting and beautiful DIY ideas, inspired by which you can make spice racks with your own hands.
Shelf for spices made of plywood and furniture board
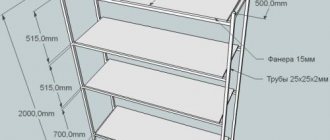
To make such a spacious shelf to your size, you will need 3 mm thick plywood, boards or furniture board, 2 screws, a screwdriver or drill, Moment Joiner glue for wood, sandpaper, and a jigsaw. From a board or furniture panel you need to cut out and sand well 3 load-bearing parts: 2 side walls and a bottom. 4 shelves and 1 transverse strip are cut out of plywood to make the structure stronger. Grooves for shelves are cut into the side walls and cross board. The thickness of the plywood is 3 mm, but the cuts need to be made 3.5 mm wide so that the shelves can be inserted freely. Holes are carefully drilled for 2 screws: if you try to screw in the screws without first drilling the holes, the board or shield may crack. The side walls are connected to the bottom using 2 screws.
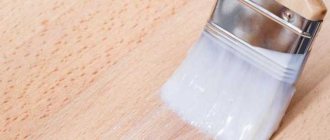
After this, the entire structure is assembled to finally make sure that everything is in order. If everything is fine, we disassemble the shelf and start gluing it. Glue is applied to the joints of the parts in the grooves, after which the structure is reassembled. To prevent the side walls from spreading out to the sides, the top of the shelf can be tied with thread until the glue dries (about 15-20 minutes). The resulting product can be painted, varnished or decorated in any other way to your taste: for example, apply beautiful designs using decoupage so that the shelf fits seamlessly into a Provence-style kitchen.
DIY spice racks
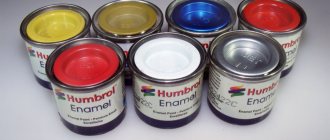
You can easily make spice racks yourself and decorate them using the decoupage technique. This is done quickly and easily. The only tools you need are an electric jigsaw, a drill, a grinder and a screwdriver. You also need to purchase several wooden boards made of pine or spruce, a set of screws and enamel to coat the final product. The thickness of the boards is maximum 3 cm. A shelf measuring 50*50 cm is made of five bars 50 centimeters long. Of these, three are the shelves themselves, and two are the side walls.
The side elements can be made in an interesting style: drawing, ornament, carving. You can come up with it yourself or look for options on the Internet. The boards under the shelves must be level so that the spices stand on them steadily.
Operating procedure:
- Each of the manufactured elements is sanded using a machine or sandpaper.
- Assembly is carried out after all the necessary holes are drilled with a drill.
- The fittings are connected using self-tapping screws and a screwdriver.
- For reliability, you can use metal construction corners between the perpendicular elements of the shelf.
- The final product is treated with varnish.
The spice rack is ready. Using experience and imagination, you can make several of these attributes for your kitchen interior, as well as make your loved ones and friends happy.
Magnetic holder for glass jars
It is very convenient to place glass jars with spices directly on the wall using magnets and a metal sheet.
A sheet of metal is firmly attached to the wall, and two round magnets are glued to each jar, and that’s it - the most convenient solution for storing seasonings is ready! If you don’t really like the idea of decorating a wall with a sheet of metal, you can decorate it with vinyl film or vinyl wallpaper, after first checking the attracting ability of magnets through a layer of decorative material.
Design isn't the only thing that matters - storing spices in the kitchen
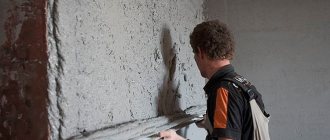
It often happens that a spice rack in the kitchen has many functions - in addition to spices, we store kitchen utensils, dishes, accessories and even cookbooks on it. hanging spice rack should not only be stylish, but also durable. Let's make sure that the material from which it is made (eg bamboo, teak, stainless steel) or on which it is applied (eg stain, oil, enamel or varnish) is resistant to moisture. Equally important is how you mount it on the wall.
Neat wooden shelf
This wonderful shelf for identical round jars of seasonings is also easy to make from 7 narrow boards and a sheet of plywood for the back wall.
To make the shelf look beautiful in the kitchen, you can paint it to match the color of the apron or furniture, and to quickly find seasonings, stick neat labels on the lids of the jars.
Niche for spices in the interior
If the layout of the room allows, you can organize a whole island of aromatic seasonings in your kitchen. To do this, even during the renovation, they provide space for a niche for shelves for spices. In this case, the volumetric structure will not clutter up the space.
The niche can be the same color as the walls and furniture, or completely different from them, taking all the attention to itself. For example, when the internal surface of the structure is made of lining. If desired, you can make a niche of an unusual shape. In any case, the advantages of this arrangement of seasonings are obvious. After all, the eternal debate between spaciousness and space saving is resolved here.
Condiment cabinet on kitchen unit
Making a separate neat cabinet for seasonings and other small items on the side of the kitchen furniture is another wonderful idea that will bring additional comfort and a touch of originality to the kitchen interior.
A shelf without a back wall is made from wooden boards of the required size. The door frame is assembled from wooden planks using metal corners. An openwork metal mesh is attached to the underside of the door with a stapler. The door is attached to the shelf using furniture hinges. The product is painted, varnished and mounted on the side wall of the kitchen unit. To make the spice cabinet look even more attractive, it is advisable to choose a beautiful handle for it that will match the overall style and design of the kitchen.
Options for storing spices - from simple to the most original ↑
Organizing the storage of your favorite spices is a creative process, finding the best solution specifically for your kitchen. And you should approach it with all responsibility.
Shelves for spices - a practical element of the interior ↑
Beautiful shelves for spices are a godsend for the kitchen. Beneficially emphasizing the chosen interior style, they perfectly perform the function of storing containers with spices. To securely fix them, the shelves have special stops.
You can easily make a wooden shelf for seasonings yourself.
The manufacturing material can be metal, wood, plastic. However, the first two options are preferable, both in terms of aesthetics and reliability.
Note! Lack of free space on the kitchen walls is not a reason to give up shelves. They can decorate the end wall of a wall cabinet or its door from the inside. Another solution is to place long narrow shelves in niches formed by the same wall cabinets.
The shelves on the inside of the cabinet should not be too wide
Special storage modules ↑
Modules are a structure consisting of individual containers or compartments for spices. They can be built-in or independent, in the second case having a stable support base.
Free-standing modules are most often mobile and contain only the most necessary seasonings. You can put away all the rest “until the occasion”, for example, in a cabinet or pantry.Mobile spice organizer
Built-in modules are traditionally installed in a drawer or narrow kitchen cabinet. They involve placing spices in such a way that it is as convenient as possible to identify and get them.
Pull-out cabinet for storing spices - ergonomic and practical
An original solution - spices in a niche ↑
Having a niche in the kitchen gives every chance to turn it into an original and beautiful place for storing spices. If its size and geometry allow, then it is quite possible to place not only numerous jars, but also bottles with vegetable oil and favorite sauces.
Organization of niche space in the kitchen
To prevent a niche from becoming a place where various containers pile up, it is necessary to approach its design competently. First, consider the finish. Using various textures and colors, you can highlight a niche against the background of the main and other walls, creating a favorable accent. You can stop at one finishing material, and then containers for spices will become more important.
This will be “secondly”. To place spices in an open niche, choose the most beautiful and original container. These can be products of unusual shapes or made of multi-colored glass, etc. You can create a whole color picture by choosing bright spices or jars as “strokes.”
Magnetic boards (panels) for the modern housewife ↑
Another way to organize the storage of spices in an original way is magnetic boards. They come complete with neat and beautiful jars that will attract the attention of your kitchen guests. Manufacturing material – stainless steel.
Magnetic board base with jars
Magnetic boards can be attached to both vertical and horizontal surfaces. These can be the walls of the room, doors, walls and even the bottom of wall kitchen cabinets.
Attaching cans to a horizontal magnetic base
Made of metal with a chrome finish, such panels will fit perfectly into a modern interior in the hi-tech style, minimalism.
Rails for placing spices in the kitchen ↑
A kitchen rail is a wall-mounted storage system for small kitchen utensils or spices, made in the form of a holder. It itself is a hollow metal tube (one or more), taking the shape intended by the manufacturer. You can hang shelves on it, special jars with hook lids - just for seasonings, a drying rack for dishes, etc.
The simplest railing with hanging cans
The railing can be sold separately or as a system for storing spices - complete with jars. Traditionally, their number is 6-8 pieces, so you will have to decide on the most commonly used spices.
Rail storage system for kitchen utensils and seasonings
Trays and baskets for seasonings - simplicity and convenience ↑
Special trays will help you organize a budget-friendly and mobile place for storing seasonings. Most often they are made of wood, decorated in one way or another. Externally, such trays resemble a low box with handles on the sides. With their help, the product can be easily moved from place to place. Relatively high sides prevent spices from falling out.
Tray with jars for spices - set from the manufacturer
The tray is perfect for storing not only jars of seasonings, but also soft packaging in the form of bags. It can always be put away in a table, cabinet or pantry, which makes this option convenient for small kitchens where there are few free surfaces.
Even a seemingly simple tray can become a kitchen decoration
Wicker baskets for spices look original and beautiful. They are appropriate in an interior designed in Russian, country, or eco-style. There are many options for decorating baskets; you can purchase the product you like or have your hand in its design.
A spice basket will add coziness to your kitchen
Pocket organizers for large and small kitchens ↑
Organizers that do not take up much space with many compartments in the form of pockets are a practical solution for kitchens of any size. However, a clarification should be made: in order for such a place to store seasonings to look aesthetically pleasing, they should be stored in soft packaging or more or less flat jars.
Kitchen organizer with spice pockets
Note! To make it convenient to choose your favorite spices without spending a lot of time, the pockets are usually made transparent.
The material used to make such an organizer is often thick fabric (for the base) and thick film. This makes it easy to wash and put away when necessary. Depending on the size, the organizer can find a place on the wall or the end of the cabinet. If you have an island kitchen, practical pockets will be appropriate in the central (usually working) part of it.
Metal jars with magnets
This method is very similar to storing glass jars on a metal sheet. Only in this case, a sheet of metal can simply be glued to the wall, because aluminum jars are much lighter than thick glass containers. Magnets are glued to flat metal jars on the back side in the same way, but due to their light weight, it will be enough to glue one magnet to each jar.
How to make hanging shelves in a pantry with your own hands
Wall shelves always look light and laconic. This option is perfect for lovers of high-tech style and minimalism. The whole secret of such products lies only in installing them on the wall. Read more about how to create this piece of furniture and install it correctly in step-by-step instructions:
- The first stage is making the shelves. In this design, they must be wide enough so that the mount fits securely to the product. Plywood must be cut into equal pieces - the dimensions in this case depend entirely on individual preferences.
- You should get one long and narrow blank - the front side of the shelf, two wide boards for the base itself, two small side ribs where objects will be located, as well as three bars - they will become jumpers.
Important! The side edges of each workpiece are sharpened at 45 degrees for easy assembly of the parallelepiped shelf.
- Having provided additional convenience with masking tape, you need to fold the shelf around three bars already attached to the base. In this position, they must be glued and secured with weighty objects until they dry.
- The next step is to secure the side panels in place of the shelf ribs. This can also be done using glue. The blanks are cut from the same plywood with a 45-degree edge.
- For aesthetics, treat the joints with wood putty - they should become invisible. Sand the shelf. If desired, you can prime, paint and varnish.
- For fastening, you need to take metal bars or profiles. They must go inside the shelf cavity. Weld or fasten the workpieces as shown in the photo. Paint as desired. Place them on the wall.
- Place the shelf on the metal fastener.
This design of a wall rack will not take up much space and will be an excellent design solution. Moreover, the load capacity of the structure is several tens of kilograms.
Shelf for test tubes
Another unusual, but at the same time very compact and functional way of storing spices is using large glass tubes. For them, exactly the same as in the previous method, holes corresponding to the diameter of the test tube are drilled in a narrow shelf-bar. To prevent the tubes from falling through, rubber sealing rings are placed on them.
Large test tubes with beautiful cork lids will look wonderful in a simple “antique” wooden box. This solution also saves useful space in the kitchen and makes it possible to quickly find any seasoning.
Photos: sawdust2stitches.com, comfort.bg, instructables.com, yablor.ru, vzhik.info, hometalk.com, pennywisecook.com, ivandelrio.org, lifestyle.allwomenstalk.com, craftionary.net
Add to favorites1
- Tags
- storage systems
- DIY
- spice racks
storage systems, DIY, spice shelves
Wooden box shelf
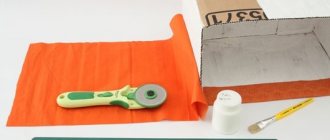
In essence, this is a product made from thin narrow boards; the box will first have to be disassembled, all the nails removed, and the boards thoroughly sanded. A wooden pallet will also work, as long as the width of the planks is slightly larger than the diameter of the jars. The author of the idea used 6 long boards and 2 pairs of short ones, wood glue and nails.
- Between 2 long boards I installed short ones, approximately equal to double the height of the jars. Glued it together and nailed it down with small nails. The long boards are the bottoms of the top and bottom shelves, the short ones are the sides of the bottom.
- I attached 2 more long boards to the side edges of the lower long board and the lower part of the sidewalls from the front and rear, creating the sides of the lower shelf.
- In the same way, I attached 2 boards to the bottom of the top shelf and inserted the side panels between them.
- I painted it, decorated the façade with decoupage and varnished it.
The shelf is light, so it hangs on a cord. If you wish, you can take the idea as a basis and implement your own version, improving the design and assembly method. For example, make the sidewalls solid, and install the sides and bottoms between them, so it’s neater.
Spice jars
I managed to purchase 3 types of containers, and I decided to combine them with a common lid decor. The lids were covered with cork wallpaper 2 mm thick, with rubber glue. Over time, the cork decor has shrinked slightly, so it makes sense to leave an allowance of 2 mm along the edge of the lids. I cut out the signatures on the jars from spice bags and attached them with tape. If you have the opportunity and desire to print beautiful labels on self-adhesive paper, it will work out much better.
These are the spice jars I used.
Decor of spice jars
Wall shelf in the kitchen, bathroom, dressing room
A DIY shelf finds a place not only in the interior of living rooms. In the kitchen it will come in handy for utensils, as a place to store recipe books, and can also simply decorate a wall. For example, a wooden shelf that resembles a drawer looks interesting in the interior of a country-style kitchen.
Metal wall shelves are often found in bathrooms.
DIY wall shelf
Many people call wall shelves their favorite decorative element in an apartment or house. And for good reason: books with beautiful covers, original shapes, elegant dishes, trinkets and souvenirs from travel... All this instantly transforms the room. You can, of course, look into any furniture store and choose the option you like, or you can put a little human warmth and imagination into this thing: we suggest making a shelf with your own hands!
Idea 1
Unusual bookshelves: in the shape of a circle
The round shape is not just stylish. A round bookshelf will allow you to significantly save space by accommodating a lot of small items. It’s really easy to do it by hand: follow our photo instructions.
What material to use? We recommend using fiberboard sheet. This material is inexpensive and quite durable.
In addition, it bends perfectly. You will also need a board (its role is the central shelf in our circle shelf). You choose the length yourself depending on the size of the book shelf you need.
Let's start work: the success of the work is in precise calculation.
For convenience, we suggest you use the formula. d is the diameter of our circle, on which the size of the board in the center depends. Formula – l=3.14 x d/2.
Calculation example: if a board measures 150 by 700 mm, then the length of the semicircle will be 1100 millimeters (3.14x700/2).
Now we take a sheet of fiberboard and mark it (you can use a marker). Carefully form a circle. The edges of the strips need to be fixed: you can use high-quality glue in a gun. Bend the strips very carefully, as they may crack, even though the material is considered relatively durable. Before finally attaching the strips, check how the board shelf is installed in the center. If the calculations were accurate, then there will be no problems with this. The shelf is almost ready! We finish with painting: it can be just varnish, or paint of the color you need. We recommend hanging this unusual circle shelf with screws. The DIY shelf is ready - see photo below.
Idea 2
Wooden bookshelf: use rope rope
Wooden shelves like those in this master class are perfect for country or shabby chic interiors. And its shape is very universal: suitable for the kitchen, living room, and bathroom.
What material should I use? This shelf should be made of natural wood. We will need two boards (possibly three, depending on how many shelves you need). The boards must be the same size.
We begin work: on two (three) boards we mark the places where the holes will be.
We make holes using a drill (as in the photo below). Keep in mind that the diameter of the drill bit should be slightly larger than the diameter of the ropes that will connect the shelf. It is advisable to paint the boards in any tone to your taste.
Advice! This shelf allows you to show your imagination. You can make it more original if, for example, you paint the boards only at the ends.
Our bookshelf is almost ready: all that remains is to assemble the structure. The rope rope needs to be folded in half, retreated approximately thirty centimeters, and knots should be tied (see photo). The ends are pulled through holes in the boards and secured with knots. Ready! For photos of DIY wall shelves, see the instructions below.
We install a profile or special holders for the shelf. We fasten the brackets with screws. we attach the shelf. The rear edge of the shelf is covered with adhesive tape. We insert the shelf into the profile and secure it. We hope you are convinced that glass wall shelves are really easy to make!
Step-by-step photo instructions for making a DIY bookshelf
We invite you to familiarize yourself with a variety of ideas on how to make shelves yourself from drywall, newspapers, plastic, pipes and other available materials... Get inspired!
A shelf made of pipes can simultaneously serve as a sconce. The ideal place is above the bed, sofa or chair: in general, the place where you like to read.
Wooden bathroom shelf
Simple and elegant. To make a wooden bathroom shelf last longer, cover it with a special varnish or film. We also recommend adding hooks to the bathroom shelf, on which it will be convenient to hang hand towels, nail scissors, combs and other small items.
Oddly enough, newspaper can be a durable material. For a shelf like the one in the photo below, you will need about seventy sheets of newspaper.