With a variety of layout options, such an important detail as a storage room in an apartment is often undeservedly ignored. Many people think that this place is only suitable for storing unnecessary junk. Contrary to prejudices, experienced designers claim that a supposedly useless nook can easily be turned into a full-fledged functional area, and there are plenty of great ideas in this regard.
A small but properly planned pantry can accommodate an unexpectedly large number of things.
Features of placement and purpose of a small storage room in an apartment
Small dark rooms, popularly called “closets,” became popular in the era of mass construction of standard housing. Each apartment had a storage room and was a built-in room next to the bathroom in the hallway or a fenced-off corner in one of the rooms.
When arranging racks, shelves and drawers, it is necessary to use every centimeter of space, without leaving mediocre empty space.
The living spaces in the houses were small and had a standard layout. Therefore, the dark room played the role of a “secret” repository for everything that did not fit in other places. Those who still live in “Khrushchev” and “Brezhnevka” buildings are familiar with such architectural appendicitis firsthand.
Storage systems must be equipped for the things that will actually be there; their strict systematization is necessary.
- In a panel house, narrow, elongated storage rooms are located at the end of the corridor or along it; occupy from one to 3-4 squares of the living room or bedroom.
- In Khrushchev-era buildings, “storages” are located in one of the rooms and are a partitioned off corner.
- In Brezhnevkas the premises are more substantial, with an area of 3 sq.m.
One small closet can go a long way in keeping your entire apartment tidy.
Modern interior design abandons dark nooks and crannies, offering to maximize the space. Unfashionable closets are always the first on the list to be dismantled.
Types of structures
Storage systems for pantry can be very diverse, but they can be divided into 3 main types:
- U-shaped;
U-shaped rack - linear, these racks are also suitable for placing seedlings and indoor plants;
Linear rack - corner.
Corner shelving
Pantry furniture made in the shape of the letter “U” can be installed in any room. Such racks can be freely moved wherever required.
Linear racks are ordinary straight shelves.
Such designs are the simplest and take up less space, allowing you to significantly save space.
Corner models have a monolithic corner, which is also used for storage.
Ideas for planning a small storage room in an apartment
Still, there is no need to rush to tear down barriers. There is an opinion that the design of a small storage room in an apartment is one of the most exciting stages of reconstruction. If you approach the issue creatively, you can consider at least 5 options for the wonderful transformation of a dark corner, depending on which part of the apartment it is located in.
During the construction of panel houses, the so-called “Khrushchev” buildings, such premises were immediately included in the projects.
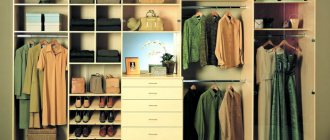
- To the dressing room
This is the first thing that comes to mind: throw a crossbar, hang a hanger and, voila, the dressing room is ready. In fact, when creating such a room correctly, every square centimeter of usable space should be used.
The “correct” dressing room should be planned as three-tier already at the project stage:
- with mezzanines,
- with space to place clothes on hangers,
- with lower shelves for shoes.
Such a room will fully accommodate home textiles and shoes, freeing up space in the rooms from unnecessary cabinets, ironing boards and irons.
- In the room for storing food and kitchen appliances
By the way, this is the true purpose of the pantry. Even under Tsar Gorokh, special nooks were allocated in houses for long-term storage of food. Such an act of transformation should be considered as a return to Russian traditions. Since kitchens in old houses are small, remodeling will allow you to remove most of the kitchen utensils out of sight. Free space can be used for stylish design.
Some storage rooms were given about 3 square meters of usable area.
- To the library
For these purposes, both a narrow, high, deep Khrushchev-era pencil case and an elongated, cramped room in panel houses are suitable. The main emphasis is on a large number of racks and shelves, but how to distribute them rationally depends on the characteristics of a particular area.
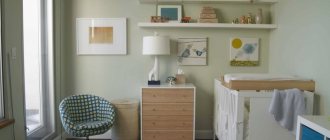
A great idea for reconstructing a closet combined with a living room or children's room.
- To the laundry
Often, utility rooms are located in line with the toilet and bathroom, miniature and extremely roomy. Here, the option of creating a laundry suggests itself, where you can take out both the washing machine and all the small things associated with washing, including detergents and hygiene products, buckets, mops.
Storerooms adjacent to small bathrooms can be used for drying and ironing clothes.
- To the office
This idea is worth taking up where the area is more than 3 sq.m., because the office implies a long period of time for a person to work in a closed space. This means there should be at least more space than in the wardrobe or kitchen compartment. Ideally, you should have a full-fledged room with a desk, chair, shelves and shelving.
The design of a storage room that performs office functions is as close as possible to an ordinary living room.
When arranging a pantry for new functionality, you should pay attention to its location, size, and door location. Often during reconstruction it is necessary to change the exit direction and widen the doorways. For the future, it is worth organizing a new room so that after a while it can be easily adapted to something else.
Any storage room provided by the builders can be modernized up to the point of dismantling the walls and changing the configuration of an existing room.
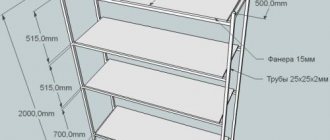
Assembling the rack
A simple drawing of the product with dimensions will greatly simplify the work.
So, the rack itself will be assembled in the following sequence: first, the side racks with partitions are made, and then the shelves will be mounted on them. In order not to get confused about the sizes of the elements, be sure to make a preliminary drawing at least on a piece of cardboard.
Advice! Don’t forget to consult with your owner to clarify the height of the shelves, in case she wants to keep something specific there. But usually the shelves are made a little larger than a three-liter jar.
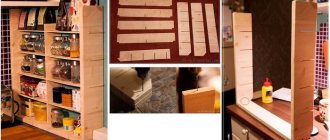
Side racks
The beams and boards most often have a length of 3 or 4 meters - buy this option so that when cut in half you get 2 racks at once.
Adjustment of racks to one size
- So, we take the purchased beam and cut off four absolutely identical pieces from it using a circular pendulum saw, which is also called a miter saw.
- Trimming helps to make the cuts strictly perpendicular, which is important for the stability of the rack. If this is not available, you can use a miter box and a hand saw.
Advice! To make the edges of the cut more even and smooth, the timber can be pre-wrapped with masking tape.
Sawing timber lengthwise
- We make jumpers from the remaining timber, dissolving it into two identical parts. For such work you will need a circular saw; if you don’t have one, then buy a ready-made solution right away.
Marking the slats
- Using a tape measure, we mark the resulting blanks, for example, 50 centimeters each - this value will correspond to the depth of our rack. We clearly draw the marks using a carpenter's square so that we can see the cut lines.
- Next, using the same pendulum saw, we cut the slats.
Marking the racks for the crossbars
- At the next stage, you need to mark the racks according to the height of the planned shelves.
- We take one of them, place it on a flat horizontal surface and draw a line at the required height. Then we apply a strip to it and, in order not to make a mistake in the measurements, we simply make an outline. We draw horizontal lines on the sides, indented from the edge to a slightly smaller thickness than the lintel.
- The design of the side post will be such that the lintels will be recessed into the beams - this will be more beautiful, and everything will hold much stronger.
- Next, we take all the other racks, lay them all side by side, resting their ends against something flat, and transfer the marks with a square to all the elements.
Grooves for jumpers
- We take a miter box, preferably a professional one, of course, and according to the markings we make cuts in the timber, without going beyond the horizontal line, repeating the manipulation the required number of times for all the grooves.
Grooving
- Next, the unnecessary part between the cuts is selected with a chisel and hammer. You need to work carefully so as not to go beyond the intended boundaries, and the resulting groove should have a clearly rectangular shape. If necessary, you can use a file or sandpaper to bring the geometry to perfection.
Connecting racks with jumpers
- We check how the rail fits into the prepared recess; if everything is in order, then we make a major fastening.
Drilling holes on the connection
- First of all, in the pre-assembled sidewalls, at the joints, we drill two holes. They are needed so that when tightening the screw, the wood does not crack.
Coat the joints with glue
- Then we remove the jumpers and apply a layer of glue on the bottom and sides. The groove also needs to be coated.
Fastening with self-tapping screws
- We return the jumper to its place and tightly tighten the connection points with self-tapping screws. In this case, the parts will be pulled towards each other, which will allow the glue to set properly.
- Remains of squeezed out glue must be immediately removed with a sponge soaked in water.
Pantry rack: finished side panel
As a result, we got these two absolutely identical ladders, which, if necessary, can be used exactly like this. But that’s not why we started assembling furniture. To slightly reduce this direct resemblance of the rack, you can decorate it using a hand router.
Milled counter corner
Creating the design and interior of a small storage room in an apartment of different types
There are dozens of room design options, among which the most popular today are such styles as classic, loft, high-tech, minimalism, country, and ethno style. Each of them corresponds to certain details, color schemes, and furniture elements. But, of course, first of all, the design of the premises depends on the tastes of the owners, as well as on the possibilities of the living space. They will differ for different types of layouts.
- In a Khrushchev-era building, it is best to arrange a storage room like a built-in wardrobe. Given its tiny size, this is the best option.
Hanging shelves and pull-out drawers will turn an uncomfortable pencil case into a spacious closet.
- In Brezhnevka, the dimensions allow you to decorate a full-fledged room with various types of shelving, hanging rods, and life-size mirrors.
Brezhnevka allows you to experiment with styles.
- In Stalin, the “secret” rooms are smaller than Brezhnevka, but quite deep. It’s easier to make a storage room out of them (things, dishes, household appliances, etc.); for a work area such as an office or workshop, they will be a bit cramped.
Beauty and individuality are added by stylish materials and fittings, designer doors, and decorative elements.
Types of lighting fixtures
It is not always easy to understand which dressing room lighting fixtures are primary and which are secondary. LED strip as an addition to ceiling lamps (chandeliers, spotlights) can be much more effective, illuminating even remote corners of the room and allowing you to find the necessary items of clothing.
It is not always possible to achieve such an effect from a chandelier of an unusual shape. Track and spot light sources are another option for illuminating the entire space of a room.
Halogen lamps
Such lighting fixtures are in great demand due to the variety of types - they differ in design and functionality. Install a halogen spotlight on the canopy of a modular cabinet and direct its rays downward - the result will be amazing.
One such lamp can fill the entire interior space of furniture with light. Supplement the device with a motion sensor to get backlighting that turns on when the cabinet door is opened.
LED lightening
High-tech lamps based on LED diodes are becoming more and more popular every year in all spheres of human activity. The design of furniture and interior design is no exception. They are characterized by efficiency, durability, safety and high-quality lighting.
Fluorescent lighting devices
They are divided into two main types - compact energy-saving and linear (tubular) lamps. Among the advantages, we note low energy consumption. There are more disadvantages - they are not strong enough to withstand mechanical shocks, they are bulky, and outwardly very simple. If you use them, then place them horizontally above the fitting room mirror.
LED Strip Light
A flexible board consisting of many LEDs with exposed contacts is an excellent option for additional cabinet lighting. Can be placed both inside modular structures and along the perimeter of the ceiling/floor.
Organization and renovation of a small storage room in an apartment
Before starting renovations, it is necessary to create a project with detailed zoning of the room. It is necessary to take into account the length and height of the walls, the depth of the room, the placement of the door, the presence/absence of sockets and switches, ventilation outlets. Based on the measurements, the furniture arrangement is plotted on the plan, the height and width of the shelves are calculated, and the color of the walls and floor is selected. Only having a ready-made plan in hand can you order all the materials necessary for installation.
The pantry in the dressing room can be organized by two cabinets facing each other with open shelves.
Selection of lighting
This issue should be taken seriously, since there are no sources of natural light in the pantry. Therefore, when remodeling, you need to carefully consider the lighting system. The most effective solutions are:
- tablet lamps;
- spot lighting;
- turning spots;
- sconce;
- LED strips (on shelves).
The main task is to make the farthest corners easily accessible to light.
Depending on the project and the chosen style, you can combine different lighting fixtures.
Selection of ventilation
As a rule, closets are located in the central part of the apartment, away from the centralized exhaust system. But for such rooms, ventilation is extremely necessary, so this issue must be taken into account.
Storerooms do not always have windows, which means that their artificial ventilation plays a special role.
You can organize the supply of fresh air by installing a forced ventilation system using mechanical ventilators or breathers, which are convenient but expensive. The easiest way is to ventilate by opening the doors. The main thing is not to forget to do it regularly.
Take care immediately that the room is not too humid.
Installation of shelving
To effectively use the pantry, the racks are extended from the floor end to end to the ceiling. Depending on the size of the room they can:
- occupy the entire space (built-in wardrobe);
- be equipped along two adjacent walls (L-shaped);
- occupy three walls (U-shaped).
Materials are selected depending on the style, most often it is wood, plastic, MDF boards or metal.
To store large items (winter shoes, suitcases, household appliances), the bottom shelf is made 70-100 cm high. In order not to restrict movement, the distance between parallel rows should be at least 70 cm.
Shelves can be solid, with perforations, stiffening ribs, sides; for convenience, they should be diluted with drawers, net baskets, and hooks.
How to make a metal rack with your own hands
Before you start manufacturing, you need to imagine what such a structure will look like and what fasteners will be used.
Rack drawing
Next, take the necessary measurements and draw your idea on paper. It is possible to find a suitable drawing and assembly diagram on the Internet or draw it yourself. The design can be of any size and shape that will fit into a given pantry.
For fastening, it is better to choose metal fasteners, as they are very durable and can withstand any weight.
Necessary materials
When starting to select a material (metal, wood, plastic) for manufacturing and fastening materials, you need to know what will be stored on them, the expected weight, dimensions.
For the frame you should take a metal corner or pipes.
In addition, you will need connecting elements for assembling the frame, brackets, screws and self-tapping screws.
For manufacturing, you need to select a material, the thickness of which depends on the expected weight of the luggage (the greater the weight, the thicker the shelf fabric).
Tools
For assembly you will need the following tools:
- pencil;
- drill;
- screwdriver;
- building level;
- hacksaw for metal;
- roulette.
When starting assembly, it is better to wear special clothing so as not to get dirty or get injured.
Designer tips for decorating a small storage room in an apartment
To create the same design in an old apartment from an inconvenient storage room as in the photo in cool magazines, you should listen to the advice of experienced designers.
- “Extend” the room by finishing the floor and walls in light colors.
Storage systems must be equipped for the things that will actually be there; their strict systematization is necessary.
- Place the light bulbs so that the light is distributed evenly throughout the room.
In a Khrushchev apartment, a tall, light closet, divided into a significant number of compartments, turns out to be a good organizer of space.
- Install sliding doors if the total area of the apartment is small - this design saves space.
The highest shelves are suitable for containers with Christmas tree decorations and other items that need to be taken out periodically.
- Set aside central shelves for things you use frequently; Put away non-essential items upstairs.
The pantry adjacent to the kitchen is mainly equipped to accumulate a food reserve and is filled with rarely used or very massive kitchen utensils.
Before demolishing partitions, think carefully about which part of the house needs to be urgently saved from rubble. A pantry can be an excellent “extra office” for a kitchen, bedroom or living room; will help organize your living space aesthetically and competently.
To have somewhere to put writing utensils, use a top, install organizers (storage systems), and hang open shelves.
How to arrange a pantry?
The equipment will depend on the dimensions of the storage facility and its functional purpose. The most rational solution in arranging a utility room is to install hanging shelves that do not overload or clutter the space. It is important to correctly select the construction material taking into account the expected load. If the pantry in the apartment has sufficient dimensions, the best option would be shelving or built-in cabinets made according to the individual parameters of the room.
The photo shows an example of arranging a storage room in an apartment.
The lower tier is occupied by corner shelves for seasonal shoes and special sections for bulky and heavy items such as bags of cereal, buckets, a vacuum cleaner and other equipment.
In the middle segment there are mainly shallow shelves that are suitable for storing laundry baskets, tools or dishes.
The upper section is equipped with mezzanines, rods and wall hooks. This part is suitable for outerwear and rarely used items and accessories in the form of New Year's toys.
Recommendations for dressing room lighting
Here are some tips for organizing lighting:
- choose the most economical lamps - the more spacious the room, the more benefits they will provide;
- try to create lighting that is close to natural - do not overdo it with brightness;
- do not use a chandelier in small dressing rooms - it will be useless and irrelevant;
- lighting is thought out at the room design stage, before installing modular cabinets, shelving and doors;
- Do not backlight the mirror for a small wardrobe (other lamps will be sufficient).
When organizing lighting for a dressing room, they are guided by almost the same rules as for the rest of the living rooms of a house or apartment. Properly designed room lighting will allow you to achieve ease of use and maximum comfort. Follow the recommendations above. Additional consultation with specialists will not be superfluous.
Lighting for dressing rooms
With all this, do not confuse the dressing room with a regular wardrobe. If the latter is used exclusively for storing clothes, then a person enters the dressing room undressed and leaves fully dressed, combed and prepared to leave the house. For this reason, bright lighting without eye strain is a priority when arranging such rooms.
For suspended ceilings, built-in lighting fixtures with a large dispersion angle are used, and for ordinary ceilings, chandeliers or standard ceiling lamps are used. Another option is models of devices with rotating shades, allowing you to set the desired direction of lighting.
The area with the mirror is illuminated using wall sconces and tubular lamps. Above the pipes, where the hangers are attached, oblong and thin lighting fixtures are attached.
Since a dressing room, especially a large one, requires a considerable number of lamps, it is advisable to use devices based on LEDs for these purposes - strips, lamps, standard lamps, etc. Their shape does not matter, the main thing here is low electrical energy consumption, durability and low glow temperature.
To increase savings, each group of lamps should be connected to a separate switch. If you want to achieve full automation, then use motion sensors with a long shutdown delay.