Varieties
The following materials are used in the manufacture of plastic aprons:
- PVC panels, the standard width of which is 25 cm and thickness - 0.8–1.2 cm. They are produced in lengths from 2.6 to 3 m. Their main feature is the presence of special locking fasteners on glossy or matte parts for seamless connections. Therefore, with proper installation, you can independently make a kitchen apron for the kitchen on the wall in the form of a monolithic surface from individual elements. The main thing is that there are no cracks, otherwise water and debris will get into them. PVC is used to make plain, thermo-film-coated or varnished aprons.
- ABS sheets are single-layer plastic materials decorated with photo printing or designs. A finished kitchen apron made of ABS plastic is usually produced in dimensions of 200 x 60 x 0.15 cm. Its main advantage is its high resistance to mechanical damage and the absence of deformation during bending. Aprons made of sheet plastic are produced in a wide variety of designs, since high-quality images are applied to the surface of the product. In addition, you can order an apron with an original design.
- Cast polycarbonate is a refractory plastic material that looks like ordinary glass. The surface can be glossy or matte. Kitchen aprons made from this material are sold ready-made. Images imitating tiles, decorative stone, brick and other materials are applied to the inner polycarbonate coating. In addition, such an apron can be equipped with lighting elements (for example, LEDs) that will highlight the product.
Taking into account the size of the kitchen wall that needs to be tiled, you need to calculate and select the appropriate model.
Beautiful examples
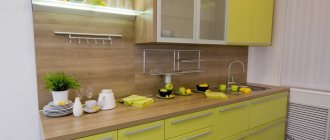
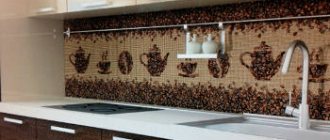
A snow-white plastic apron with expressive images of juicy fruits will look great in tandem with a set in which the upper part is made in orange, and the lower cabinets are black.
Images of lush green landscapes on a plastic apron will be a wonderful addition to the glossy soft green set with matte steel fittings.
Against the background of a set in which the lower cabinets are made to look like wood in a gray-brown shade, and the upper cabinets are painted white, plain glossy PVC panels will look organic. Their color can be milky, beige or cream.
To learn how to attach a kitchen apron made of plastic, see the following video.
The presence of proposals on the construction market for finishing the kitchen space often leads to a dead end. But there are always options for resolving the issue. The ratio of cost and quality, the ability to install it yourself are among the advantages of a plastic kitchen apron . What ensures its popularity is what it looks like.
Ready-made hanging aprons for the kitchen made of plastic have several varieties.
Among them are:
- Carbonate glass. The use of this material for a kitchen apron is considered the most reliable. In terms of strength, it is slightly inferior to glass or tile, but has a lower cost.
- PVC. They can be sold in pure form or with a finished design. Strength and load-bearing capacity depend on the thickness of the slab.
- Vinyl. It can decorate the work area, but can become deformed when heated by a working stove. For this reason it is rarely used.
- Plastic lining. It is gradually losing its popularity due to its low strength and low resistance to high temperatures.
The first two options are the most popular when making a kitchen apron from plastic. What are the advantages of this material?
Prices for plastic lining
Advantages
A kitchen apron for the kitchen on the wall made of plastic has the following positive qualities:
- quick and easy installation, which you can do yourself;
- in the event of a breakdown, replacing the damaged part is a simple task;
- relatively low cost (average price per 1 m2 of ABS plastic product is 1300 rubles);
- protection against condensation and various deposits;
- You can hide electrical wires behind the surface;
- undemanding in cleaning (sometimes you need to wipe the surface with a damp sponge to remove dirty marks and greasy stains);
- environmental friendliness;
- does not absorb odors;
- moisture resistance;
- high heat resistance (withstands up to 80 ° C);
- light weight.
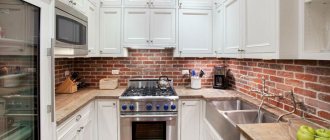
Manufacturers make models that imitate various materials. For example, a brick kitchen apron will fit perfectly into the interior. In addition, there are products decorated with photo printing, which is applied to the surface using high-tech equipment. Thanks to this, there are unlimited possibilities for decorating the apron.
Rules for caring for an apron
When caring for an apron, the following rules must be observed:
- Regular cleaning with a damp sponge and household cleaning products is required.
- To remove water and detergents, after cleaning the surface is wiped with a dry cloth.
- It is not recommended to use compounds with abrasive particles and acid-base agents.
During operation and cleaning, the characteristics of the apron coatings are taken into account, which can be smooth or with a textured surface.
Flaws
Before installing a plastic apron in the kitchen, you need to study its disadvantages in order to understand what shortcomings will have to be corrected after installation. The obvious disadvantages of the product include the following parameters:
- is easily scratched, therefore, metal scrapers and abrasive powders, as well as acetone, should not be used to clean the surface from heavy dirt;
- easily deformed due to mechanical damage;
- protection must be installed between the apron and the hob;
- When ignited, plastic releases toxic substances;
- fades when exposed to UV rays;
- short service life (approximately 5 years).
But in any case, such a decorative element has much more advantages than disadvantages, which is why craftsmen recommend lining a working wall in the kitchen with it.
Choosing an apron: useful tips
Before purchasing or ordering a product, you need to consider a few points:
- The edges of the apron should extend beyond the kitchen unit, so you need to take all the measurements first.
- To prevent water flowing from the countertop from getting under the product, it is recommended to install a border for the joints, the purpose of which is to prevent the penetration of moisture.
- For small rooms, the best choice would be a white kitchen apron that matches the overall design of the kitchen. You can choose a light-colored product decorated with a discreet pattern.
- Covering a wall with a small backsplash with an image printed by the manufacturer using heat printing is a bad idea because it will not be noticeable.
What to look for when choosing
A kitchen apron made of plastic has many advantages, but they are only relevant if high-quality products are initially selected.
The modern building materials market is full of fakes and low-quality goods, so when choosing high-quality plastic, you should definitely take into account the following nuances:
- Thickness. The larger this parameter, the stronger and more durable the material.
- View of the front surface. The color of the plastic product should be uniform without blurry spots or streaks.
- Availability of quality certificates. It is best to purchase products only from trusted manufacturers, since well-known companies usually value their reputation and are unlikely to produce products of poor quality. Uncertified facing materials may contain a large number of toxic and hazardous components to human health.
In the interior of any kitchen, an apron not only performs very important protective functions, but also plays a unique decorative role. Therefore, when choosing a plastic coating, it is necessary to take into account not only its operational and technical characteristics, but also its decorative and aesthetic properties.
As a rule, the facing material for the kitchen work area is selected to match the color of the countertop or kitchen unit, but if you wish and have good taste, you can experiment a little and choose a more non-standard solution.
Required Tools
Before you begin installing the apron, you need to prepare the following devices for preparatory and installation work:
- level and measuring tape;
- hacksaw;
- impact drill or hammer drill and drill;
- stationery knife;
- liquid nail gun;
- putty knife.
Consumables include silicone sealant, glue, primer, and fasteners (screws and dowels).
Initial stage - surface preparation
According to the advice of the experts, it is necessary to prepare the wall. To do this you need to perform a few simple steps:
- Dismantle the old covering.
- Treat the surface with acrylic primer and antifungal agent.
- Level the base with a mixture of gypsum plaster.
Before installing a plastic apron in the kitchen, you need to think about the placement of technological holes for installing sockets. If the wiring will pass under the product, it will have to be laid in grooves, which must be made in the wall using a hammer drill. As a result, the unevenness must be primed and the electrical wires covered with a plaster mixture.
Preparing the apron
First you need to determine the size of the product. The best option would be an apron that extends slightly beyond the level of the tabletop (approximately 1–3 cm). In turn, the height of the panel directly depends on the design of the kitchen. If the edge of the apron runs along the center of the wall, it will be necessary to treat the seams with silicone sealant and decorate them, for example, with moldings.
If you purchased a sheet of plastic that is too large, it means that it will have to be cut to the required dimensions. For these purposes, a fine-toothed hacksaw or a utility knife will be useful. You can make a perfectly even cut using nichrome wire. When the apron needs to be assembled from several plastic parts, in this case the seams must be placed vertically. Otherwise, the installation technique will be disrupted, which will inevitably lead to damage to the entire structure.
To properly install a plastic apron in the kitchen, you need to choose an installation method. It depends on the type of product, the features of the headset and the stage of repair.
Cost of a plastic apron
How much does a plastic apron cost? The exact price always depends on the material and decorative design of the apron. For example, polycarbonate is cheaper than polyvinyl chloride; a panel with a uniform texture will be cheaper than a panel made to look like marble or wood.
See also: Photo wallpaper in the interior
On average, the cost of a plastic apron is about 1,500 rubles. When choosing a panel, it is not recommended to consider overly cheap models - they may turn out to be of lower quality and durability.
Gluing an apron is a reliable and optimal option
This method has obvious advantages:
- the panel will fit tightly to the surface, so there will be no free space between the wall and the product;
- thanks to liquid nails (special construction adhesive), the plastic will become less susceptible to mechanical stress;
- simple installation technology.
This installation option is suitable when the room has smooth walls, cleaned of dust and treated with a primer. The masters have come up with an optimal and simple way to glue a plastic apron in the kitchen, to perform which you need to follow the following method:
- Measure the distance to sockets and other elements that require through holes.
- Mark the resulting dimensions with a pencil on the back of the apron.
- Cut recesses of appropriate sizes. To complete this step you will need a sharp utility knife.
- Mark the lines of the top and bottom edges of the product on the wall.
- Apply mounting adhesive in thin strips to the back of the apron.
- Press the back of the plastic sheet against the wall surface. The main thing is to press down the edges of the product so that they do not come off.
- Cover the plastic cuts with decorative skirting boards and mask the joints with strips, if necessary.
Installing a plastic splashback in the kitchen yourself is a simple task. However, if it is necessary to dismantle the decorative element, then irreversible damage cannot be avoided, which will make the product unsuitable for reuse.
Decorating a plastic apron
It is important not to make a mistake with the color of the apron. You cannot use dark colors in a Khrushchev apartment: they visually make the room feel cramped. For a small kitchen, choose light shades, they are in fashion today.
If transparent plastic is used, it can be decorated with photo wallpaper, colored film or other materials. To do this, you need to apply the design to the plastic. You can purchase panels with ready-made patterns, but if you want to be creative, use one of the methods listed.
Decorative painting
The apron can be painted with acrylic or oil paints. The plot should match the kitchen design. To apply the drawing, you can use templates or your own imagination.
Don't choose complex subjects. A modest, neat drawing looks much more impressive than poorly created intricate plots. Please note that the patterns must be applied in a mirror image, because the surface with the picture will be adjacent to the wall.
Photo wallpaper
The most popular and easiest way to decorate a transparent plastic apron is with photo wallpaper. The decor is glued onto a dry and absolutely clean plastic surface. Fine sand and other debris will prevent paper or film from adhering evenly to the plastic. Bulges and air bubbles under the wallpaper are considered defective.
If you are undergoing renovations in your home, there will be a lot of dust in the air. As it settles, it will ruin the result of your work. The entire pattern may become covered with small specks. This is especially true for small rooms.
It is more difficult to achieve clean air in a Khrushchev-era apartment than in a large apartment. Ventilate the room where decorative work is being carried out and do a wet cleaning.
The glue is applied directly to the drawing, that is, the picture should be under the plastic.
Film
Self-adhesive film is used for decoration. The choice of this material is huge. In addition, you can order interior printing on “self-adhesive” according to your photo or sketch. You need to glue slowly, removing the backing gradually. This is a job for neat people.
Before pasting, the plastic is sprayed with water so that the adhesive layer does not immediately adhere to the surface. From time to time, adjust the film and remove air bubbles. For renovations in a Khrushchev-era building, the color of the film is chosen based on the finish of the walls and countertops.
How to secure a plastic apron in the kitchen with dowels: instructions
Installation using the mentioned fasteners should not cause any problems. This installation method is best used on panels that have a pattern on them, as the same adhesive may cause some damage to the image. It is not necessary to move the furniture set during the work. Installation should be carried out according to the following plan:
- Use a drill or hammer drill to make holes in the wall and apron for the dowels. At this stage, a building level will be useful, with which you can make accurate markings.
- Clean the surface from any dust that has formed.
- Place the prepared apron against the wall and secure it with dowels.
- Mask the caps with furniture plugs, the color of which should match the plastic.
An apron installed in this way can be easily dismantled: to do this, you need to unscrew the dowels and carefully remove the product. In addition, dowels (concrete screws) or anchor bolts can be used for fastening.
Features and advantages of plastic kitchen aprons
Plastic panels for the kitchen, which are often used to make an apron to protect the wall, have many advantages, in particular:
- The material is highly resistant to moisture, which is a very valuable quality for kitchen coverings. Thanks to this, plastic panels can be installed even in the space behind the sink, without expecting deformation during operation.
- The surface of plastic panels can be coated in any color, which allows the apron to perfectly fit into the overall design of the kitchen interior. In addition, modern technologies make it possible to apply all kinds of decorative elements, even paintings and photographs using photo printing techniques.
- Installing an apron is not particularly difficult, so you can handle this process yourself, which allows you to save some costs on repairs and finishing. The important point is that, due to the ease of installation, the panels can be very quickly replaced with others, for example, if you want something new.
- The working panel, finished with plastic, can withstand fairly high temperatures (up to 80° C), so the panels can be safely installed behind the stove, which allows you to protect the wall from splashes of boiling dishes.
- It is very easy to clean the surface of the plastic from grease and other contaminants. To do this, you can use any mild cleaning products.
- The size of the panels is different, they are light in weight and do not create unnecessary load on the kitchen walls.
- An important advantage is the low cost of this material, which allows you to decorate the kitchen not only beautifully and functionally, but also profitably.
Installation of an apron using lathing
The mentioned structure can be made of wood or metal. If lumber (for example, timber) will be used to organize it, they must initially be treated with water-repellent impregnation, an antiseptic and a fire retardant in order to protect the tree from negative influences.
Profiles and strips must be installed level. According to the masters, there is a quick way to install a plastic apron in the kitchen using lathing:
- Secure bars or metal profiles at a distance of no more than 50 cm with dowels or staples.
- Secure the plastic panel with self-tapping screws.
- Cover the edges and sections of the apron with decorative strips.
This technique has several advantages:
- Possibility of installation on uneven surfaces;
- a free gap is formed between the wall and the apron, in which you can hide the wiring and install decorative lighting.