Kitchen apron. What is this?
The kitchen apron is the wall space between the wall cabinets and the work table.
A parallel can be drawn between the housewife's apron, which is used as work clothes when preparing food, and the wall apron in the kitchen.
It performs the same functions:
- Protective. The wall is attacked by steam, splashing oil, and water. The apron protects the surface from exposure to aggressive kitchen environments.
- Practical. It is much easier to remove dirt, grease, food particles and water droplets from a smooth and sliding surface. The apron is made from precisely these materials, which greatly facilitates the cleaning process.
- Decorative. An apron can play a major role in kitchen design. Furniture and decoration of the rest of the room can be selected in combination with the apron.
The apron has many tasks. It performs the necessary functions in the kitchen. Without a specially decorated area, the kitchen loses a lot of advantages and benefits.
Housewives have the following requirements for kitchen aprons:
- Moisture resistance;
- Strength to mechanical stress;
- Easy to care for;
- Resistance to high temperatures;
- Resistance to household chemicals;
- Beauty.
There are quite a lot of requirements for an apron. You should choose the material for it wisely, without rushing.
There are many materials for making a kitchen apron.
Let's look at the most popular of them:
- Mosaic;
- Ceramic tile;
- MDF.
- Plastic;
- Porcelain tiles;
- Metal;
- Natural and artificial stone.
Of all the options listed, the most colorful, practical and original is mosaic. Let's talk about this type of kitchen apron in more detail.
Advantages and disadvantages of mosaic
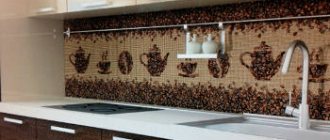
Mosaics are the most original and expressive way to decorate a kitchen. This apron brings originality and individuality to the design. No other material for making the area between the work table and cabinets can create such a bright and unusual atmosphere in the kitchen. When choosing this particular material for finishing, you need to know all its advantages and disadvantages.
Advantages of a mosaic apron:
- Resistance to external factors. Mosaic is resistant to household chemicals, moisture, and acids.
- Rich color range. When making a mosaic backsplash, you do not need to follow the directions of the design or print. You can lay it out as you wish, combining any number of colors and decorative elements.
- Attractiveness. Such a design solution cannot go unnoticed by guests.
- Easy to use and maintain. Mosaic tiles are made from durable material coated with glaze. Dirt and grease are easily washed off.
- Practicality. If some elements are damaged, they can be easily replaced with others.
Important! To clean the mosaic panel, you can use any cleaning products. Even abrasive substances will not damage its surface.
Disadvantages of a mosaic apron:
- Price. The price of the material for making a mosaic apron is slightly higher than other types of tiles. We are talking not only about the high cost of the material itself, but also about the cost of work. Laying out an apron yourself is difficult. Professional help and special tools are required. Small mosaic is considered the most difficult material to install.
- Lots of seams. You need to grout a large number of seams carefully and use high-quality grout so that it does not darken over time. Caring for seams, since their number exceeds a hundred, is a rather labor-intensive task.
Advice! If you decide to hire workers to lay out a mosaic apron, then contact large companies. Finding a specialist with extensive experience in this profile is quite difficult.
Where to use mosaic?
Apron. An apron is understood as a part of the wall located above the working surfaces of the unit in the part where there is the greatest likelihood of splashes of grease and drops: above the sink, table and stove. You can completely lay out this area with a mosaic in the form of some simple ornament or a whole picture of small parts. Or you can only part of the wall, combining it with regular tiles.
Tabletop - oddly enough, it is perfect for decorating tabletops. A surface made of this material is not afraid of temperature changes, humidity, or chemicals contained in detergents.
The mosaic floor also looks very original. You can lay out the design in the center, you can completely cover it with multi-colored squares, or you can create a simple ornament.
Walls and furniture. A kitchen covered entirely with mosaics will look very colorful, but using it to highlight some area or part of the wall will be quite appropriate. Some do-it-yourself mosaics make window sills, bar counters and furniture facades.
Types of mosaics and methods of fixing them
On sale you can find mosaics of different sizes and shapes. Let's look at this issue in more detail.
Classic mosaic . In the language of professionals, it is called tesserae. This is a square element ranging in size from 1x1 cm to 5x5 cm. Nowadays, rarely anyone undertakes to lay out each element. To attach tesserae, matrices, polymer bridges, polyurethane mesh and a paper base are used. The matrix is a panel measuring 30x30 cm onto which individual mosaic elements are attached.
Tesserae in panels are fastened in several ways:
- Polymer jumpers. The connection is considered unreliable and is therefore used extremely rarely. The connections are broken during use or just when laying the pattern on the wall.
- Paper base . The paper base is attached to the front side of the mosaic and is removed after laying the apron.
- Polymer mesh. The mesh reinforces the tesserae and prevents them from falling apart. This method of laying the apron is the most convenient and economical in terms of time and glue consumption.
- Self-adhesive panel. A matrix similar to double-sided tape. Its only drawback is the impossibility of attaching it to a plastered wall. But it attaches perfectly to glass or plastic surfaces.
Sealing joints between mosaics and other walls
Using a mounting gun and acrylic sealant, seal the areas where the mosaic touches walls, cabinets, sinks, etc. Remove excess sealant with a damp cloth, finger or special tool (see photo).
Let the installed mosaic dry. Rearrange furniture or continue renovating your kitchen.
That's all! The installation of the mosaic on the apron is complete. Good luck to you in your endeavors!
Especially for the site: Everything about apartment renovation
Choosing a mosaic for a kitchen apron
Before making a choice, let's take a closer look at what design can be created using mosaics in the kitchen and what material to select tesserae for it from.
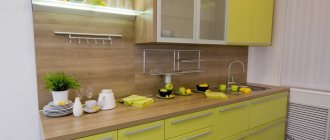
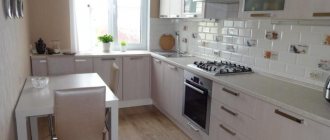
Monocolor
The mosaic is laid out in modules of the same color and size over the entire surface of the kitchen apron.
This option is suitable for a kitchen rich in decorative elements. Therefore, the apron is made in calmer colors so as not to oversaturate the interior.
Mix
The version of this apron is similar to the monocolor one, but has some differences. The apron is made of tesserae of different shades of the same color.
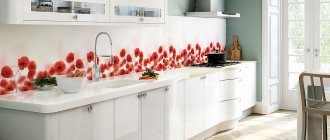
Panel
This is a popular and expensive option for a mosaic kitchen apron. The panel is a drawing, a picture of any complexity.
To fulfill each design idea, it is necessary to select a special type of tile. For example, glass mosaic tiles are ideal for the kitchen. But natural stones, although they look chic and expensive, are not so easy to care for. It is impossible to wipe off drops of wine or coffee from them. Therefore, you should approach the choice of kitchen decoration carefully, weighing all the pros and cons.
Let's consider all possible material options used for the production of mosaics and select the best one for you.
Review of different types of mosaics with examples of interiors
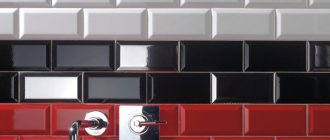
Form
A mosaic kitchen apron can have different shapes:
- square;
Decorating the backsplash with mosaic tiles in black with light grout
- rectangular;
- round and five-pointed;
- irregular shape for stones;
Material
The size of the tile and some of its performance characteristics depend on the material from which it is made.
- Glass
is the most popular material for mosaics.
Types of mosaic material
Glass mosaic
For the kitchen this is an ideal option. Firstly, it is easy to use and care. There are no visible stains on it if you didn’t have time to clean up before the guests arrived. Secondly, it costs less than its counterparts on the building materials market. Thirdly, it is very durable. Resistant to temperatures and abrasive surface cleaning agents.
Glass mosaic in turn is divided into:
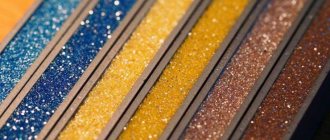
- Glass homogeneous mosaic. These are small glass cubes or candies and can be matte or shiny. Manufacturers add glitter and foil to some models.
- Smalt. The glass is baked with metal oxides. The result is high-strength glass of rich color that glows from the inside. Smalt can easily be mistaken for mother of pearl.
- Glass with added minerals. This tile is made by mixing glass with aventurine or iridium. The surface of the mosaic becomes durable, shiny, and shimmers with all the colors of the rainbow.
Ceramic mosaic
If you want to create a special atmosphere in the kitchen, claim sophistication and individuality, you should choose ceramic mosaic tiles for laying out the apron. It imitates handmade products, is very durable, and is perfect for oriental-style interiors.
Compared to glass mosaics, ceramic ones do not have such a wide selection of shades and colors and require more grouting materials when finishing joints. At the same time, the thickness of the ceramics is impressive, it is twice as thick as glass, approximately 10 mm.
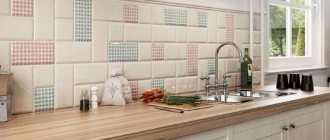
Types of ceramic mosaics:
- Matte;
- Glossy;
- Imitating stone or pebbles;
- Ugly, rough.
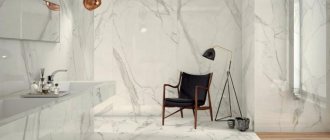
Stone mosaic
The main advantage of stone is wear resistance and strength. If you are building a house to last forever, then this option will definitely suit you. In order to produce stone tiles, factories use a variety of stones and minerals: marble, onyx, etc.
When purchasing stone mosaics, avoid the option of using porous and soft minerals. They are left with indelible marks from red and orange liquids. And this is not very practical for the kitchen. Stone mosaic is easy to combine with ceramics and smalt.
Advice! In order for the stone to remain smooth and beautiful for a long time, treat the surface of the mosaic with a protective compound that will fill the pores of the material. It will become smoother, which will make cleaning the surface easier.
Porcelain stoneware mosaic
The advantage of porcelain stoneware is that it is less porous compared to stone, but retains the high strength of glass and stone together.
Unfortunately, porcelain stoneware has a very poor color palette. It is difficult to choose these tiles for an effective and individual kitchen design.
Mother of pearl mosaic
Buying natural mother-of-pearl tiles is affordable for very rich people, but everyone can appreciate its merits. Mother-of-pearl mosaic gives a feeling of comfort, dims the light, while simultaneously reflecting and scattering it. It shimmers in the sun, highlighting it with warm and spring shades.
As an option, you can choose glass or smalt mosaic with mother-of-pearl coating. It has the same beauty characteristics as natural.
Metal mosaic
This version of mosaic is made of rubber or ceramics, covered with a thin layer of stainless steel, bronze or brass. The disadvantage of this method of making an apron is rapid abrasion. But in appearance it will be very attractive, as it has beautiful shades of steel and gold. Perfect for modern techno style.
Mirror mosaic
It is made from small pieces of stele with a thickness of no more than 5 mm. An elegant and individual interior created with the help of a mirrored apron requires careful and constant care, which is not always convenient for modern housewives.
This option is best used not as the main one, but as a decorative element for aprons made of other materials.
How to lay a mosaic?
The time has passed when craftsmen spent years creating frescoes from small details with their own hands. Now no one will want to do such hard work anymore. To make it easier to glue the mosaic onto the surface with your own hands, manufacturers place a specialized elastic mesh base under the pieces. Similarly, consumers purchase ready-made matrices ranging in size from 10 to 25 cm.
The mosaic in the kitchen area is laid in stages. Before gluing the finished parts, you need to prepare the wall - level it and prime it. To get a specific idea of how the finished pattern will look, you can make a computer model of the kitchen with mosaics, or simply draw out the prepared wall with a pencil, connecting the matrices with fragments into one block, a couple of pieces, for simplicity.
The next step is applying glue. They apply it to the wall, to a small area with a similar calculation, so that 2-3 matrices can be glued in one go. Residues are immediately removed with a spatula, as it dries instantly. To glue a mosaic on a mesh base, you need to press each section, pressing the mesh into the glue with a rubber spatula or a soft rag. It is important to ensure that the sheets do not move and that the same distance is maintained between them. It is best to use white glue so that it does not show through the parts of the mosaic.
A day after gluing, we begin grouting the joints. Before doing this, you need to remove the remaining glue with your own hands, using a wet sponge or rag. The grout is applied with a rubber spatula, filling the joints. Since it dries quite quickly, a small area is treated at one time in order to have time to remove the remaining material before it hardens. The grout can also be washed with a wet soft cloth or sponge, and if it has already dried, you can use a cleaning agent, which must then be rinsed off with water. So, the entire wall is processed section by section.
Mosaic for the kitchen room is a fairly unpretentious material; it does not require specialized care. It can be washed with products that do not contain abrasive particles, certainly in the same way as ordinary ceramic tiles.
Preparing to carry out mosaic work in the kitchen
After you have finished choosing tiles for your mosaic backsplash and have decided on the material and color scheme, you need to learn everything about glue and grout. They will be useful for attaching mosaics to the wall and processing seams.
Choosing glue
The choice of adhesive for mosaic kitchen backsplash should be based on the following characteristics of the tile and the means for attaching it to the wall:
- White adhesive is necessary for transparent tiles so that it cannot be seen through them. In other cases, the color of the glue does not matter.
- You need to choose epoxy and polyurethane adhesive bases for very wet rooms. In the kitchen, mosaics can be held in place just fine with cement glue. And it is much cheaper than all the others.
- For stone mosaics, choose a quick-drying cement adhesive because the stone changes color when it absorbs liquids.
- To glue paper-based glass tiles, use epoxy grout; it can be used as glue. Then the remaining glue will not have to be removed from the seams. And this is very problematic when using this type of mosaic; elements may fall out of the paper matrix.
- For laying out aprons in kitchens, you can purchase ready-made adhesives. They are designed for areas with intermittent water contact and low tile load.
These essential adhesive characteristics will help you make the right choice without extra costs.
Choosing grout
Mosaic grout is a mixture used to fill the space between tiles. It is necessary to complete the production of a finished apron in the kitchen. The grout protects the tiles from dirt and moisture entering the space between the tiles. Prevents the appearance of mold and mildew. Without grouting, the repair will look sloppy and less aesthetically pleasing.
There are several types of grout for joints on the building materials market.
Cement based grout
Advantages:
- Easy to apply;
- Low price;
- Moisture resistance;
- Chemical resistance.
Flaws:
- Poor color palette.
Resin grout (epoxy)
Advantages:
- Elasticity;
- Resistance to temperature changes;
- Resistance to chemicals;
- Moisture resistance;
- Wide selection of shades and colors.
Flaws:
- High price;
- Experience is required to work with it.
Important! It is epoxy grout that has the greatest resistance to moisture. If the apron in the kitchen is located close to the sink and stove, choose this type of mixture for the joints.
Mosaic laying
The difficulty of such finishing lies not so much in the complexity of the work itself, but in its duration. You can make installation easier by using matrices.
Materials
Any facing work requires specific materials. In this case, these include:
- mosaic tiles or matrices;
- tile adhesive - exactly the same type as the selected tile. It is advisable to add latex;
- grout is preferable based on epoxy resins, as it is stronger. However, you need to work with it quickly and remove the excess immediately;
- primers - preferably acrylic, since there is always humidity in the kitchen.
Tools for laying mosaics.
Preparing the base
A mosaic apron requires a completely flat base.
- The surface is cleared of any finishing, and if the plaster is suspicious (there are peelings, voids), it is also removed.
- Concrete or brick is primed.
- For large defects and unevenness, level the wall with your own hands using plaster mixtures; for small ones, putty is sufficient.
- After drying, the surface is primed again: adhesion for any type of mosaic is low.
Apron finishing
Only an experienced craftsman can lay tiles directly on the wall. So when working with your own hands, especially with small mosaic sizes, it is preferable to do things differently.
- A fiberglass mesh with cells measuring 2*2 mm is placed on a flat surface. The mosaic is laid out on it in the form in which it should look on the apron. If necessary, lay out dry first.
- If the intended composition is successful, each tile is freed from paper and glued to the grid. A minimum of glue is needed - this is a temporary fixation. Mounting crosses of minimal thickness are inserted between the elements in order to maintain the uniformity of the seam. The photo shows the assembly of a mosaic on a grid.
- Prepare the glue according to the instructions, then apply it to the wall with a notched trowel.
- Using an even spatula, apply the adhesive layer to the back surface of the mesh.
- The finished area is placed on the wall, pressing with a spatula. If necessary, use a mallet. The mosaic should ultimately form a single plane.
- The following fragments are attached in the same way.
- The seams between the tiles are rubbed down after a day, when the glue has set. The grout is applied with a rubber spatula, and excess is immediately removed with a damp sponge: when it hardens, the composition becomes extremely durable and difficult to remove.
The photo shows grouting the seams on a mosaic apron.
Mosaic finishing is an interesting and durable option for the kitchen. Of course, its installation requires more time and effort than tiling or porcelain stoneware, but the result is worth it.