Modern technologies have come a long way from the times when decorating and finishing various areas of the interior was a labor-intensive and very complex process. Today, you can decorate the walls in your bathroom or kitchen in a matter of days, with a minimum of effort. If you see a nice small ornament in the future design of your home, then choose mosaic. The technology of arranging miniature squares on a grid allows you to glue large fragments at once, rather than individual elements. To get a beautiful pattern or a special panel, it is important to know the basic rules for tiling with small tiles.
Kinds
When choosing a grout, factors such as the level of humidity in the room, the width of the joints, the need for mechanical stability of the mosaic and the frequency of wet cleaning are taken into account. Accordingly, the desired mixture is selected - most often these are cement- and epoxy-based products.
Cement grout
The cement-sand mixture is easiest to work with, both for an experienced tiler and for a beginner. To improve the characteristics, additives are added to the mixture - plasticizers, stabilizers and water repellents. Cement products are recommended for use in cladding, where the width of the joints does not exceed 3-5 mm.
Cement grouts are mixed with latex or water, and to protect them from moisture they are coated with a polymer water-repellent varnish. The rough surface and the tendency of seams to darken and become clogged with dust make cement grout less attractive than others, but cheaper.
Epoxy grout for mosaic
Preparations based on epoxy resins are recommended in cases where the seams are rubbed down for a long time, and there are no plans to dismantle the mosaic for several years. In addition to resins, they contain decorative and coloring pigments in the form of mother-of-pearl and sparkles, and fast polymerization of the composition is ensured by hardener substances.
The epoxy coating is very durable and smooth, not prone to mechanical damage, exposure to aggressive chemicals and clogging with dust.
However, working with epoxies is more difficult than working with cement-based products. Due to its thickness, the mashing process requires considerable effort, and rapid hardening requires some skill.
Epoxy grout can only be removed from joints together with the tiles. Therefore, grouting work should be carried out as carefully as possible.
How to choose a high-quality adhesive solution?
The composition of the adhesive base must be ideally combined with the facing material. Therefore, the main criterion when choosing is the type of material from which the small elements are made.
Cement based mixture
The standard composition of tile adhesive includes 5 parts cement, 1 part sand and another 10% (of the total mass) of plasticizer. The last component is lime milk or washing powder, which perfectly combines bulk substances. This mixture can be dark gray or white. It is not recommended for use under glass or metal tiles and should not be applied to drywall.
Adhesive made from polymer components
If you plan to lay tiles in an area with a high level of moisture (bathroom, swimming pool, sauna, bathhouse), then choose an acrylic-based mixture. Polymer components have high quality properties: they dry very quickly, after hardening they become like stone or very dense plastic. In addition, you can add paint to the mixture and get any shade. The acrylic mixture does not need to be prepared, just stirred. The price for such properties is high.
Epoxy adhesive
A worthy competitor to the acrylic mixture for installation is a mixture of epoxies. The finished substance includes epoxy powder or resin and a special hardener liquid. The two-component composition creates a strong, dense and at the same time transparent, like glass, base. Any type of tile can be glued to it. This product is expensive, but its exceptional properties surpass other mixtures. It securely fixes the tiles in any area and removing such cladding during subsequent repairs will not be easy.
Rules for working with grout
- Mosaics are glued only to a perfectly flat surface. Mosaic will not be able to hide holes, gaps and other defects, and it will hold up worse.
- Epoxy grout sets quickly, so prepare it in small portions, which must be used within 20-25 minutes.
- You need to remove the “epoxy” from the surface of the mosaic immediately, before it hardens.
- They begin grouting a day after cladding, when the glue has dried a little.
- It is allowed to work with grout mixtures only with a soft silicone or rubber spatula. Metal devices must not be used.
- The container for preparing cement grout must be clean and the water must be free of impurities and debris.
- Do not add too much water to cement. Excess moisture will make the mixture “weak” and the coating unstable.
Laying mosaic tiles on a grid
Materials and equipment
- Select in advance the type of mosaic according to the interior design project and buy it in sufficient quantities (based on the calculation table of the coverage area).
- Choose glue from a range of ready-made ones or make your own.
- Stock up on primer (liquid for impregnating the plaster under the glue).
- Buy two types of spatula - wide and notched.
- Prepare a container for the solution.
- To roll the sheets, you will need a rubber roller (or silicone); you can also use a squeegee or rubber grater.
- A container of clean water and moisture-absorbing towels for cleaning.
- Tape measure, building level, laser for marking, pencil and meter ruler.
Preparation and marking of surfaces
- determine the number of whole sheets (start counting from the top so that the cut fragments are in the area near the floor);
- create a lower horizontal border from which you can start gluing large fragments;
- During installation, all parallel straight lines must be adjusted using the center line and checked with a level so that the whole pattern does not move at an angle.
Mosaic grout consumption per 1 square meter
The determining factors when calculating the consumption of the grout mixture are:
- dimensions of the mosaic - the smaller the elements, the greater the consumption;
- width and depth of joints - more grout will be needed to fill large gaps between tiles;
- grout density – recommended consumption for a specific brand;
- unforeseen situations - the need to eliminate defects and unevenness of the foundation will require additional expenses.
The amount of the required mixture can be calculated using the following formula: (k+d)/(k*d)*z*m*n = consumption in kg/m2.
Letter designations:
- d – mosaic width in mm;
- k – its length in mm;
- m – width of the tile joint;
- z – thickness of the mosaic element;
- n is the density of the mixture in kg/m3 (varies from 1.5 to 1.8).
It is recommended to carry out calculations when the tiles have non-standard dimensions. For the rest, you can rely on the data indicated on the grout packaging.
Subtleties and features of the process: laying mosaic tiles
The special but simple process of laying new mosaic tiles begins with preparing the surface. Main stages of preparation:
- Cleansing. Clean the walls from the previous coating. It is necessary to remove the remaining layer of old tiles, paint, wallpaper or other facing material. In a new home, it is enough to clean the surface from dust and construction debris.
- Leveling the surface before laying. It is necessary to replace the layer of plaster, leveling the walls. If the level differences are too noticeable, then plasterboard sheets are attached.
- Use a special solution (a primer with a special deep penetration composition) for better adhesion of the adhesive mixture. The final surface after treatment should be fairly rough and completely dry.
It is important to have a ready-made design project that takes into account the location of plumbing, lighting and decor. General data will help you correctly calculate the required number of mosaic elements and consumables.
How to grout a mosaic?
Grout, incorrectly or carelessly applied to the surface of the mosaic, can ruin the appearance of the coating and negate all efforts to lay the tiles. Let's figure out how to use grout correctly for a decent result.
Cleaning tiles and grout
If we are talking about fresh masonry, then the seams do not require special cleaning. It is enough to wait until the tile adhesive dries - this is at least a day, and preferably two days. After making sure that the mosaic is held securely, remove all plastic crosses (if any) and any remaining adhesive mixture. To do this, it is most convenient to use a foam sponge with a hard side or a large-bristled brush.
Then carefully wipe the mosaic and seams with a damp and dry cloth. If necessary, you can use a vacuum cleaner - it will remove any remaining dust that the rag did not reach.
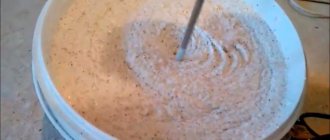
Making the first batch
Experts recommend not mixing the entire volume of grout at once. It is better to start with a small portion and observe how the composition behaves, and also adapt to the grouting process yourself.
They are guided by the instructions indicated on the packaging of the product - you need to prepare the batch strictly in accordance with it, without exceeding/decreasing the volume of the components. To mix, you should use a metal spatula, a construction mixer, a drill or a screwdriver with a special mix attachment.
The most difficult thing to prepare is epoxy fugue - due to its dense consistency, it is difficult to turn and becomes softer only after prolonged mixing. The cement grout is left for 7 minutes to bind, then mixed again and work begins.
When preparing a cement mixture, the dry component is added to the liquid, and not vice versa. It is better to take a little less water, and then gradually bring the mass to the desired consistency.
Surface protection
Mosaic is very sensitive to mechanical and chemical damage, so it needs protection when rubbing. A special spray will help create a protective layer - it is sprayed onto the entire surface of the cladding in 20 minutes. It is important to wait until the product has completely dried and then begin grouting.
The spray will create a thin film that will prevent the viscous mixture from drying out. When the finishing work is completed, the remaining product along with the protective layer can be easily removed with a soft sponge or rag.
If there is no protective spray, the edges of the mosaic can be blotted with a sponge soaked in water. To make it easier to remove grout residue, the surface is periodically moistened with water from a spray bottle.
Seam filling
Step-by-step instruction:
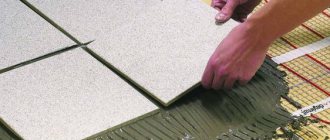
- Take a rubber spatula and scoop more grout onto it.
- Use a wide diagonal motion from top to bottom to move straight across the mosaic, trying to capture as many elements as possible.
- Once again, pass along the surface, pressing on the area between the tiles so that small indentations remain.
- If the area of mosaic tiles allows, wet a gloved finger and run it along the seams. This will help to slightly deepen and level the layer.
The grouting mesh will speed up the process of filling joints. These are fiberglass sheets with perforations and silicon carbide coating. But due to the risk of scratching the mosaic glaze, beginners should not use the device.
Moistening the grout
In the first 4 hours after applying the tile filler, it is recommended to moisten the joints. This is especially true for rooms with low humidity levels and high air temperatures. Wetting will improve the hydration of the solution, strengthen the joints and prevent cracking. Moisten the seams repeatedly with liquid from a spray bottle or a foam sponge well soaked in water.
Removing the remaining grout from the mosaic
Removal of mixture residues will depend on the composition. If epoxy-based grout was used, the mosaic should be cleaned immediately, without waiting for the composition to dry. If the mixture is cement, the residue can be removed after 30 minutes, when a separate section of the mosaic has been processed.
“Epoxy” is removed with a solvent; for cement compositions, ordinary water is suitable. Wash the tiles with a rag or sponge with a hard layer in a circular motion, periodically rinsing the device with water.
You should not put too much pressure on the mosaic so as not to damage the glaze. It is better to wash the rags in two containers - in one to wash off the remaining grout, and in the second - to wash it clean. Complete the process by wiping with a dry cloth.
The grout will take about a day to dry. During this time, the mosaic should be protected from ultraviolet rays, drafts, temperature changes and getting wet.
Features of laying a mosaic frieze
The mosaic frieze is laid after the main tile has been laid and a gap has been made in it. But the thickness of ceramic tiles is usually several times greater than the thickness of the mosaic, which after installation should be flush with it or minimally recessed. Therefore, it is necessary to prepare the base for the frieze.
https://youtu.be/XdX9H2zRFJg
The corners of the laid tiles are covered with masking tape. The gap left is filled with tile adhesive and stretched using a simple chipboard template with a protrusion. The width of the protrusion corresponds to the width of the gap, and the depth is equal to the height of the mosaic tile. After applying the required amount of glue, the masking tape protecting the edge of the front surface of the tile is removed. The glue is left for a day. After it has dried, a mosaic frieze is applied to the prepared surface; if it protrudes beyond the level of the tile, the surface is sanded. And only after that the adhesive mixture chosen for the mosaic is applied and the frieze begins to be glued.
Important! The remains of the mosaic can be used creatively. But some part of it must be left in case partial repair of the cladding is required.
Tips for use
8 important recommendations from tilers:
- A grout that is identical in color to the mosaic will help hide imperfections in the coating.
- Contrasting grout is used only for zoning space. The exception is when the seams must be in harmony with the design elements of the room.
- Inexperienced tilers should use not individual tiles, but entire modules consisting of several dozen mosaics. It's faster to work with them and easier to avoid mistakes.
- Before starting work, the grout should be tested on a small, inconspicuous area of the coating.
- It is better to fill the seams of wooden mosaics with epoxy compounds, since the coating may crack under the influence of the liquid cement mixture.
- If the mosaic moves slightly during the grouting process, it can be returned to its place with the smooth part of the spatula, but only during the first 30 minutes.
- Glass mosaic is rubbed with transparent compounds or neutral shades.
- The grouting area for one approach should not exceed 2 m2.
Choice of grout color
Today, the color range of grouts is different. Absolutely any consumer can find their own option. The correct choice of shade affects the result of the entire work. It will also help correct or hide shortcomings and mistakes made during the laying of the mosaic.
When choosing a color, it is recommended to give preference to a shade that matches or is darker than the tile itself. If you select a light mixture, the picture will merge and will not be visible. It is also important to take into account that the grout can change its color after drying.
If glass mosaic tiles or photo collages are used, it is better to give preference to a transparent composition.
Of course, the choice is up to the buyer, but it is best to try several types of grout before completely grouting the joints.
How to clean and protect tiles from fungus and dirt?
Among the protective agents for tiles and mosaics we can recommend:
- water repellents - impregnations with moisture-repellent properties that create a thin protective layer on the seams;
- polymer varnish for the space between tiles - penetrates into the depth of the grout, creating a more durable protective layer that collects drops on its surface;
- silicone or acrylic sealants - used in “problem” areas where contact with water is most likely (corner seams, areas near the sink, bathroom, plumbing fixtures).
Seams protected from moisture will not accumulate bacteria and fungus. To protect against mold, fungicides are also added to the grout, which do not give the fungus a chance to grow.
If the fungus still prevails, and unpleasant stains of dirt appear on the seams, the following will help:
- white vinegar - spray it onto the seams, leave until dry, and then remove dirt with a brush;
- hydrogen peroxide - the algorithm of use is similar to vinegar;
- tea tree oil – 1 tsp. dilute in a glass of water, spray on the seams, do not rinse;
- furatsilin – 1 tablet, dissolved in a liter of water, apply and thoroughly wash the seams;
- household chemicals – chlorine-containing and anti-mold agents such as “Izocid”, DALI, “Antifungal”, “Mill Kill”.
Read more about how to remove mold from tile joints in this article.
Features of the material
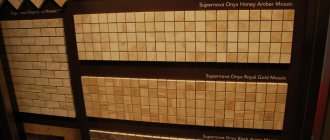
The block structure of the mosaic, when small segments are assembled into square plates, measuring 15x15, 20x20, allows you to select a ready-made pattern. The basis for mosaic tiles can be a mesh, reinforcing substrate or flexible, durable paper.
This distribution of tile pieces allows you to place the parts at equal distances and reduce installation time. Selected in one color scheme or with a specific pattern, tiled cladding does not require joining skills.
The fastening of the mesh for the mosaic is located on the back side, and the paper on the front side. Therefore, when installing the parchment base, it is placed on the solution with the paper facing up. Then it is moistened and the adhesive layer is removed.
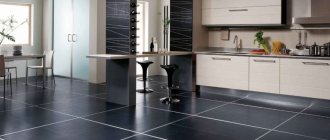
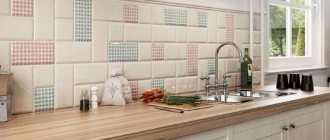
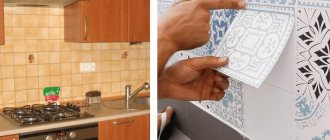
Basically, mosaic tiles are used to cover bathrooms, showers, and splashbacks in kitchen areas. Now tiles have appeared, details that are not square, but of arbitrary shape. This finish imitates a pebble surface, with many irregularly shaped elements.
In addition to straight surfaces, mosaics on a grid can be glued to walls with curves, protrusions and semicircular areas.
Removing grout from the mosaic surface
When the grout has completely dried (and not just set), you can begin the final removal of plaque. The amount and intensity of deposits depend on how thoroughly the sponge or rag was washed and how often the water in the container was changed.
The most effective way to remove excess grout is to use a hose to spray clean water. There is no need to rub anything, use rags or abrasives. If there is no practical possibility to implement such a method, they resort to the dry method. The best option is felt fabric; it is quite abrasive, but at the same time soft and will not damage the mosaic coating.
The only exception is complex mosaics with a textured and grooved surface. Here you will have to resort to a special solvent that can penetrate into the smallest crevices.
After laying and grouting the mosaic, all that remains is to take care of periodic maintenance of the coating. Splashes should be removed from the surface in a timely manner, wiped dry, and avoid contact with alcohol-containing and alkaline products that deprive the mosaic of its shine.
Seam filling
For grouting, it is recommended to use two-component mixtures selected according to the type of mosaic tile, since there is a difference between mixtures for ceramic and glass materials. The grout mixture is diluted with water in the proportions indicated in the instructions. If the mosaic for the bathroom is being grouted, the mixture must additionally have antifungal properties.
Grouting mosaic joints
Before starting to grout, the surface of the mosaic is thoroughly cleaned of any remaining glue, and where it protrudes between the chips, it is removed. Apply grout only with rubber spatulas in vertical and horizontal directions. Approximately 0.5 m2 is processed at a time. Using diagonal movements of the spatula, remove the excess grout remaining on the surface, and allow the mixture to dry for some time according to the instructions. The mosaic is cleaned of grout with a damp sponge, the surface is polished with any flannel cloth.