Where does this ceramic tile get such a strange name? For which rooms is it best suited and how to install it correctly?
You will find answers to these and other questions in this review.
Initially, such products (after installation) resembled brick and were used mainly for facade work. It got its name because of the special shape of the blank. It had a couple of holes at the end, and thanks to its convex shape it looked like a snout.
Today, Hog tiles remain similar to bricks, but are produced in a much greater variety of colors and patterns. It is used to decorate bathrooms, kitchen splashbacks, loggia walls and sanitary facilities. Sometimes it can be found in cafes, restaurants or other public institutions.
Tiles in the form of bricks are quite popular, however, without special skills, it is not recommended to take on the task of laying such tiles. Let's find out why.
What difficulties arise when working with a “hog”?
To create a convex shape, you have to use more material, which increases the weight of the tile. Additional glue applied to the wall will help hold it in place. This increases grip and durability.
The tiles must be laid out perfectly evenly, otherwise all the flaws will be noticeable. Special attention is paid to the seams. Marking marks, or stretched string and a laser level will help you achieve perfectly straight lines.
The hardest part is joining the corners. For the outer corner, you have to file the tile at forty-five degrees, trying to avoid chipping. For the inside, use a grinding wheel to make a small notch. Use flexible diamond blades at low speed. After cutting, check that the connection is correct.
You can trim the “Boar” tile a little with a grinder or an electric tile cutter. Hand tools will not help in this situation. And in order to cut it lengthwise or crosswise, you will need a special cutter. It is also used to cut out holes for switches and sockets.
! Our specialists can cut tiles of any complexity using modern CNC machines. Contact us!
When installing sockets, faucets or other structures, avoid getting their edges on the chamfers. Try to install along a horizontal seam.
Facing with such tiles requires wide joints. Uniform spacing is achieved using plastic crosses up to 10 mm thick.
When purchasing, take into account the 5-10 percent defective rate, which is attributed to trimming or accidental damage to the material. This way you will prevent downtime and insure yourself against the risk of discrepancies in the appearance of tiles from different batches.
How to lay “Boar” tiles in the kitchen
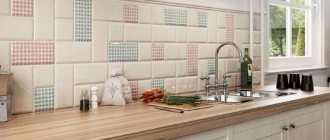
Usually for an apron in the kitchen it is mounted offset. To diversify the picture, individual small tiles with a pattern or specially designed borders are used. The thinner the seams between the rows, the less dirt will clog in them. But too thin seams will not add convenience, especially when caring for tiles.
To ensure that the plinth fits more tightly to the apron and there are no gaps between the side edges, align its edge with the bottom or top side of the tile. When marking, take into account the size of the countertop, the dimensions of the stove, washing machine and baseboard. Also, do not forget about the sizes of tile bevels and tiles. This ensures precise alignment of the joints and overall consistency with the decor of the room.
Classic in diagonal design
If you imagine the classic “hog” tile laying pattern and mentally rotate it at an angle of 45 degrees, you will get another non-standard method. In addition to the fact that as a result the room looks fresh and unusual, this method of laying tiles allows you to visually expand the space.
Photo: abeautifulmess.com
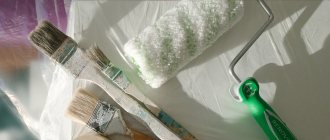
Preparatory work
Before you begin installing the tiles, you must carefully prepare the surface so that it is smooth and free of flaws. First of all, you need to get rid of the old surface, such as wallpaper, paint, and remove all dirt. Next you should apply putty and level the walls with it. It must dry, after which a primer is used.
The next step is marking. Here a marker, upholstery cord, plumb line, and building level will come to the rescue. First, the lower horizontal line is applied, the height of which depends on the height of the furniture. Depending on the installation method, the remaining lines are applied horizontally, vertically or at an angle. Finally, the profiles are attached to the wall.
List of sources
- dizainkyhni.com
- dekoriko.ru
- www.ivd.ru
- kitchendecorium.ru
- ukuhnya.com
- proplitki.ru
- dizainexpert.ru
- kuhnidizayn.ru
- Author: Sergey
Share with your friends!
Chess board
If you alternate horizontal and vertical laying of tiles, two per improvised square, you will get a spectacular chessboard on the floor or wall. If you use tiles of two different colors for this, the result will impress you even more.
Initially, boar tiles were used for cladding facades. But today it is often used instead of conventional tiles when decorating the interiors of kitchens, bathrooms and toilets. In addition to the classic “brick with seam” 85x285 mm, the interior version is also available in other sizes. There are even square glazed products that look especially impressive not only in photos, but also in reality.
Hog tile
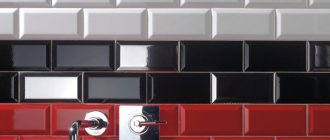
Decorative tile “hog” got its name because the original version of this cladding had two holes on the side, reminiscent of a pig’s snout. Modern tiles do not have such holes, but the designation remains and is fixed. Moreover, in Europe, such finishing material for interiors is usually called metro.
In terms of composition and manufacturing technology, boar is a classic ceramic tile with glaze. The only difference from the usual tiles is the presence of an edge beveled at 45 degrees along the perimeter of the “brick”. This chamfer emphasizes the seams and makes the wall more like brickwork, and also adds a bulge and dimension to the tiled surface.
The tiles in question are most often used when forming an apron in the kitchen above the countertop and when decorating corridors or bathrooms. A brick wall inside a house always looks unusual. And if it is also emphasized by a bright glaze, then the decor turns out to be especially catchy, sophisticated and original.
Varieties of “hog” tiles
Peculiarities
Hog tiles are quite often used in kitchen backsplashes. Its shape and relief resemble brickwork.
Initially, the tile was used for facade decoration, and got its name due to two holes on the flat part, providing ease of transportation. They are the ones that visually resemble a pig's snout. But, this feature is unique to the domestic market.
The European buyer calls the tile “subway” because it is traditionally used for finishing subway stations and underground passages.
The pleasant appearance and comfortable shape allowed the “hog” to quickly occupy its niche in interior decoration. Modern designs of tiles have become more diverse, the decor is more pleasant and colorful. It can be produced with glaze or painting.
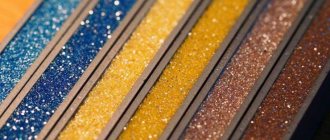
There are a lot of unexpected colors of the “hog” available for sale. Thanks to the presence of a chamfer on the product, it looks voluminous and solid.
Advantages and disadvantages
Among the advantages of boar tiles:
- excellent water resistance of glazed ceramics;
- durability (facades with similar cladding have been standing for more than a century);
- no need for excessive leveling of walls for gluing tiles;
- glaze resistance to elevated temperatures;
- Resistant to scratches and splitting.
You don’t need highly specialized skills to apply a “hog” sticker. The tiles are installed using the usual tile technology. The walls are leveled, removing potholes and bumps larger than 5 mm. And then the ceramic cladding is glued using an adhesive solution.
Among the disadvantages of boar tiles, it is worth mentioning only the higher cost than that of standard tiles without bevels, and the small size of the elements. On the one hand, ceramics that are small in width and height simplify the application, and on the other hand, they increase the time of tiling work in the kitchen or bathroom. The chosen layout method is also important here, but lining walls with small parts always takes longer than large ones.
Brick tiles are more often used for facing kitchen aprons
Method of laying boar tiles
The boar tiles are laid in the following ways:
- traditional (offset, a la “brickwork”);
- stacked horizontal or vertical;
- diagonal;
- herringbone (zigzag).
For an apron in a small kitchen, it is best to choose a traditional or zigzag layout. This installation option will look most advantageous in a small room filled with furniture and household appliances.
Tile layout options
If preference is given to the stacking method, then it is recommended to pay special attention to the seams and the color of their grout. Here you will need contrast - the grout is dark in color, and the hogs are light. In this case, it is not worth doing the entire cladding in one tone, as the entire visual effect of the convex shape of the tile will simply be lost.
The sticker of “brick” tiles on the wall is done in six steps:
- Surface preparation with leveling and priming.
- Trying on tiles and marking the first row according to level.
- Placing a support rail from a bar or profile.
- First row sticker.
- Gluing the rest of the tiles.
- Two days for the glue to set and grout the joints.
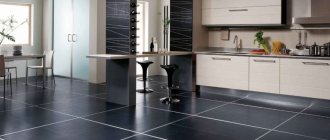
There are photos on the Internet with wild boars on the floor. There is nothing stopping you from using this glazed ceramic as a floor covering. However, its convex shape will interfere with walking. Glazed “bricks” are more of a wall decoration. Just as roof windows are designed for installation in the roof, this tile is best used only when facing vertical surfaces.
Sticking such tiles to the wall is no different from standard work.
About grout
For a specialist, there will be nothing complicated in laying, but for a beginner it will not be so easy to cope with ideal external corners. To imitate brickwork, you need to place the tiles staggered. An option such as displacement is also possible, as well as laying using the “seam to seam” method.
In the latter case, special attention should be paid to the seams, you need to choose a contrasting grout, and the layout and sealing should be simply ideal in quality. To play it safe, it is better to choose a grout that is more standard in color, it can be:
- white;
- gray;
- creamy;
- beige
or black, corresponding to the “metro” tone.
The mixture must be of high quality, not afraid of moisture, frequent washing and temperature changes. If you chase cheap grout, be prepared for the fact that it will darken very quickly and will not have any aesthetic appearance. The best option in this case is a powder based on epoxy resin.
Recommendations and advice for tile masters
Creating a backsplash from metro tiles in the kitchen with your own hands or covering the walls in the bathroom with it doesn’t seem like anything difficult. There are no special tricks here. Independent adjustment of plastic windows according to the season or widening the opening to accommodate non-standard sizes of interior doors can cause even bigger problems.
The main thing in gluing the tiles in question is the perfect evenness of the seams. Any inaccuracy in leveling it will be clearly visible on the wall. This is far from wallpaper or PVC tiles, which forgive small flaws in the original markings. Otherwise, the gluing of the boar is carried out using a technology common to all ceramics.
The original tile layout will transform the interior
What kind of “hog” is there? Sizes and types
Among the standard types of such tiles are ceramic, clinker and gypsum tiles. Ceramic - more common due to its ease of maintenance, versatility and wear resistance. As a rule, its surface is smooth and glossy with minimal relief.
Hog tiles usually have chamfers - beveled edges along the edges of the product
This is what a tile backsplash without chamfers looks like
Ceramic tiles themselves are the most practical finishing material
Clinker tiles are made of clay, have a porous structure and are very similar to ordinary bricks. Clinker is made only in natural shades; it is extremely rare to find white.
Clinker tiles are the most durable, but also expensive
A plaster “hog” is the worst choice for a kitchen apron. The tiles are easy to care for, absorb moisture strongly, and have a short service life. It happens, just like clinker, only in natural colors. The only advantage for kitchen renovations using such tiles is their low cost.
As for the size of the tile, the length and width of the product directly depends on the manufacturer and ranges from 6 to 10 cm in width and from 12 to 30 cm in length. A proportional “hog” is considered to be a product whose length is two to three times greater than its width.
The most common sizes are:
- 15 by 7.5 cm - as a rule, these sizes are produced in Italy.
- 20 by 10 cm - GOST of Russia, the most common size on the market.
- 30 by 15 cm - this size is often produced in China.
- 30 by 7.5 cm - a size simulating the size of a brick.
In the photo, the most common size of the “hog” is 20x10 cm
And this is an example of ceramic tiles measuring 30x7.5 cm