A rug is a practical and useful thing in every home. It gives a feeling of comfort, warmth and coziness. If you need such a thing, do not rush to the store. Try making a rug with your own hands. There are many benefits to this process. Firstly, a rug made by yourself will be unique; it can have any shape, size and design. Secondly, it will help you save money. Thirdly, you will get rid of old unnecessary things. In this article we will look at how to make a rug from scraps of fabric with your own hands.
DIY rugs made from scraps of fabric
To make a rug with your own hands, you can use many techniques.
The following will be useful for work:
- old things;
- scraps of fabric;
- waste yarn;
- cheap T-shirts and T-shirts bought on sale.
To master one of the techniques, it is advisable to watch a detailed master class on needlework or read the proposed material.
Articles on the topic (click to view)
- Photo curtain for the kitchen
- Kitchen interior with black and white curtains
- Photos of beautiful curtains with eyelets
- Photo of voile curtains for the kitchen or living room
- Photo of a bedroom interior with beige curtains
- Tips on how to choose curtains for the bedroom: photos of interiors
- Curtains for an arch in the hall or kitchen
DIY rug. Basic Techniques
To make crafts from scraps, the following techniques are used:
- Knitting. Here, narrow strips of fabric are used, which are knitted according to a certain pattern.
- Patchwork. This technique involves creating a mosaic from various pieces of fabric, which must be sewn together to form a single fabric.
- Weaving. The technique is similar to knitting, but without a hook and knitting needles. A base is proposed on which you need to apply shreds or threads.
- Stitching. Here we use braids made from shreds, balls, inside of which there is a padding polyester. Thanks to the volumetric blanks, the rug is voluminous.
DIY rug knitted from shreds
Let's take a closer look at the technique of knitting a rug from strips of fabric:
- Already “outdated” T-shirts, T-shirts and other thin knitwear are suitable as materials for work. In the product you need to cut off the bottom seams and places where there are seals in the form of several folds of fabric.
- The remaining canvas needs to be cut into narrow strips, moving in a spiral.
- A hook is more suitable as a tool for work.
- You need to start knitting a round product from a chain in which there are 5 air loops. In each row you need to add loops to get a round shape of the rug.
- You can knit a rectangular product, then the length of the chain should be the same as its width or length. Knitting can be continued with single crochets, or with double crochets.
Patchwork style rugs
The name of this style became known not so long ago, but beautiful patchwork products decorated the homes of our grandmothers.
To make such a carpet, you need to follow the instructions:
- prepare leftover fabric, bright shreds, beautiful, but small things with prints;
- new fabrics need to be washed and steamed, but old ones need to be ironed, and if necessary, starched;
- Dense fabrics look best in the finished product: tweed, gabardine or drape;
- In order for a sewn rug to last longer, be sure to prepare a base, as well as foam rubber, batting or padding polyester;
- all prepared pieces must be made the same size, taking into account seam allowances;
- arrange the scraps the way you see them on the finished product: you can randomly or according to a special pattern that can be found on the Internet;
- the first such product should be simple, but subsequent ones should have a complex pattern and curved lines;
- To make the product soft and voluminous, you need to make two canvases, between which a padding polyester should be placed, and the canvases should be sewn together.
Weaving technique without a hook
The activity is fun, but requires attention.
The mat is created in the following order:
- choose a large photo frame, and if you have one, it’s better to make it the desired size;
- using cloves, hammer them into two opposite sides of the resulting frame at a distance of 2.5 cm from each other;
- prepare unnecessary knitted T-shirts and T-shirts, “unravel” them into strips;
- pull the strips onto the nails to create a base;
- as a working thread, select a bright strip that needs to be laid between the stretched strips, alternating above the strip, under the strip, etc.;
- For weaving, it is advisable to choose only bright colors - continue working with them;
- to get fringe, the remaining threads need to be tied together;
- during operation, the weaving must be pulled up so that the mat fabric is dense;
- Having finished the product, remove all knots and excess strips to the wrong side and remove the product.
The finished craft can be decorated with something, if desired.
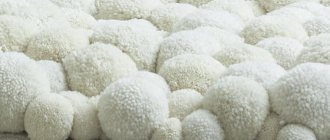
Volumetric rugs made from shreds
To make such a product for your home, you will need a lot of time, effort and patience. There is also more fabric than previous versions of the product. It will turn out cheerful, soft and original. Children love these rugs.
You can make a voluminous patchwork rug with your own hands in several ways:
- Fill the square-shaped scraps with padding polyester, form them into balls and sew them to the base.
- To make a grandmother's rug, you need to weave braids from strips, then sew them together or in a spiral using a strong thick thread.
- If you cut thick knitwear into strips, it should curl. You can speed up the process by washing the strips in the washing machine. The twisted pieces need to be sewn together, then you will get a voluminous rug.
- From the strips, tie a ribbon 10 cm wide and several meters long. When knitting in each row, the last stitch must be purled. The fabric will curl. Next, the finished tape needs to be laid in the shape of a circle or spiral and sewn together.
- To get a carpet in the form of grass, you need to purchase a rigid mesh with large cells from a hardware store. The hook should go through them. Strips of knitwear or cotton need to be cut into pieces. Weaving starts from the middle. The strip is located under the mesh, one edge extends into one mesh cell, and the other into the adjacent one. A tight knot is tied on the front side of the mesh. This way all cells are filled. It is advisable to choose bright stripes, then the rug will turn out cheerful and fluffy.
Embroidery with knitted ribbons
A master class on sewing such a carpet can be found on the Internet, but we will try to describe it in detail.
The resulting product can be used not only as a rug, it can serve as a cover for a sofa or chair. Everything will depend on the number of old T-shirts.
To work, you need to prepare knitted tapes , canvas or any dense fabric that will be the basis of the rug. You need to draw the picture you like on it.
Strips cut from old things need to be rolled into a tube and sewn according to the pattern with a contrasting thread.
Next we lay a strip of a different color according to the pattern. This is how the entire picture drawn on the canvas is embroidered.
Round rug made using a hoop
For needlework you will need old T-shirts, a hoop of any size and scissors.
T-shirts are unraveled into strips of equal width from one side seam to the other to form rings. They need to be put on the hoop vertically, then horizontally. The resulting sectors must be identical.
Expert opinion
Smirnova Ekaterina Anatolevna
7 years of experience in interior design, professional architect
The main thing here is that the strips do not stretch too much , otherwise the finished product will not hold its shape. All stripes placed on the hoop must intersect in its center.
We start the work from the center: fasten the strip with a loop and pass it in a circle, alternating above and below the longitudinal lines.
When the strip ends, the next one is tied to it, and the knot is hidden under the previous row. This is how the entire space of the hoop is braided. The remaining strips are tucked in, and if they are long, they are cut off.
Step-by-step master class on making your own rug from strips of fabric
There are a lot of ways and sketches by which you can knit your product, but sometimes it is not entirely clear in what sequence and by what method the piece of furniture was made. You can find many tutorials on the Internet that describe all the steps in detail. If watching the video is inconvenient, then you should consider in advance the main stages of carpet production.
Selection of materials
You can choose any material for needlework. Jeans, shirts, dresses, blankets will do. But for an accurate choice, it is better to know in advance for which specific room the rug is being knitted. If you need to decorate a bedroom, then a fluffy and soft material is ideal, but for the bathroom you will need a fabric that absorbs water well. In any case, the choice of material is free and limited only by the capabilities and availability of the required material.
Old clothes
Pattern
The dimensions of the product can be different and depend on the size of the room and your own imagination. You can take a closer look at the cutting technique using the example of a rug consisting of 20 round parts. First you need to make a parts template. If you don’t have a compass, you can use a plate or a pan lid. Using these tools, an even circle is drawn on the material and a circle is cut out along it.
Cutting details
The template is applied to scraps of fabric and 20 blanks are cut out from it. The same process is carried out with carpet insulation.
Sewing 20 round pieces
The parts are laid out one on top of the other - insulation on the bottom, the workpiece on top, face down. The resulting “sandwich” is fastened with pins along the entire circumference. Then an indent of 5 mm is made from the edge of the workpiece, and a seam is laid. To prevent the fabric from puffing up after turning it inside out, the seam allowances are notched. A wide cut is made at the edge of the sewn fabric, through which the part is turned out very carefully. The resulting flap is smoothed with an iron. All 20 circles are prepared using this method.
Assembling parts into a composition
A cardboard square is placed on each part so that its corners are in contact with the circle, and outlined with a pencil. The circles are folded in pairs, with the cuts inward, and stitched along the applied markings. Thus, 4 blanks are connected and stacked in a row.
They are pinned together and sewn together. The long sides of the resulting part are also sewn together with a continuous seam. These steps continue until you get a carpet with dimensions of 4 circles in width and 5 in length.
You might be interested in Half-cross stitch: how to do it for a beginner
Additional Information! After all the parts are connected, they are carefully ironed in the steam mode, otherwise it will be uneven.
Firmware for petals
Each petal is applied evenly to the fabric and sewn with a neat seam. Only the slots made on the reverse side remain. You can ignore them, but it is better to process and sew them up by hand.
Master Class
Useful tips
If you make a rug from scraps for a child , then you need to take into account that it will be washed from time to time. Therefore, the insulation for it must be selected in such a way that it can withstand numerous washes and not break down. The ideal option is padding polyester.
Since the fabrics for the rug will be used already washed, it means they will not fade. You just need to choose the right color to make the product bright.
any rug made from shreds along the edge so that the threads do not pull out and the product remains suitable for use for a long time.
The choice of material and technique for making a rug depending on its purpose
First, you need to determine the purpose of the future rug, which will be made using the patchwork technique or another method. If the product is intended for the bathroom, it is better not to make it too thick so that the mat dries quickly. If the product is needed for a child who likes to play on the floor, it is better to make it denser and the pattern brighter.
To work, you will need scraps of any fabric, fur, leather or suede. If you have old T-shirts or colorful socks that you don't mind throwing away, you can make a rug from knitwear.
For a rug using the patchwork technique, you will need a base - a dense material, such as burlap or drape-type coat fabric. Original products are made on the basis of construction mesh - it holds its shape and has large cells in which it is convenient to attach flaps.
Patchwork needlework technique
Regardless of the needlework method you choose - sewing or knitting, it is recommended to prepare the base for the carpet in the shape of a square or circle. Practice shows that decorative patchwork work itself is delicate. And to make the coating practical, it is worth strengthening it with a base of dense fabric. It is hemmed on the back side of the rug or blanket.
Base for the rug
How to make your own carpet from scraps of fabric?
Having selected materials for work, you need to decide what shape the product will be - round, square, oval or in the shape of a heart or fish. If you need a base, it should be cut out according to a template made of paper.
Expert opinion
Smirnova Ekaterina Anatolevna
7 years of experience in interior design, professional architect
Some needlewomen use a ready-made rug as a stencil. Then prepare your tools.
So, to work in the patchwork technique you will need fabric scissors, a ruler, a sewing machine, and an iron.
Rustic knitted rugs
Colorful thick country style rugs are easy to create with your own hands from old knitted clothes. This fabric has the advantages: it stretches well and does not fray. Products made from it are placed on the floor, on the bed, and even used as furniture covers. You need to work in the following order:
- Choose 3-5 T-shirts in a suitable shade. You can try to create a color transition - a gradient, that is, smoothly go from darker to lighter (and back). Instead of T-shirts, you can use colored socks.
- Cut the T-shirts into transverse strips 4–5 cm wide. You don’t have to worry about ensuring that the width of the blanks is the same everywhere - small flaws in the finished work will not be noticeable.
- Connect the ribbons, tying them into one long rope, and wind them into balls.
- Using a large hook (No. 10) from knitted yarn, knit a rug. First, make a chain of 7 air loops and close them in a circle. Continue tying the base around the circumference with simple stitches and double crochets, achieving a circle of the desired diameter.
The second way to create a rustic rug is even simpler. To do this, you need to complete steps 1 and 2 described above, then act differently:
- Collect bundles of three ribbons of approximately the same length. Secure each bundle on one side (sew or glue with tape), then weave a tight braid. Fix its tip in the same way.
- Sew all the braids together to create one continuous long braid.
- Laying out the braid on a flat surface in the form of a spiral, sew it in a circle. This is done manually using neat, invisible stitches or using a machine using a zigzag stitch. If the center is made elongated, the result will be an oval.
Rugs using patchwork technique: patchwork, lyapochika
To make a rug with your own hands using the patchwork technique, you will need some experience. You will need pieces of fabric cut into squares of the same size (10x10 cm). To do this, it is better to immediately make a template, with the help of which it will be easier to make identical blanks. They need to be sewn according to the following pattern:
Patchwork
- Sew 10 squares together in one line. Connect the pieces by folding them face to face, then smooth the seam from the inside out.
- Make 10 of these ribbons.
- Sew the strips together one by one to get a square piece. The size of the carpet will be approximately 90x90 cm, taking into account seam allowances.
- Smooth out the mat from the right side.
- Sew the base fabric to the workpiece using bias tape. The finished product can be stitched.
Lyapochika
To make a “shaggy” carpet at home, another technique is suitable - “lyapochika”. Scraps of fabric are “slapped” onto the base, and a very nice and soft product comes out. You will need strip strips 2–3 cm wide and 7–10 cm long. You need to sew the carpet according to the following algorithm:
- Cut a blank from the base fabric in the shape of the future rug.
- Draw the entire surface with parallel lines at a distance of 3–5 cm. This can be done using a ruler and tailor's chalk.
- Make a bundle of 3-4 scraps of fabric, fold it in half, and sew a stitch at the fold, fastening them together. You will get a “spider” with 6–8 legs, which needs to be sewn to the beginning of the first strip. It is necessary to fix the “spider” so that 3 of its “legs” are above the line, and 3 are below.
- Sew the remaining bunches of strips in the same way, moving from left to right. Leave a distance of 2–3 cm between strip blanks.
- Then proceed to fill the next row. To prevent the top row from interfering with working with the bottom row, secure the hanging strips with sewing pins.
- Do the same for the entire rug.
Carpet based on construction mesh
Handicraft stores sell a special mesh for creating carpets, but you can also get by with construction mesh - it costs less. From the mesh, cut a blank in the shape of the future rug - a circle, an oval, a heart, a flower or something else.
Then cover the edges with tape at a distance of 1 cm or tie with crochet threads using a hook. This must be done so that the mesh does not crumble.
Prepare the knitwear - you will need strips of fabric 2–5 cm wide and 10–12 cm long. It is advisable to pre-wet these strips, then spin them in the machine without adding detergent. This trick will allow the knitwear to curl into tubes.
Secure each strip into a grid cell. This can be done using a crochet hook or by hand, tying the ends of the flap with a knot. In the same way, you can attach strips of faux fur to the mesh - then the product will turn out even more fluffy and soft. Weaving a carpet is not difficult, even a child can do it. You will need perseverance and accuracy.
Knitted rugs from patches
From scraps joined into long ribbons, a rug can be crocheted, just as napkins are crocheted from ordinary yarn. True, for such work you need a large hook, 6-10 mm thick.
Begin work by tying a braid of 5-6 air loops, which are closed into a ring. Then the fabric is knitted in a spiral with double crochets, periodically knitting two stitches from one loop to increase the diameter. After each row, the work must be laid out on a flat surface to control the plane.
Crochet
Crocheting a rug
Video - Crocheting a round rug from cut fabric strips
Such a simple round rug does not require any special skill; even those who have picked up a crochet hook for the first time can knit it. If you have experience, you can create real masterpieces of any form.
Crochet rug
Handmade children's rug
Bright knitted rug
Multicolored rug
How to wash and clean a homemade rug?
If washing is delayed, the rug can be vacuumed from the underside. If stains appear on the front side, it is better to remove them using a stain remover, then rinse the product in clean water.
“Shaggy” rugs or faux fur items are treated with a carpet cleaner - the liquid forms foam that penetrates into the most difficult to reach places. Next, the foam is collected along with the dirt by wiping the product with a damp cloth.
Main types of homemade rugs
There are many options for different rugs made from old unnecessary things, and no less methods for bringing the whole theory into reality.
All this can be found in books on needlework or on the Internet, or you can show your own imagination, creating another masterpiece. Here we discuss the main and most popular options for weaving carpets from things that have lost their need in their original form. So:
- A soft, voluminous rug, the base of which consists of shreds.
- Grandmother's rug, woven using a crochet hook.
- A rug made of braids, the basis of which is the weaving of a standard braid.
- The braided version is performed using a regular hula hoop.
The choice of type for your own creation can only be made based on your own preferences and skills.
How to make patchwork rugs with your own hands
There are many techniques to make your own fabric rug. Each allows you to fantasize and be creative on the topic of flooring.
In special classes and master classes they teach how to create voluminous or flat rugs, pleasant to the touch or the simplest, “rustic” ones. When choosing any technique, it is important to prepare many scraps of fabric, for which old things, unnecessary yarn, or even T-shirts and T-shirts purchased at a minimal price will be useful.
Basic techniques for making rugs:
- Knitting - here natural yarn or narrow strips of fabric are prepared, which are knitted according to the classical pattern.
- Patchwork is the creation of a mosaic from different patches that are sewn together into one whole.
- Weaving is similar to knitting, only here knitting needles with a hook are not used, but there is a base on which threads or scraps are applied.
- Stitching - either braids from shreds are used, or balls with padding polyester inside - this is how volume is obtained.
Patchwork and grass rugs
Nowadays carpets with long pile, called “grass”, are fashionable. They are very soft and warm. True, it’s difficult to clean them without a powerful vacuum cleaner, but they look beautiful and cozy with them. Making such rugs with your own hands is not at all difficult, however, it can take a lot of time. This is if you decide to use threads. But it's very beautiful.
These are the results that can be obtained using this technique. But to make the carpet so beautiful, you need ribbon yarn or thick threads
The idea is outrageously simple: threads and strips of fabric are tied to a mesh base. There are two tying techniques - just using a knot, and making a loop. They give slightly different results, but both techniques are good. You can try and choose.
How to make rugs with your own hands from scraps
The same painting mesh is suitable as a base, but a rubber anti-slip backing for carpets is better. She's practically perfect. We tie threads or scraps of the same length to the cells of the grid - in each or through one.
Row by row we tie the scraps
If you do not have such perseverance, but you have a sewing machine, the process can be speeded up significantly. But the base must be woven. We fold “blade of grass to blade of grass” and stitch it on a typewriter. So row after row. Making patchwork rugs with your own hands is much faster with a machine.
You can also use a rubber mat with holes as a basis.
DIY carpets using patchwork technique
The “patchwork” products are beautiful and original. Do-it-yourself patchwork style rugs from scraps of fabric are easy to make. To make them, follow the instructions:
- Prepare material - scraps of fabric, scraps, themed pieces with prints specially purchased in stores or on the Internet.
- Wash and steam new fabrics, starch and iron old scraps.
- Thick fabrics - tweed, gabardine, drape - are perfect for rugs.
- For a longer service life of the product, take a lining - it can be foam rubber, synthetic padding, batting or a thick carpet base.
- Bring all pieces of fabric to the same size and shape; use a template for this; no seam allowances are needed for dense materials.
- Take the base, stitch all the pieces of fabric onto it in a chaotic order or following certain patterns and images. Schemes for patchwork can be found in specialized magazines or on the Internet.
- Once you have mastered simple sewing, you can try making rugs with curved lines or complex patterns.
- A variation of patchwork is the knitted type, in which the patches are not sewn, but tied together.
- To obtain a soft, voluminous rug, you can use the quilting technique, in which 2 fabrics are sewn together, and a padding polyester is laid between them.
Step-by-step instructions for various techniques
In order to create a beautiful rug that you won’t be ashamed to show to guests, you need to accurately follow the instructions corresponding to each of the implementation methods.
Soft volumetric rug
To make a product that is perfect for a children's room, you must first prepare the following materials and tools:
- Small scraps cut from outdated clothing.
- Scissors.
- Special rubber mat with ordered holes.
- A hook or small tweezers.
Step-by-step production:
- The prepared fabric is cut into strips of equal width and short length.
- Using a hook (tweezers), the strips must be inserted into the holes.
- Tie them in a simple single knot.
- Using the same scheme, close all existing holes with fabric strips.
Everything is very simple and fast!
"Granny's rug"
This option is more popular than others. It can be found in many village houses. But many people want to give city apartments a little zest and real comfort. This product can be made without the help of your grandmother. To do this you will need:
- Crochet hook in volume from 7 to 10 mm.
- Scissors.
- Waste fabric in various colors.
Manufacturing:
- The fabric is cut into thin strips. In this case, efforts are not necessary, since evenness does not play a special role. Thanks to some unevenness in the cuts, the rug will acquire a peculiar volume.
- The strips are tied alternately into one continuous rope. The sequence of colors depends on the idea of the future product. Tying is done using a regular double knot, which is pulled as tight as possible to make it easier to hide.
- At the end point of the finished rope, a small loop is made, and from it five loops are knitted in the form of a chain. The very last loop must be connected to the very first. This is how the initial row is formed.
- The second row is done a little differently. From the first row, a convex loop remains, into which the working tool is inserted and then also grabs the one closest to it in a counterclockwise direction.
- So there are two loops on the hook, to which the free thread is also captured using the hook. The thread must be pulled through these loops. This creates the next loop.
- The entire row is knitted according to the same pattern until the very end.
- This pattern should be repeated from the very beginning until the entire rug is completed.
There are several options for connecting threads:
- A circular connection is made as needed to introduce a specific color. The result should be a product with multi-colored even circles.
- Sequential is performed by preliminary fastening of a homogeneous knitting thread. Each type of fabric is attached in the sequence intended by the manufacturer. The result is a rug with a constantly repeating pattern.
- A chaotic connection occurs with the introduction of various tissues at random. The result is a bright product with absolutely illegible rows of knitting.
Rug made of braids
If it is impossible to use a knitting tool such as a crochet hook, you can use a simpler method of making a product from scraps. To do this you will need:
- Fabric in three colors.
- Needle and thread or glue.
Work progress:
- The fabric is carefully cut into strips of the same size.
- Stripes of three colors are woven into a standard braid.
- The braids must be glued or sewn together.
- A solid long braid is curled in a circular direction. Here the braid should also be secured with a needle and thread. You can also use glue for these purposes.
How to weave a rug from scraps without a hook
If you are not a master of crocheting, then you have the opportunity to weave rugs from scraps of fabric with your own hands without it, using small tricks. How to do it:
- Take a special large photo frame or make a base for the future product according to the desired dimensions from wood.
- Place nails on two opposite sides in 2.5 cm increments.
- For threads, use the same old T-shirts or T-shirts, preferably knitted ones.
- Pull the threads onto the nails - this will be the base.
- Take a working thread - let it be contrasting, pass it alternately under and above the warp.
- Continue weaving the threads, incorporating different colors.
- To obtain fringe, you can tie the threads together and not cut the ends; for a smooth weave, it is better to cut them.
- Periodically, the weaving will need to be pulled up to the first row to achieve the desired density.
- Having finished weaving, remove unnecessary parts to the wrong side and remove the finished product.
- If desired, the rug can be decorated.
Braided rugs
You can weave a rug in different ways, and to do this, the scraps again need to be joined into long strips.
Braid rug
This method is very simple, it does not require any tools or equipment other than a needle and thread.
Step 1.
Sew three patchwork strips together.
Sew three patchwork strips together
Step 2.
We braid them into a regular braid. It should turn out to be quite long, so the strips will have to be extended as you work.
Braiding
Step 3.
We secure the end of the braid with a pin and begin to roll it in a spiral on a flat surface.
Twisting a braid
Step 4.
We fasten each turn to the previous one on the reverse side, sewing it with threads.
Sewing a braid
Step 5.
You can do it differently: first twist the entire braid, and then carefully sew the turns in a spiral.
Making a rug
An oval rug is made in the same way.
Braided rug
Terry mat-braid
Curly rug made from braids
Rug made of towels
But if you need a rectangular shape, it is better to weave several braids of the same length, lay them close to each other and sew them in a straight line. And weave the ends with cord or sew on a typewriter.
Scheme for making a rectangular rug
Rectangular woven rug
Advice. Such a rug will hold its shape better if you add a lining to it on the back side.
The lining can be an old towel
Braided rug
To make such a rug you need to make a frame for weaving. Its size should be slightly larger than the desired size of the canvas. Nails with small heads are placed on two opposite sides or wooden pins are installed to secure the base. The distance between them is 2-2.5 cm.
Weaving frame
Advice. If you add another intermediate crossbar to the frame, which can be attached at different levels, you can make rugs of different sizes.
Step 1.
We begin work by securing the warp threads. This can be cord, twine, thick yarn, or scraps tied into a long ribbon. The end of the tape is tied to the upper corner stud, after which it is snaked around all the pins of the upper and lower crossbars in turn. You need to stretch the base well, but not too tightly.
Fastening the warp threads
Step 2.
Preparing working threads. They should not be too long so as not to make weaving difficult. It is better to attach the next strip as you shorten the previous one.
Preparing working threads
Step 3.
We begin weaving by alternately passing a strip of working thread over and under the stretched warp threads.
Let's start weaving
Step 4.
Having reached the end of the row, we wrap the working thread around the outer warp thread and continue weaving in the other direction.
Weaving from the edge
Step 5.
Every few rows, compact the fabric by pulling the woven rows up. To do this, you can use a special device in the form of a wooden fork or simply use your hands. The denser the weaving itself and the smaller the distance between the rows, the less noticeable the warp threads will be.
Thread compaction device
Step 6.
We make the required number of rows, periodically increasing the working thread or changing it to a strip of a different color.
Weaving a rug
Step 7
If the color of the working thread needs to be changed at the edge of the rug, it is cut close to it and hemmed, or the next strip is tied to the cut end, and the knot is left on the wrong side. But you can do it differently: tie the strips on the edge, leaving long tails. In this case, the edges of the rug will be fringed.
Weaving a rug with fringe
For reference. The fringe on the other two sides can also be done at once, if you do not wind the warp threads around the pins, but tie them to each pair with separate strips.
Chair cover with fringe
At the end of the work, the canvas is carefully removed from the nails.
You can complicate the weaving by taking two working threads instead of one at once, and interweaving them both with each other and with the warp threads.
How to weave a rug without a loom
Video - Rug made of shreds on a frame
You can also weave a round rug in a similar way. A hoop can serve as a frame for it.
Round wicker rug
The process of weaving a rug on a hoop
Volumetric rugs made from shreds
Making voluminous rugs from scraps of fabric with your own hands will take more time and fabric, but it's worth it. The coating turns out to be original, cheerful and children really like it. There are several types of making volumetric rugs:
- The base is made of pompoms - for this, take square pieces of fabric, form them into balls filled with padding polyester, and sew them together.
- Grandmother's rug - braids are woven for it, which then need to be sewn together in a spiral or in any other order with a thick, strong thread.
- Cut thick knitted fabric (sweaters) into strips and let them curl on their own - to speed up the process, you can wash the strips in the washing machine with only water. The twisted strips are sewn together to form a voluminous rug.
- You can knit a long ribbon of yarn 10 cm wide and several meters long; in each row, knit the last loop as a purl so that the fabric twists. Then arrange the material in the desired order (spiral, circle) and sew together.
- It is possible to immediately knit a spiral - to do this, you need to grab and knit the outermost loop of the finished fabric.
- To create a grass-shaped rug with your own hands, you need to prepare a base - a rigid mesh, which is sold in hardware stores. It is better to take one with large cells where the hook would go. We prepare the fabric - knitted strips or cotton. It is better to start weaving from the center - you need to place the strip under the mesh and pull both ends to the front surface with a hook, then tie a tight knot on the wall of the cell with a pull. After filling all the cells, you will receive a fluffy rug.
Rug made of pompoms
This rug is made using the patchwork technique. It is very warm and soft and children really like it.
You will need: old T-shirts, T-shirts or fabric (it is better to use knitted fabric), scissors, padding polyester or foam rubber, thread, needle.
Master Class
- Cut the fabric into squares of the same size.
- Form balls from padding polyester or foam rubber.
- Make pom poms by combining squares with fillings.
- Sew the pompoms together or sew them to the fabric base tightly to each other.
The pompom rug is ready! I recommend watching the video master class!
PATCHWORK ✨✨ WE SEW a voluminous rug #with our own hands!!! Patchwork technique
What are patchwork products?
Although many argue that patchwork originated only in the 18th century in England, the history of Rus' proves that patchwork products were used here even earlier. Homespun clothing, which was worn by the inhabitants of the country since ancient times, was expensive, so it was passed down to younger children from older ones, and newborns were swaddled with the fabric of their mother’s dress.
Handmade rugs have every chance to become a real work of art and a highlight of the home.
An item made using the patchwork technique is a complex fabric structure, usually made of chintz or linen; Before you start sewing, the fabrics need to be washed and ironed to avoid shrinkage. It would be useful to take into account some nuances that will help you learn the secrets of mastery.
They can decorate the interior of a city apartment and give it a touch of rustic coziness.
How to create a pattern
Creating an ornament is impossible without preparing a template and constructing a pattern. You can start when the chosen pattern is clearly visible. Pieces of fabric similar in size and shape are prepared for it.
To create a template you need paper; Each part is applied to it, indicating the dimensions and taking into account seam allowances. To avoid confusion, they can be numbered.
Today this art is known as patchwork or patchwork.
Attention! It is necessary to make two versions of the same template: one with allowances, the other without them.
Using the prepared patterns, the pattern is laid out and basted. It is stitched first along the large, and then along the smaller, inner contour. A zigzag stitch is convenient for this.
Then both contours are cut out and placed on the wrong side: first the smaller one, and then the larger one.
Our grandmothers also practiced this type of needlework.
To extend the “life” of the product and give it aesthetics, lining material is used between the top and bottom layers.
Expert opinion
Smirnova Ekaterina Anatolevna
7 years of experience in interior design, professional architect
Patchwork is used in the manufacture of pillows, blankets, tablecloths, bed linen, napkins, rugs, as well as designer wall panels.
Creating all kinds of carpets is one of the most popular uses of this craft.
Variety of types of patchwork techniques
Multi-colored joyful products have many designs, which gives them uniqueness and a special flavor, including ethnic ones.
Patchwork provides needlewomen with incredible scope for creativity.
Classical
It is considered the most common and accessible at the initial stage of education. Studying patterns made for beginning craftswomen will also help.
It is convenient because the work uses elements in the form of geometric shapes.
The easiest way to start is by making potholders, but you can make more complex things, for example, a DIY patchwork rug.
Square within a square
Most believe that this type of patchwork, like the classics, is suitable for beginners.
Using this method, you can sew a small rug from multi-colored stripes using the patchwork technique.
- take fabrics of two colors, cut into strips, sew and iron;
- from a material of a different color, cut out a part whose size corresponds to the width of the two-color strip;
- both elements are sewn together in the form of a sleeve, right sides facing each other;
- The “sleeve” is cut into squares, from which any composition can be assembled.
Russian square
Here the square piece is placed in the center, triangles are sewn to it with the right side inward. It is worth noting that previously the Russian square was assembled only by hand, and the parts were attached “overlapping”, which gave the product volume.
For work, it is better to take chintz and cotton, although linen, silk, and wool are also suitable.
American square
In the scheme of this option, the main figure is placed in the center, around which rectangles of different lengths but the same width are placed. The technique allows you to sew rugs, curtains, pillows and pillowcases on them using a sewing machine or by hand.
This type of patchwork gives the product strength and can be decorated with ribbons and braid.
Triangles
The use of geometric shapes is widely used in patchwork sewing. You can create many original patterns and ornaments from triangles.
If you connect their smaller sides, you get multi-colored stripes, and when you connect the “long” ones, squares are formed.
Dresden plate
A very interesting pattern, more similar to an open chamomile flower. It is noteworthy that the shape of the petals can be different: with rounded, pointed, triangular edges. A pillow made from shreds using this technique using a pattern looks impressive.
The only rule of patchwork is that there are no rules.
- A circle of the selected diameter is drawn on a sheet of paper or cardboard.
- Another smaller circle is drawn in its center, which will be the center of the flower.
- The petals will be attached to it. Their width directly depends on the number of elements. Usually the circle is divided into 16 equal parts, at the tops of which an octagon is drawn.
- A template is also drawn for the petals. Petals are cut out along it with seam allowance.
- Each is folded lengthwise and stitched along the top edge, after which it needs to be turned right side out and the corner smoothed with an iron, and then sewn to the center, connecting all the parts to each other.
Color combinations, texture, geometry - everything depends only on the designer’s vision and purpose of the project.
Chrysanthemum petals
This mosaic can only be done by those who already have good patchwork skills. To make it you will need square pieces of fabric that are folded in several layers. The flower may have 12 or 16 petals with pointed edges. For it, it is better to take thin chintz, silk or viscose.
Some craftswomen believe that wide silk ribbons look very impressive.
Mill
For the Windmill ornament you need fabric in contrasting colors. It consists of eight triangular elements - four of each color. Initially, two triangles are sewn together, alternating colors. All parts connected together form a strip. The result should be two such blanks, which are stitched from the center.
The pattern connects square and triangular pieces of different sizes.
Crazy
The name itself implies that no rules or canons are followed here. Therefore, parts can be of different shapes.
This is how genuine works of avant-garde art are sometimes born.
Patchwork pillows in the patchwork style - crazy, decorated with beads, sequins, beads, lace, and ribbons - attract attention. They look original with large, unusually shaped buttons and various metallized fittings.
Crazy is used for sewing bedspreads, rugs, clothing items and accessories, and making decorative panels.
To create compositions, you do not need to prepare a special template: the peculiarity is the freedom of creativity.
Not only a variety of shapes, but materials and colors are appropriate here.
DIY pillow made from scraps: master class
Among the most popular products made using various types of patchwork techniques are pillows for many years: large and small, made using various types of techniques, but always beautiful and eye-catching.
In order to decide on the palette and other attributes, it is very important to imagine in advance where our brainchild will “settle”.
Expert opinion
Smirnova Ekaterina Anatolevna
7 years of experience in interior design, professional architect
Many beginning craftswomen believe that making a patchwork pillow is difficult, but once you master even small skills, with some effort and patience, it turns out that it can be made quite simply.
Necessary materials
To work you will need:
- fabric for the base and for making the ornament;
- measuring and writing instruments;
- scissors;
- sewing machine (if you don’t have one, all work can be done by hand).
For a classic living room, perhaps, a “mosaic” of plain patches of different shades would be better suited.
For sewing you will need fabric cut into squares of the selected size. In this case, there should be an equal number of primary and secondary colors. Usually they cut 64 pieces, after which they are folded with the right sides inward and stitched on a machine.
For the pillow you will need four blocks, each of which will have 16 squares.
When they are ready, they are joined by stitching.
If the product is one-sided, then the back part is made smooth, from a single piece of canvas.
For a double-sided product, you will need another 64 elements, which are connected in the same way as on the front side.
This will look amazing in a modern interior, especially if it is youthful or kitschy.
You can start with a square or rectangular pillow made from multi-colored stripes.
You can fill the pillow with holofiber, foam rubber or other filler, at your discretion.