Needlewomen know what patchwork is. But many have only heard of what kinusaiga is. The unfamiliar magic word actually means the art of making paintings from silk scraps. A kind of patchwork, only without a needle. This type of needlework was born in Japan. At the origins of Kinusaiga was Setsu Maena, a professor at a Japanese university. Over time, kinusaiga spread beyond the borders of their homeland and European craftswomen immediately adopted this technique of creating beauty with their own hands. How can you pass up creating amazing things from scraps and remnants of silk fabric? Simply put, European needlewomen acquired the art of creating masterpieces while saving on expensive materials.
At the origins of Kinusaiga was Setsu Maena, a professor at a Japanese university.
Kinusaiga or patchwork without a needle: details about the technique and tools that are needed
The kinusaiga technique does not involve the use of a needle as in the patchwork technique, but is based on making a sketch on paper, which is then transferred to a wooden board.
A slot is made along the contour of the sketch - a recess. After that, the picture itself is made using scraps of silk. The Japanese women took these pieces of silk from old kimonos, which the thrifty Japanese never threw away - silk, after all.
The shreds are laid out on the cut elements of the sketch and the edges of the shreds are pressed into these same slots. With the right selection of paints and colors, the paintings turn out to be of unique beauty. And it would seem - scraps of an old kimono! We can say that the natural economy of the Japanese became the parent of this art - kinusaiga.
Interior styling with foam decor: the variety is endless
Try to achieve the most unexpected effects in various styles using stucco finishing.
Foam decor in a Scandinavian interior
Classic and neoclassical: something that will never go out of style
A feature of these areas is the traditional, calm and solemn design of the premises. They are characterized by the use of columns, pilasters, arches, various moldings, panels, top and border plinths. With the help of sockets the lamp is framed on the ceiling or walls.
Foam decor in the bathroom
Antique style: enjoy the motifs of the ancient world
Often used in the hall or living room. This is sophistication. High ceilings are decorated with ornaments and decorative panels. Window vaults are decorated with cornices and monograms. The main accent on which all attention is focused are the columns and sculptures. In order to visually increase the scale of the structure, these elements are placed under the base of the arch. Visually it seems as if Apollo came down from heaven and holds the vault on his shoulders.
Foam ceiling plinth
Rococo and Baroque as a tribute to the Renaissance
These styles came to us from the distant 17th-18th centuries and brought to the interior a feeling of pomp, majesty, and inexhaustible wealth. At that time, stucco molding was made mainly from gypsum; such decorations were expensive and bulky. This motif has carried over into modern decor.
Stucco foam decor
An abundance of moldings on walls and ceilings, borders, various columns, balustrades, rosettes and many other details, skillfully combined in one room - this is what is necessary when decorating the Rococo and Baroque styles.
Foam decor on a false fireplace
Modern: letting in everything new
Geometric lines are a thing of the past; all features in an Art Nouveau style interior tend to be smooth, which is why design with arches is common. Ceiling vaults are decorated with decorative tiles imitating beams, caissons, and domes. Despite the fact that this style tries to be unlike anything else, the volumetric decoration of the ceiling and decoration with other foam products remain unchanged.
Brick-like foam decor
Eclectic: make your own style
To get eclecticism, mix similar styles (2 or more). A very important point is the correct application of color. The result is an original decoration of the room. In such a situation, any foam part can be used. Foam stucco on the ceiling has already become traditional. Framing doors and windows with the same or similar rims will create an interesting tandem. Kitchen decoration in this style is gaining popularity.
Foam panel
Gallery: kinusaiga (25 photos)
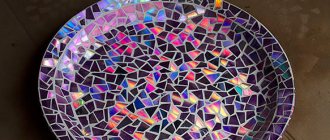
How to make a painting on polystyrene foam from fabric with your own hands: a master class for beginner needlewomen
How to make a picture in the New Year style in patchwork for children? New Year's patterns always look beautiful and festive. We can talk about the art of kinusaiga for a very long time. But it’s better to see how to make at least a small masterpiece with your own hands. Below is a technique for creating a painting on foam plastic for beginners.
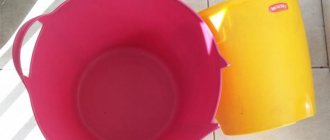
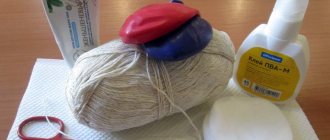
What you will need to start the master class:
- foam sheet (thickness not less than 1 cm;
- scraps of fabric of different colors;
- scissors;
- stationery knife (scalpel);
- nail file (for threading fabric into foam);
- sketch (your own or you can take any ready-made one);
- carbon copy.
The fabric should be selected to be non-stretchable and thin enough. The edges should not fray.
First, look at what is in stock: old scraps, leftover fabrics that were not thrown away after sewing some wardrobe item. Everything will go to work. If checking the storerooms does not give any results, then you will have to take whole pieces and cut out the elements of the planned picture from them.
Process:
First you need to decide on a drawing. For the first time, you should not choose something complex, with many elements. Let these be light geometric shapes. And from them you can already build a small cute house.
Using a sheet of copy paper, you need to transfer the sketch onto a piece of foam plastic.
Crafts from palms: interesting applications and master classes Modular origami dragon, Chinese dragon from modules Paper plastic for beginners step by step: templates and diagrams DIY felt angels and patterns
Using a knife or scalpel, make a cut along the contour of the sketch to a depth of about 3 mm.
Cut the selected fabric into pieces of the desired size. Using a nail file or something more convenient, tuck the pieces of fabric into the foam sheet. Thus fill the entire “picture”. The edges of the fabric should fit tightly into the slits.
Cut off the excess edges of the foam with a scalpel or a stationery knife.
Next, the resulting panel can be framed. It can be purchased, or you can make it yourself. If there are suitable materials. You can simply make a border using decorative tape, which you need to secure with beautiful pushpins. These buttons are sold at any office supply store. Buttons in bronze or gold colors look beautiful.
The kinusaiga technique is often used to decorate lids for boxes or boxes (for example, for sewing accessories or cosmetics).
Stunning Christmas tree decorations and crafts are made using this technique.
“Scarlet peonies” from paper accordions
The world of flowers is beautiful and diverse! You’re amazed at what bizarre shapes, combinations of colors and shades are found in the kingdom of flora. Among garden flowers, beautiful spherical peonies stand out for their lush forms, blooming profusely on bushes and flower beds. These flowers look wonderful in bouquets, compositions and festive decorative elements. You can also make beautiful voluminous peonies from corrugated paper and use them in the design of an applique or panel.
What you will need in the master class
To create an applique with scarlet peonies, we will need to take:
- light green and light yellow office paper;
- colored double-sided paper in yellow and dark green;
- bright red corrugated paper;
- corrugated cardboard orange or brown;
- green marker (felt-tip pen);
- scissors, glue.
How to make an applique with scarlet peonies from corrugated paper
Prepare the necessary tools, colored paper and cardboard to create a composition with voluminous flowers.
Take a piece of light yellow paper and glue a light green rectangle on top of it, leaving a border around the edges. Cut out a flower basket from orange corrugated cardboard. Glue the basket onto the base.
Prepare rectangles of red corrugated paper, as well as small yellow rectangles to decorate the center of the flowers. Divide each red rectangle into four parts and stack them on top of each other.
Fold the corrugated rectangles into an accordion so that the gathers are perpendicular to the fold lines. There should be a total of three vertices or five fold lines. Make an accordion out of yellow paper.
Make the edges of the red accordion rounded, and make notches on the yellow one. Place the yellow piece in the center, inside the red accordion.
Using scissors, make a small cutout on the back of the accordion and tie a thread around the center.
Straighten the accordion and make cuts towards the center to separate the petals.
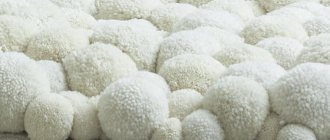
Gently bend the petals towards the center to create voluminous buds, as in the photo.
Make the number of flowers needed for the composition in a similar way.
Glue a few buds over the edge of the basket.
Make a second row of flowers. Glue the remaining flowers. Cut leaves with angular edges from green paper. Use a green felt-tip pen to draw veins.
Glue the leaves inside the bouquet and along the edges.
Cut out a basket handle from corrugated cardboard and glue it on top of the basket, as in the picture. Cut out heart-shaped petals from red crepe paper and glue them near the basket.
The applique with scarlet peonies is ready!
How brightly the scarlet buds of peonies glow! If you like pink or burgundy flowers of this type, use crepe paper in the appropriate color. Such an original composition with voluminous flowers can be used as a basis for a panel, painting, or postcard.
Master classes were prepared by Anastasia Ushakova.
In order not to forget the page address and share with friends, add it to your social network:
More interesting:
See also:
How to make a headband with flowers from polymer clay
Master class by Nina Aleksina on how to make a headband with flowers with your own hands. How to make flowers and...
Corrugated paper tulips with candies
As promised, I’m showing our version of tulips made of corrugated paper with candies. As you remember, …
Elastic band in the shape of a gerbera flower (crochet)
Master class on knitted elastic band in the shape of a gerbera flower. Author: Liliya Pervushina. Ability to crochet...
Flowers made of tulle and satin ribbons
Flowers made of tulle and ribbons Another master class about flowers made of fabric. If you want to do for d…
Flowers from foamiran
Another master class by Tatyana Blinyaeva for our competition flowers from foamiran Fashion trend is Fo...
Snowdrop flowers made of satin ribbons
Snowdrop flowers made from satin ribbons Two master classes using the kanzashi technique, how to make them from satin ribbons...
DIY mimosa
Another work from Olga Pivneva, also for the competition, a simple but effective plasticine craft for...
Rose flower (crochet)
Rose is the queen of flowers. But it's a pity that it fades so quickly. But crocheted roses will never wither...
Original craft “Shoe with flowers”
Original craft “Shoe with flowers” Such a decorative item will be an decoration in the interior, ...
Bouquet of tea roses with sweets
To create such a composition of delicate tea roses with delicious chocolates you will need…
Magnet "Cupcake"
The second entry for the competition “Gifts for March 8 with your own hands” from Anna Kozhevnikova, librarian of the Cent…
Interior rose made of foamiran
Interior rose from foamiran Rose on an elastic band... Rose on a hairpin... All this became possible for the good...
Tags: March 8, DIY flowers
Kinusaiga: simple patterns and their execution
Kinusaiga allows the use of any scheme that is at hand . You can buy templates, or you can make them yourself. The easiest way is to use stencils. As an example, below is a Kinusaiga master class using a simple template.
To complete this handicraft you need:
- A3 size cardboard;
- A4 size cardboard;
- scraps of fabric of different colors;
- padding polyester;
- glue;
- nailfile;
- threads;
- needle;
- scissors;
- acrylic paints;
- thin brush;
- cord (soutache) of different colors;
- pins;
- frame.
Scheme for creating a painting:
In your work, you can use any scraps that you can find.
- The drawing must be transferred to tracing paper. Cut into component parts - parts.
- After the division is completed, you need to number the parts of the drawing. Then cut out fabric elements using them. You need to leave a 3 mm allowance along the edges.
- Then prepare the canvas for the future painting. For this purpose you need to take a sheet of ceiling tiles. The thickness should be half a centimeter. Glue the sheet onto thick cardboard.
- Glue the second copy of the drawing, which was printed in advance, to the foam. Cut a groove in it, the depth of which should not exceed 2 mm, along the contour of the sketch.
- Apply glue along the cut grooves with a glue stick. When performing this Japanese handicraft for the first time, it is recommended to apply a glue stick to the entire surface.
- Next comes the process of creating the appliqué: the edges of all parts prepared from fabric must be pushed into the grooves so that the edges plunge into the grooves and are tightly fixed there.
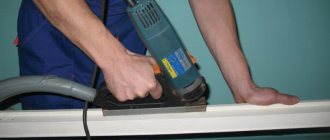
Architectural elements made of foam plastic: assessing the possibilities
Before you renovate the interior of a bedroom, corridor or hall, as well as the external facade of the house, you should decide exactly how you see its changes. Architectural elements made of foam can be present in a wide variety of unexpected designs. It is advisable to make a semantic load on this subject or organically introduce it into the planned project. It all depends only on you and your desire.
Foam decor in the shape of a pumpkin
Foam fireplace portal
3d foam decor
The functional side of working with foam products is no less important than the decorative one. Experienced builders love polystyrene foam for its ease of use, light weight and ease of use. It is very easy to saw at any angle, paint, and varnish. The cost of the material is just a penny, and this is a significant plus.
Foam decor in the living room
Foam columns for interior
Foam wall decor
Some ideas and patterns for decorating a kitchen using the Kinusaiga technique
Below are sketches and diagrams for designing and decorating the kitchen with Kinusaiga paintings.
This whole application is not done quickly, but the result is worth spending time on. Embroidery with needles takes much longer than paintings made using the Kinusaiga technique. When the basis of knowledge of the Kinusaiga technique is fixed, you can take on more complex panels and paintings, which will definitely decorate your home and become an excellent gift for any occasion.
Corner elements as part of the decor
On the outside of the building, the corner elements are represented by horizontal wide stripes that start from one end of the building and go to the other. There is an imitation of a protruding stone. It looks very impressive in tandem with columns and monograms. Finishing work goes very quickly. In the interior, corner elements are used as a transition between moldings or ceiling plinths. This is not just a “corner”, it is a spectacular decoration that organically fits into the line.
Foam decor in the kitchen
Foam decor on the coffered ceiling
Foam decor in the interior of the house
Recently, the use of vertical moldings, combined into a square or rectangle, which focuses attention on a particular wall, has become popular. Inside such a square you can hang a painting, a collage of photographs or a three-dimensional panel. In this case, the corner elements made of foam plastic may not have a “corner” shape at all.
Corner elements catch the eye. Make your home stand out from many!
Foam decor on frame
Foam moldings
Tips for beginning needlewomen
With the spread of the art of kinusaiga throughout the world, specialized stores began to open, which began to sell tools for this type of needlework. Special sets of fabrics also appeared on sale (not every European has an old kimono at home that can be used for scraps).
In addition to fabrics, you can also purchase combination sets in such stores, which include tools, fabrics and drawings - sketches of varying degrees of complexity. Such sets are designed for both beginning needlewomen and those who have been practicing this art for several days.
Here's what these sets look like:
The acquaintance with the art of kinusaiga was successful. And surely the number of his fans will increase after reading this article. Try to complete at least one painting using the presented technique - after that you will want to do something else and more. Kinusaiga gets addictive very quickly. And this is good. Because housewives and needlewomen have a new occupation. You always want something new.