How to turn cardboard into the basis of three-dimensional letters and numbers?
Volumetric figures are decorated with a variety of materials, using corrugated paper, thread, and napkins. But the base is made from cardboard. If you want to make the number 1, then with your own hands you need to first make a blank for it.
The diagram below shows the recommended dimensions for this number. You will need 2 of these parts - one for the front side, the other for the back side, cut them out of cardboard. Decide how thick the number will be; you need to cut a strip of cardboard that wide.
It is better to carry out further manipulations together. Start at the top by first attaching a strip of side panel to the front using masking tape.
Please note that where the number bends, the tape must be cut evenly so that it fits well in this place.
After you attach a strip of cardboard to the front side of the number, you also need to glue it to the second side of this number, which will be the back.
All that remains is to glue one edge of the strip to the second at the top, after which you can tell yourself that you were able to make the number 1 with your own hands.
Let's see how to make the base for the next number. To make the number 2 from cardboard, transfer the presented template onto it with your own hands. To do this, you can use checkered paper and then draw larger cells on the template, thus transferring the design.
You can also draw it by hand, repeating the lines and bends of a given number. As in the first case, for work you will need:
- digit pattern;
- cardboard;
- construction tape;
- scissors.
Cut out two blanks of the number 2, glue them together with construction tape using a strip of cardboard. In this case, its width is 7 cm.
Now attach the other half of the number.
As you can see, for this it is not necessary to glue the tape over the entire surface; you can attach it in small pieces, fixing it perpendicular to the surface.
Surely, you have already understood the technology of how to make a three-dimensional figure from cardboard.
Using the same principle, you will make all other numbers if the events being celebrated require it. Now check out the various options for decorating such numbers.
Painting numbers with acrylic
Volumetric numbers can be simply painted using a brush or spray can. Just pay attention to the fact that after gluing the cardboard structure, adhesive tape remains on top and after painting it can be visible.
Paint: the best option is acrylic paint
TIP: Therefore, for a more accurate result, we initially recommend gluing paper on top of the cardboard , but using double-sided tape to create a flat surface.
Let these numbers, regardless of the chosen design method, give joyful emotions to you, the birthday party and all the guests of the party, because this is their purpose! Good luck!
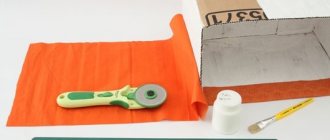
How to make fringe to decorate letters and numbers?
To do this, you can use different types of paper: corrugated, colored, we’ll take white paper. In another way it is also called papyrus, wrapping. When you buy shoes, they are often wrapped in this thin, translucent material.
To make a volumetric figure using this principle, you will need:
- Silk paper of different colors;
- scissors;
- PVA glue.
Remove the paper from the packaging and cut it into strips 4 cm wide.
The long edges of these blanks need to be cut with fringe using scissors. To speed up this process, fold several strips at a time or roll each strip to create 4-5 layers.
Apply numbers from PVA cardboard to the bottom and glue a strip of prepared paper here. Since it is very thin, it is better to glue two tapes at once. If you use colored or corrugated paper instead, then attach it in one layer. The second goes a little higher, located above the first.
Combine colors to make the number most effective.
After you have fully decorated it, decorate a corner of the apartment in the same colors.
Frame making
So, let's start making the frame of the numbers. The figures consist of rectangles, circles of different diameters, and semi-ovals. Since our figure is three-dimensional, individual elements end at the ends. The ends are square in shape. The execution of individual parts for different numbers has its own characteristics, let’s figure it out:
Digit 1
This is the most popular number! Celebrating the first year of a baby's life is the most awaited event. This figure consists only of rectangles, but more details are needed than for others.
Number 1 pattern:
Let's start with the right side rectangle, take measurements from the top of the figure to the base (the crossbar at the bottom of the figure). Secure with tape. We measure the left segment of the rectangle from the curved part to the crossbar. We decorate the upper part of the crossbar; you will need two rectangles. Cut out a rectangle for the bottom and fasten it together. We cover the ends of the figure with squares, you need 4 of them. For the arched upper part, shallow cuts can be made on the inside of the cardboard to make the cardboard more pliable.
Watch the video master class on making a unit:
Digit 2
Unlike the one, the two has smooth curves, so making a cardboard base for the number will be a little more difficult.
Number 2 patterns:
To create a semi-oval figure, cut off a long strip, connect it to the upper semi-oval of the figure, and do the same with the inner one. To make the “tail”, it’s easier to make it straight, prepare rectangles for the top and bottom. Using 3 end squares we complete the production of the figure.
Watch the video master class on making twos:
Digit 3
Does the holiday date consist of the number 3? It will take even more effort.
Patterns for number 3:
For two outer semi-ovals: the top (smaller size) and the bottom (larger size), it is necessary to cut two long rectangular strips, also for the outer one, having previously measured these segments. Glue a rectangle to the bottom of the outer semi-oval - the bottom and squares to the 3 ends of the figure.
Watch the master class on how to make the number 3:
Digit 4
Four is similar to one. Start of making a figure as for a unit, i.e. on the right side of the main rectangle.
Number 4 pattern:
We make a blank for the left side of the oblique segment. Together with the crossbar, they can be shaped like an angle or have a square end. Next, according to the measurements, we cut off rectangles for the upper and lower parts of the crossbar. To form the internal corner, prepare three segments of appropriate sizes. It is advisable to weight the bottom of this figure, for example, with a wooden block for stability. Attach the block to the inside of the bottom in advance.
Watch the video on how to make a four with your own hands:
Number 5
For number 5, choose a template with straighter lines to make it easier to cut and connect the elements.
Templates for 5:
First of all, let's design the top part by measuring the required length on cardboard, cutting out and attaching rectangles at the top and bottom. Prepare 2 long rectangles for the outer and inner semi-ovals. The bottom is a rectangle 20 cm long on the bottom of the semi-oval. It remains to close the ends, there will be 4 of them.
Watch the video master class on how to make a frame for the number 5 from cardboard:
Number 6
It consists of a large outer circle and a small inner one, as well as 2 semi-ovals: outer and inner.
Number 6 patterns:
We form the bottom at the bottom of the large circle. We measure the lengths of the semi-oval segments and cut off the strips of the required length. We fasten with tape. Similarly, we take measurements of the inner circle, cut off a rectangle and connect the parts. We close the end of the upper semi-oval with a square.
Number 7
The easiest number to perform! But you will have to think about how to reliably put this figure vertically.
Patterns for number 7:
It is better to make the rectangle of the number 7 template curved and strengthen the bottom, again with wooden blocks, or make the bottom from several layers of cardboard glued together. Next, cut out 1 end square, the bottom, two rectangles for the top element and two long rectangles for the curved parts.
Number 8
Probably, more often this figure is used to decorate premises for the celebration of Women's Day.
Templates for 8:
The figure eight consists of 2 circles: large and small. Having previously measured them, we prepare 2 long rectangles for the two inner circles. The outer circles can be connected by a long rectangular strip or you can assemble the side of the number from several short ones, gluing them together.
Watch the master class on how to make the number 8 from cardboard and napkins:
Number 9
The number nine is performed similarly to the number 6. Remember that the bottom of the figure will be on the lower semi-oval, and the bottom of the six will be on the lower circle!
Pattern 9:
Digit 0
This figure “loves” round dates!
Stencil for number 0:
We prepare one large oval circle and two long rectangular strips for the curved sidewalls: outer and inner. We measure 20 cm at the bottom for the bottom.
Watch the video on how to make the number 0:
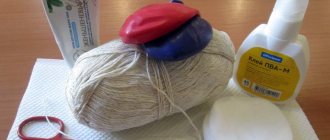
Knitting threads for decorating letters and numbers
They are used to decorate three-dimensional figures. You can use yarn of one or more colors. For this decoration you will only need:
- preparing numbers from cardboard;
- threads;
- PVA glue;
- brush.
Starting from the top or bottom edge of the number, apply glue here with a brush, then wind the threads. To prevent the cardboard base from showing through, you need to wind it in different directions, for example, first along, then across, diagonally.
When you're done with one color of yarn, glue the loose end to the cardboard. Next, attach the edge of the second ball of thread. Design the volumetric figure in a different color. When the number is completely covered with yarn, you can admire the beautiful results of your work.
In skillful hands, knitting threads will quickly turn into pompoms.
You can make them using a fork, a semicircle of cardboard, or another method. Step-by-step photos will also help you make pompoms from threads.
- As you can see, you first need to cut out two identical rings from cardboard. Place the thread inside.
- The yarn from the ball is wound around the rings, gradually filling them. Then cut along the outer circle, passing the scissors between the two cardboard blanks.
- Pull the thread and the fluffy pompom is ready.
- So make several in different sizes using different yarns.
You will get this wonderful number 1, which can be made voluminous or flat.
Sequins or glitter
When decorated with sparkles or glitter, the birthday numbers are less voluminous, but they sparkle and shimmer. So here whoever likes it more.
How to make the following numbers for a birthday boy:
- Option one - apply PVA glue to all surfaces and sprinkle with glitter.
- Option two: buy ready-made glitter paint in a bottle.
Tip: after covering with glitter, apply varnish on top so that they do not fall off on the floor and do not remain on your hands when you touch them.
Don't forget to make a beautiful cake stand - this article contains ideas!
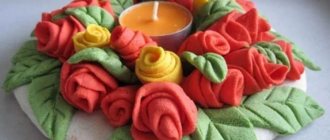
Decoration of volumetric letters and numbers with ribbons
This material will also help solve the question of how to make volumetric figures.
To form the number 2 this way, take:
- red satin ribbon;
- white beads of various diameters;
- glue;
- scissors.
Everything is extremely simple.
Starting from one small edge, wrap the number with tape. The turns need to be overlapped so that the internal contents of the number do not show through them. Apply a little glue to opposite sides of the cardboard number, which will make it easier to attach the strips. A glue gun will help fix beads of different diameters. They can also be sewn to fabric ribbons, but such work is more painstaking.
To implement the second variation you need:
- braid of the same width, but different colors;
- scissors;
- glue.
Cut pieces of braid of the same size, tie each one in the center with a knot. Glue the resulting bows onto the cardboard base, placing them tightly together.
If you have enough free time and are patient, then you can make roses from satin ribbons, decorate the entire figure with them or just individual fragments.
If you want, use the already known master class to make such flowers or make them according to a different principle.
As you can see, you need to periodically bend the corners of the tape and secure them with a basting stitch.
Once it is shaped like this, curl it to give the appearance of a rose. Secure the workpiece with thread and needle. The zigzag braid is a ready-made flower base. It is enough to collect it on a thread, pull it, shape it into a circle, and secure it with a thread.
You can make not one circular row of such turns, but several. Each subsequent one will be slightly smaller in diameter than the previous one. Sew a button in the center and you can sew or glue the flower onto the number.
It can be not only flat, but also voluminous. For this you will need the same wavy braid. Cut two strips from it. Match them up as shown in the photo and stitch lengthwise to join. Now you will twist this ribbon so that it turns into a round flower. How to combine these two stripes can be seen in the next photo.
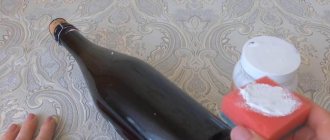
Corrugated paper number
Products made from corrugated paper always look especially beautiful. They are often chosen for themed photo shoots. Therefore, if you like this option, then feel free to follow the step-by-step master class.
In the process you will need the following:
- corrugated paper;
- scissors;
- centimeter;
- elastic bands;
- cardboard;
- glue;
- pencil;
- glue gun
We cut out strips of the same size from corrugated paper.
We slightly tuck the edge on one side of the workpiece.
As a result, the workpiece should look like in the photo.
We begin to form the middle of the rose.
We wrap the entire strip around the middle and secure the finished rose with an elastic band or wire.
Make the required number of roses.
Draw a number on a piece of cardboard and cut it out. Cover with corrugated paper of a suitable color. We fix the roses with a glue gun.
DIY roses and other flowers from napkins
For the next master class you will need:
- napkins;
- circle pattern;
- stapler;
- scissors.
Place several napkins, without unfolding them, one on top of the other. Place a circle on top. Cut out the napkins using this template.
In the center, these blanks need to be secured with a stapler.
Lift the first layer and roll it up to resemble the inner, unopened rose bud. The second row of petals will be freer. Decorate the entire rose in this way. Here's another idea. You need to take 8 napkins or papyrus paper and fold them like an accordion. Thicker multi-layer napkins are suitable for this method. You should end up with a voluminous rectangle. Trim the ends so they are rounded. Now begin to straighten the accordion-folded blanks, shaping them into a flower.
To make the number 1, you need to stick these roses over the entire surface. Look how beautiful flowers look in different sizes and colors.
- The trimming technique will also allow you to create blanks for decorating numbers. To do this, you need to cut the paper into squares, place a pencil in the center of each, and twist it.
- Without removing this square from the pencil, attach the blank to the cardboard base of the number, having previously coated this area with glue.
- The trim pieces need to be glued close to each other to create the effect of a single volumetric surface. Combining different paper colors would also be appropriate here.
Instead of glue, you can use plasticine.
You need to lubricate the surface of the cardboard blank with it or roll a small ball out of plasticine, wrap each end with half a toothpick, insert such blanks into the plasticine balls. Then attach it to the cardboard base. If you plan to hang the number on the wall, then you can make it from foam. In this case, the trim pieces are attached to a toothpick, then stuck into the foam. If the sheet of this material is not very thin, then you can make three-dimensional numbers and put them. They are more durable than thin foam.
First birthday number
For this composition we will make a cardboard base that is hollow inside.
If a unit is easy to build on paper and cut out, then how to calculate the length of the sides? You can do everything by eye, or you can use a mathematical formula:
P = 2(a + b) ,
where a and b are the sides of the figure.
Make some extra space for gluing the parts together.
So, what is the number 1 from napkins made of:
- double corrugated cardboard;
- napkins;
- hot glue;
- masking tape;
- scissors and breadboard knife;
- stapler
- Cut out a number from the template. Transfer to cardboard, cut out 2 parts.
- Calculate the length of the sides of the figure and cut out the sides.
- The figure may expand downwards. Then the sides will look like a trapezoid.
- Secure the pieces together using masking tape. Secure them from the inside with hot glue. Attach the second part of the unit and secure with masking tape.
- The inner part should be strengthened in advance; install tightly fitting pieces of cardboard into it. They will act as stiffening ribs, and the decor will not bend.
- If desired, cover with napkins.
- Fold roses from napkins.
Decorate the number 1 for your birthday with a large napkin flower.
Take a knitting needle, wrap a napkin around it, and remove the tube. Straighten it a little and, fastening the ends with a stapler, make a petal. The center of the flower is one corrugated tube, rolled in a spiral.
These flowers look like they are made from balloons.
Add pompoms and a congratulatory garland to the figure set.