Are you unhappy with the boring appearance of a bottle of champagne on your holiday table? Are you thinking about what original gift to give to a relative, friend or maybe a colleague? We offer a simple but effective design option - decoupage New Year's champagne bottles with your own hands.
This bottle looks elegant for New Years and does not require any special talents at all. Not everyone knows how to draw, but many people have a craving for beauty, right?
Decoupage is a decoration technique based on transferring a cut-out picture onto an object and coating the surface with varnish to preserve the composition.
Every year this technique becomes more widespread. Rumor has it that in France, even luxurious royal interiors are decorated with decoupage.
We have selected for you some easy and beautiful bottle design ideas using the decoupage technique, and we can’t wait to share them.
Option 2. Champagne with a spruce branch and voluminous snow
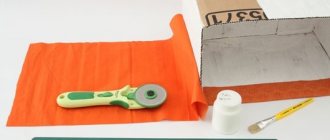
You will need:
- a bottle of champagne;
- small sponge;
- gypsum;
- PVA glue;
- hair dryer;
- heat gun;
- white and blue acrylic paints;
- primer (sold in art stores);
- thicker and thinner brushes;
- old toothbrush;
- napkin with artistic motif;
- additional decorations - artificial spruce branches, satin ribbon, pom-pom ribbon.
- As in the previous master class, we remove the labels from the bottle and degrease it with nail polish remover.
- Apply a small amount of primer to the sponge and paint the bottle in several layers.
- Take a napkin.
- We tear it in half. It is better to tear it apart rather than cut it, so that the edges turn out uneven.
- We measure how many napkins we need.
- We tear off the excess edges of the napkin from the sides, bottom and top. Remove the bottom layers of the napkin. We leave only the layer with the pattern.
- Apply acrylic adhesive varnish to the surface of the bottle with a brush.
- We apply a napkin and carefully cover it on top with the same glue-varnish, from the middle to the edges. Do not press too hard on the napkin to avoid damaging it. Pay special attention to its edges.
- Dry with a hairdryer.
- Apply acrylic paint to a sponge or sponge and go over the bottom of the bottle to imitate snow.
- Use a sponge and blue acrylic paint to paint the top of the bottle. We paint a little onto the napkin, making a smooth transition.
- Dry it with a hairdryer and cover the entire surface with acrylic varnish.
- Mix gypsum and PVA glue in equal proportions until a homogeneous mass is obtained.
- We apply it with a thinner brush to those places where we would like to see snow - on the Christmas tree, the roof of the house, the bottom of the bottle.
- Sprinkle with silver glitter. It can be purchased at nail shops. Let it dry.
- Apply white acrylic paint to an old toothbrush and make an imitation of snow at the top, splashing the paint onto the surface. Pay special attention to the junction of the napkin and the blue paint.
- We take additional decorations. We make a bow from a satin ribbon. We cut off the excess. We seal the edges of the tape using a lighter.
- We take spruce branches and glue them using a heat gun.
- We form a bow from a ribbon with pompoms and glue it to the middle of our composition.
- Using a toothbrush and acrylic paint, sprinkle some snow on our composition.
Decoupage Christmas balls in vintage style
This master class offers you a simple decor option with which you can easily repeat the decoupage of New Year’s balls with your own hands.
To work you need to prepare the following items:
- Plastic balls (plain or transparent);
- PVA glue, diluted with water in a ratio of one to one;
- Napkins with matching motifs;
- Scissors;
- Acrylic based paints;
- Craquelure varnish;
- sponge;
- Semolina (you can use special artificial snow).
New Year's decoupage of the ball begins by covering the blank with gold-colored paint. Apply it with a tapping motion. After the paint layer has dried, a layer of varnish intended for craquelure is applied over the surface of the ball. With its help, cracks will form. This way you will get a ball with an aged effect. Leave the workpiece to dry.
After the ball has dried, you need to apply paint of the main shade to the surface of the ball. A sponge is best suited for these purposes. Next, dry the item again. To speed up drying, you can use a hair dryer. Subsequently, you will see cracks begin to form on the ball.
Next, the decoupage of Christmas balls begins directly. From the selected thematic napkin, you will need to cut out the motif with your own hands and separate the layer with the colored image. Now using a brush and diluted PVA glue, fix the pictures on the ball. When decoupage, glue is applied from the middle to the borders of the picture. The borders of the pasted image are shaded using a sponge and paint of the main shade. In addition, pictures can be completed with acrylic-based paints.
The master class and decoupage of New Year's balls is coming to an end and at the last stage, certain areas of the ball are dipped in semolina or special artificial snow.
This wonderful New Year's decoupage will help you decorate boring Christmas tree balls with your own hands.
Option 3. Decoration using decoupage card.
Here's what you need to get it working:
- as usual, a bottle of sparkling wine;
- card for decoupage, or a colorful napkin with New Year's motifs;
- gloves;
- alcohol;
- Matt lacquer;
- brush;
- acrylic primer;
- scissors;
- decoupage glue;
- white acrylic paint;
- sponge or sponge;
- various decorations (ribbon, fir branches, etc.).
For detailed MK, watch the video:
DIY New Year's gift - decoupage of a champagne bottle. Master classes on Podarki.ru
Christmas boot
These socks, which were previously traditional in the culture of foreign peoples, are now favorite decorations in our homes. Especially when it comes to DIY Christmas boot decor. You can create amazing embroidered crafts, knitted, woven and woven. Or you can create products using the decoupage technique without any artistic skills. And all we need for this is:
- natural cotton fabric;
- napkins with New Year's patterns;
- cling film;
- parchment paper;
- flat synthetic brushes;
- acrylic glue;
- and what would you think? Iron!
The process of creating this decoration for your home, or packaging for another gift, since a boot or sock can be used in different ways, is very simple. To create it, you need to cut a piece of fabric of the required size. Place cling film on top of it. Then separate the required top layer of the napkin and place it on top of the film. Cover the entire multilayer structure with another layer of parchment paper and iron it with a hot iron.
After this, carefully lift the paper and cover the napkin with glue, and then wait for it to dry completely. Then we reapply a layer of parchment and do another ironing. The main work, decoupage and the master class of which I briefly described to you, is now complete. All that remains is to give this blank the shape of a boot, and also cut out a sock of similar dimensions from an unshaped material. You can fasten both pieces together with a beautiful thread or even paper clips if you glue a beautiful braid on top using hot glue. Your craft is ready, you can decorate your home with it!
And if anything in my description was not clear to you, then I suggest you watch the following video . Here the whole process is shown clearly, and even very young craftswomen can cope with it. I also provided you with examples of such socks that you can use as a guide when coming up with your own craft.
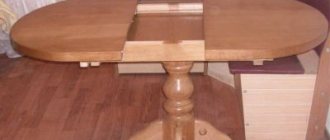
Option 4. Blue bottle in decoupage style.
In this master class it is proposed to make this beauty:
To do this you will need:
- bottle;
- acrylic lacquer;
- acrylic paint;
- alcohol;
- glue;
- ribbon;
- hair dryer;
- sponge;
- the drawing that we will apply. It could be rice paper, a decoupage card, a colorful napkin, or just a printout from a magazine.
Watch the video for more details:
Bottle made using decoupage technique. Master class // FORUMHOUSE
Beautiful decoupage: master class of a ball and a Christmas boot
Of course, you can choose a variety of items to decorate your gift. The decoupage of the clock looks very beautiful, and any housewife will love the design of the cutting board, which will subsequently become not just a home decoration, but also an important item in the kitchen utensils. But I still decided to consider in this article how you can beautifully decoupage a New Year’s ball.
After all, buying beautiful designer Christmas tree decorations is quite difficult for obvious reasons. And economy class balloons usually do not impress with their design. Therefore, there is nothing better than a Christmas ball made using the decoupage technique. There can be any picture on its surface. Little ones will love bears, bunnies and foxes, and older children will love images of cartoon characters. The balls can have either a New Year's ornament or pictures of natural beauty, works of art, bright abstraction or personal photos.
The last of the listed options seems to me the most interesting. After all, such Christmas tree decorations seem to contain some symbolic meaning. Since celebrating the New Year is considered a family celebration, you will probably want to be close to your loved ones on this magical night. However, this opportunity is not always provided. Therefore, for your Christmas tree you can make balls with photographs of family, friends and even pets.
Option 5. Decoupage “Santa in the house”
As in the previous options, you will need a bottle, primer, acrylic paints, sponge, napkins, glue, varnish, brushes, and also:
- file;
- polystyrene foam for windows;
- putty or salt dough for the chimney;
- thin rope;
- putty knife;
- hot glue gun.
Detailed instructions in the video:
Decoupage of a bottle of champagne for the New Year // Decoration of bottles of champagne for the new year.
Work organization tips for beginners
Most of us don’t have extra time and money, so you should take care of organizing your workplace in advance - so that later you don’t have to suffer excruciatingly from the sight of furniture damaged by glue and paints.
So:
- It is recommended to cover the working surface with an unnecessary bag, film or paper;
- It is important to use only high-quality tools: sharp scissors, brushes with natural bristles. If desired, you can purchase ready-made decoupage kits;
- It is better to always keep nail polish remover on hand in order to remove excess paint stains in time;
- To make your craft the highlight of the celebration, pay special attention to choosing a picture to transfer to the bottle. It should please the person to whom your gift is intended, or match the style of the holiday table setting. You can even create a drawing yourself in any graphics editor and print it on a laser printer.
Choosing a decoupage style
Recently, decoupage has become a popular hobby. It is used to decorate interiors of various styles. And the technology itself is also subject to several trends, including:
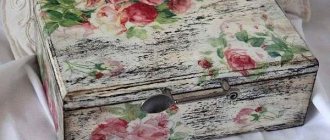
- shabby chic. Translated from English, the shabby chic style means “shabby chic” and is now experiencing a rebirth. Vintage decor is an unusual and stylish way to decorate any item. As the name suggests, it involves creating abrasions and the effect of aristocratic antiquity. In this style there is definitely a place for floral motifs, lace, and ribbons;
- Victorian grace . Many people, without knowing it, decorate New Year's interiors in the colors of this style, which combines dark green, red and beige shades with gilding. A bottle of champagne, made in Victorian style, will, of course, emphasize the elegant taste of the owner of the interior;
- provence _ In this French style, country simplicity is reflected in soothing pastel colors, serving methods and even the dishes on the table. Bottles of French sparkling wine, decorated using the decoupage technique, will come in handy here;
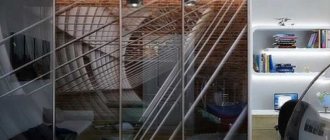
- modern minimalism . Decoupage in this case is made from newspaper or magazine cuts. Ideal for youth parties, where the simplicity of the decor element in the style of “minimalism” or “simplicity” will be appreciated.
To summarize, we can say with confidence: decoupage is the most suitable technique for holiday bottle decoration. With its help, you can create a real work of art - and all this with minimal investment of time and money. At the same time, you will get great pleasure from the process.
And rest assured: the owners of such an exclusive gift will be no less happy!
A decorated bottle will decorate any holiday table, create a New Year's atmosphere, and become the subject of everyone's admiration.
Decoupage ideas for Christmas balls
Decoupage of New Year's balls is the fastest and most effective way of decorating. You can create not only modern stylish decorations for the New Year, but also retro pieces from the childhood of our ancestors. A variety of styles and techniques will reveal the creative potential of adults and children. Do-it-yourself dotted, painted, patchwork balls will help you decorate your home in an original way for the New Year holidays.
Decoupage using napkins
Making your own ball according to a sketch from an ordinary nondescript toy is very simple. To do this, you need to prepare the base and consumables. Remove the clothespin from the ball, place it on a knitting needle or wooden skewer and degrease the surface well with alcohol. If it is very smooth, you need to go over it with sandpaper for better adhesion to the varnish and primer.
You can use paint or plaster as a primer. Cover the ball with a thin layer and leave to dry. Drying time depends on the material of the toy. If necessary, you can make a multi-layer primer, but only after the previous strokes have completely dried.
For decoration, you can take napkins with any theme. The main thing is that the drawings match the size of the ball. We cut out the pictures, iron them, separate the thin paper from the base and apply it to the product. Attach the napkins to the ball using a mixture of glue and water. Use a small brush to coat the paper attached to the ball and leave to dry. Using paint and glitter, you can outline an outline, for example, whiten a candle flame, Santa Claus's beard, or starling feathers. The final step of decoupage is coating with acrylic varnish.
Photos for decoupage balls
Decoupage of New Year's balls with a photo is an interesting gift idea. First of all, you need to prepare the necessary materials for active creativity and select photographs. Photos can be anything, scene, group or portrait. We adjust their size to the size of the ball in a special program and print it on a printer. You can take color or black and white photos, edit them in a vintage style, and apply any filters. It is better to take pictures of faces with a reserve, in case something gets blurred or distorted. Regular office paper is not an option. It is better to print on a paper towel. To prevent it from getting jammed in the printer, you should stick its edges onto a plain A4 sheet.
The next stage is preparing the ball. We remove the old coating from it using acetone and cotton wool. Sand carefully to avoid leaving deep cuts. Then we put it on a pencil and cover it with acrylic paint. You can use a brush or a piece of sponge.
We place pictures of the required size on the prepared surface of the ball and glue them with PVA glue. All edges must be well straightened so that there are no wrinkles or overlaps. On the back of the toy you can paint snowflakes and decorate it with sparkles and ribbons.
Decoupage with paper
You can make any Christmas tree decoration that has lost its former attractiveness original. You can breathe new life into a nondescript New Year's ball using the simplest and most affordable materials. Decorated in a certain style, they will be appropriate for any event. For example, you can decorate a music school classroom with toys decorated with sheet music. Balls with newspaper headlines and text will look original on a small Christmas tree. The following instructions will help you make decoupage with plain paper on a ball of any size:
- Degrease the surface of the toy with alcohol;
- We cut thin strips from decorative paper, newspapers or sheets of music notations;
- If the paper is thick, immerse it in water for a few minutes;
- Coat the ball with paint or plaster;
- Coat the strips with PVA glue;
- We chaotically apply the decor to the toy and smooth it with a clean cloth;
- After complete drying, treat the ball with acrylic varnish.
Decoupage with relief volumetric patterns
This method of decorating New Year's balls is also called paper paper or 3D decoupage. It consists of creating convex elements on a round surface using a special structural paste, polymer clay. A very small amount of material is placed between the parts of the design, which are then glued together. It is not necessary to have modeling skills to turn an ordinary Christmas ball into a real masterpiece.
For relief decoupage, a standard set of tools and materials must be supplemented with clay or texture paste. After studying the step-by-step master class, you can get to work. There will be no difficulties if all steps are followed carefully and consistently.
A Christmas ball made of any material will do. Its surface should be treated with alcohol and painted with water-based acrylic paint. To create a more even base, the procedure should be repeated several times. While the layers dry, you can prepare the drawing.
Cut out several identical patterns from a napkin. We attach one drawing to the ball and glue it. Smooth out the edges with a brush and leave the workpiece to dry for several hours. The same needs to be done with the rest. Then we varnish the toy and apply texture elements. You can use paste or clay to process the outline of the pattern and add any relief element. After drying, the picture must be sanded and varnished.
Painting as a decoupage method for New Year's balls
Even a novice needlewoman can decorate Christmas balls with painted patterns. To do this, you do not need to have drawing talent or artistic skills. If you are not confident in your abilities, you can practice first on any other surface. For work you will need the following materials:
- The Christmas balls themselves;
- A simple pencil with a soft core;
- Palette of acrylic paints;
- Silver, golden sparkles;
- Synthetic brushes of different numbers;
- Core thread;
- Grater.
Before starting work, you need to select a drawing. Then carefully transfer the idea with a simple pencil to the workpiece. The pattern can be located on one side or cover the entire round surface of the toy. We outline the prepared picture with paint. To prevent the contour from being smeared, you can make it in several layers, waiting for the previous strokes to dry. After complete drying, wipe off the pencil marks with an eraser.
A painted New Year's ball can be decorated with beads and sparkles. We glue beads, rhinestones, and sequins using a glue gun or shoe glue. You can sprinkle glitter on the painted areas where the paint has not yet dried.
For decoupage painting, it is better to choose frosted glass balls. Plastic toys are more difficult to work with because they have visible joints and a too smooth surface.
Decoupage with dot painting
One of the easiest decorating techniques. The finished ball with dot painting turns out to be original and very beautiful. An interesting texture is formed thanks to small dots merging into one pattern.
The preparatory stage of decoration includes degreasing, cleaning and painting the round surface of the toy. The base color should contrast with the outline and dot pattern. The applied primer must be varnished and dried. The lengthy process can take all day.
The prepared monochromatic ball is decorated with special acrylic contours. These are small tubes of paint with a small hole, which makes it possible to make dots of any size, even barely noticeable ones.
Dot decoupage is usually done symmetrically. The elements are applied alternately on both sides. Stripes of dots can be plain or variegated. Two colors alternating through a row look original. You can also create a drawing or a flower arrangement from dots. If you use metallic paints and contours with sparkles, the balls will shimmer mesmerizingly in the light of the garlands.
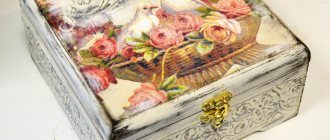
Decoupage of Christmas balls in vintage style
Vintage Christmas tree decorations will fill the New Year's atmosphere with special charm. For decoration, you can use old photographs printed on a printer, yellowed book pages, newspaper clippings, and lace patterns. The mysterious, romantic style takes you back to the ancient era. The main requirements of antique vintage decoupage are adherence to a certain style, the author's intention and individuality. New Year's toys made using this technique are distinguished by their graceful lines, sophistication, and unusual shapes. You can use themes of animals, plants, insects.
For New Year's decoupage of balls in vintage style, natural materials are used. These are fabric, lace, wax, leather, paper, paints and varnishes on a natural basis. Craquelure, aged surface, textile bows are welcome.
The easiest way to decorate Christmas tree decorations in vintage style is by gluing napkins with an aged image. To do this, you need to artificially age the selected photos in a special program and apply filters, for example, a sepia tone. We glue the printed pictures to the ball and coat it with varnish. Each product must have its own history, significance and exclusivity.
Decoupage inside the ball
There are several ways to create original decoupage inside a ball. There are two completely different techniques. Painting with acrylic paints inside the ball and decorating the two separated halves.
For interior painting you will need a transparent New Year's toy, acrylic paints, a brush or a cotton swab. The surface does not require additional treatment. Remove the metal thread holder, pour paint inside and create a spiral, moving in a circle. Instead of paint, you can use nail polish. You can simply pour the dye into the ball and gradually turn the toy over to create a uniform coating.
The second way to decoupage a ball is to decorate its individual halves. We cut the plastic toy along the factory gluing line. We clean out the uneven areas at the cut site. We paint the inside with acrylic paint and create the necessary background. Glue pieces of airy cotton wool to the bottom of the ball and spray with hairspray. We prepare several identical pictures and cut out an element from each. Now these parts should be placed in the ball according to the picture, but at some distance from each other. We use contour paint to complement the white snow and create snowdrifts.
Many more interesting ideas
For maximum inspiration, we bring to your attention more ideas for decoupaging bottles for the New Year.
Did you like the article? Tell your friends about it:
- 17
- 2