Floating shelf
Cut 50 strips of yarn approximately 3 meters long (a little more is better than less). Gather them together and tie a knot exactly in the middle - this will be the center of the pendant. Divide the ends of the threads into 4 equal parts. Then divide each of the parts into two more and twist these parts together; can be divided into three and braided.
All you have to do is throw the 4 resulting strands (or braids) over the object on which you are hanging the composition and tie a knot. Place the plate in the middle: it will hold firmly, and you can put small flowers on it. For decoration, you can tie a yarn tassel to the bottom knot.
Macrame
- yarn, rope, or even an old T-shirt cut into strips (unless, of course, you decide to weave a rug out of it);
- scissors.
The macrame technique is great for creating elegant hangings for plants in pots. The step-by-step master classes in the pictures below will help you master this simple technology.
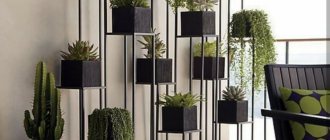
Multi-level shelves with holes
- wooden plank;
- several flowerpots in the shape of a cylinder or with an extension at the top;
- rope;
- metal ring;
- drill and drill bit 10mm;
- saw;
- sandpaper and paint and/or stain (optional).
Turn the pots over and place them on the board, trace them, then measure 2.5-3 cm along the sides and draw squares around the circles. It is on them that you need to cut the board with a saw, so it is more convenient to start closer to the edge/corner. Already on the sawn-off planks, draw a smaller circle inside the circles already existing there. It would be optimal to step back 6-7mm from the edge or play it safe and measure the diameter of the flowerpot in the part that should be above the shelf.
Using a drill, make holes inside the small circle until the hole is large enough for the saw to fit through. Use a saw to cut out the entire circle. Then drill a hole in each corner for the ropes. Thread the ropes, tying a knot under each shelf, and tie everything to the metal ring on top. The pendant is ready! You can further decorate it before threading the ropes: sand the boards and saturate them with stain, paint the flowerpots.
Important: if your flowerpots have a hole at the bottom, it is better to make the bottom shelf without a hole, placing the flowerpot there on a saucer (glue the saucer for reliability): the fact is that water from the upper flowerpots will flow down.
Concrete paper flowers
Tender asters
To create such a flower, you will need a little patience and precision in cutting out identical fringe strips.
Materials:
- colored paper;
- scissors;
- toothpick;
- glue.
Procedure
- First of all, you will need to prepare two strips of different widths. A narrow stripe for the base, and a wider stripe for the petals. Each flower will have 1 different strip.
- Cut fringe on a wide strip.
- Place a thick strip on the table, and attach a thin strip to it along the edge on top and to the right so that it slightly overlaps the thick one. The two strips should be attached to each other not on top, but like trains of a steam locomotive.
- Glue the strips and wait until dry.
- Using a toothpick or other thin stick, start twisting the flower from the thin base side.
- Apply glue.
- Smooth the petals onto the flowers and make leaves from green paper.
Fragile tulips
A strict and elegant tulip will unobtrusively decorate the wall. One of the first harbingers of spring will delicately fit into the interior. For example, several tulips can be placed in the corner of the posters.
Materials:
- thick double-sided paper (green for leaves, colored for bud);
- cardboard template with a five-petal flower;
- scissors;
- thick needle
- wire;
- green winding for stem;
- glue.
Procedure
- Trace the flower templates and cut them out.
- We wrap the wire in green.
- The cut flowers should be thoroughly wetted so that they bend easily.
- Punch a hole in the center of the flower and insert the wire there. Secure the stem to the flower with a loop.
- After one coat we coat the flower petals and roll them into a tulip bud.
- We coat the remaining two petals and finish the bud.
- We attach leaves to the wire.
You can make the petals more natural by crushing the paper with tangled wire.
Large lily
A large lily is easy to make using plates, paper and scissors. You can make it from white Whatman paper or colored paper. Large buds can be used to decorate a concert hall. Children really enjoy making these simple flowers.
Procedure
- Take two plates (one large and the second with a smaller radius). The large plate is the center, and the small plate is the petals.
- Place a sheet of paper in front of you and circle a large plate in the center.
- Fold the sheet in half 6 times.
- Using a small plate, trace 1 small petal. Let's cut out this blank. It should look like a triangle turning into a circle.
- We repeat three times and get three identical blanks for the flower. We bend them, but do not align them too much.
- Now attention:
- on the first flower just make 1 cut to the center;
- on the second flower, cut off one triangle-petal;
- On the third flower, cut off two triangle petals.
- Bend each flower and shape it with petals.
- Glue the flowers together from largest to smallest.
- Sew the bottom with thread for stability, and then seal it with a round base.
Options: You can use colored paper instead of white. It will look especially bright if each of the blanks is a different color.
Paper Camellia
A beautiful, but rather labor-intensive flower is made from thick paper. For this flower you will need to select several sheets of paper in the same color, slightly different in tone. You can look for paper in art stores that sell thick sheets of toned drawing paper.
In addition to paper you will need:
- yellow paper for the centers;
- green paper for leaves;
- glue gun;
- scissors;
- wire;
- cardboard.
Procedure
- Draw six-petal patterns on cardboard. All templates should be slightly different in size to make the bud more magnificent.
- Trace the templates and carefully cut out.
- Using scissors, lightly roll each petal inward.
- Coat with glue and place one piece on top of the other.
- Cut thin strips of yellow paper. Make a fringe around the edge.
- Roll the yellow piece of paper into a tube and glue it in the center of each flower.
- Cut petals from green paper.
- Attach the buds and leaves to the wire.
Volumetric tube lily
Interesting flowers are made from small repeating elements. The most difficult thing about this flower is cutting out many identical squares, but this problem can be solved by immediately purchasing square sheets of stationery paper for notes.
In addition to this you will need:
- glue;
- round cardboard base.
Procedure
- Place squares of paper in front of you.
- From each square you need to roll a horn and glue it together.
- While the paper is drying, cut out a round base. The larger the base, the more petals you will need to make. To prepare one flower with a base with a diameter of 10 cm, you will need approximately 38-40 petals.
- Now coat the tip of the petal with glue and apply it to the edge of the cardboard base. Glue the petals so that they touch each other closely.
- Once you've made one circle, start a new one by moving the tip a little closer to the center until you've covered the entire circle.
Options: you can use petals of different colors, but it is better to strictly observe the order and not glue them chaotically. For example, one full circle of one color, and then add another.
Kokedama
Kokedama is a ball of earth wrapped in moss. This design is held in place by threads. Due to the absence of pots, kokedama looks original and natural. I talked about the materials and how to make it here: “How I visited botanical gatherings, or Kokedama “Sperm Whale” with my own hands.”
It is easy to hang a kokedama using the same threads that were used to wrap it. Alternatively, you can stitch the ball through with threads or braid it with macrame.
More ideas
More inspiration! A few more ideas for non-standard hangers and places where to attach them:
In our store you will find several ready-made solutions for hanging plants.
Almost everyone at home has indoor flowers. They bring not only aesthetic pleasure, but also help purify the air and thereby take care of our health. Let us also take care of our green friends and create optimal conditions for their living. And to do this, you need to choose the right container and place it in a place where there will be no drafts and heat from the batteries. So, let's talk about how to choose a wall pot for a plant.
Types of artificial flower cleaning
- Dry – if the product cannot be washed, but it is covered with a layer of dust, use a special brush to remove dust. The best solution is to use a hairdryer on a cold setting. Place the hairdryer close to the bud and blow cool air on it.
Do not use hot air for blowing. If the leaves are unstable, they may bend or lose their shape altogether. Also, do not leave such products on the sunny side. Direct sunlight causes premature fading and loss of color.
- Wet – it’s much easier here. Clean the plant with a damp cloth or rinse under the tap.
Decorating the interior with artificial flowers is a very difficult but enjoyable task. Thanks to the low price of such products, you will update your rooms every season!
How to fit it into the interior?
Now let’s talk about how to make wall-mounted flower pots “features” of the interior.
- The style in which the container is made must match the style of the interior of the room. For example, in a room decorated “classically”, a glossy black cube-shaped pot will look alien.
- The color palette is also very important. The pot can either blend into the general background of the room or act as an accent spot.
- If you have not one, but several plants, select containers for them that match each other in color, shape, style, and hang them so that the larger ones are at the bottom and the smaller ones at the top.
- Place vine plants higher than others, allowing their branches to hang beautifully.
- When purchasing flower pots, do not forget that they should be in harmony with their inhabitants. If the plant never blooms, you can buy it a brighter “home”; if there are brightly colored flowers, it is best to “house” it in a neutral-colored dish.
Styles where you can't do without flowers
DIY floral decor will look good in any room, but it is worth considering that it is not suitable for every interior. But there are styles where you can’t do without the image of buds.
Shabby chic
An interior decorated in this style requires the use of all kinds of women's items painted with flowers. Most often these are roses; they will look appropriate both in textiles and as an applique on the wall. This style cannot do without furniture with floral decoupage.
Provencal style
In this case, you need to use an image of lavender. These can be embroidered plants on towels or pillows, as well as compositions of artificial flowers. You can also use daisies, mimosa sprigs and other homemade wildflowers.
Japanese style
The symbol of the Land of the Rising Sun is sakura. Therefore, delicate pink flowers can be glued to the wall where the ebony tree is painted. You can also paint the fabric with these colors and stretch it onto the frame.
Choosing solutions
We offer several options for attaching flower pots to the wall:
- a wooden rack with shelves on which trinkets are next to flowers; it is best to fix it on brackets;
- the decorative lattice with holders for pots looks very original;
- shelves suspended by a rope from a “bar” with holes for inserting pots will look good if all the plants are approximately the same size;
- Wall baskets in which you can install small containers with flowers look original and unusual;
- for a large, overgrown plant, you can make a hanging box;
- old metal pipes and buckets can also become original flower shelves.
To learn how to make wall-mounted flower pots with decor, watch the video below.
Decorative bicycle with a basket, which became an excellent shelter for flowering geraniums
A fairly popular topic among interior and landscape designers is creating flower pots with your own hands. Almost all families grow indoor plants or flowers in the garden. It looks very interesting if standard flower pots are placed in an unusual flowerpot. Of course, there are a lot of bright and original models of flowerpots on the market, but any person wants to bring individuality and some zest to their home or garden. There are a huge number of options on how to make a flowerpot with your own hands; all you have to do is choose the material that will look most appropriate in your garden or home
Video: decorating a wedding wall with paper pompoms
If you are designing a wedding yourself, you need to know how to properly place paper pompoms on the wall, chairs, and tables so that the decorations look harmonious in the interior. When decorating a banquet hall with paper decorations, consider the color scheme. The right combination of shades will allow you to get a unique composition that will become the main decoration of your celebration. The video will help you do everything so that the decor and its color become the highlight of the room:
DIY flower pots: building material
Surely, after renovation, any housewife is left with some unused materials that can be used to create flowerpots:
- If you have slats, bars or other boards, you can create a wooden planter. First you have to cut out equal parts for the walls, and then connect them with nails or glue. The walls and bottom of the pots can be designed in the form of a lattice, or they can be solid. For oblong bowls with flowers, a flowerpot-box in the form of a small fence is suitable. This design is appropriate in an apartment or house in a rustic style.
Small wooden blocks left after renovation will become an exclusive interior decoration, you just need to add a little color
- It’s quite easy to make a flower pot with your own hands for the garden from leftover logs, although it’s better to entrust this task to a man. A log about 1-2 meters long can be rested on two small logs to form a kind of bench, or simply placed horizontally on the ground. Then the inside of the large log is cut out, leaving only the walls and bottom. Inside you can put small bowls with petunias or other garden flowers.
An outdoor table made of concrete blocks used as flowerpots is a unique detail of a summer cottage
- You can make a bright flowerpot from leftover ceramic tiles. To do this, you will need only 5 parts, one of which will become the bottom, and the rest - the walls. The easiest way to connect the parts is with glue. Spectacular interior items are made from mirror tiles; they are easy to fit into a modern minimalist interior or high-tech style.
Simple-shaped concrete flowerpots can be decorated with mosaics
A mosaic from remnants of tiles will help create an art masterpiece for the design of the site
Bright orange pipes with plants - an unusual composition that can transform the interior
- When burlap or other dense fabric remains from construction and gardening work, you can make flowerpot pockets for small plants. To do this, you need to cut out two identical square or semicircular parts and sew them on three sides. For a more complex pattern, you will have to select a base in the form of a wire, which will give the shape to the product. Such pockets look great on the fence of a country house or on the balcony.
Textile striped pockets with a variety of plants can complement any vertical plane
The simplest paper flowers
Flowers-hearts
You can make elegant flowers very quickly and easily using a minimum amount of materials. To create, we need paper, cardboard, glue, pencil and button.
Procedure
- Fold the paper in half and draw half a heart.
- Carefully cut it out and use it as a template for other petals. They should all turn out the same.
- Cut out the petals (at the rate of 8 pieces per 1 flower).
- Cut out a circle from cardboard to form the base for the flower.
- Carefully apply petal by petal to the circle. No glue yet. It is necessary to arrange the hearts so that each subsequent one completely overlaps its half with the previous heart. We make sure that the petals lie flat on the circle, without shifting.
- Place a drop of glue in the center and attach a button to it that will hold the petals.
Options
To create a more complicated version of this flower, you can use paper of two colors. Dark edges with a light center of the petal look good. In order to create such a flower, you will need paper of two colors and two heart templates. Where one will be slightly smaller than the other. Once the 8 hearts of different colors have been cut out, use glue to glue the smaller heart to the larger one. When they are dry, finish the craft as above. Or, if you use white paper, then you can simply paint a little on the edges of each petal.
Flowers-hearts 3D
If you want a more voluminous and dynamic craft, then you can use a different method of attaching the petals.
- We prepare the flower details as indicated above.
- Bend each heart in half. In front of us lie double halves that look like books.
- We coat each half-heart on one side and attach it to the base circle. Make sure that each petal “opens” in one direction.
It is not necessary to attach the petals to the cores. Interesting works are obtained when the petals are attached directly to the surface.
Pots made from natural materials
What could be easier than using materials that nature gives us to create flowerpots and pots? In the nearest forest or by the river you can find something that will subsequently significantly transform your interior:
- A beautiful flowerpot will be made from pebbles - small, streamlined stones. They are glued together, giving the future product an unusual shape. Similarly, you can use nut shells, tree cuts, small twigs, cones, etc.
Shells can be used as flowerpots for small plants.
- You can make a flowerpot for your garden with your own hands from a tree stump. A core is cut into it, into which a large plant, such as a fern, is placed. If you make several of these stumps at the same time, you will get a whole clearing in the garden.
A real masterpiece can come from an uprooted stump or a cut of a log.
- Eco-style flower pots can be woven from wicker. Weaving from wicker is quite difficult for a beginner, but the products are very impressive. You can hang or place such pots both in the house and in the garden.
An unusual composition can be created using colorful old windows and flower pots.
Advice! If you can’t find vines in the area, you can weave from newspapers or magazine pages. The weaving pattern always depends on the shape of the future product.
Wooden structure with drawers where you can display flowers in pots and enjoy the overall view of the flowering wall
- You can make an original hanging flowerpot with your own hands from coconut shells. To do this, first make several holes in the coconut with a knife to drain the juice. Then the nut is sawed. You can saw it in half, then you get two small flowerpots, or you can just cut off the top to get a pot-bellied tall flowerpot. When the coconut dries, you need to cut out all the flesh inside with a knife. Next, three holes are made near the edge of the flowerpot in order to thread the ropes through which it will be suspended. Orchids look especially good in small pots, and climbing plants in larger pots.
Corrugated paper flowers
Craftswomen are very fond of corrugated paper, as it is inexpensive, sold in large rolls and has an unusual texture. Flowers created from such paper turn out lighter and airier. Small folds and creases that are on the surface make crafts made from it more natural. This paper is best used for lush and voluminous flowers.
Corrugated paper peonies
Very voluminous flowers that can be used to decorate a children's party. By themselves, they are very bright, so they should be combined with a calm background.
Materials:
- corrugated paper of different colors;
- wire;
- scissors.
Procedure
- Take corrugated paper of different colors. Fold each color like an accordion.
- Arrange the leaves in the order you want the flower to have.
- We do not touch the first accordion (this will be the edge), but make each subsequent one a few centimeters shorter.
- Triangle the edges of each roll of paper. These will be the tips of the petals.
- Bend each roll slightly in half and determine its middle. You can mark it with a pencil.
- Unroll the rolls and fold them middle to middle.
- Use a wire to pull the paper together in the middle.
- Bend the paper in different directions to reveal the petals.
Options:
In a similar way, you can make a single-colored flower of a smaller size. To do this we need 6 squares of corrugated paper of the same color, wire and scissors.
We put six sheets of paper and fold them like an accordion. We fasten the accordion in the center with wire. We round the edges to get graceful petals. And straighten the flower layer by layer.
Simple corrugated paper flower
Materials:
- paper;
- cardboard;
- scissors;
- glue;
- toothpick.
Procedure
- You need to cut 12 circles from a sheet of corrugated paper. You can fold the paper several times to cut out 4 circles at once.
- Use your fingers to sharpen each circle on one side. Corrugated paper is thin, so this is easy to do. Glue can be used as a fixative.
- Cut out the center circles from cardboard and glue the petals to it in a circle.
- Cut a thin strip from the corrugated paper. Use scissors to create a neat fringe. Twist the strip onto a toothpick - this will be the core.
- Glue the middle to the center of the cardboard base.
Instead of using paper as the middle, you can glue small beads there.
Big Rose
Few people don't like roses. Lush and fragrant, they attract many admiring glances. It’s not for nothing that the rose is called the queen of flowers. But, unfortunately, the life of a flower is short-lived. You can correct the situation with the help of paper roses, which can “bloom” all year round.
Materials:
- a whole roll of rose-colored corrugated paper;
- green paper for the petal and stem wrapping;
- wire;
- rose stem (you can take a stick or an old pencil).
- glue;
- scissors;
- pencil;
- round surface;
- glue gun
Procedure
- Cut a large sheet of corrugated paper in half. Take one of the halves of the sheet.
- Fold it in half 8 times.
- We cut on the sides, getting identical rectangles.
- We take one rectangle, fold it in half, and start cutting a small leg almost from the center of the bottom. Having cut off a couple of centimeters, we begin to cut out a semicircle. Then we cut off the extreme corner and cut it out like half a heart. Then we open the rectangle. We should get a heart on a leg.
- We repeat these steps until we run out of paper.
- We pick up a pencil without any irregularities. We apply it diagonally to one corner of the heart and slowly twist it, stretching the paper a little. Repeat with the other edge of the heart.
- The resulting folded edges of the petals must be carefully stretched a little more so as not to tear the paper. The petal will get beautiful wavy edges. We do this with each petal.
- Take some small spherical surface. This could be a ball, or you could even use your knee. We apply each petal with the middle to a rounded surface and stretch it slightly so that it becomes curved. Thus, we proceed with all 16 petals.
- We take the second half of our large sheet of paper. Fold it in half, and in half again. And we pull each edge of the sheet to the middle of the sheet. So we get 6 folds.
- Cut the paper into 12 petals.
- We take the first sheet, fold it in half and immediately begin to cut out a semicircle of the heart. We immediately begin cutting the oval, without a leg. Cut out each petal this way.
- We repeat the steps we did with the first group of petals: twist them onto a pencil, stretch the edges and make them slightly concave. We should get almost identical petals, but different in width.
- Take green paper and cut out 6 rectangles approximately 15x20 cm. These will be rose leaves.
- Fold each rectangle in half and cut out a leaf.
- We take scissors and lightly straighten it along the grain of the paper to get a more natural look.
- Using glue or double-sided tape, glue the leaves to the wire frame. We bend the wire slightly, giving the shape of a sheet, and wrap it with green paper or tape.
- We fasten the sheets into two groups of three leaves.
- Take a piece of green paper approximately 25 by 30 cm. Cut out the bases of the flower from it. To do this, you need to cut a small “fence” up to about half the sheet. We twist each clove with scissors.
- We take wide petals, and slightly pulling the sides of the petal towards each other, we form folds in the center. We fix them with staples or glue and put them aside for now.
- We take our base stick and carefully apply petal by petal and glue the petals.
- Glue the edges of the green sepals together to form a ring. We put this ring on a rosebud. The rose is ready. Now, together with the leaves, it can decorate the wall.