No matter what the plot is, and no matter what views its owner has on landscape design, there will still be garden paths there: made of clinker bricks, carefully selected paving slabs, or from round pieces of wood laid in the grass. This article will tell you how to properly design and make a path, how to prepare a base for it and how to choose a covering. A path made according to all the rules will decorate the site and will serve for a long time, as befits a decent engineering structure.
Types of tracks
The main purpose of garden paths is to connect different functional areas on a summer cottage: gates and a house, houses and a garage, a summer kitchen and a recreation area... But this is also an important element of the landscape: the overall perception of the site, and even the most The best design can easily be ruined by an unsuccessful and inconvenient path.
According to landscape science, all garden paths are divided into utilitarian and walking, or functional and decorative.
This classification places emphasis on expected load. It’s one thing if wheelbarrows with sand or compost regularly pass along the trail, and another if people just move along it.
- Utilitarian (functional) paths lead from the gate to the site to the house, from the house to the outbuildings. They require intense loads, so they are made from durable materials.
- Walking (decorative ) country paths may not be made at all, but they increase the level of comfort. They are laid so as not to walk on wet ground or grass after rain, and they usually lead either to a relaxation area with a hammock and swing, or to a playground, or gazebo.
You can use another classification, according to which landscape designers divide all paths in a suburban area into:
- Main;
- Secondary.
The main path leads from the gate to the house, it is made straight and as short as possible, and ideally it should be made of the material with which the facade was finished. If the base is finished with natural stone, then a central path made of natural stone would be ideal.
How professionals plan paths
Planning a “road network” in a country house always begins with a sketch. The network is applied to the site plan, taking into account its topography, groundwater level, buildings and soil composition.
The following recommendations from professionals should be taken into account:
- Where the paths intersect, there should be no sharp corners; even straight lines are undesirable. Arches with a radius as large as possible will look advantageous, preferably with a border of plants;
- In suburban areas both near Moscow and in the regions there are more straight and short DIY garden paths than radius paths, but this is a controversial decision. Straight ones are good and beautiful only in a regular English garden with an ideal lawn. The closer the garden is to the natural, the more tortuous the design can be (excluding the central one);
- Large trees should not be planted next to garden paths - their roots will grow and damage the surface;
- The total area of the paths should not exceed 15% of the area of the site.
The main paths that lead to a house or other important building in the country are usually planned so that two adults can pass on them without interfering with each other. According to the standard, there should be 0.7-0.75 m per person, but usually such structures are made from 1 to 1.5 m wide.
The width of the central path can reach up to three meters.
Secondary paths from the summer kitchen to the recreation area, etc. made from 0.8 m to 1 m wide.
The width of step paths is 50-60 cm, they are usually made between flower beds and rock gardens and are used infrequently and mainly for some simple work, like walking with a watering can to rose bushes. For such paths, pieces of turf are taken out at intervals of one step, a layer of sand or gravel is poured and tiles, stones or round timber are placed on top. These elements must be lower than the lawn so that the grass can be mowed freely.
The width of garage paths is usually slightly larger than the width of the car.
There are two approaches to the height of paths in modern landscape design:
- above the lawn level. Such structures along their entire length should always have a transverse slope for water drainage (2-3 degrees). This method is used only in areas with good drainage so that water does not stagnate on the lawn or plantings. In wet areas, drainage is made along the edges of such paths: grooves for water drainage.
- below the lawn level. Such structures drain water themselves; they cannot be done in areas with very high groundwater levels, but in the rest they work very well.
GroundworkturfFORUMHOUSE Member
The lawn should be two centimeters higher than the path. This is convenient for mowing the lawn and looks better aesthetically.
On a relief site, instead of a path, sometimes it makes sense to make an original staircase, but not always, it depends on the slope. If you can make a path with a slope of 10-12 cm per meter, great; if the angle of inclination is greater, steps are made. A comfortable size of steps is 10-12 cm in height and 35-40 cm in width.
Garden paths made of other materials
Here are a few more original garden paths that you can easily make yourself.
grass path
When we talk about low-cost garden paths, we can’t help but remember what is perhaps the simplest method. To make a grass path, you don't have to dig a trench and prepare a bed to lay the material. It is enough to dig a few flat stones or stone slabs shallowly to mark the “path”, and plant low plants along them.
- Low-growing plants for hedges and borders
Emphasize the beauty of the landscape with a low hedge up to 1 m high.
Track arrangement
What to pave the path with? When choosing a coating, people usually rely on their financial capabilities and aesthetic preferences. But what’s really important is the operating conditions, whether you have to clear it of snow or not.
Paths with a hard surface can be cleared of snow, but paths with a soft surface cannot be cleared of snow.
| Hard surface | Soft cover |
| Concrete, natural stone, tiles, clinker bricks, etc. | Soil, gravel, pebbles, bark, crumb rubber, rubber tiles, lawn, wood. For such paths, it is necessary to secure the edges. |
Many people choose combined coverings, hard materials laid with gaps, filled with grass or gravel, bark, etc. Such coverings of different colors and shapes are made where the path is used, but not often.
How to make a base for a walkway
You can make different bases for paving stones, bricks, tiles, stone and wooden slabs. The choice of foundation depends on the type of soil on the site:
Sandy soil is universal; water is easily absorbed into it without any drainage systems. You can make any base, but for a trench it is enough to remove 15-20 cm of the top layer;
Sandy loam or loam for making paths is also quite normal soil, the top layer is removed by 25-30 cm, the bottom is covered with geotextile, and only then the “pie” of the base is poured in layers.
Clay or peat are the most problematic soils on the site for constructing a path. In such areas it is necessary to provide a drainage system!
Base with DSP. If the path is functional and it is expected that loaded wheelbarrows will periodically move along it, then it makes sense to use a central heating system in the foundation pie. This basis has been tested many times by members of our portal. They do it like this:
- A ditch 25-30 cm deep is dug along the entire length and width of the path;
- Sand is poured into it, the layer thickness is 5 cm;
- The next layer is crushed stone, 15 cm thick. The crushed stone layer must be compacted: the base must be monolithic, not walkable.
- On top there is again 10 cm of sand - without any geotextile, the sand even has to get into the crushed stone to fill the voids. The foundation will only get stronger!
- Compact the sand, add it and compact it again.
- The last layer is 5-6 cm of CPS (4 parts sand: 1 part cement).
AtlanFORUMHOUSE Member
You will get the same solution, only simpler, you don’t need a mixer or a mixer attachment for a drill. I fell asleep, brought it out on a slope, laid tiles, and spilled water.
It is easy to lay tiles, paving stones, stones or other materials on this base of the garden path with your own hands; it is better to lay the last row on mortar. The joints are also filled with CPS: they simply scatter the dry mixture along the path, use a regular brush to push it into the cracks between the slabs and spill it with water. Then they sprinkle again, sweep and spill again, and so on until the seams are completely filled.
For most of these garden paths, a border is overkill, and without it the tiles won’t “go anywhere.”
GroundworkturfFORUMHOUSE Member
It is possible without a border, if you strengthen the sides with temporary restraints from boards with nailed pegs and embank them with fertilizer and a tamper, to create a lawn that will strengthen the paving stones.
And if you still want to make a border, then it is installed on a layer of crushed stone using a DSP solution. The border needs a solid base. This rule applies to paths with any base.
Almost all of our users lay geotextiles at the bottom of the pit under the first layer of sand.
GroundworkturfFORUMHOUSE Member
Geotextiles on sandy loam, then sand with a tamper.
Geotextiles not only separate the continental soil from the fill layer, but also serve as additional reinforcement for the base. Sometimes geotextiles separate all layers of crushed stone and sand, and in vain! In practice, this is only necessary for large embankments, when the sand layer exceeds half a meter.
Base without DSP
If the path is intended only for the movement of people, then a cement-sand mixture under the tiles is not needed, and the base for the path can be made according to the scheme proposed below.
There are even simpler options.
BurantaiForumHouse Member
For a walking path, 15 cm of ASG and 5 cm of clean sand are sufficient for leveling under the tiles. It is better not to tamp the sand-gravel mixture, but to fanatically pour it with water, it will lie more densely. Spill the seams with sand. The depth of the trench is so that the tiles/paving stones lie a couple of centimes below ground level.
In the spring, such a structure may rise in some places - no need to worry, the “micro-bulgunnyakhs” will melt without any consequences for the quality of the path.
What to make paths from
The path surface can be hard or loose. To create a hard coating, the following materials are used:
- Concrete . Concrete walkways are more than just plain gray tape. In addition, there are dyes and you can decorate it if desired. There are also forms for filling immediately on site. It turns out homemade paving slabs. Another option is to pour small concrete slabs of the required size yourself, then lay them on the bedding. See photos for design examples.
Everyone in the household has forms for such a path - cut water bottles into cylinders, place them as needed and fill them with solution: beautiful and cheap
Large pebbles as backfill and colored concrete slabs
Another option for laying homemade concrete slabs on a garden path
Concrete path with expansion joints. If you look closely, you can see that there are stripes across
Another ready-made form for homemade paving slabs
Looks attractive due to the border and non-linear shape
A simple concrete strip can be decorated to your liking
This is how they pave a path in a country house or near a house using ready-made forms into which concrete mortar is poured.
Flagstone. This is a natural stone that has been cut into plates. It is laid on a prepared base (more on this later), the gaps are filled with backfill. It turns out beautiful, reliable, non-slip. It’s not for nothing that landscape designers love flagstone paths so much.
Backfill is one of the important elements that shapes the appearance
In this form, the flagstone path does not break up the lawn, and it is comfortable to walk
The color of the stone can be any
Brick. Ordinary ceramic brick is a beautiful material, but not for paths. It absorbs moisture, and if it then freezes wet, it breaks into pieces. If you are planning to make a path out of broken bricks, then you can walk on it more or less normally only for a couple of years. Then you'll have to redo it. The resulting cracks will need to be filled with coarse sand or fine crushed stone. Clinker bricks will last much longer on the path, but this option cannot be called low-cost: the cost of one piece starts from several tens of rubles.
Quite nice paths made of old brick. And if you do the backfill on the sides and in the seams, it will be absolutely beautiful
These are two types of bricks - ceramic and crushed granite
A clinker brick path is beautiful, to say the least... but maybe too beautiful for a garden?
Tree . Such a seemingly unsuitable material, but with proper processing it can serve for a long time. Moreover, many hand-made wooden paths can be classified as low-cost. For example, they came up with the idea of using stumps and tree cuts as borders or coverings. They also make flooring from well-treated boards - better than a terrace, but if not, an old floor will do.
Building a tree can become an excellent path
This type of wooden pavement for a summer residence
Properly treated wood can last for several years.
Combination with pebbles - comfortable to walk
Gorgeous path for a plot near the house
And this is how to make a path from boards
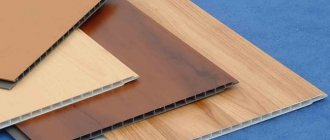
Plastic. There are tiles for garden paths made of plastic - polyethylene or polypropylene. It has a square shape and a system of locks that is attached to one another. It can be laid directly on top of the lawn or previously trodden paths in the country house or on a plot of land. This is an option - fast and cheap. It can definitely be called “Low Cost”. It is better, of course, to make the filling according to the rules from crushed stone and sand, and lay plastic elements on top. It's a little longer and more expensive. There is also an immodest, but very beautiful option for plastic tiles for paths. There is also “garden parquet”. These are slabs or boards made of wood-polymer composite - WPC (they are in the photo, they look exactly like parquet). This material appeared relatively recently. It looks and feels like wood, but is essentially a mixture of wood flour and polymer. These are very beautiful coatings, but their cost is by no means modest. Although not fabulous.
The good thing about a plastic path in a country house or on a plot is that it can be made in a few minutes
Another type of plastic tiles for paths
This is garden parquet. Gorgeous, but overpriced
And another option for polymer tiles for garden droshky
This is a bunch of plastic garden tiles
Pebbles. These are rounded natural stones that can be found on the banks of rivers or lakes. Flatter stones are more suitable for making paths. There are different shades of gray, black, white, and sometimes you can find burgundy. These stones, laid close to each other, create amazingly beautiful mosaic paths. But this is an activity for the diligent and persistent. Those who lack patience can find large flat boulders or large pebbles and place them in the sand. It's not as luxurious, but no less reliable. You can do the same with granite or other similar stones. It is important that at least one edge is relatively flat. You put this flat part up, and bury the rest. The work is not easy, but you can not only walk on the path, but also drive.
Different types of pebble paths
Large pebbles do not require as much time for installation
Beautiful pebble paths in the garden
Large natural stones can be used to pave good corners
Available materials. Country paths are made from old tires and bottles.
There are also paved paths: gravel or crushed stone. Their peculiarity is that with a small layer of 2-3 cm and sufficient compaction, it is comfortable to walk on them. If the layer is slightly larger, unevenness will form when walking, and such walking will be tiring. Therefore, as you have seen in many photographs, gravel and crushed stone are used as backfill, into which rigid elements made of other materials are laid. When done correctly, this is convenient: gravel conducts water well and puddles do not form. Those who don’t like the gray color can be advised to paint it: many designers do this when organizing rockeries.
Example of a gravel path
Sand base
The sand base cannot be called super reliable, but if the sand is well compacted, it will last for several seasons. But it can only be done for pedestrian paths. If you make a base of two layers, pour fine washed river sand into the bottom one, and make the top one from sand with a noticeable clay content, then in a damp area such a structure will act as a drainage ditch.
A layer of clean river sand (10-12 cm) is poured onto the bottom of the ditch dug at the site of the future path, spilled generously with water, and compacted.
- A layer of geotextile is placed on it.
- On top is a layer of sand with visible clay content.
- Water from the dense upper layer will flow into the loose lower layer and be removed beyond the site.
- Ready-made tiles or other paving material are laid on this base, the cracks are spilled with sand and spilled. Paths with such a base provide for the use of a curb; it significantly extends the service life.
Base for soft path
The base for a walkway with a soft surface is also easy to make with your own hands. It is not very different from the base of paths that are paved with tiles, paving stones or stones. Here's how to make a crushed stone path base, made by our user named seregarsp.
The fertile soil layer was removed to a depth of about 20-30 cm, the bottom of the trench was well compacted, 5 cm of sand was poured with a tamper, geotextiles were laid, curbs were installed, the finishing layer of crushed stone was poured and compacted.
For our user with the nickname New Light, the finishing layer of the track is bark.
How to make a monolithic concrete path
For garden concrete paths, remove 25-30 cm of soil; on clay soils prone to frost heaving - deeper. Then you can make the following base options:
- Pour a 10-20 cm layer of crushed stone and compact it well;
- Install formwork from boards and high pegs. The formwork should rise 4-5 cm above the trench, the pegs should remain on the outside of the boards. If you plan a path with bends, it is better to use plastic formwork;
- Lay geotextile or agrofibre, a material that allows water to pass through;
- Pour a layer of sand, which is also compacted and leveled so that the future layer of concrete is uniform.
- For pedestrian paths, the thickness of the concrete layer should be 8-10 cm, for structures along which a car will drive – 10-15 cm.
- Some experts advise covering the sand cushion with a film that will prevent the cement laitance from sinking into the sand. This way it will harden, gain hardness, and not dry out;
- Next comes the reinforcement (if reinforcement is provided). This is usually a metal mesh.
- That's it, you can pour the solution. It should be homogeneous, not too liquid, but not particularly thick. When pouring, the solution is constantly leveled and periodically pierced with a spatula to release excess air.
- Transverse expansion joints must be made every 1.5 - 2 meters. The shorter the lengths between the seams, the stronger the track and the lower the likelihood of cracking.
It is important that in the center of the path the concrete layer is 0.5-1 cm thicker than at the edges, forming a barely noticeable mound for better water drainage. And the concrete coating itself should rise 2.5-3 cm above the level of the surrounding soil. This simple trick will kill two birds with one stone: it will be easier to clear the path of snow, and when it rains, debris will not wash up on it.
A monolithic concrete path is often decorated with different elements - this should be done as soon as the concrete “sets”. Look at the photos below: these garden paths were made by hand, the first one by our user with the nickname Veter1412, who laid free stones from a nearby quarry in the concrete.
Veter1412FORUMHOUSE Member
When walking barefoot, the stones massage your feet very pleasantly. I really like it and it's useful.
The second uses a very interesting technique, which our user with the nickname leprofag spied on from the Americans. It looks like the path has a curb, but there isn't!
LeprofagFORUMHOUSE Member
I pour the concrete, level it, then cut the edges from the trim scraps.
As soon as the surface of the concrete begins to dry, I make grooves with a broom, then I renew the edges with a spatula, and after drying, I treat it with a water repellent.
After the path is filled, it is covered with film and watered from time to time. When the concrete hardens, the formwork is removed.
Patterns made from homemade tiles for garden paths, cast in special molds, are also popular on our portal.
Tile laying technology
You can lay out a beautiful path from paving slabs yourself, but this work requires attentiveness and accuracy from the performer. If the tiles are small in size, then this is especially important, since a fairly large amount of work will need to be done. Large products are much easier to install, but even in this case certain rules must be followed. Let's look at the installation process in more detail.
The product is placed in the required area and tapped with a rubber mallet. This allows you to “drown” a separate element in the sand. The weight of the mallet is approximately 1.5 kg. Next, you should use a spatula to level the tiles. As necessary, it is allowed to add or, conversely, remove sand.
Note! Tiles that are chipped can also be used in path construction. But the seams between such products should be minimal (no more than 7 mm). If you follow this rule, then the path will look quite aesthetically pleasing.
It is recommended to use a building level during installation. This will allow you to lay the tiles evenly. After completing the work, you can begin installing the curbs.
Interesting: Decorative fences for flower beds
Track. Main stages
The path surface can be either hard (paving stones, stone, tiles, clinker bricks) or soft: crushed stone, bark, lawn grass, etc. Soft surfaces are chosen for small auxiliary paths.
The base is selected based on the soil on the site. When a stronger and more stable base is needed, CPS is used; in other cases, a cement-sand mixture can be dispensed with. A monolithic concrete structure or a path on a concrete screed in a country house is also made quite often, usually in areas with problematic soil. It looks modest, but will last for many years.
At FORUMHOUSE you can look at options for the most budget-friendly garden paths and learn how stone paths are made. Read our article on how to make different types of wooden paths. Our video tells how the garden paths were made and the garden was decorated in the popular “Abode of Angels”.
What to lay from
The most common question concerns what material to choose. Designers often use building materials left over after the construction or renovation of a building for paving paths - boards, bricks, stones. If the foundation is lined with stone, then the path near the house is laid with the same stone. And then, in the depths of the site, you can use paving stones or other materials.
For a wooden house, a garden path is suitable, in which you can combine stone and wooden elements. Moreover, you can make them yourself from scrap materials. A porcelain stoneware walkway also goes well with such a structure.
If the house is built of brick, then the path is made of it. However, it should be understood that a simple brick will fall apart after a few years. To pave a path in a country house, you need to use a special clinker. Then the “pavement” will have a beautiful appearance and will last a long time.